Untuk melindungi data penting, lihat Pertanyaan Umum Penggunaan sebelum mengoperasikan disk cloud CBS Anda.
Memformat disk data akan menghapus semua data.Pastikan disk tidak berisi data, atau data penting telah dicadangkan.
Untuk mencegah pengecualian layanan, pastikan CVM telah berhenti menyediakan layanan eksternal sebelum memformat.
Petunjuk
Menginisialisasi disk cloud (Windows)
Menginisialisasi disk cloud
Dokumen ini menggunakan CVM dengan Windows Server 2012 R2 yang diinstal.Perhatikan bahwa langkah-langkahnya dapat berbeda sesuai dengan versi sistem operasi.
3. Pilih Disk Management (Manajemen Disk) di menu pop-up untuk membuka jendela Disk Management (Manajemen Disk).
Keterangan:
Jika disk yang baru ditambahkan dalam status offline, jalankan Langkah 4 sebelum Langkah 5 untuk melakukan inisialisasi.Jika tidak, Anda dapat langsung menjalankan Langkah 5.
4.
Disk terdaftar di pa
nel sisi kanan.Klik kanan area disk 1, dan pilih Online untuk membuatnya menjadi online.Status disk 1 berubah dari Offline menjadi Not Initialized (Tidak Diinisialisasi).
5.
Klik kanan area disk 1, dan pilih Initialize Disk (Inisialisasi Disk) di menu.
6. Di kotak dialog pop-up, disk yang perlu Anda inisialisasi ditampilkan.Pilih MBR atau GPT dan klik OK.
Perhatian:
Jika format partisi disk diubah setelah disk digunakan, data asli pada disk akan dihapus.Silakan pilih format partisi yang sesuai berdasarkan kebutuhan aktual Anda.
7. Klik kanan ruang disk yang tidak terisi, dan pilih New Simple Volume (Volume Sederhana Baru).
8. Di kotak dialog pop-up New Simple Volume Wizard (Wizard Volume Sederhana Baru), ikuti petunjuk pada antarmuka dan klik Next (Selanjutnya).
9. Tentukan ukuran volume sesuai kebutuhan, yang merupakan nilai maksimum secara default.Klik Next (Selanjutnya).
10. Tetapkan huruf drive, dan klik Next (Selanjutnya).
11. Pilih Format this volume with the following settings (Format volume ini dengan pengaturan berikut), konfigurasikan parameter sesuai kebutuhan, format partisi, dan klik Next (Selanjutnya) untuk menyelesaikan pembuatan partisi.
12. Klik Complete (Selesai) untuk menyelesaikan wizard.Tunggu hingga inisialisasi selesai.Saat status volume menjadi Healthy (Sehat), inisialisasi disk berhasil.
Setelah inisialisasi selesai, masuk ke antarmuka PC untuk melihat disk baru.
Pilih metode inisialisasi sesuai dengan kasus penggunaan aktual Anda:
Jika seluruh disk ditampilkan sebagai satu partisi terpisah (tidak ada disk logis seperti vdb1 dan vdb2), kami sangat menyarankan Anda untuk tidak menggunakan partisi, dan langsung membuat sistem file pada perangkat kosong.
Jika seluruh disk perlu disajikan sebagai beberapa partisi logis (ada beberapa disk logis), Anda harus terlebih dahulu mempartisi disk, dan kemudian membuat sistem file pada partisi.
2. Jalankan perintah berikut sebagai pengguna root untuk melihat nama disk.
fdisk -l
Jika hasil yang dikembalikan seperti yang ditunjukkan pada gambar berikut, CVM saat ini memiliki dua disk, dengan /dev/vda adalah disk sistem dan /dev/vdb adalah disk data yang baru ditambahkan.
3. Jalankan perintah berikut untuk membuat sistem file pada perangkat kosong `/dev/vdb`.
mkfs -t <Format sistem file> /dev/vdb
Ukuran partisi yang didukung oleh berbagai sistem file berbeda.Pilih sistem file yang sesuai dengan kebutuhan.Contoh berikut menggunakan EXT4 sebagai sistem file:
mkfs -t ext4 /dev/vdb
Perhatian:
Pemformatan membutuhkan waktu.Perhatikan status sistem yang berjalan dan jangan keluar.
4. Jalankan perintah berikut untuk membuat titik pemasangan baru.
mkdir<Mount point>
Gunakan membuat titik pemasangan baru /data sebagai contoh:
mkdir /data
5. Jalankan perintah berikut untuk memasang partisi baru ke titik pemasangan yang baru dibuat.
mount /dev/vdb <Mount point>
Gunakan membuat titik pemasangan baru /data sebagai contoh:
mount /dev/vdb /data
6. Jalankan perintah berikut untuk melihat hasil pemasangan.
df -TH
Jika Anda tidak perlu mengonfigurasi pemasangan otomatis disk saat startup, lewati langkah-langkah berikut.
7. Konfirmasikan metode pemasangan dan dapatkan informasi yang sesuai.
Berdasarkan kebutuhan bisnis, Anda dapat menggunakan tautan lunak disk cloud elastis, UUID sistem file (pengidentifikasi unik universal), atau nama perangkat untuk memasang disk secara otomatis.Deskripsi dan metode perolehan informasi adalah sebagai berikut:
Metode pemasangan
Kelebihan dan kekurangan
Metode perolehan informasi
Menggunakan tautan lunak disk cloud elastis(direkomendasikan)
Kelebihan: tautan lunak disk cloud elastis bersifat tetap dan unik.
Tautan tersebut tidak berubah dengan operasi seperti pemasangan, pelepasan, dan pemformatan partisi.Kekurangan: hanya disk cloud elastis yang dapat menggunakan tautan lunak, yang beroperasi tanpa terasa untuk operasi pemformatan partisi.
Menjalankan perintah berikut untuk mendapatkan tautan lunak dari disk cloud elastis.
ls -l /dev/disk/by-id
Menggunakan UUID sistem file
Konfigurasi pemasangan otomatis mungkin gagal karena perubahan UUID sistem file.Misalnya, memformat ulang sistem file akan mengubah UUID-nya.
Menjalankan perintah berikut untuk mendapatkan UUID sistem file.
blkid /dev/vdb
Menggunakan nama perangkat
Konfigurasi pemasangan otomatis mungkin gagal karena perubahan nama perangkat.Misalnya, jika disk cloud elastis di CVM dilepas dan dipasang kembali, nama perangkat dapat berubah saat sistem operasi mengenali sistem file lagi.
Menjalankan perintah berikut untuk mendapatkan nama perangkat.
fdisk -l
8. Jalankan perintah berikut untuk mencadangkan file /etc/fstab ke direktori /home, misalnya:
cp -r /etc/fstab /home
9. Jalankan perintah berikut untuk menggunakan editor VI untuk membuka file /etc/fstab.
vi /etc/fstab
10. Tekan i untuk masuk ke mode edit.11.Pindahkan kursor ke akhir file, tekan Enter, dan tambahkan konten berikut.
<Device information> <Mount point> <File system format> <File system installation option> <File system dump frequency>
<Urutan pemeriksaan sistem file saat startup>
(Direkomendasikan) Gunakan pemasangan otomatis menggunakan tautan lunak disk cloud elastis sebagai contoh.Tambahkan konten berikut:
Gunakan pemasangan otomatis menggunakan nama perangkat sebagai contoh.Tambahkan konten berikut:
/dev/vdb /data ext4 defaults 00
11. Tekan Esc, masukkan :wq, dan tekan Enter. Simpan konfigurasi dan keluar dari editor.
12. Jalankan perintah berikut untuk memeriksa apakah file /etc/fstab telah berhasil ditulis.
mount -a
Jika perintah berhasil dijalankan, file telah ditulis.Sistem file yang baru dibuat akan dipasang secara otomatis saat sistem operasi dijalankan.
Membuat sistem file pada partisi
Contoh ini menggunakan alat partisi parted di sistem operasi CentOS 7.5 untuk mengonfigurasi disk data /dev/vdc sebagai partisi utama.MBR digunakan sebagai format partisi default, format EXT4 sebagai sistem file, dan /data/newpart sebagai titik pemasangan.Pemasangan otomatis disk saat startup dikonfigurasi.Perhatikan bahwa operasi pemformatan dapat berbeda berdasarkan sistem operasi.
2. Jalankan perintah berikut sebagai pengguna root untuk melihat nama disk.
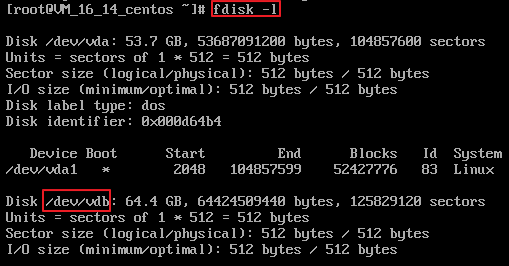
fdisk -l
Jika hasil yang dikembalikan seperti yang ditunjukkan pada gambar berikut, CVM saat ini memiliki dua disk, dengan /dev/vda adalah disk sistem dan /dev/vdb adalah disk data yang baru ditambahkan.
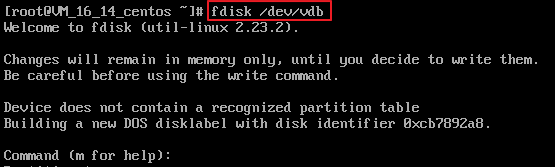
3. Jalankan perintah berikut untuk menggunakan alat fdisk untuk mempartisi disk data yang baru ditambahkan.
fdisk<Disk data yang baru ditambahkan>
Gunakan disk data yang baru dipasang /dev/vdb sebagai contoh:
fdisk /dev/vdb
Informasi yang dikembalikan mirip dengan yang ditunjukkan di bawah ini:
4. Masukkan n dan tekan Enter untuk mulai membuat partisi baru.
Informasi yang dikembalikan mirip dengan yang ditunjukkan di bawah ini:
Ini menunjukkan bahwa disk tersebut memiliki dua jenis partisi:
p menunjukkan partisi utama.
e menunjukkan partisi yang diperluas.
5. Gunakan membuat partisi utama sebagai contoh.Masukkan p dan tekan Enter untuk mulai membuat partisi utama baru.
Informasi yang dikembalikan mirip dengan yang ditunjukkan di bawah ini:
Partition number (Nomor partisi) menunjukkan nomor partisi utama.Anda dapat memilih dari 1-4.
6. Gunakan memilih nomor partisi 1 sebagai contoh.Masukkan nomor partisi utama 1 dan tekan Enter.
Informasi yang dikembalikan mirip dengan yang ditunjukkan di bawah ini:
First sector (Sektor pertama) menunjukkan sektor awal.Anda dapat memilih dari 2048 - 20971519.Nilai default-nya adalah 2048.
7. Gunakan memilih nomor sektor awal default 2048 sebagai contoh. Tekan Enter.
Informasi yang dikembalikan mirip dengan yang ditunjukkan di bawah ini:
Sektor terakhir menunjukkan sektor akhir. Anda dapat memilih dari 2048 - 20971519.Nilai default-nya adalah 20971519.
8. Gunakan memilih nomor sektor akhir default 20971519 sebagai contoh. Tekan Enter.
Informasi yang dikembalikan mirip dengan yang ditunjukkan di bawah ini:
Ini menunjukkan bahwa proses mempartisi selesai.Partisi baru telah dibuat pada disk data 60 GB.
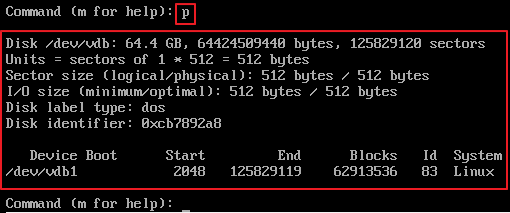
9. Masukkan p dan tekan Enter untuk melihat informasi tentang partisi yang baru dibuat.
Informasi yang dikembalikan mirip dengan yang ditunjukkan di bawah ini:
Ini menunjukkan informasi detail dari partisi /dev/vdb1 yang baru dibuat.
Jika terjadi kesalahan selama operasi mempartisi, masukkan `q` untuk keluar dari alat fdisk dan hasil partisi sebelumnya tidak akan disimpan.
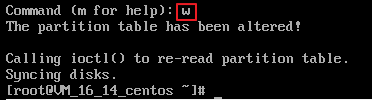
10. Masukkan w dan tekan Enter untuk menulis hasil partisi ke dalam tabel partisi.
Jika informasi yang dikembalikan mirip dengan yang ditunjukkan di bawah, partisi telah dibuat.
11. Jalankan perintah berikut untuk menyinkronkan tabel partisi ke sistem operasi.
partprobe
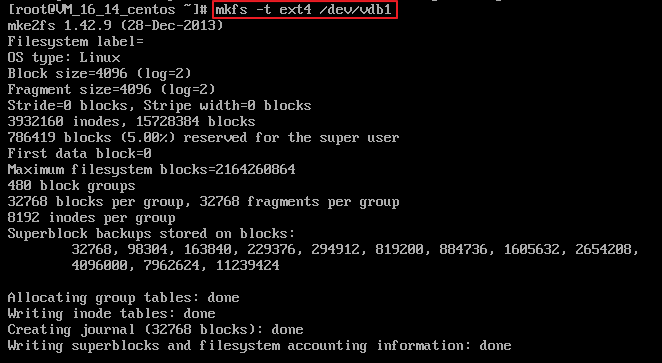
12. Jalankan perintah berikut untuk mengonfigurasi sistem file dari partisi yang baru dibuat ke yang diperlukan oleh sistem.
mkfs -t <Format sistem file> /dev/vdb1
Ukuran partisi yang didukung oleh berbagai sistem file berbeda.Pilih sistem file yang sesuai dengan kebutuhan.Contoh berikut menggunakan EXT4 sebagai sistem file:
mkfs -t ext4 /dev/vdb1
Informasi yang dikembalikan mirip dengan yang ditunjukkan di bawah ini:
Pemformatan membutuhkan waktu.Perhatikan status sistem yang berjalan dan jangan keluar.
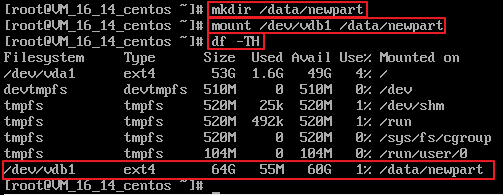
13. Jalankan perintah berikut untuk membuat titik pemasangan baru.
mkdir<Mount point>
Gunakan membuat titik pemasangan baru /data/newpart sebagai contoh:
mkdir /data/newpart
14. Jalankan perintah berikut untuk memasang partisi baru ke titik pemasangan yang baru dibuat.
mount /dev/vdb1 <Mount point>
Gunakan membuat titik pemasangan baru /data/newpart sebagai contoh:
mount /dev/vdb1 /data/newpart
15. Jalankan perintah berikut untuk melihat hasil pemasangan.
df -TH
Informasi yang dikembalikan mirip dengan yang ditunjukkan di bawah ini:
Ini menunjukkan bahwa partisi /dev/vdb1 yang baru dibuat telah dipasang ke /data/newpart.
Jika Anda tidak perlu mengonfigurasi pemasangan otomatis disk saat startup, lewati langkah-langkah berikut.
16. Konfirmasikan metode pemasangan dan dapatkan informasi yang sesuai.
Berdasarkan kebutuhan bisnis, Anda dapat menggunakan tautan lunak disk cloud elastis, UUID sistem file (pengidentifikasi unik universal), atau nama perangkat untuk memasang disk secara otomatis.Deskripsi dan metode perolehan informasi adalah sebagai berikut:
Metode pemasangan
Kelebihan dan kekurangan
Metode perolehan informasi
Menggunakan tautan lunak disk cloud elastis(direkomendasikan)
Kelebihan: tautan lunak disk cloud elastis bersifat tetap dan unik.Tautan tersebut tidak berubah dengan operasi seperti pemasangan, pelepasan, dan pemformatan partisi.
Kekurangan: hanya disk cloud elastis yang dapat menggunakan tautan lunak, yang beroperasi tanpa terasa untuk operasi pemformatan partisi.
Menjalankan perintah berikut untuk mendapatkan tautan lunak dari disk cloud elastis.
ls -l /dev/disk/by-id
Menggunakan UUID sistem file
Konfigurasi pemasangan otomatis mungkin gagal karena perubahan UUID sistem file.
Misalnya, memformat ulang sistem file akan mengubah UUID-nya.
Menjalankan perintah berikut untuk mendapatkan UUID sistem file.
blkid /dev/vdb1
Menggunakan nama perangkat
Konfigurasi pemasangan otomatis mungkin gagal karena perubahan nama perangkat.
Misalnya, jika disk cloud elastis di CVM dilepas dan dipasang kembali, nama perangkat dapat berubah saat sistem operasi mengenali sistem file lagi.
Menjalankan perintah berikut untuk mendapatkan nama perangkat.
fdisk -l
17. Jalankan perintah berikut untuk mencadangkan file `/etc/fstab` ke direktori `/home`, misalnya:
cp -r /etc/fstab /home
18. Jalankan perintah berikut untuk menggunakan editor VI untuk membuka file /etc/fstab.
vi /etc/fstab
19. Tekan i untuk masuk ke mode edit.
20. Pindahkan kursor ke akhir file, tekan Enter, dan tambahkan konten berikut.
<Device information> <Mount point> <File system format> <File system installation option> <File system dump frequency>
<Urutan pemeriksaan sistem file saat startup>
(Direkomendasikan) Gunakan pemasangan otomatis menggunakan tautan lunak disk cloud elastis sebagai contoh.Tambahkan konten berikut: