Setting a Single or Multiple Connection Addresses
Download
Focus Mode
Font Size
This document describes how to set a single or multiple database proxy connection addresses via the TDSQL-C for MySQL console.
The database proxy access address is independent of the original database access address. Requests sent to the database proxy address are all routed through the proxy cluster to access the read-write and read-only instances of the database. This enables read-write separation by forwarding read requests to read-only instances, thereby reducing the load on the read-write instance.
Prerequisites
Setting a Single Database Proxy Connection Address
After the database proxy is enabled, TDSQL-C for MySQL provides a database proxy connection address by default. You can configure the policy for it and mount it to read-only instances.
1. Log in to the TDSQL-C for MySQL console, select the cluster with the proxy enabled in the cluster list, and click the Cluster ID to enter the cluster management page.
2. Open the topology in Cluster Management > Cluster Details, hover over the database proxy area, and click Details to go to the database proxy management page. Alternatively, click the Database Proxy tab on the cluster management page to go to the Database Proxy Management page.
3. Find the target access address on the connection address page and click Adjust Configurations in the operation column.

4. Complete the configurations in the pop-up window and click OK.
Step 1: Configure Policy
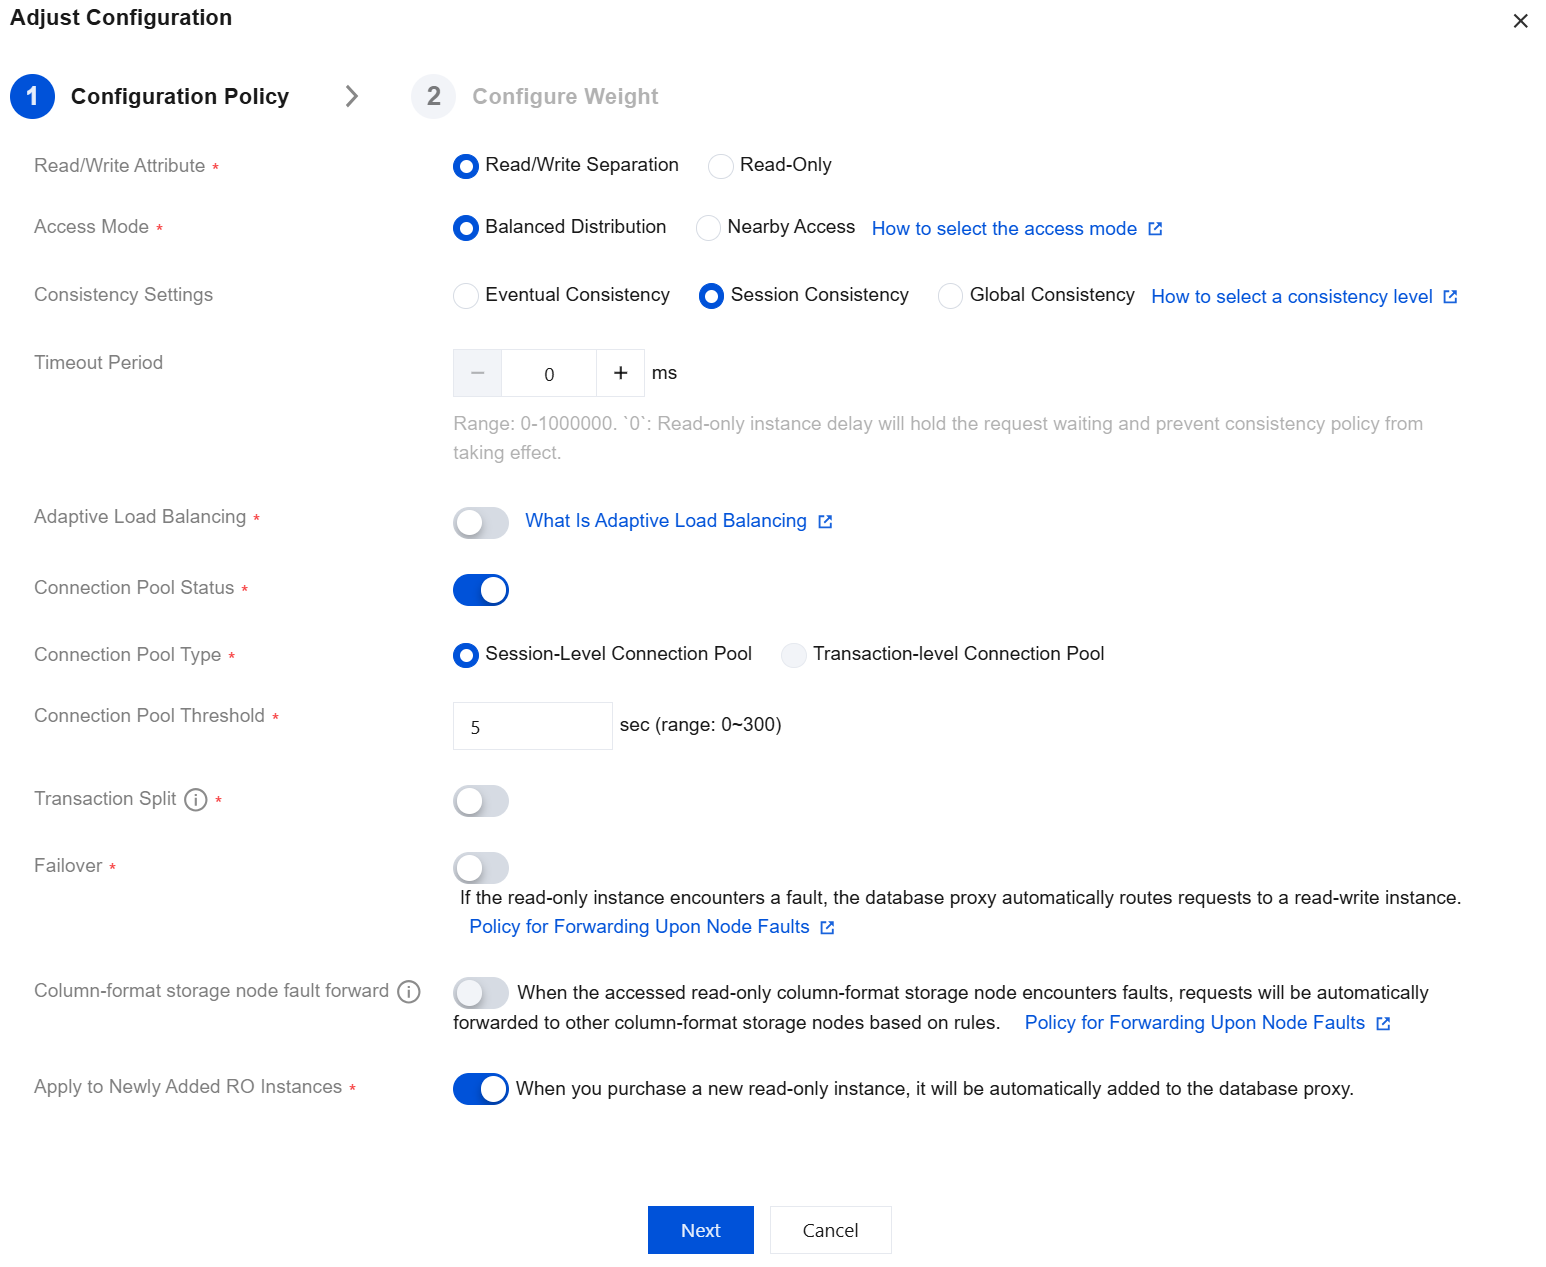
Parameter | Description |
Read/Write Attribute | Select the Read/Write Separation of the proxy access address, which can be Read/Write Separation or Read-Only. If Read/Write Separation is selected, the Read/Write Separation feature will be enabled automatically. |
Access Mode | Select Balanced distribution or Nearby access to set the connection link from the client to the database proxy. For details, see Access Mode. |
Consistency Settings | If Read/Write Separation is selected, three consistency levels are provided: eventual consistency, session consistency, and global consistency. They can meet your consistency requirements in different scenarios. For details, see Consistency Level. Note: Changes to the consistency level take effect only for new connections. If you need the parameter to take effect immediately through resetting the connection, you can use the load rebalancing feature or restart the instance. |
Timeout Period | If the consistency level is set to session consistency or global consistency, you need to set a timeout period for data replication between the read-write instance and read-only instances. The value ranges from 0 to 1,000,000 milliseconds. If it is set to 0, when a read-only instance experiences a delay that causes the consistency policy to be unsatisfied, the request will keep waiting. If it is set to a non-zero value, for example, 1000 milliseconds, when a read-only instance experiences a delay and the delay exceeds the set 1000 milliseconds, the request will be automatically forwarded to the primary instance by the system. Note: Currently, the timeout period cannot be set separately for each database proxy instance under the same cloud account. The timeout period can only take effect uniformly for all database proxy instances. If you modify the timeout period for a single database proxy instance, the timeout period for all database proxy instances will be uniformly modified. |
Adaptive Load Balancing | Determine whether to enable the adaptive CLB feature. Once it is enabled, requests are routed to instances with lower loads based on the backend load conditions to achieve load balancing for database instances. For details, see Adaptive CLB. |
Connection Pool Status | The connection pool feature is mainly used to reduce the instance load caused by the frequent establishment of new connections in non-persistent connection services. If you enable this feature, you can select a supported connection pool type. Currently, session-level connection pools and transaction-level connection pools are supported. For details, see Connection Pool Overview. |
Connection Pool Threshold | When the connection pool type is set to "session-level connection pool", set the connection pool threshold. The value ranges from 0 to 300 seconds. |
Transaction Split | Determine whether to enable this feature. Once it is enabled, reads and writes in one transaction are split and executed on different instances. Read requests are forwarded to read-only instances to reduce the load on the primary instance. |
Failover (Read/Write Separation selected) | Determine whether to enable this feature. Once it is enabled, the connection address will be routed to the read-write instance when the database proxy encounters faults. |
Analysis Engine Failover (Read/Write Separation selected) | Determine whether to enable this feature (this setting is supported only in database proxy version 1.4.5 or later). Once it is enabled, when the accessed read-only analysis engine encounters a fault, requests are automatically forwarded to other read-only analysis engines according to the rules. For the detailed fault forwarding policy, see Instance Fault Forwarding. |
Apply to Newly Added RO Instances | Determine whether to enable this feature. Once it is enabled, newly purchased read-only instances or read-only analysis engines will be automatically added to the database proxy. If the read weight is automatically assigned by the system, a weight is assigned to newly purchased read-only instances according to the specification. If the read weight is customized, the weight of newly purchased read-only instances is 0 by default when they are added. You can click Adjust Configuration on the Database Proxy > Connection Address page to modify the weight. |
Step 2: Configure Weight
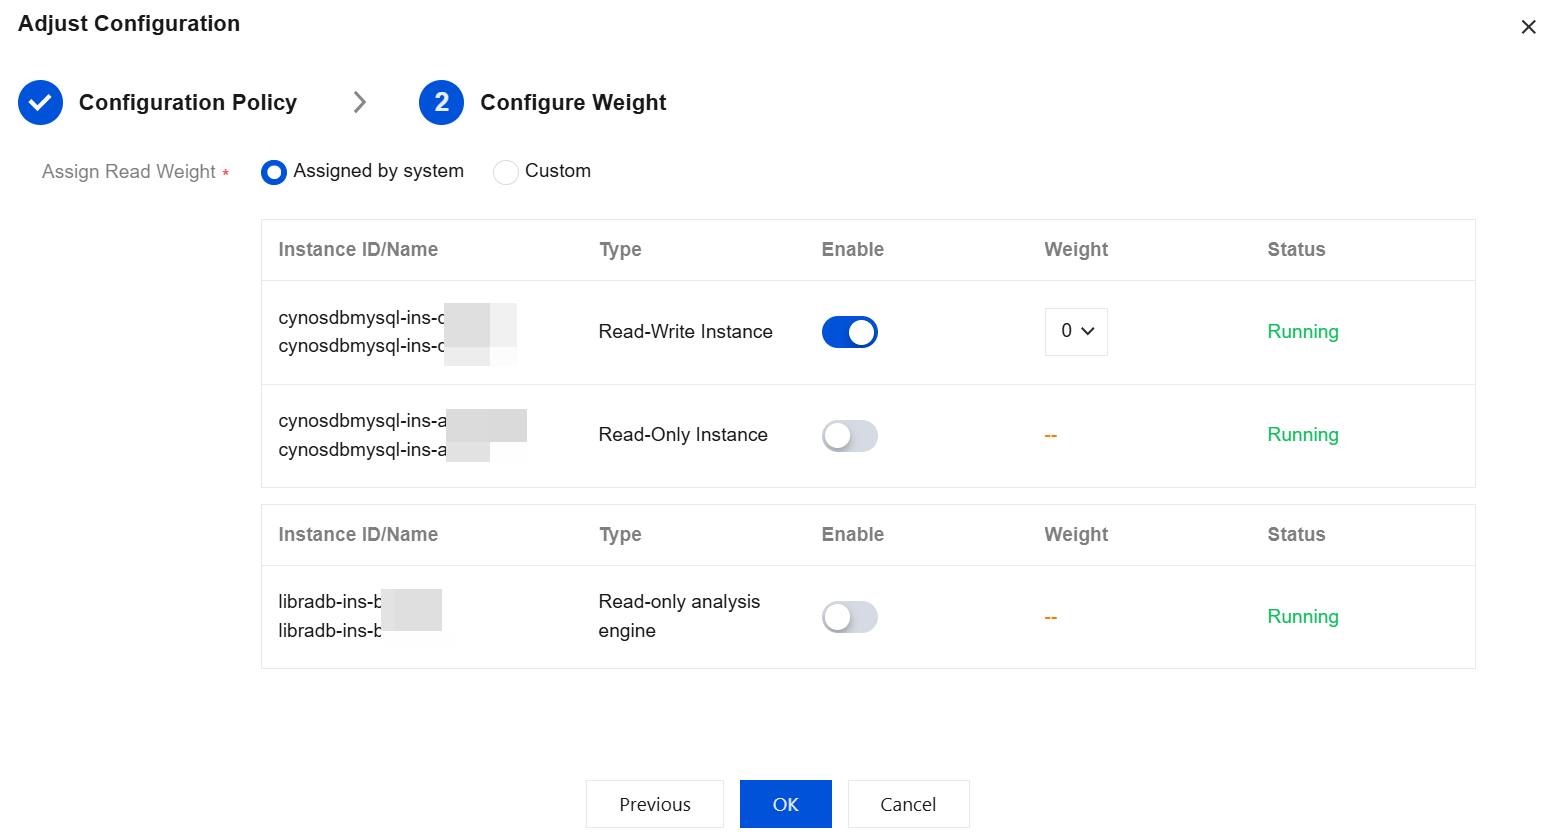
Parameter | Description |
Assign Read Weight | The database proxy needs to distribute read requests to different instances. By assigning different read weights to each instance, the database proxy can decide to which instance to route the requests based on the weight values of the instances. The system supports either Assigned by system or Custom. If the weight is customized, you can configure the weight for different instances. The descriptions of the enabling status and weight during weight assignment are as follows: Enabling Status: If the status is Enabled, the corresponding instance will be assigned a weight for connection. If the status is Disabled, no weight will be assigned to the corresponding instance for connection. Weight: Weight range: 0-100. 0 means that the corresponding instance will be assigned a weight for connection, but the weight is the lowest. The larger the value, the higher the weight, and the more read requests. After the read weights are assigned, read requests will be routed to the corresponding instances in proportion. For example, if the read weights of Instance 1, Instance 2, and Instance 3 are set to 3, 2, and 1, read requests from the database proxy connection address will be routed to Instance 1, Instance 2, and Instance 3 in the ratio of 3:2:1. Note: The weight here is for read requests (non-transactional). The read-only analysis engine does not support weight modification. It only supports using the hint syntax of /*to server instance ID*/ to forcibly specify the forwarding destination. Weight description for the read-only analysis engine When the database proxy contains a read-only analysis engine, SQL statements without specified Hint forwarding are not sent to the read-only analysis engine by default. The weight setting for the read-only analysis engine takes effect only when multiple read-only analysis engines exist. Note: The weight setting for the read-only analysis engine is supported only in database proxy version 1.4.5 or later. |
Unified Weight Management | Choose whether to enable unified weight management. When it is enabled, SQL statements without forwarding rules (Hint) will be automatically assigned to the read-only analysis engine based on the weight. In this case, the read-only analysis engine and common read-only instances perform SQL forwarding in the same Cloud Load Balancer (CLB) group. Note: This item is displayed only in database proxy version 1.4.5 or later. |
Setting Multiple Database Proxy Connection Addresses
Note:
The maximum number of database proxy connection addresses is 7.
A connection address is created by default when a database proxy is enabled.
1. Log in to the TDSQL-C for MySQL console, select the cluster with the proxy enabled in the cluster list, and click the Cluster ID to enter the cluster management page.
2. In the topology diagram under Cluster Management > Cluster Details, hover the mouse pointer over the database proxy section and click Details to enter the database proxy management page. Alternatively, you can directly select the Database Proxy tab on the cluster management page to enter the Database Proxy Management page.
3. Click Add Access Address next to Connection Address on the database proxy management page.
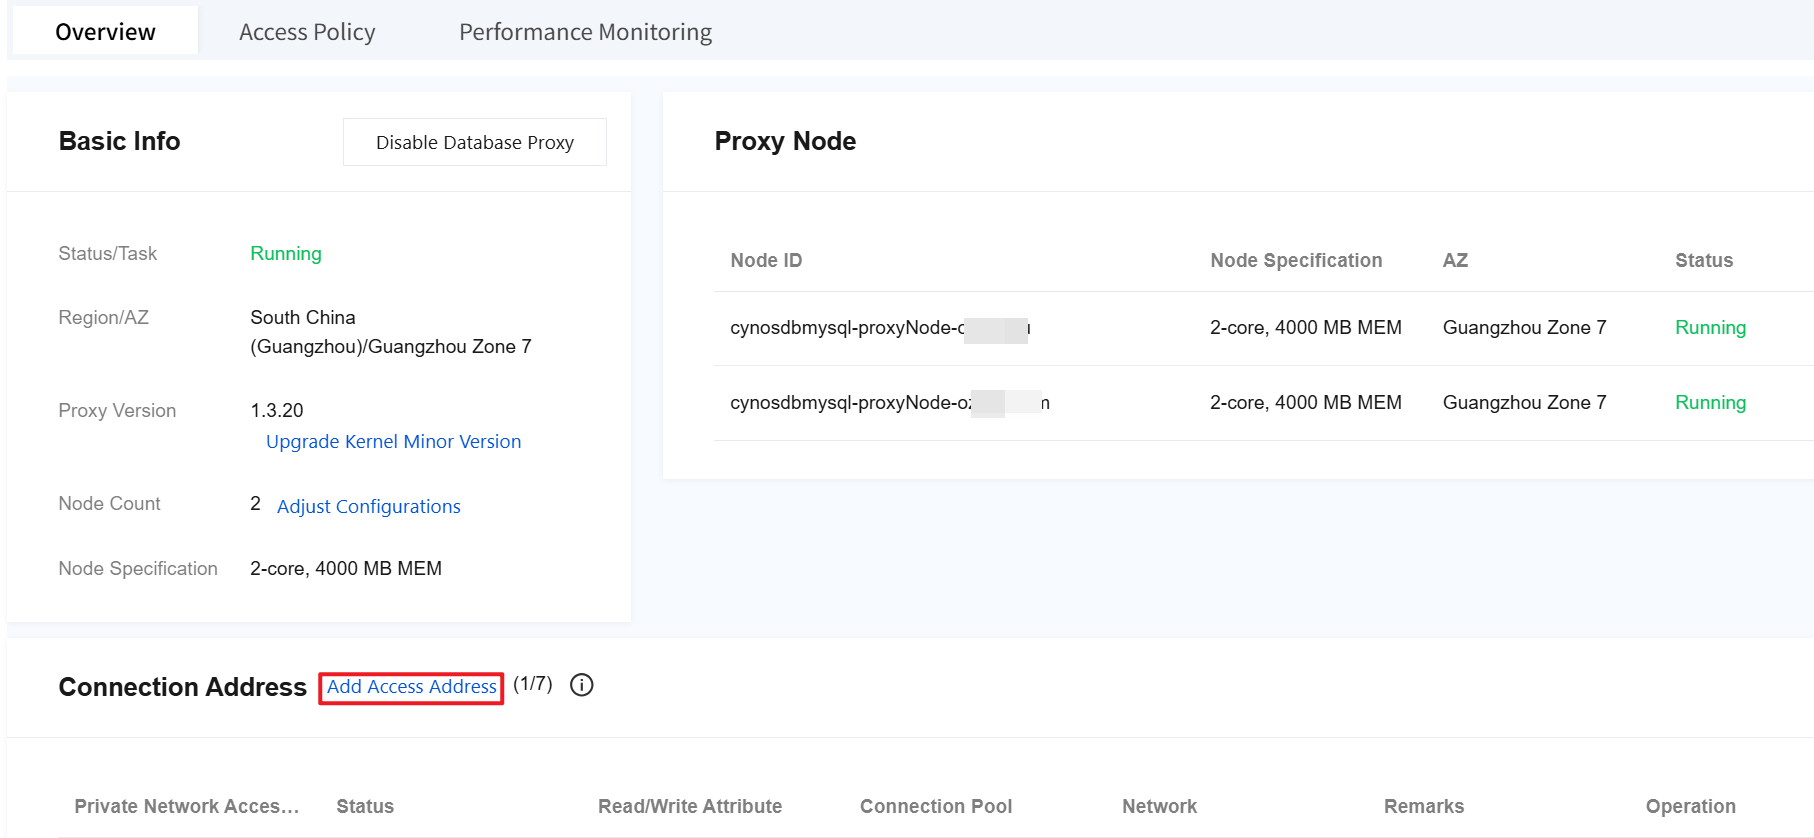
4. Complete the following configurations in the pop-up window and click OK.
Step 1: Network Configuration
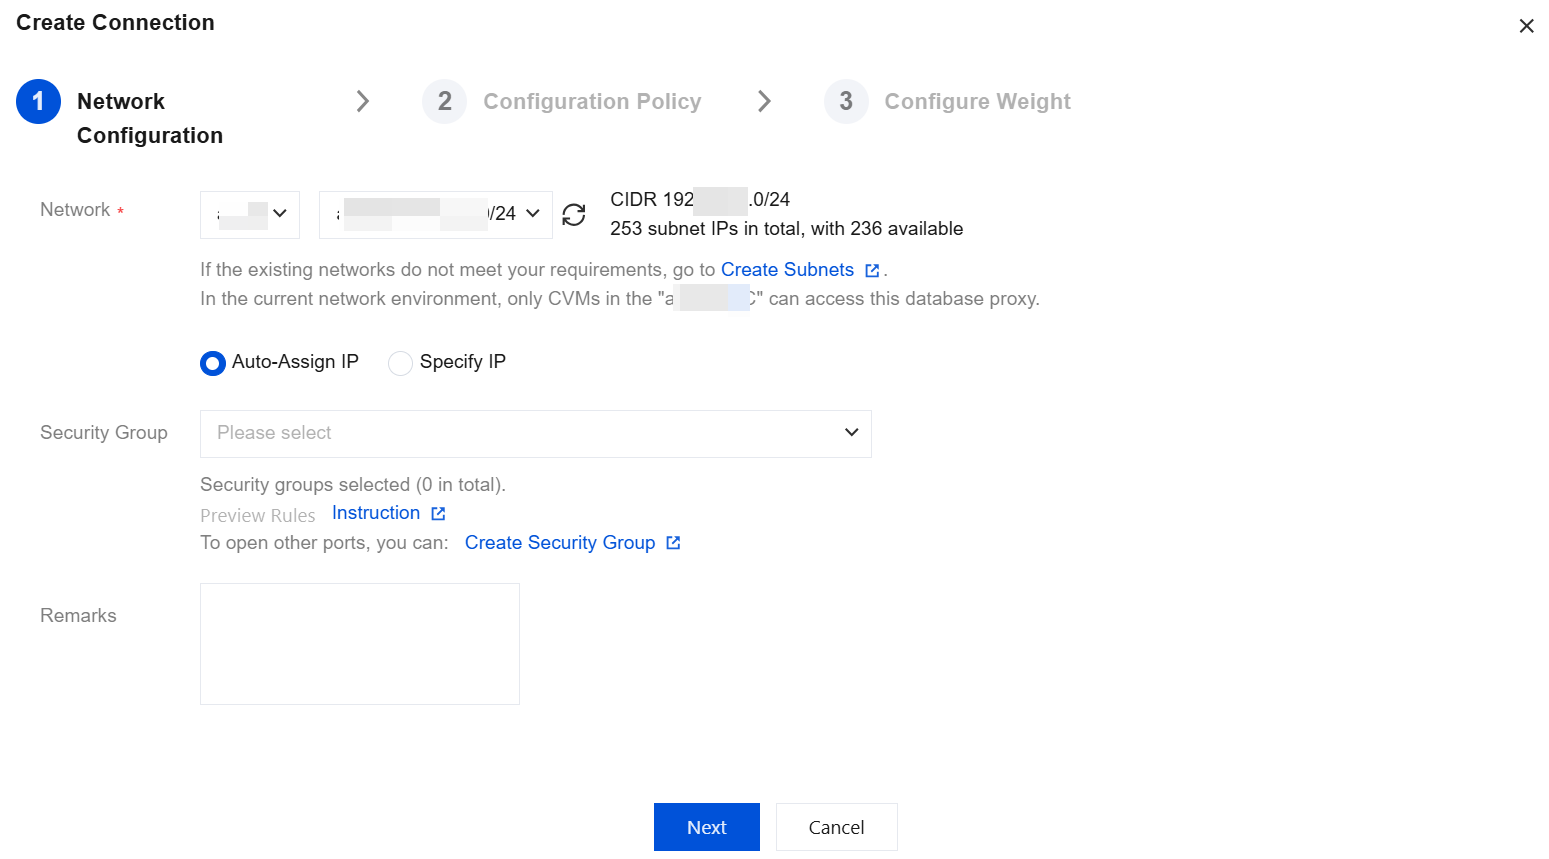
Parameter | Description |
Network | Select the network for the database proxy. Only VPC is supported. You can choose Auto-Assign IP or Specify IP. |
Security Group | The default security group is the same as that of the primary instance. You can also select an existing security group or create one as needed. Multiple security groups can be selected. Note: You need to configure the security policy and allow the private network access port (3306 currently) to access the database proxy. For details, see Creating and Managing TencentDB Security Groups. |
Remarks | Optional. Leave remarks for the database proxy connection address to be added. |
Step 2: Configuration Policy
For specific options and descriptions, see Step 1: Configure the policy in Setting a Single Database Proxy Connection Address.
Step 3: Configure Weight
For specific options and descriptions, see Step 2: Configure the weight in Setting a Single Database Proxy Connection Address.
Related APIs
API | Description |
This interface (CreateProxyEndPoint) is used to create a connection endpoint for the database proxy. |
Help and Support
Was this page helpful?
You can also Contact sales or Submit a Ticket for help.
Help us improve! Rate your documentation experience in 5 mins.
Feedback