Setting SSL Encryption
Download
Focus Mode
Font Size
SSL encryption overview
Secure Sockets Layer (SSL) authentication is a process that authenticates the connection from the user client to the TencentDB server. After SSL encryption is enabled, you can get a CA certificate and upload it to the server. Then, when the client accesses the database, the SSL protocol will be activated to establish an SSL secure channel between the client and the server. This implements encrypted data transfer, prevents data from being intercepted, tampered with, and eavesdropped during transfer, and ultimately ensures the data security for both the client and the server.
The SSL protocol needs to be established based on reliable TCP and has the advantage of being independent from application layer protocols; therefore, high-level application layer protocols such as HTTP, FTP, and TELNET can be transparently established on it. It completes encryption algorithm processing, communication key negotiation, and server authentication before communication is made over application layer protocols. After that, all data transferred over application layer protocols will be encrypted to ensure communication privacy.
Background
When you connect to a database in an unencrypted manner, all information transferred over the network will be in plaintext and may be eavesdropped, tampered with, and impersonated by malicious users. The SSL protocols are designed to address these risks and can bring the following benefits theoretically:
Information is encrypted and cannot be eavesdropped by a third party.
There is a verification mechanism for immediate tampering detection by both parties in the communication.
Identity certificates will be used to authenticate the identity.
TencentDB for MySQL supports enhancing the connection security by enabling SSL encryption as well as downloading and installing SSL CA certificates to the required application services.
Note:
SSL encryption protects the traffic between the database and the server rather than the data itself. Encrypting the network connection at the transport layer can improve the security and integrity of the communication data, but will increase the response time of the network connection.
Prerequisites
The instance version is MySQL 5.6/5.7/8.0.
The instance architecture is two-node/three-node.
The instance engine is InnoDB/RocksDB.
Supported Versions
MySQL uses OpenSSL to implement secure connections. TencentDB for MySQL supports Transport Layer Security Protocol (TLS) versions 1.0, 1.1, 1.2, and 1.3, depending on the MySQL version. The following table shows the MySQL versions that support TLS.
MySQL Version | TLS1.0 | TLS1.1 | TLS1.2 | TLS1.3 |
MySQL 5.7 | Not Supported | Not Supported | Supported | Supported |
MySQL 8.0 | Supported | Supported | Supported | Supported |
Enabling SSL encryption
1. Log in to the TencentDB for MySQL console. In the instance list, click an Instance ID or Manage in the Operation column to enter the instance management page.
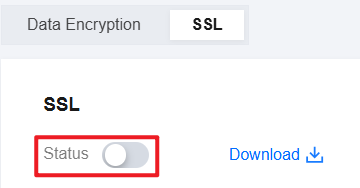
2. On the instance management page, select the Data Security > SSL tab.
3. This feature is disabled by default. Toggle it on and click OK.
The window to enable SSL encryption in the source instance is as follows:
Note:
During the process of enabling SSL encryption, your database instance will be restarted to load the SSL certificate. Make sure that your business has a reconnection mechanism.
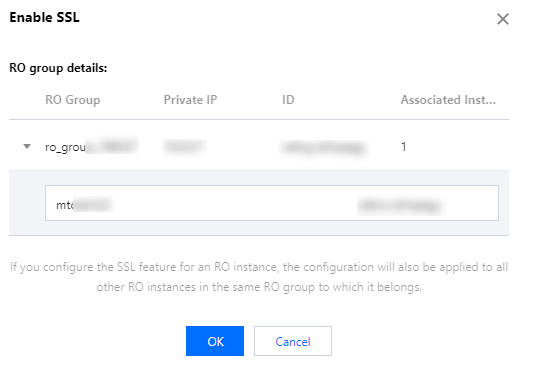
The window to enable SSL encryption in a read-only instance is as follows:
Note:
The configuration of the SSL encryption feature in a read-only instance will be synced to other read-only instances in its read-only group.
4. Click Download to download the SSL CA certificate.The certificate has a validity period of 20 years.
The downloaded file is a compressed package (TencentDB-CA-Chain.zip), which contains the following three files:
.p7b file: It is used to import the CA certificate into Windows.
jks file: A storage file for truststore and keystore in Java with a unified password of tencentdb, used for importing the CA certificate chain in Java programs.
.pem file: It is used to import the CA certificate into other systems or applications.
Configuring an SSL CA certificate
After enabling SSL encryption, you need to configure an SSL CA certificate when using a client to connect to TencentDB. The following takes Navicat as an example to describe how to install an SSL CA certificate. For other applications or clients, refer to their respective documentation.
Note:
Every time SSL encryption is enabled or disabled for TencentDB for MySQL, a new certificate will be generated.
1. Open Navicat.
2. Right-click the target database and select Edit Connection.
3. Select the SSL tab, select the path of the CA certificate in .pem format, complete the settings, and click OK.
Note:
If the error message
connection is being used is displayed, it may be because the previous session has not been disconnected. In this case, restart Navicat and try again.4. Double-click the target database to test whether the connection is normal.
Disabling SSL encryption
1. Log in to the TencentDB for MySQL console. In the instance list, click an Instance ID or Manage in the Operation column to enter the instance management page.
2. On the instance management page, select the Data Security > SSL tab.
3. Toggle the switch off and click OK in the pop-up window.
Note:
During the process of disabling SSL encryption, your database instance will be restarted to uninstall the SSL certificate. Make sure that your business has a reconnection mechanism.
Use the MySQL command-line client to enable the SSL-encrypted instance
If your database version is different, the connection command parameters of the MySQL client will be different. You can use the following command to query the database version you are using, and then refer to the subsequent steps to connect to the instance.
SELECT VERSION();Query Result Example:+--------------+| VERSION() |+--------------+| 8.0.30-txsql |+--------------+1 row in set (0.00 sec)
1. Download the SSL CA certificate through the TencentDB for MySQL console. For operations, refer to Enable SSL Encryption.
2. Using the MySQL command-line client to enable the SSL-encrypted instance through the command.
For the MariaDB client, connect to the instances using the following command.
mysql -h <IP address> --ssl-ca=<CA certificate> --ssl -P <Port number> -u < username > -p
When the client database version is MySQL 5.6, use the following command to connect to the instance.
mysql -P <Port number> -h <IP address> -u < username > -p< password > --ssl-ca<CA certificate>
When the client database version is MySQL 5.7/8.0, use the following command to connect to the instance.
mysql -h <IP address> --ssl-ca=<CA certificate> --ssl-mode=REQUIRED -P <Port number> -u < username > -p
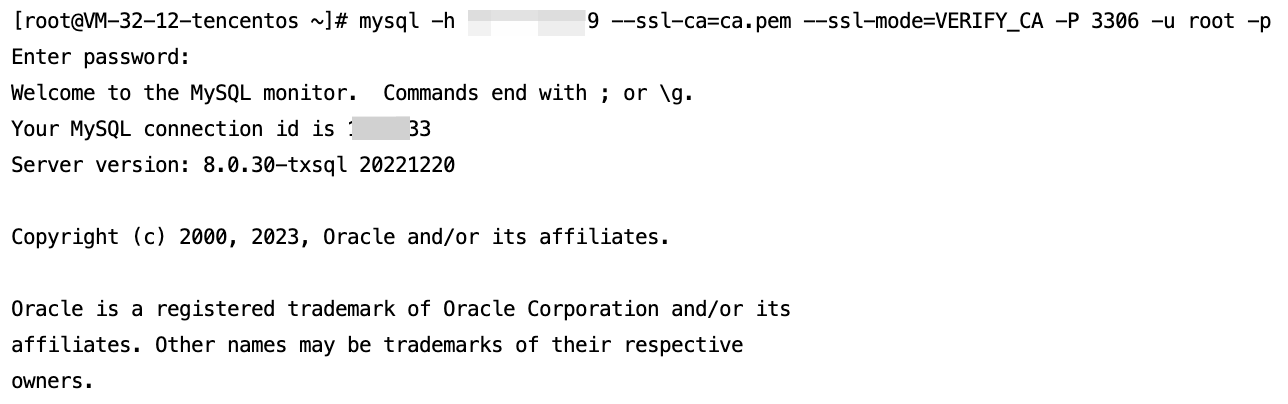
To use other SSL modes, such as VERIFY_CA or VERIFY_IDENTITY, connect to the instance using the following command.
mysql -h <IP address> --ssl-ca=<CA certificate> --ssl-mode=VERIFY_CA -P <Port number> -u <username> -p
Note:
The --ssl-mode parameter indicates the SSL mode. Generally, REQUIRED and VERIFY_CA modes are recommended. These modes require the MySQL client to use the SSL/TLS protocol to connect to the MySQL server and to verify the SSL/TLS certificate of the MySQL server. The VERIFY_IDENTITY mode, in addition to verifying the SSL/TLS certificate of the MySQL server, requires that the hostname used by the client matches the identifier in the server certificate; otherwise, the MySQL client will refuse to connect to the MySQL server.
3. Enter the password for the corresponding username as prompted by the system.
Sample code for connecting to an SSL-enabled instance from common programs
PHP
$conn = mysqli_init();mysqli_ssl_set($conn,NULL,NULL, "<path of the downloaded certificate>", NULL, NULL);mysqli_real_connect($conn, '<database access address>', '<database access username>', '<database access password>', '<the specified database to be accessed>', <access port>, MYSQLI_CLIENT_SSL | MYSQLI_CLIENT_SSL_DONT_VERIFY_SERVER_CERT);if (mysqli_connect_errno($conn)) {die('Failed to connect to MySQL: '.mysqli_connect_error());}
Note:
The MYSQLI_CLIENT_SSL_DONT_VERIFY_SERVER_CERT flag needs to be added to the code to disable host name verification for the server certificate while retaining the SSL encrypted connection feature. Otherwise, the "certificate mismatch" error may occur.
PHP (Using PDO)
$options = array(PDO::MYSQL_ATTR_SSL_CA => '<path of the downloaded certificate>');$db = new PDO('mysql:host=<database access address>;port=<access port>;dbname=<the specified database to be accessed>', '<database access username>', '<database access password>', $options);
Java (MySQL Connector for Java)
# generate truststore and keystore in codeString importCert = " -import "+" -alias mysqlServerCACert "+" -file " + ssl_ca +" -keystore truststore "+" -trustcacerts " +" -storepass password -noprompt ";String genKey = " -genkey -keyalg rsa " +" -alias mysqlClientCertificate -keystore keystore " +" -storepass password123 -keypass password " +" -dname CN=MS ";sun.security.tools.keytool.Main.main(importCert.trim().split("\\\\s+"));sun.security.tools.keytool.Main.main(genKey.trim().split("\\\\s+"));# use the generated keystore and truststoreSystem.setProperty("javax.net.ssl.keyStore","<path of the downloaded certificate>");System.setProperty("javax.net.ssl.keyStorePassword","tencentdb");System.setProperty("javax.net.ssl.trustStore","<path of the downloaded certificate>");System.setProperty("javax.net.ssl.trustStorePassword","tencentdb");url = String.format("jdbc:mysql://%s/%s?serverTimezone=UTC&useSSL=true", '<database access address>', '<the specified database to be accessed>');properties.setProperty("user", '<database access username>');properties.setProperty("password", '<database access password>');conn = DriverManager.getConnection(url, properties);
.NET (MySqlConnector)
var builder = new MySqlConnectionStringBuilder{Server = "<database access address>",UserID = "<database access username>",Password = "<database access password>",Database = "<the specified database to be accessed>",SslMode = MySqlSslMode.VerifyCA,SslCa = "<downloaded certificate>",};using (var connection = new MySqlConnection(builder.ConnectionString)){connection.Open();}
Python (MySQLConnector Python)
try:conn = mysql.connector.connect(user='<database access username>',password='<database access password>',database='<the specified database to be accessed>',host='<database access address>',ssl_ca='<path of the downloaded certificate>')except mysql.connector.Error as err:print(err)
Python (PyMySQL)
conn = pymysql.connect(user='<database access username>',password='<database access password>',database='<the specified database to be accessed>',host='<database access address>',ssl={'ca': '<path of the downloaded certificate>'})
Django (PyMySQL)
DATABASES = {'default': {'ENGINE': 'django.db.backends.mysql','NAME': '<the specified database to be accessed>','USER': '<database access username>','PASSWORD': '<database access password>','HOST': '<database access address>','PORT': '<access port>','OPTIONS': {'ssl': {'ca': '<path of the downloaded certificate>'}}}}
Node.js
var fs = require('fs');var mysql = require('mysql');const serverCa = [fs.readFileSync("<path of the downloaded certificate>", "utf8")];var conn=mysql.createConnection({host:"<database access address>",user:"<database access username>",password:"<database access password>",database:"<the specified database to be accessed>",port:<access port>,ssl: {rejectUnauthorized: true,ca: serverCa}});conn.connect(function(err) {if (err) throw err;});
Golang
rootCertPool := x509.NewCertPool()pem, _ := ioutil.ReadFile("<path of the downloaded certificate>")if ok := rootCertPool.AppendCertsFromPEM(pem); !ok {log.Fatal("Failed to append PEM.")}mysql.RegisterTLSConfig("custom", &tls.Config{RootCAs: rootCertPool})var connectionString stringconnectionString = fmt.Sprintf("%s:%s@tcp(%s:<access port>)/%s?allowNativePasswords=true&tls=custom","<database access username>" , "<database access password>", "<database access address>", '<the specified database to be accessed>')db, _ := sql.Open("mysql", connectionString)
Ruby
client = Mysql2::Client.new(:host => '<database access address>',:username => '<database access username>',:password => '<database access password>',:database => '<the specified database to be accessed>',:sslca => '<path of the downloaded certificate>')
Help and Support
Was this page helpful?
You can also Contact sales or Submit a Ticket for help.
Help us improve! Rate your documentation experience in 5 mins.
Feedback