A cloud disk is an expandable storage device on cloud. You can expand its capacity at any time without losing any data in it.
After expanding the cloud disk, you need to expand the partitions and file systems. You can allocate the capacity of the expanded part to an existing partition or format it into a new partition.
Note:
MBR partition supports a disk with a maximum capacity of 2 TB. If you need to extend for over 2 TB, we recommend you create and attach a new data disk and use the GPT partition format.
Expanding Data Disks
To expand a data disk, the following three methods are provided.
Note:
If multiple cloud disks of the same capacity and type are attached to the CVM, you can identify them using the method shown in Distinguishing data disks. Select a data disk and expand its capacity as instructed below.
You can use the ResizeDisk API to expand the specified cloud disks. For more information, see ResizeDisk.
Expanding System Disks
Expanding via the CVM console (recommended)
Expanding via the CBS console
Expanding via API
1.
Log in to the CVM console, and choose More > Resource adjustment > Expand cloud disks in the row of the target CVM.
2. In the pop-up Expand Cloud Disks window, select the system disk that needs expansion and click Next.
3. In the Adjust Capacity step, set the target capacity (which must be greater than the current capacity) and click Next.
4. In the Extend Partition and File System step, view the precautions and click OK.
5. After completing the expansion operation on the console, log in to the instance to confirm whether the file system is automatically expanded. If not, refer to Extending System Disk Partitions and File Systems Online for steps on expanding partitions and file systems.
2. Choose More > Expand for the target cloud disk.
3. Select the desired new capacity size (which must be greater than the current capacity).
4. Complete the payment.
5. After completing the expansion operation on the console, log in to the instance to confirm whether the file system is automatically expanded. If not, refer to Extending System Disk Partitions and File Systems Online for steps on expanding partitions and file systems.
You can use the ResizeInstanceDisks API to expand the specified non-elastic cloud disk. For specific operations, see ResizeInstanceDisks.
Related Operations
Distinguishing data disks
Check cloud disks according to the operating system of the CVM.
4. Run the following command to view the relationship between the elastic cloud disks and the device name.
wmic diskdrive get caption,deviceid,serialnumber
You can also run the following command.
wmic path win32_physicalmedia get SerialNumber,Tag
The following information will appear:
Note that disk-xxxx is the ID of a cloud disk. You can use it to view cloud disk details on the CBS console.
Checking the cloudinit configuration
Check cloud disks according to the operating system of the CVM.
Checking the cloudinit configuration for Linux instances
Checking the cloudinit configuration for Windows instances
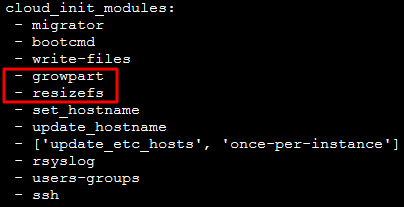
After the system disk is expanded, log in to the Linux instance and check whether the /etc/cloud/cloud.cfg file contains the growpart and resizefs configuration items.
If yes, ignore other operations.
growpart: Expands the partition to the disk size.
resizefs: Expands or adjusts the file system in the / partition to the partition size.
After the system disk is expanded, log in to the Windows instance and check whether the ExtendVolumesPlugin configuration item exists under plugin in C:\\Program Files\\Cloudbase Solutions\\Cloudbase-Init\\conf\\cloudbase-init.conf.
If yes, ignore other operations.
If no, manually extend partitions and file systems (Windows) according to the operating system, and assign its extended capacity to an existing partition, or format it into an independent new partition.