The CVM instance must have the monitoring component agents installed to collect CVM metric data. If you cannot get the monitoring metric data, refer to this document to troubleshoot this problem.
We recommend you reinstall the agents first as instructed in Installing CVM Agents and wait 3 minutes before checking again whether the monitoring data is restored. If an error occurs during the reinstallation or the monitoring data is not restored, troubleshoot the problem as detailed below.
2. Check whether the agents run properly.
Run the following commands to check whether the agents run properly:
ps ax | grep sgagent
ps ax | grep barad_agent
If the output is as shown below, the agents run normally (note that the number of barad_agent processes is 3):
If there is no output or the number of processes is incorrect, the agents are abnormal. In this case, run the following commands as the root account to start the agents. If the messages stargate agent run succ and barad_agent run succ are displayed, the agents have been restarted successfully.
cd /usr/local/qcloud/stargate/admin
./restart.sh
cd /usr/local/qcloud/monitor/barad/admin
./stop.sh
./trystart.sh
Note:
After the agents are started, wait 3 minutes and then check whether there is monitoring data in the CVM console.
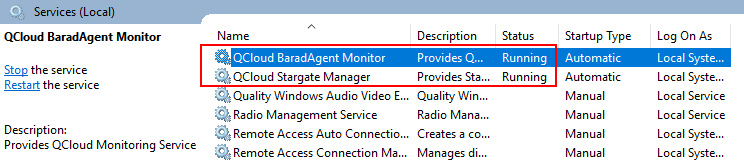
Run services.msc to check whether the agents are installed and started. If the status of QCloud BaradAgent Monitor or QCloud Stargate Manager is not Running, the service is not started. In this case, click the name of the corresponding service and start it.
Note:
If the agents are already started but there is still no monitoring data, you can proceed with the troubleshooting.
If the agents have not been installed, your CVM instance cannot be monitored and you will not receive a notification when the CVM instance runs abnormally, which can pose a high risk. For more information on the installations of agents, see Installing CVM Agents.
Step 2. Check reporting domains
The following 4 domains need to be resolved for the agents to run properly:
update2.agent.tencentyun.com
receiver.barad.tencentyun.com
custom.message.tencentyun.com
metadata.tencentyun.com
The procedures for checking and fixing the reporting domains are different for Linux and Windows. You can refer to a procedure as needed.
Linux
Windows
1. Check whether the reporting domains can be resolved properly.
Run the following commands to check whether these 4 domains can be resolved properly:
ping -c 1 update2.agent.tencentyun.com
ping -c 1 receiver.barad.tencentyun.com
ping -c 1 custom.message.tencentyun.com
ping -c 1 metadata.tencentyun.com
In normal cases, these 4 domains can be resolved on the CVM instance. If unknown host is displayed, the domains fail to be resolved. You can proceed to the next step to fix it.
2. Fix DNS resolution.
Tencent Cloud provides reliable private network DNS servers in different regions. We recommend you not overwrite the default DNS configurations. If you need to modify them, fix the resolution for the 4 domains above as follows:
1. If you use a self-built/third-party DNS service, we recommend you not add the private network DNS provided by Tencent Cloud in /etc/resolv.conf. For more information, see Private Network Access.
2. If you use a self-built DNS service, you can also add the 4 domains above to your DNS. The domain and IP mappings are as follows:
Domain Name
IP
update2.agent.tencentyun.com
169.254.0.15
receiver.barad.tencentyun.com
169.254.0.4
custom.message.tencentyun.com
169.254.0.5
metadata.tencentyun.com
169.254.10.10
3. If the two methods above cannot work, you can add the following configuration to the `/etc/hosts` file on the server:
169.254.0.15 update2.agent.tencentyun.com
169.254.0.4 receiver.barad.tencentyun.com
169.254.0.5 custom.message.tencentyun.com
169.254.10.10 metadata.tencentyun.com
Note:
After the domain resolution issue is fixed, check whether the domains can be resolved properly. If yes, wait 3 minutes and then go to the CVM console to confirm whether there is monitoring data.
1. Check whether the reporting domains can be resolved properly.
Run the following commands to check whether these 4 domains can be resolved properly:
ping -n 1 update2.agent.tencentyun.com
ping -n 1 receiver.barad.tencentyun.com
ping -n 1 custom.message.tencentyun.com
ping -n 1 metadata.tencentyun.com
In normal cases, these 4 domains can be resolved on the CVM instance. If "host not found" is displayed, the domain resolution fails. In this way, you can fix the resolution as follows:
2. Fix DNS resolution.
Tencent Cloud provides reliable private network DNS servers in different regions. We recommend you not overwrite the default DNS configurations. If you need to modify them, fix the resolution for the 4 domains above as follows:
1. Log in to the Windows CVM instance.
2. On the operating system UI, open Control Panel > Network and Sharing Center > Change adapter settings.
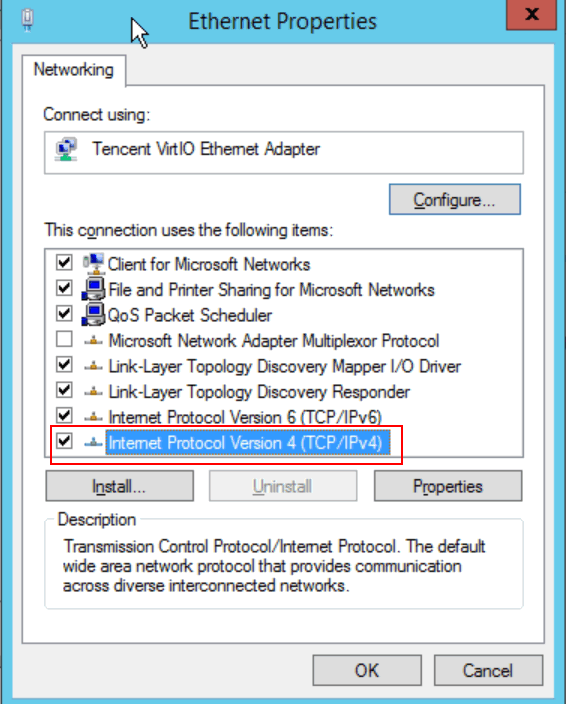
3. Right-click Ethernet and select Properties to open the Ethernet Properties window.
4. In the Ethernet Properties window, double-click Internet Protocol Version 4 (TCP/IPv4) as shown below:
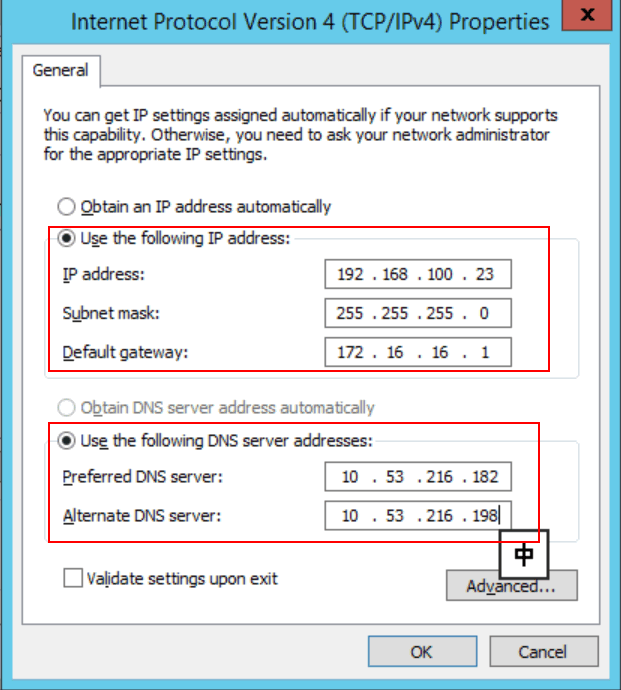
5. Select Use the following DNS server addresses and modify the DNS IP based on the corresponding region in the Private Network Access > Private Network DNS list. After the modification, click OK.
6. If the method above does not work, you can add the following configuration to the C:\\Windows\\System32\\drivers\\etc\\hosts file:
169.254.0.15 update2.agent.tencentyun.com
169.254.0.4 receiver.barad.tencentyun.com
169.254.0.5 custom.message.tencentyun.com
169.254.10.10 metadata.tencentyun.com
7. Run services.msc. Then, right-click the QCloud BaradAgent Monitor and QCloud Stargate Manager services and click Restart the service.
Note:
After fixing the UUID, wait 3 minutes and then go to the CVM console to confirm whether there is monitoring data.
If there is still no monitoring data after the restart, uninstall and reinstall the agents as instructed in Installing CVM Agents.
Step 3. Check whether the UUID is correct
Currently, the incorrect UUID configuration issue occurs only in Linux OS. For details, see the following directions.
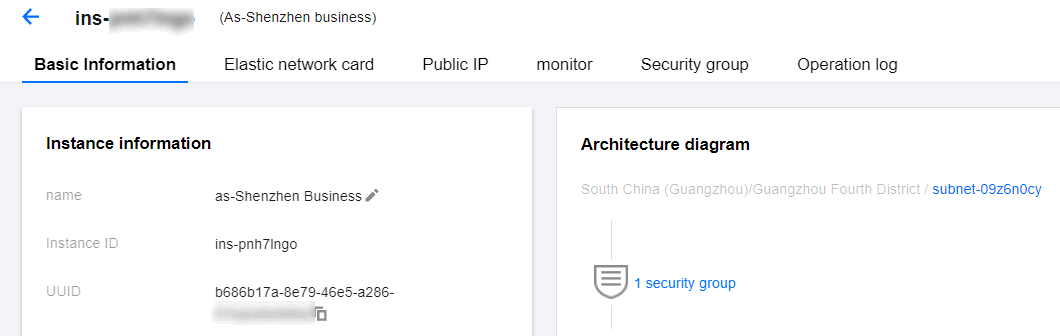
1. Log in to the CVM console and go to the instance detail page to view the UUID.
2. Log in to the CVM instance and run the following command to view the UUID:
cat /sys/class/dmi/id/product_serial
If the UUID on the server is different from that displayed in the CVM console, run the following command as the root account to fix the UUID and restart the agents:
After fixing the UUID, wait 3 minutes and then go to the CVM console to confirm whether there is monitoring data.
Step 4. Check the CVM instance log
After the CVM instance is shut down, the instance's agents will be taken offline and thus no data will be reported.
When you perform CVM Ops operations such as restart, upgrade, reinstallation, or image creation through the CVM console or through logging in to the CVM instance, the reporting of the CVM monitoring data may time out and the agents will be taken offline.
Troubleshooting: You can access the detail page of the CVM instance and view the operation logs to determine whether any relevant Ops operations were performed on the CVM instance at that time.
Step 5. Check the CVM instance load
The agents may fail to report data if the CPU usage, memory usage, or bandwidth utilization of the CVM instance is too high.
High memory usage: You can log in to the CVM instance or view the monitoring charts to check whether the CPU usage reaches 100%. If yes, upgrade the CVM configuration as needed.


 Yes
Yes
 No
No
Was this page helpful?