When the business only requires restoration operations on multiple databases and tables, CollectionRollback can be performed through the console, restoring the data to either the existing instance or a new one. Compared to a rollback of entire instance, a database or table rollback involves less data and results in a quicker process.
Version Description
Version
Rollback Method
3.2, 3.6
Rollback of entire instance (logical backup)
Collection rollback (logical backup)
4.0, 4.2, 4.4
Rollback of entire instance (logical backup, physical backup)
Rollback of entire instance (logical backup, physical backup)
Collection rollback (logical backup)
Note:
Version 5.0 instances temporarily do not support a database or table rollback to a new instance.
Flashback by Key (Logical Backup)
Use Limits
You can select up to 2,000 collections per instance to roll back.
You can roll back data to any time point in the last 7 days.
Note:
Pay close attention to the Oplog Time Lag monitoring metric found within the System Monitoring section of the instance management page. In scenarios where your business experiences frequent write, update, and delete operations, the smaller this metric becomes, the higher the likelihood that the oplog will be at risk of being overwritten.
If there are transaction operations on the client during the rollback process, you need to actively submit the transaction or set a timeout period to prevent the transaction from occupying lock resources for a long time and causing the rollback task to be abnormal.
2. In the MongoDB drop-down list on the left sidebar, select Replica Set Instance or Shard Instance. The directions for replica set instances and sharded cluster instances are similar.
3. Above the Instance List on the right, select the region.
4. In the instance list, find the target instance.
5. On the Instance Details page, select the Backup and Rollback tab.
6. Navigate to the Backup and Rollback tab and access the Backup Task List page.
7. In the Backup Task List, find the backup file to be restored.
8. In the Operation column, click CollectionRollback.
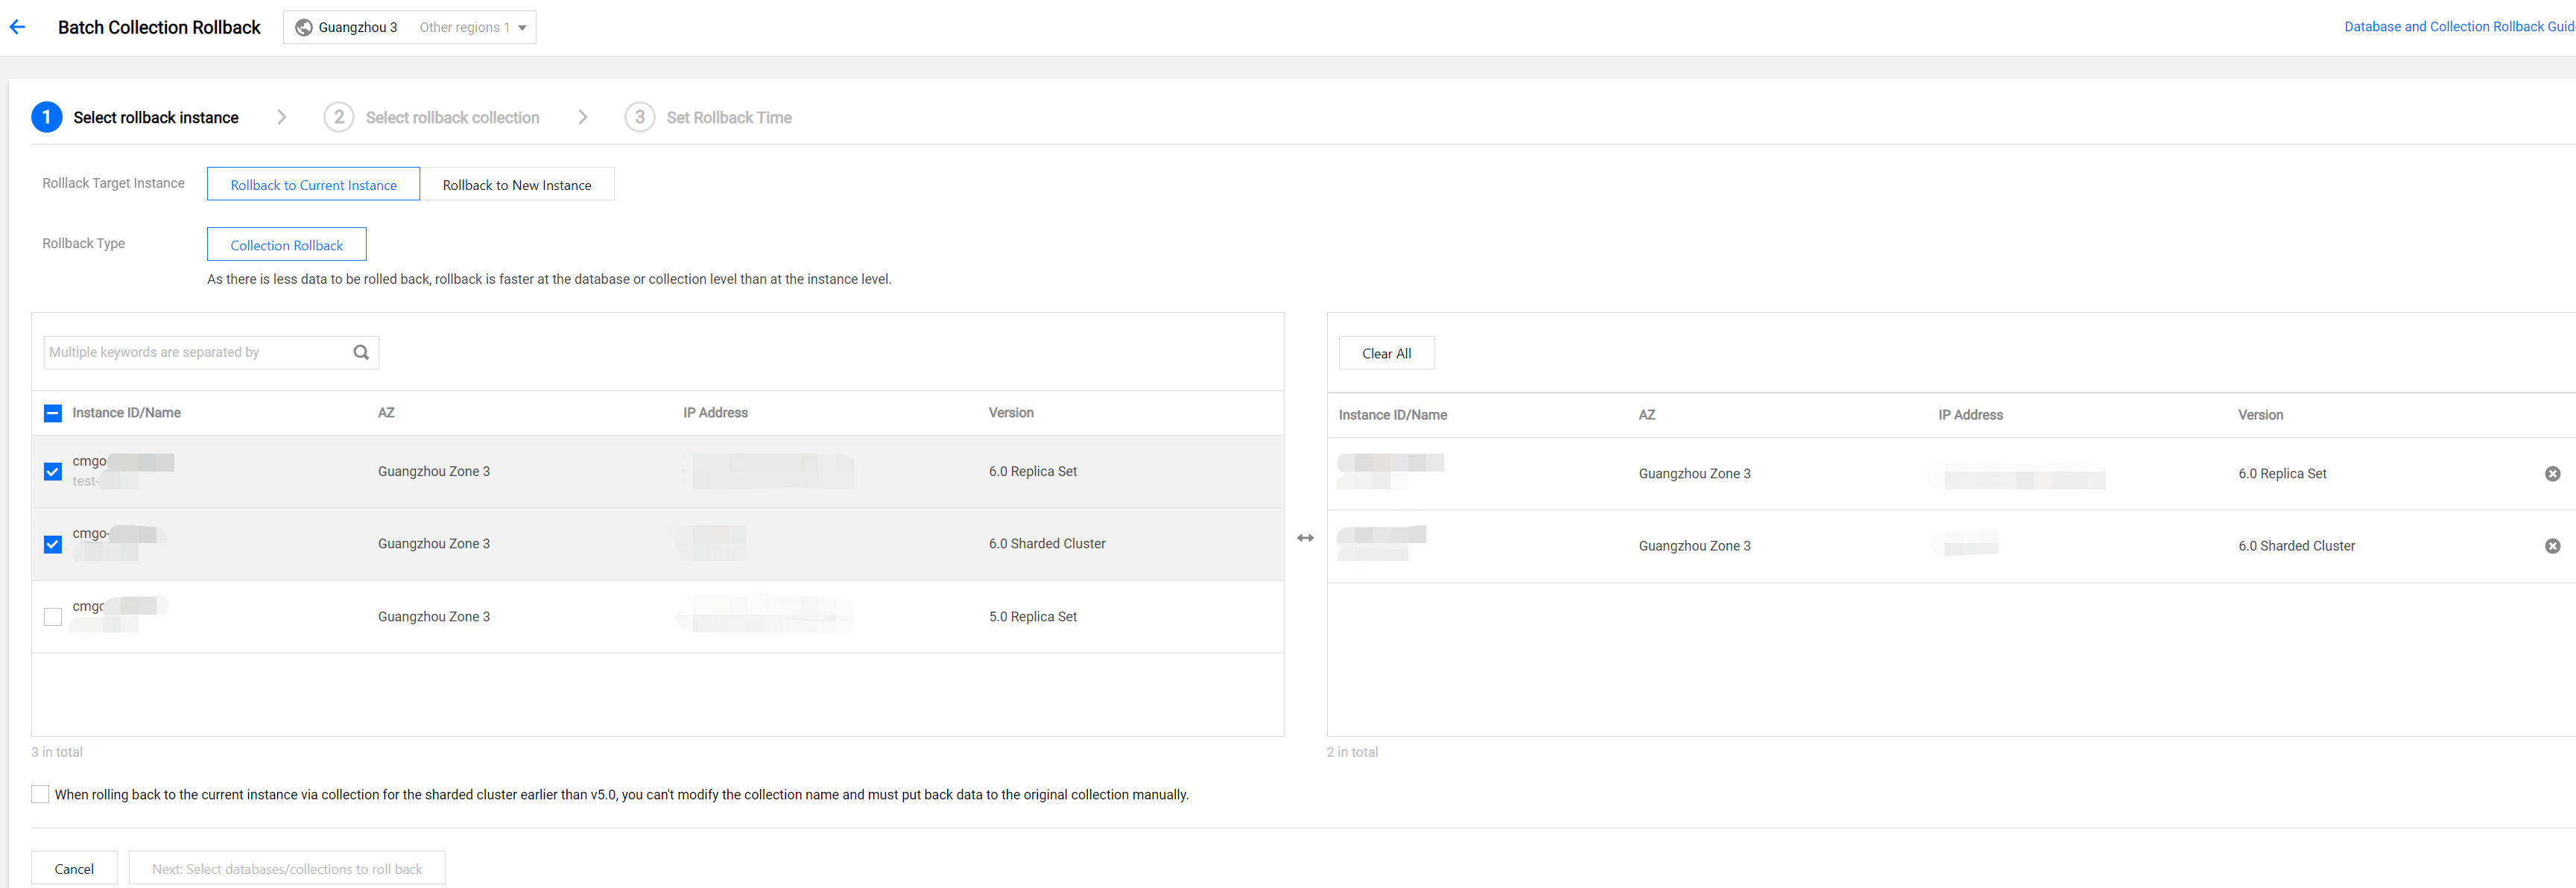
9. In the Batch Collection Rollback configuration wizard, on the Select rollback instance tab, after the Rollback Target Instance, select either Rollback to Current Instance or Rollback to New Instance. Within Rollback Type, select Collection Rollback.
Note:
Rollback to Current Instance eliminates the need to purchase a new instance by restoring databases and tables to the current instance. It supports the selection of multiple instances for batch rollback, allowing for database and table rollback or key-based flashback according to the actual scenario. In the instance list below, check one or more instances to be rolled back (you can search by instance ID, instance name, or IP address in the search box). For detailed operations, see Database and Table Rollback to the Current Instance.
Rollback to New Instance requires the purchase of a new instance and does not affect the source instance. It does not support selecting multiple instances for batch rollback. Depending on the actual scenario, you can choose to perform a database and table rollback, a key-based flashback, or clone an instance. In the instance list below, check only one instance to be rolled back (you can search by instance ID, instance name, or IP address in the search box). For specific operations, see Rolling Back Databases and Tables to a New Instance.
Rolling Back Databases and Tables to Current Instance
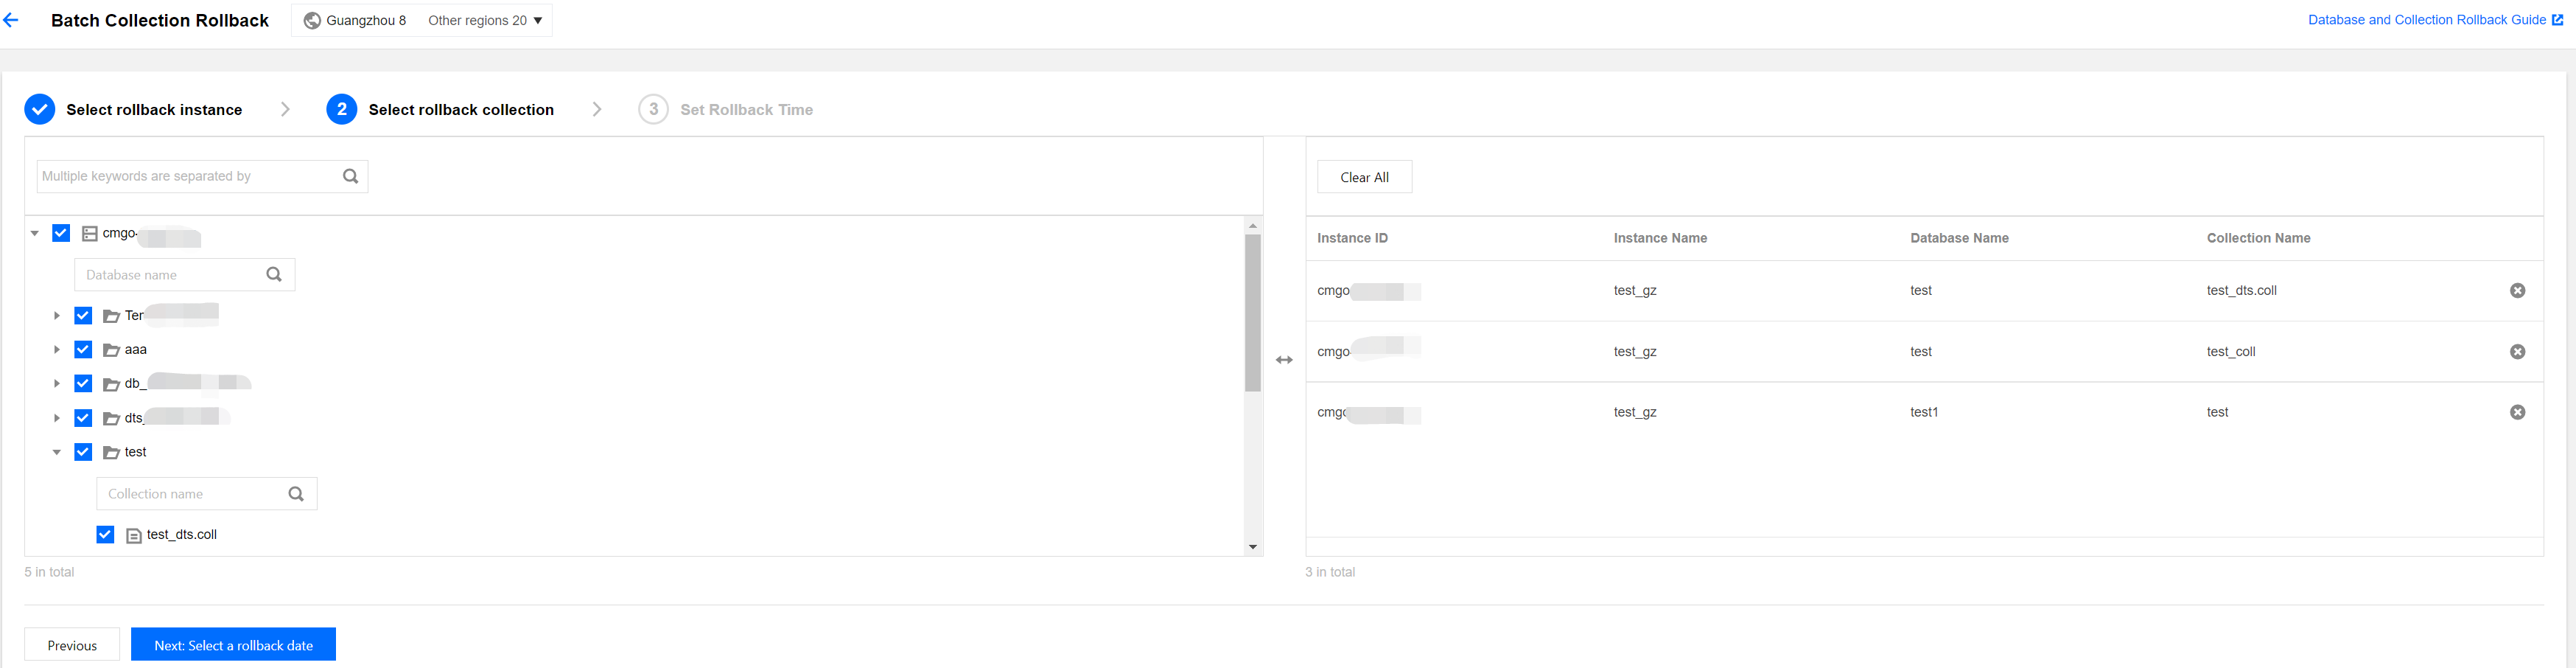
1. Click Next: Select databases/collections to roll back. On the Select rollback collection tab, select the databases and tables to be rolled back. Confirm the database and table information in the right-side box zone. As shown below.
Note:
In the right-side zone, you can confirm and modify the selected databases and tables.
click Clear All to clear the selected databases and tables if the wrong selection is made.
click
to delete the selected databases and tables one by one.
2. Click Next: Select a rollback date. On the Set Rollback Time tab, select the specific time point for the rollback from the time frame following Set Rollback Time. Confirm the instance information and the database and tablesinformation to be pre-rolled back.
Note:
Rollback time only supports selecting data from any time point within the last 7 days before the current time.
Rollback to the current instance does not rollback the original databases and tables directly but creates a new backup file. For instance, if the source database or table is test, a new database or table test_bak will be created. As shown below, Rollback Collection Name are the names of the newly created databases and tables.
After the rollback task is completed, you can batch modify database and table names as needed.
In versions of TencentDB for MongoDB below 5.0, sharded clusters rolling back to the current instance cannot modify database and table names. Data must be manually replaced back into the original databases and tables.
To prevent accidental deletion of production databases and tables, if the oplog for rollback contains a drop database or drop collection operation, the rollback task will be terminated.
3. Click Roll Back. Return to Rollback Task tab of the Batch Collection Rollback. You can see ongoing rollback tasks. Click the Operation column's Task Details to view the detailed information of the task. Wait until the task is completed. Then you can connect to the instance to confirm the correctness of the rolled-back data.
4. (Optional) Select the Batch Modify Collection Names tab under Batch Collection Rollback. Find the completed rollback task. In its Operation column, click Batch Modify Collection Names to view information about the databases and tables to be modified on the right zone. The information includes original database and table names, new original database and table names, rollback database and table names, and new rollback database and table names.
Click
to download information of the databases and tables to be modified. Then you may view locally.
Confirm the changes. Click Batch Modify Collection Names at the bottom left to complete the modifications.
Note:
Batch Rename Databases and Tables can only modify all databases and tables under a single instance of a single rollback task. If a user initiates a batch rollback task and rolls back databases and tables of multiple instances, the database and table names need to be modified one by one. For specific operations, see Batch Rollback.
Batch Rename Databases and Tables includes changing the original database and table names and rollback database and table names.
For original databases and tables, the mark _ori is added to their original names.
For rollback databases and tables, change the rollback database and table names to the original ones.
Rolling Back Databases and Tables to a New Instance
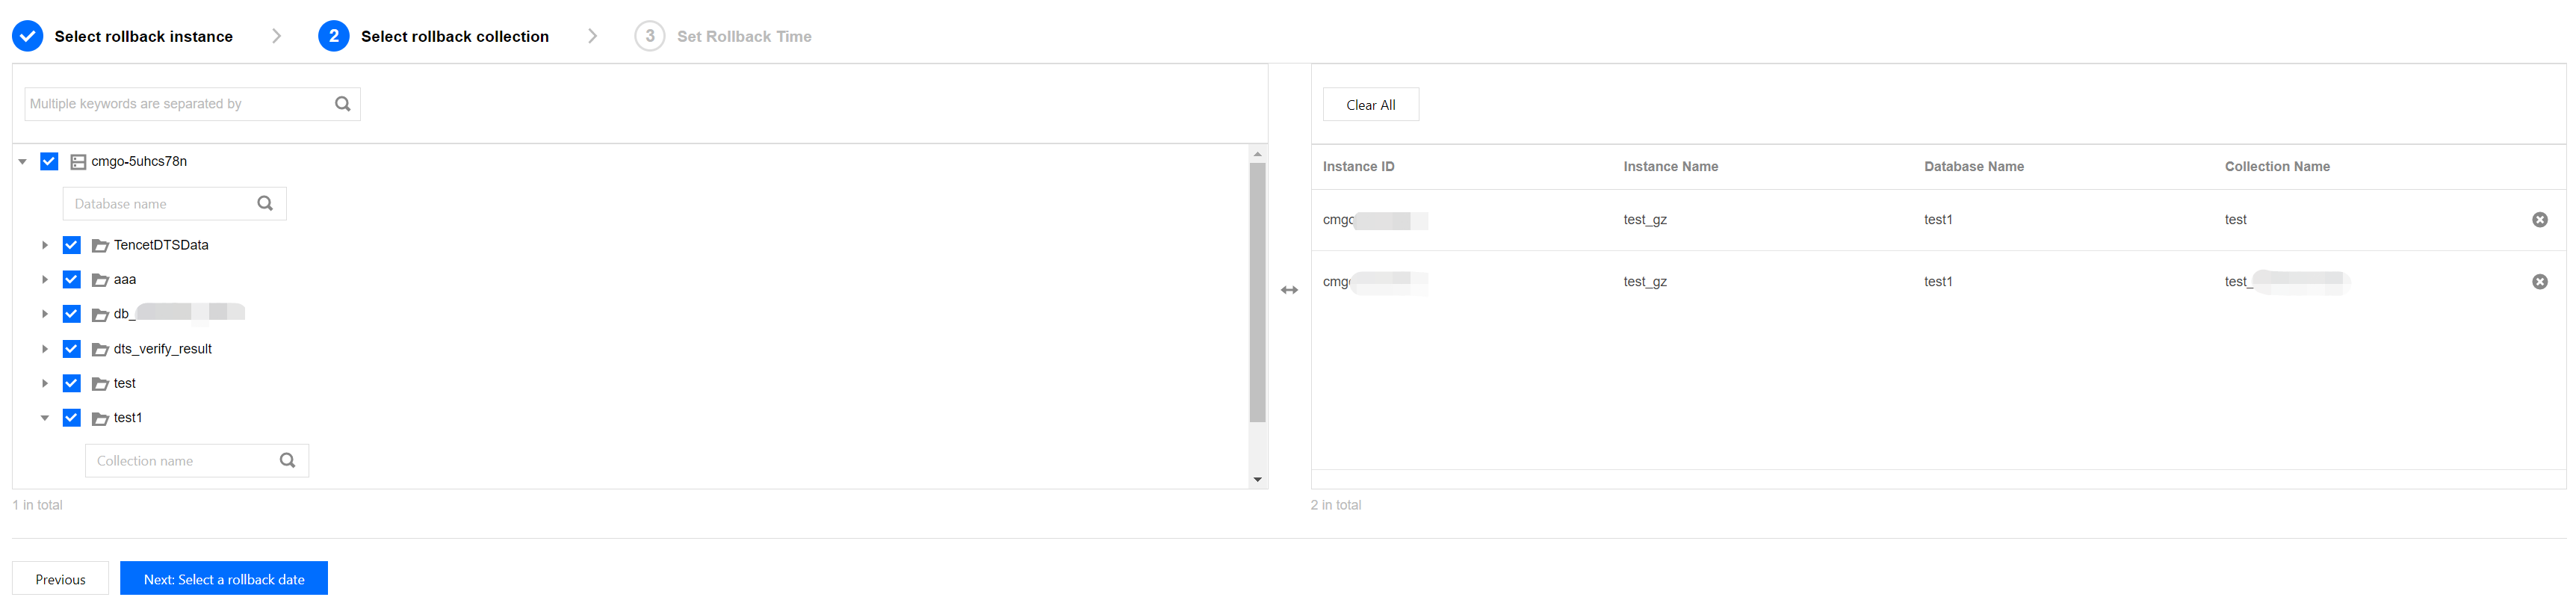
1. Click Next: Select rollback collection. On the Select rollback collection tab, choose the databases and tables of the source instance to be rolled back. In the search box, you can search for the databases and tables to be rolled back based on the database and table names. And in the right box zone, you can view the selected database and table information. As shown below. In the right box zone, you can manage the selected databases and tables.
Click Clear All to clear the selected databases and tables if the wrong selection is made.
Click
to delete the selected database and table one by one.
2. Click Next: Select a rollback date. In the Set Rollback Time tab, select the specific time point for the rollback from the time frame provided under Set Rollback Time. Confirm the instance information and the database and table information to be pre-rolled back.
3. Click Purchase and Configure a Cloned Instance. Enter the Clone TencentDB for MongoDB Instance page and select the billing mode, configuration specifications, etc., for the new instance. For more information, see Create MongoDB Instance.
4. Confirm the cost, and click Buy Now.
5. Return to the instance list page. Once the instance has been created, the source instance's databases and tables have been synchronized to the newly purchased clone instance. Then you can connect to the new instance to confirm the correctness of the rollback data.