This document will guide you on how to push logs to a specified service.
Step 1: Select the log source
1. Log in to the EdgeOne console and click Site List in the left sidebar. In the site list, click the target site to enter the site details page.
2. On the site details page, click Log Service > Real-time logs.
3. On the real-time log page, click Create shipping Task.
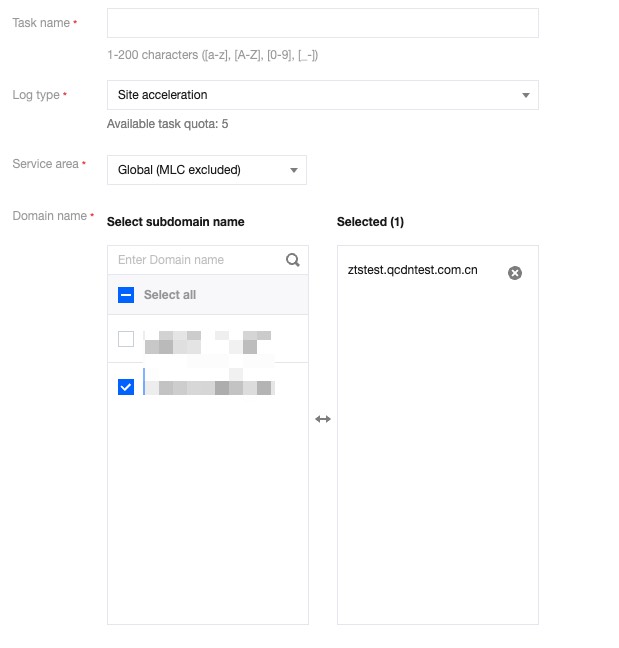
4. On the Select Log Source page, choose the log source information you want to push, configure the related parameters, and click Next.
Log Type: You can choose from site acceleration log, L4 proxy log, rate limiting log, CC attack defense log, Web attack defense log, custom rule log, and Bot management log;
Service Area: Select the log area you want to push. EdgeOne real-time log push tasks can push logs from the "Chinese mainland" or the "Global(MLC excluded)", but cannot directly push logs from the "Global". If you need to push logs from the "Global", please create two push tasks, one for the "Chinese mainland" and another for the "Global(MLC excluded)".
Domain: Select the subdomain or L4 instance for which you want to push logs. The same log does not support multiple push tasks, i.e., logs from subdomains/L4 proxy instances in the same region can only support one push task. For example, if the "Chinese mainland" site acceleration log of www.example.com has been configured with push task A, push task B cannot select www.example.com.
Step 2: Select log fields
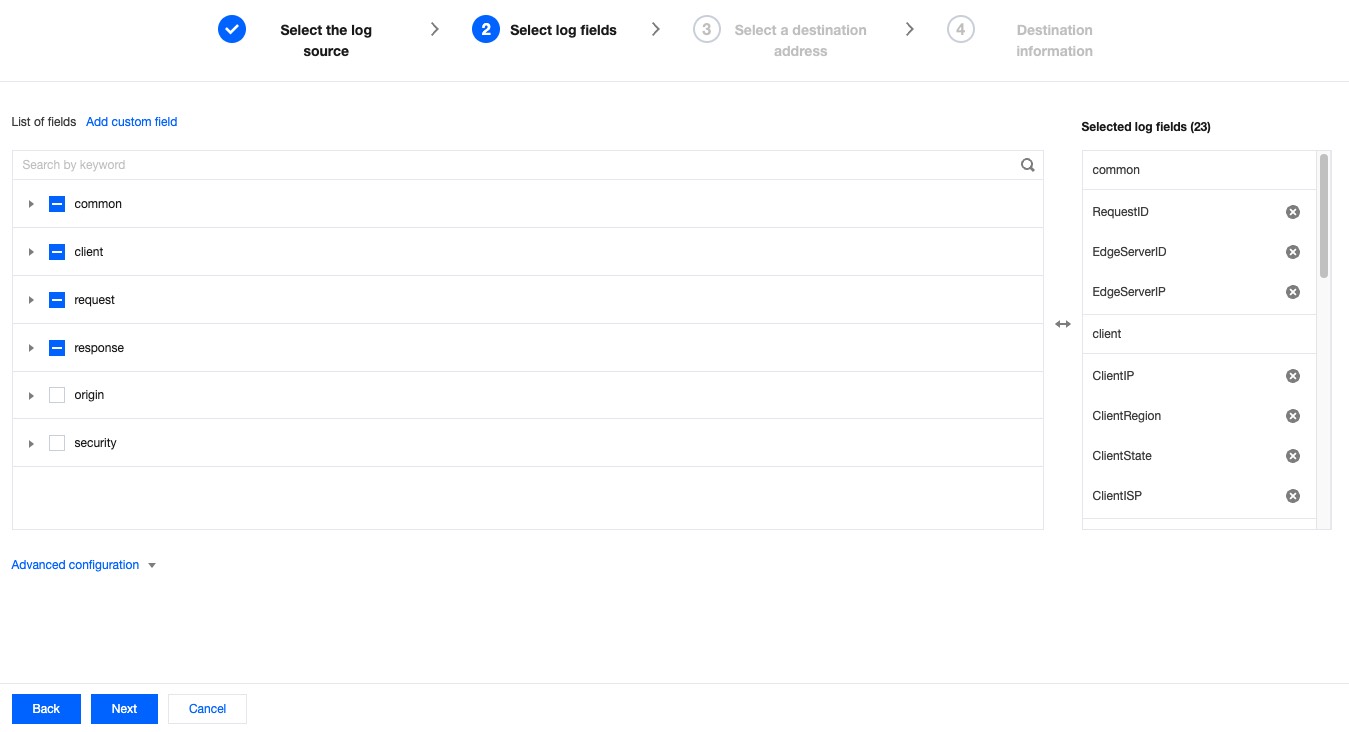
1. In the Select Log Fields section, configure the fields you want to push. You can select them by checking the boxes in the field list; for a description of the related fields, please refer to the real-time log field description.
Note:
Currently, only site acceleration logs and L4 proxy logs support custom selection of logs to be pushed.
2. (Optional) If you need to push certain elements from the HTTP request header, HTTP response header, or Cookie for analysis, you can click Add Custom Field to configure the HTTP request header, HTTP response header, or Cookie name you want to push. You can record this information accurately in the log in key-value pair format. For example, the information corresponding to the Accept-Language header can be directly obtained from the Accept-Language field in the log.
Note:
1. Fields are case-sensitive by default, so they need to match the original fields exactly;
2. Currently, only site acceleration logs support adding custom fields.
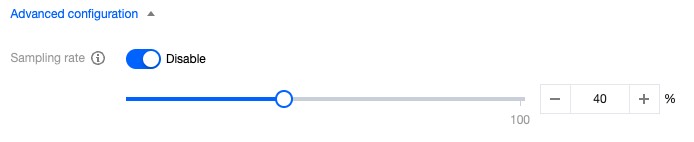
3. (Optional) If you have a large volume of logs and only need to monitor and analyze the real-time log push data without requiring all log data, you can click Advanced Configuration to configure the sampling ratio to reduce the number of logs pushed. After configuration, EdgeOne will randomly extract logs according to the set percentage and push them to your specified destination.
4. After configuring the log fields, click Next Step to proceed to Step 3.
Step 3: Select the push destination
You can choose to push real-time logs to Tencent Cloud CLS, S3 compatible bucket, or a specified HTTP server according to your needs. Follow the steps below for configuration:
Ship to Tencent Cloud CLS
Ship to S3 compatible
Ship to specified HTTP server
If you have not yet built your own data analysis system, Tencent Cloud provides Log Service (CLS) to help you complete the collection, shipping, and search analysis of real-time logs in a one-stop manner, reducing your development and maintenance costs. You can follow the steps below to ship real-time logs to Tencent Cloud CLS service:
Prerequisites
You have already activated Cloud Log Service (CLS) and granted permission to Tencent Cloud EdgeOne to create a logset.
2. It is suggested to enable the service with the root admin account. If it is a sub-account or collaborator, you need to grant them the relevant permissions.
Directions
Create a shipping task
1. In Step ③, select the destination as Tencent Cloud Log Service (CLS) and click Next.
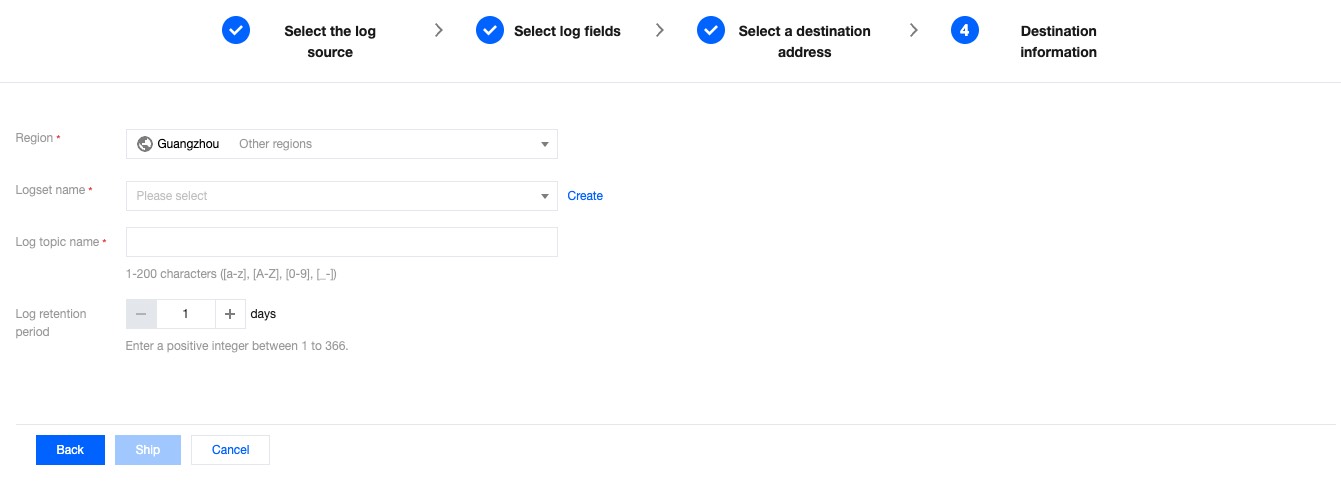
2. Fill in the relevant parameter information, the parameter explanation is as follows:
Region: Select the target region for shipping.
Target set name: Select the logset in the target region.
Note:
If this is empty or you need to create a new logset, click Create to create a logset in the selected region.
Log topic name: You can enter 1-200 characters, allowed characters are a-z, A-Z, 0-9, _, -.
Log retention time: Please enter a positive integer between 1 and 366.
Related references
Log search
Log search supports various types of search analysis methods and chart analysis forms. For detailed explanations, please refer to Log Search.
EdgeOne performs log search based on shipping tasks. On the Real-time logs page, select the shipping task you want to search, and click Search to enter the log search page.
You can later manage logsets and other modules through Tencent Cloud Log Service (CLS), such as modifying the logset name.
Logset
A logset (Logset) is a project management unit of Tencent Cloud Log Service (CLS), used to distinguish logs of different projects, and a logset corresponds to a collection. Tencent Cloud EdgeOne logset has the following basic attribute information:
Log retention time: The retention period of data in the current logset.
Creation time: Logset creation time.
Log topic
A log topic (Topic) is a basic management unit of Tencent Cloud Log Service (CLS). A logset can contain multiple log topics. A log topic corresponds to a type of application or service, and it is recommended to collect the same type of logs from different machines into the same log topic. For example, a business project has three types of logs: operation logs, application logs, and access logs, and each type can create a corresponding log topic.
The log service system manages different log data of users based on log topics, and each log topic can be configured with different data sources, different index rules, and delivery rules. Therefore, the log topic is the basic unit for configuring and managing log data in the log service. After creating a log topic, you need to configure the relevant rules to effectively collect logs and use search analysis and delivery functions as scheduled.
From a functional perspective, log topics mainly provide:
Collect logs to log topics.
Store and manage logs in units of log topics.
Search and analyze logs in units of log topics.
Deliver logs from log topics to other platforms.
Download and consume logs from log topics.
Note
The above information is excerpted from the Cloud Log Service (CLS) product documentation. Please refer to the explanations on the Log Service (CLS) side.
Each real-time log shipping task shipped to Tencent Cloud Log Service (CLS) will ship the logs of the selected subdomains to a corresponding log topic.
If you currently have your own built-in data source and need to ship real-time logs to a compatible Amazon Simple Storage Service bucket, you can refer to the following steps to continue the operation:
Note:
Currently, only support shipping site acceleration logs and L4 proxy logs to compatible Amazon S3 Storage Service buckets.
1. In Step ③, Select the destination as S3 compatible and click next.
2. Fill in the corresponding destination parameters:
Endpoint URL: URL that does not contain the bucket name or path, such as: https://storage.googleapis.com, https://s3.ap-northeast-2.amazonaws.com.
Bucket Region: The region where the bucket is located, such as: ap-northeast-2.
Bucket: The bucket name and the corresponding log storage path: for example, your_bucket_name/EO-logs/.
File Compression: Whether to use gzip compression for log files. If checked, the shipped log files will be compressed with gzip, and the file name will be changed to filename.log.gz.
SecretId: Access Key ID used to access the bucket.
2. File name description: Logs will be stored in the specified bucket path in the format of UploadTime_Random.log, and logs will be archived in a folder by date (UTC +00:00), such as:logs/20230331/20230331T185917Z_2aadf5ce.log.
UploadTime: Log file upload time, using ISO-8601 format, UTC+00:00 timezone.
Random: Random characters. In cases where there are large log volumes, there may be multiple log files with the same upload time, and this random character string is used to identify different files.
3. Click Push. After issuing the real-time log shipping task, EdgeOne will ship a test file to the target bucket path to verify connectivity. For instance, a file named 1699874755_edgeone_push_test.txt will be shipped with the fixed string test.
If you currently have a self-built data source, EdgeOne can call the backend interface address you provided by an HTTP POST request, transmitting the logs to your designated server within the HTTP body.
Note:
1. HTTP is plaintext transmission, so it is suggested that you use an encrypted HTTPS address for the API.
2. To further enhance the security verification of request sources, we provide a request authentication scheme. You can fill in the relevant authentication information in the push destination configuration, and the authentication algorithm can be found at:Request Authentication Algorithm.
3. The log shipping format comprises an array of multiple JSON objects, and each JSON object is a log.
Operation Guide
Create a shipping task
1. In Step ③, select the destination as HTTP service (POST) and click Next.
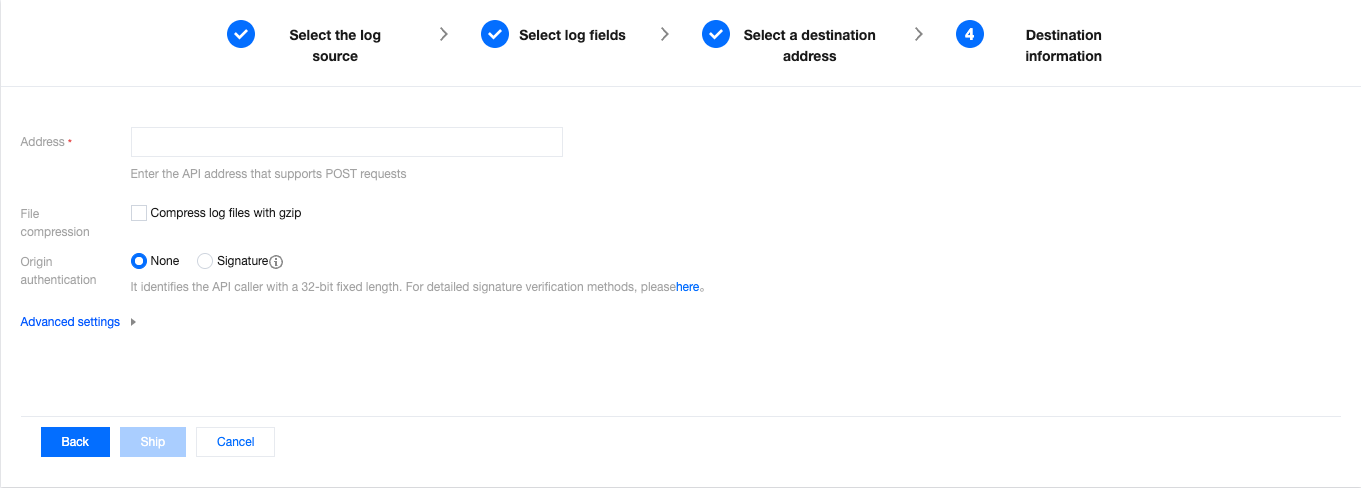
2. Fill in the relevant destination and parameter information, with the following parameter descriptions:
API address: Enter your data source API address, e.g., https://www.example.com/log
File compression: To reduce the size of log files and save traffic costs, you can enable file compression by checking "Compress log files with gzip". EdgeOne will use gzip format to compress logs before transmission and will add an HTTP request header content-encoding = gzip to indicate the compression format.
Origin authentication: When selecting encryption authentication, the shipping logs will carry authentication information for the origin to verify, ensuring the security of the data source identity.
Custom HTTP request headers: Add the HTTP headers that need to be carried when EdgeOne initiates a request. For example, if you need to identify the log source vendor as EdgeOne, you can add a header log-source = EdgeOne to identify the log source.
3. Click "ship" to issue a real-time log shipping task.
4. During the configuration phase of the real-time log shipping task, in order to verify the interface connectivity, an empty data will be sent to the interface address for verification. The data format is as follows:
[{
"BotClassAccountTakeOver": "-",
"BotClassAttacker": "-",
"BotClassMaliciousBot": "-",
"BotClassProxy": "-",
"BotClassScanner": "-",
"ClientDeviceType": "-",
"ClientIP": "-",
"ClientISP": "-",
"ClientRegion": "-",
"ClientState": "-",
"EdgeCacheStatus": "-",
"EdgeEndTime": "-",
"EdgeInternalTime": "-",
"EdgeResponseBodyBytes": "-",
"EdgeResponseBytes": "-",
"EdgeResponseStatusCode": "-",
"EdgeResponseTime": "-",
"EdgeServerID": "-",
"EdgeServerIP": "-",
"EdgeSeverRegion": "-",
"LogTime": "-",
"OriginDNSResponseDuration": "-",
"OriginIP": "-",
"OriginRequestHeaderSendDuration": "-",
"OriginResponseHeaderDuration": "-",
"OriginResponseStatusCode": "-",
"OriginSSLProtocol": "-",
"OriginTCPHandshakeDuration": "-",
"OriginTLSHandshakeDuration": "-",
"ParentRequestID": "-",
"RemotePort": "-",
"RequestBytes": "-",
"RequestHost": "-",
"RequestID": "-",
"RequestMethod": "-",
"RequestProtocol": "-",
"RequestRange": "-",
"RequestReferer": "-",
"RequestSSLProtocol": "-",
"RequestTime": "-",
"RequestUA": "-",
"RequestUrl": "-",
"RequestUrlQueryString": "-"
}]
Related References
Request Authentication Algorithm
If you have selected encryption signature in the origin authentication of the push destination information, you can custom input your custom Configuration SecretId and SecretKey. EdgeOne will add the signature auth_key and access_key in the Request URL. The details of the signature algorithm are as follows:
1. Request URL composition
As shown below, the Request URL will carry auth_key and access_key after the "?".
timestamp: The current time of the request, using a Unix 10-digit second-level timestamp.
rand: random number
access_key: used to identify the identity of the API requester, that is, your custom Configuration SecretID.
SecretKey: fixed Length 32, that is, your custom Configuration SecretKey.
uri: resource identifier, for example: /access_log/post.
md5hash: md5hash = md5sum(string_to_sign), where string_to_sign = "uri-timestamp-rand-SecretKey". The verification string calculated by the md5 algorithm, a mixture of numbers 0-9 and lowercase English letters a-z, fixed Length 32.
2. Calculation example
Assuming the filled in parameters are:
API address: https://www.example.com/access_log/post
SecretID = YourID
SecretKey = YourKey
uri = /access_log/post
timestamp = 1571587200
rand = 0
After the service receives the push request, it extracts the value of auth_key. Split the value of auth_key to obtain timestamp, rand, and md5hash. You can first check whether the timestamp is expired, the suggested expiration time is 300s, and assemble the encryption string based on the above rules. Use SecretKey to assemble the string to be encrypted, and compare the encrypted result with the md5hash value in auth_key. If they are the same, it means the authentication has passed.
3. Server-side authentication request resolution code example
Python
Goland
import hashlib
from flask import Flask, request
app = Flask(__name__)
defget_rsp(msg, result={}, code=0):
return{
"respCode": code,
"respMsg": msg,
"result": result
}
defget_secret_key(access_key):
return"secret_key"
@app.route("/access_log/post", methods=['POST'])
defaccess_log():
if request.method =='POST':
if request.content_type.startswith('application/json'):


 Yes
Yes
 No
No
Was this page helpful?