We plan to end the cross-region dedicated tunnel service of Direct Connect on December 31, 2022 (cross-region dedicated tunnel creation was not supported any more starting from September 2021). To ensure more stable and high-quality network operation of your business, your cross-region dedicated channels will be serviced by Tencent Cloud's Cloud Connect Network (CCN). For more information, see here. This document introduces how to migrate your cross-region dedicated channels to CCN.
Migration Scenario and Solution
According to the region attributes of local IDCs, the scenarios for migrating cross-region dedicated channels to CCN are divided into two types, and the migration scheme varies according to the scenario.
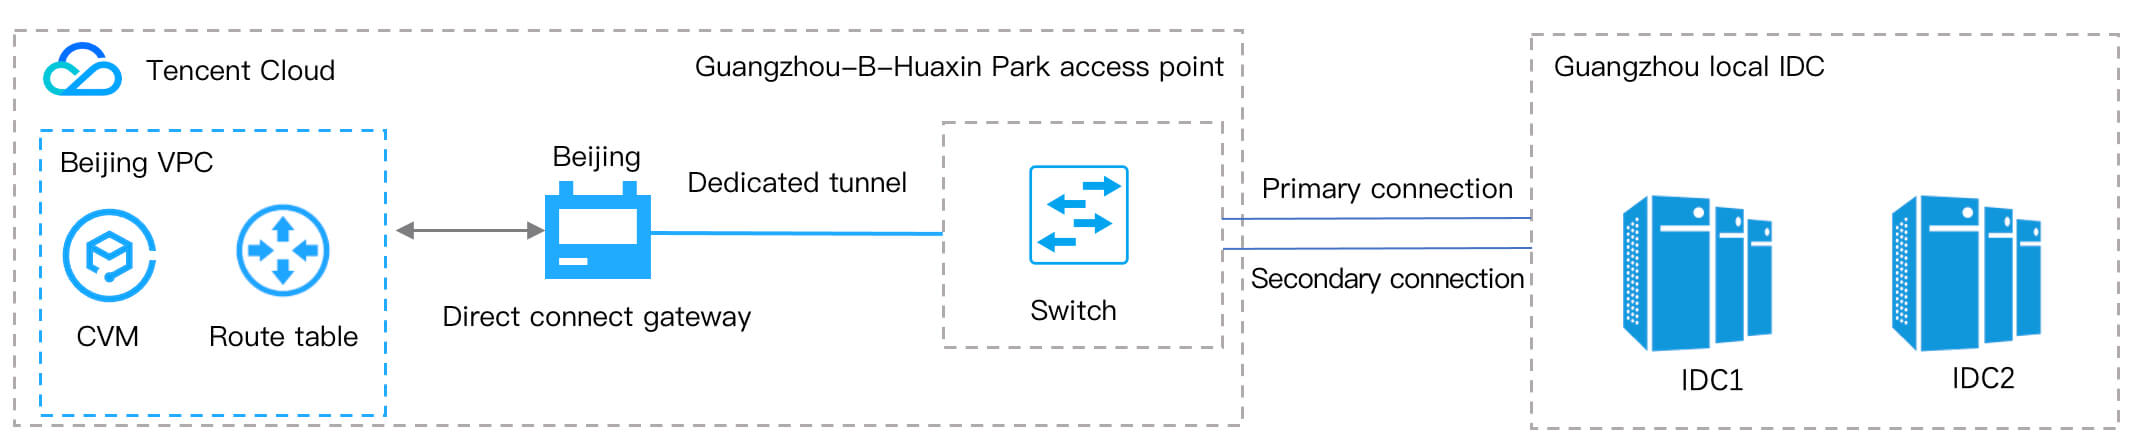
Scenario 1: Local IDCs are deployed in the same region
Local IDCs connect to Tencent Cloud through a single access point
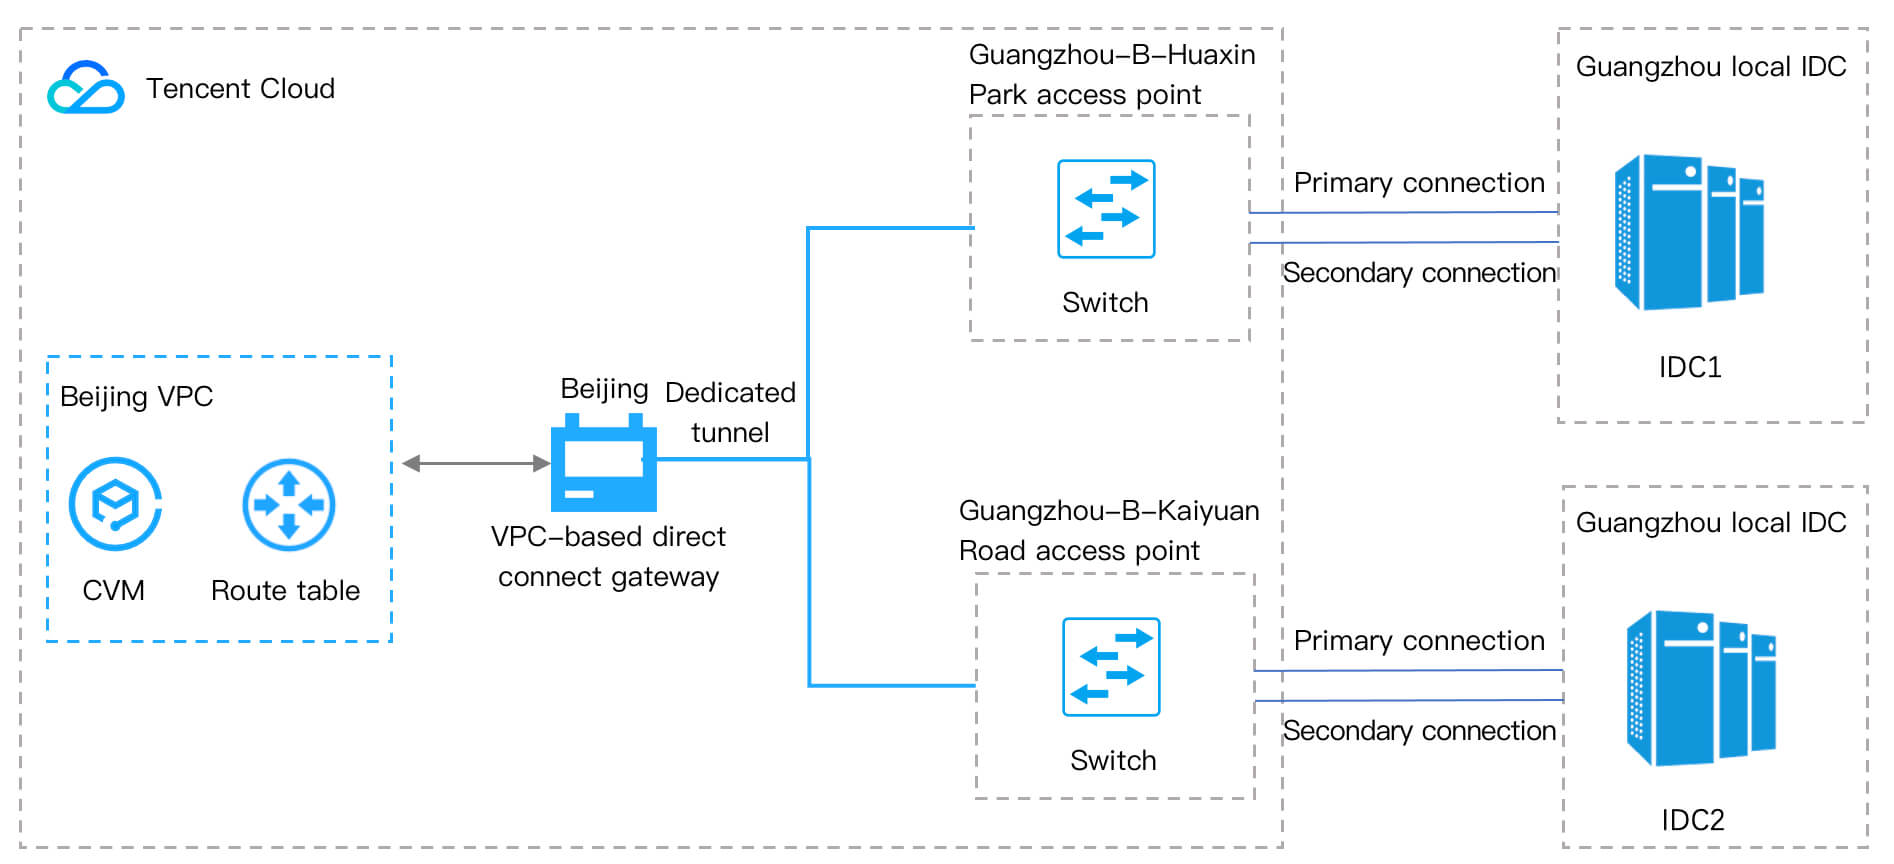
Local IDCs connect to Tencent Cloud through multiple access points
Solution
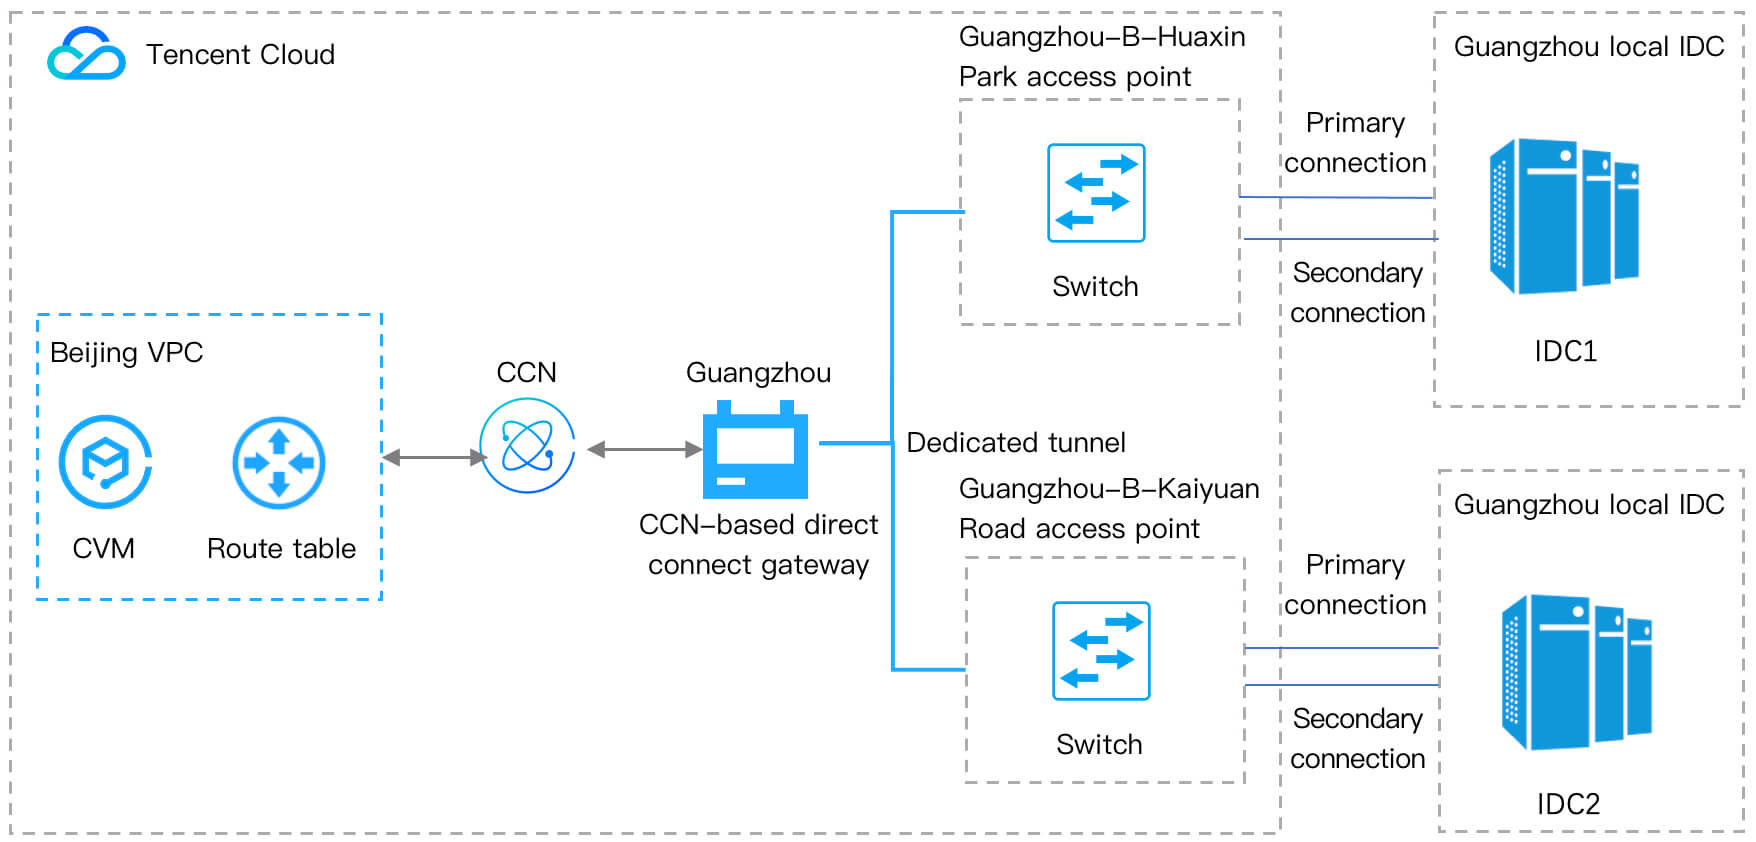
In a scenario where local IDCs are deployed in the same region, you need to create a CCN-based direct connect gateway and dedicated tunnel in the region where the connection access points reside. For more information, see Migration Process.
The switching aims to implement cross-region resource interconnection based on CCN, and the target networking after the switching is as follows.
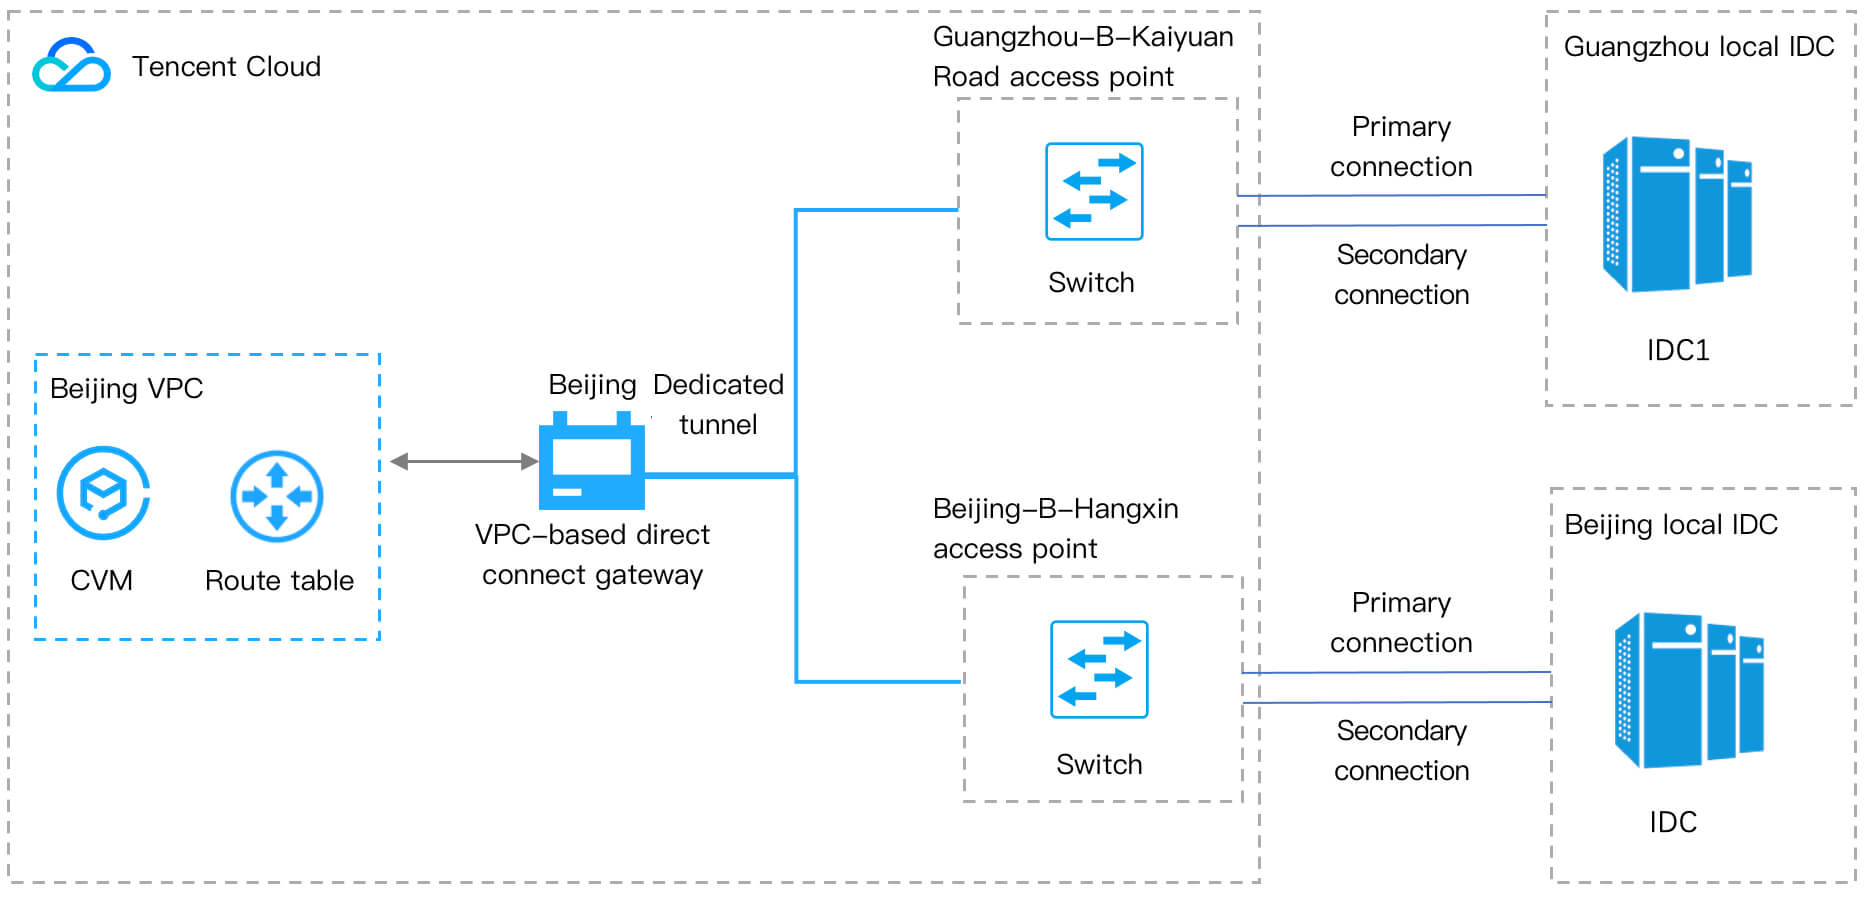
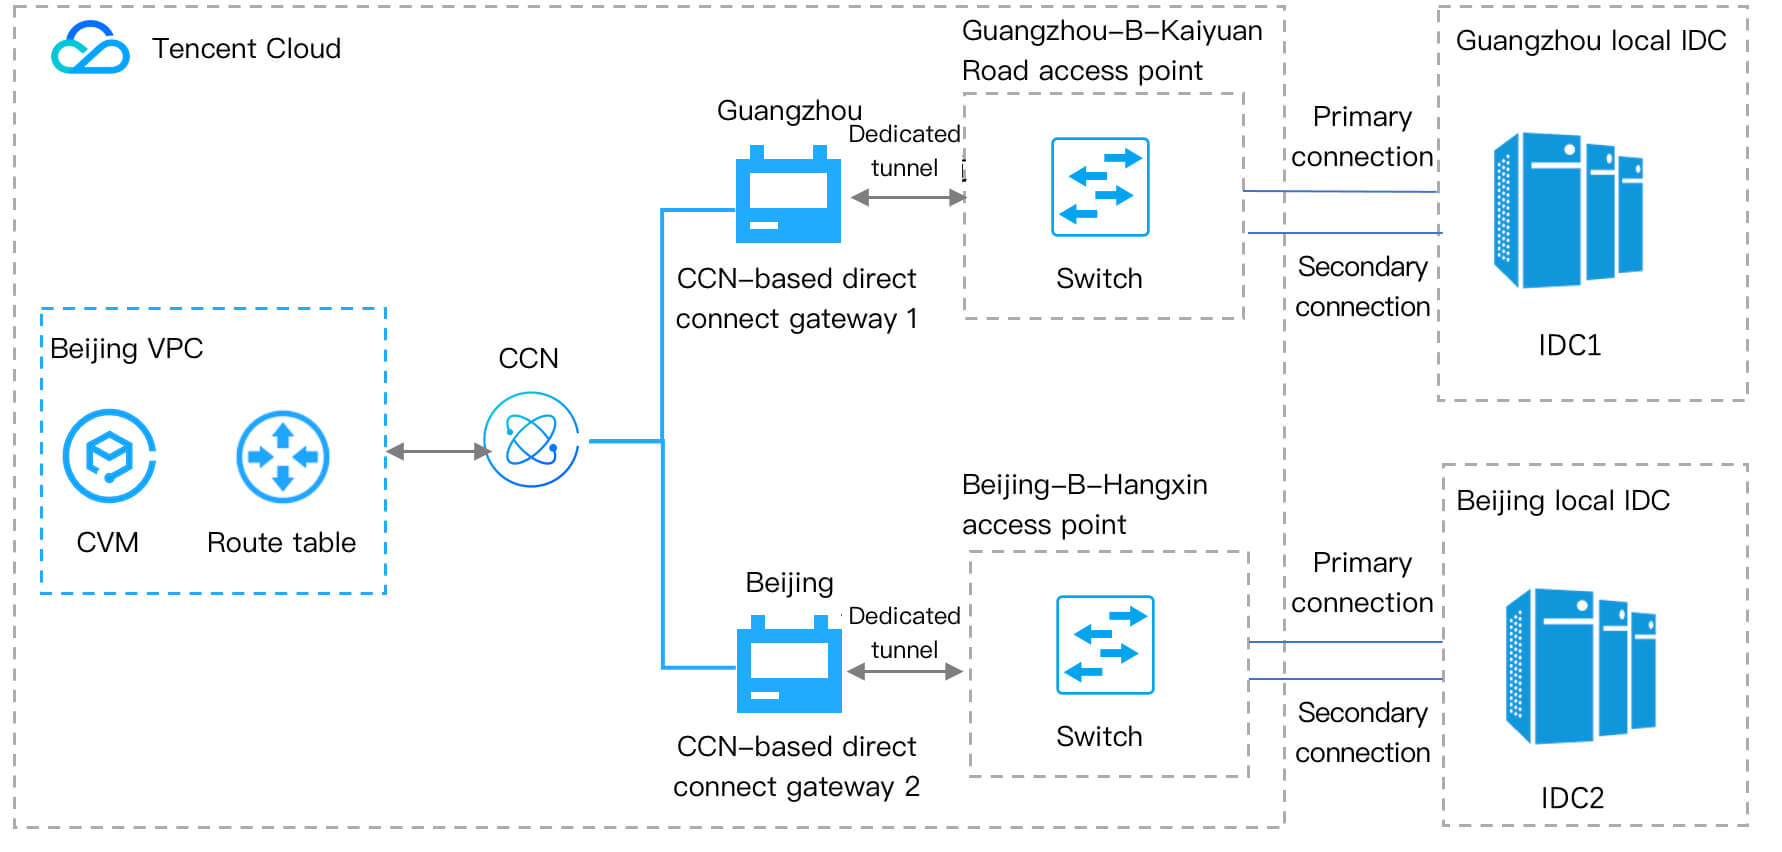
Scenario 2: Local IDCs are deployed in different regions
Solution
In a scenario where local IDCs are deployed in different regions, you need to create a CCN-based direct connect gateway and dedicated tunnel in each of the regions where the connection access points reside. For more information, see Migration Process.
The switching aims to implement cross-region resource interconnection based on CCN, and the target networking after the switching is as follows.
Migration Process
1. Preparations
1.1 Perform a high-availability (HA) drill: Before migrating cross-region dedicated tunnels to CCN, you are advised to perform an HA drill to ensure the HA of your business.
1.2 View the VPC route table configuration: View and note down the route table configuration, such as the VPC region and next hop, of the VPC where your current cross-region dedicated tunnel resides.
1.3 View the dedicated tunnel configuration: View and note down your current cross-region dedicated tunnel configuration, such as the dedicated tunnel ID, network region, peer IPs, and BGP ASN.
2.2 Create CCN dedicated tunnels: After creating CCN-based direct connect gateways, you need to create corresponding CCN dedicated tunnels to connect the access points and gateways.
On the Direct Connect side, check whether the basic configuration of the Direct Connect resources created in Resource creation. For example, check the connectivity of dedicated tunnels, BFD parameter settings, and whether direct connect gateways can obtain IDC routes.
4. Traffic migration
Note:
This step is to migrate your real traffic to CCN, and your business will be interrupted for a short time. We recommend performing the migration during off-peak hours. If you have any questions, submit a ticket.
After your business runs stably for about a week, delete the legacy direct connect gateway and dedicated tunnel.
Notes
If your current cross-region dedicated tunnel meets any of the following cases, submit a ticket before migration:
Your business is using a NAT direct connect gateway.
The BGP/BFD multi-hop feature is enabled for the dedicated tunnel.
The BGP route quota (100 routes by default) has been adjusted for the dedicated tunnel.
The static route quota (20 routes by default) has been adjusted for the dedicated tunnel.
Local Preference has been adjusted for the dedicated tunnel.
The direct route redistribution feature is enabled for the dedicated tunnel (if this feature is enabled, you can directly access IPs over the dedicated tunnel from a VPC).
Other special networking scenarios or requirements.
Migration Example
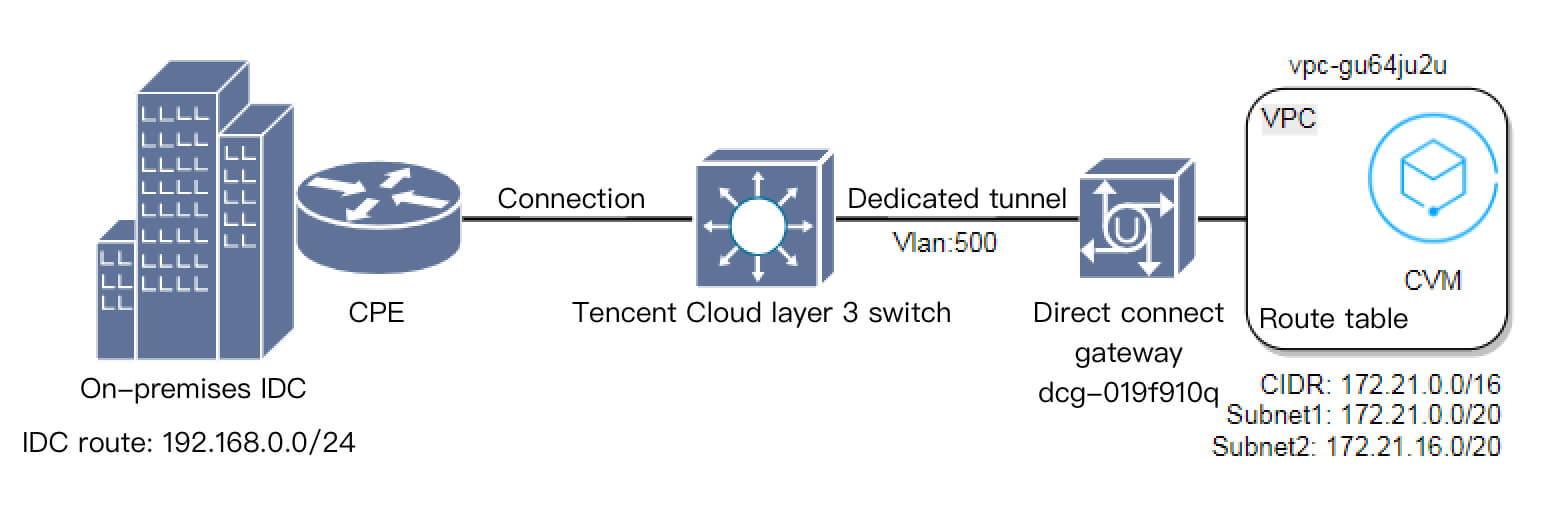
This example shows how to migrate business from a local IDC to the cloud by using a connection. The topology is as follows:
Preparations
1.
(Optional) Perform a HA drill.
To ensure business availability and rollback capability during switchover, you are advised to perform a fault redundancy drill before the switchover. That is, perform a primary/secondary connection and loaded line switchover to ensure business availability. Perform subsequent cutover operations after the drill is completed.
3.2 Click Exclusive virtual interface in the left sidebar, and click the dedicated tunnel ID to enter the dedicated tunnel details page.
4. Click the Advanced Configuration tab to view the advanced configuration of the dedicated tunnel.
Based on the preceding information, VPC traffic destined for 192.168.0.0/24 will be routed to the direct connect gateway dcg-019f9l0q based on the VPC route table policy.
2. In the upper-left corner of the Direct Connect Gateway page, select the region where the connection access point resides.
3. Click + New, enter the direct connect gateway name, and set Associate Network to CCN. This document uses "dcg-dx8kvqto" as an example. Note that CCN-based direct connect gateways currently do not support the NAT type. For more information, contact your Tencent Cloud rep or submit a ticket for consultation.
4. Click OK.
Note:
The CCN-based direct connect gateway and the connection access point must be in the same region.
2. Choose Exclusive virtual interface in the left sidebar and click + New.
3. On the Basic configuration page, set parameters as needed. This document uses "test" as an example.
Note:
Connections: Use the original connection whose ID is dc-dqggvxad.
Access Network: Select CCN.
Direct Connect Gateway: Select the CCN-based direct connect gateway "dcg-dx8kvqto" created in step 1.
4. Click Next. On the Advanced configuration page displayed, enter the VLAN ID. This document uses "501" as an example.
Note:
1. VLAN ID must be the new ID.
2. Cloud peer IP1/IP2 and CPE peer IP must be new interconnection IPs.
5. Click Next, configure the IDC device, and click Submit.
Step 3. Publish IDC IP ranges to CCN
1. Log in to the Direct Connect Gateway console. Click the ID of the direct connect gateway created in Step 1 to enter the details page of the direct connect gateway instance. Click the Publish IP Range tab and click Create.
2. On the page displayed, enter the IDC IP range and click Save. This document uses "192.168.0.0/24" as an example.
3. After successful saving, you can view the newly added IDC IP range.
Note:
1. You can use either the custom mode (formerly named "Static") to add an IDC IP range or the auto-propagation mode (formerly named "Dynamic") to publish an IDC IP range.
2. If you use the auto-propagation mode to dynamically report routes, the report delay is about one minute during the convergence process.
3. To use the auto-propagation mode to sync IDC routes, submit a ticket.
Step 4. Create a CCN instance
1. Log in to the CCN console, click + New, set parameters as needed, and click OK. This document uses "ccn-msg8kju5" and "vpc-gu64ju2u" as examples.
2. After the CCN instance is created, click the CCN instance ID on the CCN list page to enter the CCN instance details page. This document uses "ccn-msg8kju5" as an example.
3. On the CCN instance details page, click the bandwidth management tab and purchase cross-MLC-border bandwidth traffic.
4. Click Route Table.
Note:
For traditional dedicated tunnels, VPCs publish CIDR blocks to IDCs but publish VPC subnets to CCN instances.
Resource availability verification
After resource creation, you need to verify the basic configuration and business availability on the Direct Connect side.
1. Verify the dedicated tunnel connectivity.
On the customer-premises equipment (CPE), check whether the BGP neighbor adjacency is established successfully.
2. Verify the BFD parameter settings.
On the CPE, check whether the BFD session is created and whether parameters are correctly set.
3. Verify whether the direct connect gateway receives route entries from IDCs properly.
On the direct connect gateway details page, check whether IDC routes to the cloud are correctly synced to the direct connect gateway.
2. Click the test CCN instance ("ccn-msg8kju5" in this example) to enter the instance details page. Click the Associated Instances tab, click Add an instance, and set parameters as needed. This document uses "Direct Connect Gateway", "Beijing", and "dcg-dx8kvqto" as examples.
3. Click OK. The instance whose ID is dcg-dx8kvqto is successfully associated with the CCN instance.
4. Click Route Table. The route table of the CCN instance is as follows.
Note:
1. If the dedicated tunnel uses the static routing mode, and you want to switch IDC-to-VPC traffic to a CCN dedicated tunnel path, you only need to direct CPE routes to the new sub-interface CCN dedicated tunnel.
2. If the dedicated tunnel uses the BGP routing mode, there are two cases if you switch to CCN:
2.1 If the direct connect gateway was created after September 15, 2020, the CCN instance sends a VPC CIDR block to the direct connect gateway, and the original cloud tunnel also sends a VPC CIDR block to the IDC, the local router obtains the VPC CIDR block based on the BGP protocol. You need to manually enable or disable the VPC or direct connect gateway route in the CCN instance to control the IDC-to-VPC traffic path. For more information, see Direct Connect Gateway Overview.
2.2 If the direct connect gateway is created before September 15, 2020, the CCN instance sends a subnet CIDR block to the direct connect gateway, and the local router obtains the subnet CIDR block based on the BGP protocol. The original cloud tunnel sends a VPC CIDR block to the IDC, and the local router obtains the VPC CIDR block based on the BGP protocol. According to the rule where the route with the longest mask will be matched, IDC-to-VPC traffic will be automatically switched to the CCN instance. For more information, see Direct Connect Gateway Overview.
Switch the VPC-to-IDC traffic path
1. Click the route table whose ID is rtb-2kanpxjb and view the VPC route table policy changes. The VPC can automatically sync the CCN route table, and equivalent routes added later are disabled by default. The original dedicated tunnel is still used as the VPC-to-IDC traffic path.
2. Disable the routing policy of the original direct connect gateway and enable the routing policy where the next hop is CCN.Now, the VPC-to-IDC traffic path is switched to the CCN dedicated tunnel.
Note:
When changing the routing policy, the VPC-to-IDC traffic is interrupted. To ensure business security, you need to perform the operation in a time window where the business can be interrupted.
To perform a smooth switchover, perform the steps below:
2.1 Split the IDC route into two detailed routes: In this example, split 192.168.0.0/24 into 192.168.0.0/25 and 192.168.0.128/25.
2.2 Add the two detailed routing policies to the VPC route table.
2.3 The VPC-to-IDC traffic will choose the 25-bit mask detailed routing policy. Now, the routing policy where the next hop of the destination IP range 192.168.0.0/24 is the direct connect gateway is invalid, and you can disable or delete the routing policy.
2.4 Enable the routing policy where the next hop is the CCN IP range 192.168.0.0/24 in the VPC route table. Then, the VPC-to-IDC traffic still chooses the detailed route routing policy of the original direct connect gateway.
2.5 Disable or delete the routing policies of the detailed routes one by one. Then the VPC-to-IDC traffic will be switched to the CCN tunnel accordingly.
HA drill after migration
After the preceding steps, the cross-region dedicated tunnel business is completely switched over to the CCN instance. After observing the business for a period of time, you can perform a fault redundancy drill to ensure HA of the primary/secondary connections and loaded connections.
Deletion of legacy resources
After the HA test, observe the business for about one week. If the network is stable, delete the legacy dedicated tunnel and direct connect gateway resources.