tencent cloud

文档反馈

How to integrate Tencent IM with Salesforce

最后更新时间:2024-02-07 17:30:51

    Introduction

    This tutorial aims to demonstrate an approach to integrate the Tencent Cloud IM SDK into Salesforce's workflow to leverage the communication between a Salesforce agent and an end user.

    Preliminary

    1. Sign up for Tencent Cloud, register IM service and create an app, see guidence.
    2. Sign up for a Salesforce developer account in case you don't have, click here.

    Road Map

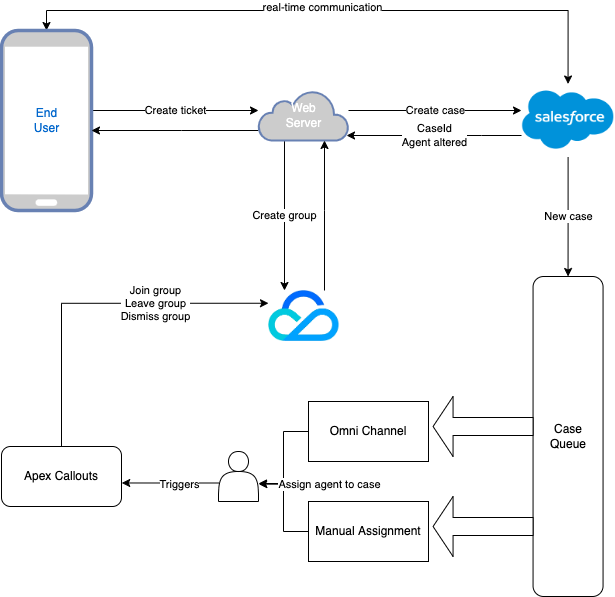
    Three parts are essential to achieve the goal.
    1. An end user application for end user to start an conversation.
    2. An online server for creating a Salesforce case and creating an Tencent Cloud IM chat group. Also provide APIs for invite/delete Salesforce Agent to the group and dismiss the group when case is closed.
    3. An custom Salesforce utilities component for in-Salesforce communication.
    Here's the integration map:


    End User Application

    Tencent Cloud IM provides a variety of SDKs for the most popular platforms, and you can simply choose the one for your platform, check out our SDKs here: Android, iOS, Web, Flutter, Windows, Unity, Unreal Engine. The recommended way to build your application from scratch is to utilize our TUIKit to layer up the interface, see here: Android, iOS, Web, Flutter.

    Online Server Relay

    In here, we will guide you step by step to create a web server to allow an end user to submit a Salesforce case and create an Tencent Cloud IM chat group, also allow Salesforce agents to be invited/removed from Tencent Cloud IM chat group and also delete the group when case is closed.

    Agent Chat Interface

    This tutorial will give you the instructions to create an chat interface in Salesforce and invite agent into the Tencent Cloud IM chat group. Also, you can use our Web UIKit to build this plug-in widget.

    Step 1. Create an online server

    The online server is for the purpose to connect Salesforce and Tencent Cloud IM, and enables the end user to create a Salesforce case and create an corresponding Tencent Cloud IM chat group. The example Node server is shown below:
    const express = require("express")
    const axios = require("axios")
    var TLSSigAPIv2 = require("tls-sig-api-v2") // Generate UserSig for Tencent Cloud IM
    const sf = require("node-salesforce") // Salesforce API Connection Library for Node.js Applications
    
    const YOUR_SDKAPPID = 1400000000
    const YOUR_SECRET = ""
    const ADMIN_USERID = ""
    
    const app = express()
    app.use(express.json())
    
    const port = process.env.PORT || 3000
    
    app.use(express.json())
    
    app.use(function (req, res, next) {
    res.header("Access-Control-Allow-Origin", "https://YOUR_DOMAIN")
    res.header("Access-Control-Allow-Headers", "*")
    next()
    })
    
    // End user calls /createticket to create a Salesforce case and a Tencent Cloud IM chat group. Waiting for a Salesforce agent joining to the group.
    app.post("/createticket", async (req, res) => {
    const { userId, caseInfo } = req.body
    if (!userId) return res.status(500).send("Missing userId")
    
    const auth = await getSalesforceAccessToken()
    if (auth.error) return res.status(500).send("Salesforce auth error")
    
    const salesforceCase = await createCase(auth.token, caseInfo)
    if (!salesforceCase.success)
    return res.status(500).send("Case creation failed")
    
    const groupName = salesforceCase.id
    const result = await createGroup(groupName, userId)
    if (result.ErrorCode !== 0)
    return res.status(500).send("Group creation failed")
    
    res.status(200).send(result)
    })
    
    // When detect a new agent assigned to the group, Salesforce sends a request to join this agent to the chat group
    app.post("/joingroup", async (req, res) => {
    const { groupId, userId } = req.body
    if (!userId) return res.status(500).send("Missing userId")
    if (!groupId) return res.status(500).send("Missing groupId")
    
    const result = await joinGroup(groupId, userId)
    if (result.ErrorCode !== 0)
    return res.status(500).send("Join group failed")
    
    res.status(200).send(result)
    })
    
    // When detect an agent removed from the group, Salesforce sends a request to remove this agent from the chat group
    app.post("/leavegroup", async (req, res) => {
    const { groupId, userId } = req.body
    if (!userId) return res.status(500).send("Missing userId")
    if (!groupId) return res.status(500).send("Missing groupId")
    
    const result = await leaveGroup(groupId, userId)
    if (result.ErrorCode !== 0)
    return res.status(500).send("Leave group failed")
    
    res.status(200).send(result)
    })
    
    app.post("/deletegroup", async (req, res) => {
    const { groupId } = req.body
    if (!groupId) return res.status(500).send("Missing groupId")
    
    const result = await deleteGroup(groupId)
    if (result.ErrorCode !== 0)
    return res.status(500).send("Delete group failed")
    
    res.status(200).send(result)
    })
    
    const getSalesforceAccessToken = async function () {
    const url = "https://{your_instance}.salesforce.com"
    const conn = new sf.Connection({ loginUrl: url })
    try {
    await conn.login("SF_EMAIL", "SF_PASSWORDSF_TOKEN")
    return { error: undefined, token: conn.accessToken }
    } catch (e) {
    return { error: e, token: undefined }
    }
    }
    
    const createCase = async function (token, caseInfo) {
    const { subject, desc, name, email } = caseInfo
    const body = {
    Subject: subject,
    Description: desc,
    SuppliedName: name,
    SuppliedEmail: email,
    }
    const headers = {
    headers: {
    "Content-Type": "application/json",
    Authorization: "Bearer " + token,
    },
    }
    const url =
    "https://{your_instance}.salesforce.com/services/data/v{api_version}/sobjects/Case"
    try {
    const result = await axios.post(url, body, headers)
    return result.data
    } catch (e) {
    return { id: undefined, success: false, error: e }
    }
    }
    
    const generateUserSig = function () {
    const expires = 600
    const api = new TLSSigAPIv2.Api(YOUR_SDKAPPID, YOUR_SECRET)
    return api.genSig(ADMIN_USERID, expires)
    }
    
    const generateRandom = function () {
    return Math.floor(Math.random() * 4294967295)
    }
    
    const createGroup = async function (groupName, userId) {
    const sig = generateUserSig()
    const random = generateRandom()
    // Use salesforceCase.id as group ID
    const data = { Owner_Account: userId, Type: "Public", Name: groupName, GroupId: groupName }
    const url = `https://console.tim.qq.com/v4/group_open_http_svc/create_group?sdkappid=${YOUR_SDKAPPID}&identifier=${ADMIN_USERID}&usersig=${sig}&random=${random}&contenttype=json`
    try {
    const groupRes = await axios.post(url, data)
    return groupRes.data
    } catch (e) {
    return { ErrorCode: -1, ErrorInfo: e }
    }
    }
    
    const joinGroup = async function (groupId, userId) {
    const sig = generateUserSig()
    const random = generateRandom()
    const data = { GroupId: groupId, MemberList: [{ Member_Account: userId }] }
    const url = `https://console.tim.qq.com/v4/group_open_http_svc/add_group_member?sdkappid=${YOUR_SDKAPPID}&identifier=${ADMIN_USERID}&usersig=${sig}&random=${random}&contenttype=json`
    try {
    const groupRes = await axios.post(url, data)
    return groupRes.data
    } catch (e) {
    return { ErrorCode: -1, ErrorInfo: e }
    }
    }
    
    const leaveGroup = async function (groupId, userId) {
    const sig = generateUserSig()
    const random = generateRandom()
    const data = { GroupId: groupId, MemberToDel_Account: [userId] }
    const url = `https://console.tim.qq.com/v4/group_open_http_svc/delete_group_member?sdkappid=${YOUR_SDKAPPID}&identifier=${ADMIN_USERID}&usersig=${sig}&random=${random}&contenttype=json`
    try {
    const groupRes = await axios.post(url, data)
    return groupRes.data
    } catch (e) {
    return { ErrorCode: -1, ErrorInfo: e }
    }
    }
    
    const deleteGroup = async function (groupId) {
    const sig = generateUserSig()
    const random = generateRandom()
    const data = { GroupId: groupId }
    const url = `https://console.tim.qq.com/v4/group_open_http_svc/destroy_group?sdkappid=${YOUR_SDKAPPID}&identifier=${ADMIN_USERID}&usersig=${sig}&random=${random}&contenttype=json`
    try {
    const groupRes = await axios.post(url, data)
    return groupRes.data
    } catch (e) {
    return { ErrorCode: -1, ErrorInfo: e }
    }
    }
    
    app.listen(process.env.PORT || port, () =>
    console.log(`Example app listening on port ${port}!`)
    )
    The server supports a route /createticket for the end user to create a case in Salesforce and a chat group in Tencent Cloud IM. Here's what we do here:
    1. Fisrt we fetch an accessToken from Salesforce, more about SF_TOKEN.
    const getSalesforceAccessToken = async function () {
    const url = "https://{your_instance}.salesforce.com"
    const conn = new sf.Connection({ loginUrl: url })
    try {
    await conn.login("SF_EMAIL", "SF_PASSWORDSF_TOKEN")
    return { error: undefined, token: conn.accessToken }
    } catch (e) {
    return { error: e, token: undefined }
    }
    }
    2. Create a Salesforce case.
    const createCase = async function (token, caseInfo) {
    const { subject, desc, name, email } = caseInfo
    const body = {
    Subject: subject,
    Description: desc,
    SuppliedName: name,
    SuppliedEmail: email,
    }
    const headers = {
    headers: {
    "Content-Type": "application/json",
    Authorization: "Bearer " + token,
    },
    }
    const url =
    "https://{your_instance}.salesforce.com/services/data/v{api_version}/sobjects/Case"
    try {
    const result = await axios.post(url, body, headers)
    return result.data
    } catch (e) {
    return { id: undefined, success: false, error: e }
    }
    }
    3. Generate UserSig for Tencent Cloud IM
    const generateUserSig = function () {
    const expires = 600
    const api = new TLSSigAPIv2.Api(YOUR_SDKAPPID, YOUR_SECRET)
    return api.genSig(ADMIN_USERID, expires)
    }
    4. Create a Tencent Cloud IM chat group by case ID and user ID
    const createGroup = async function (groupName, userId) {
    const sig = generateUserSig()
    const random = generateRandom()
    const data = { Owner_Account: userId, Type: "Public", Name: groupName }
    const url = `https://console.tim.qq.com/v4/group_open_http_svc/create_group?sdkappid=${YOUR_SDKAPPID}&identifier=${ADMIN_USERID}&usersig=${sig}&random=${random}&contenttype=json`
    try {
    const groupRes = await axios.post(url, data)
    return groupRes.data
    } catch (e) {
    return { ErrorCode: -1, ErrorInfo: e }
    }
    }
    In addition, the web server provides routes to join/leave/delete a Tencent Cloud IM chat group by case ID and agent ID. These are used when Salesforce trigger detects the changing of case agent. More details will be discussed in Step 3.
    const joinGroup = async function (groupId, userId) {
    const sig = generateUserSig()
    const random = generateRandom()
    const data = { GroupId: groupId, MemberList: [{ Member_Account: userId }] }
    const url = `https://console.tim.qq.com/v4/group_open_http_svc/add_group_member?sdkappid=${YOUR_SDKAPPID}&identifier=${ADMIN_USERID}&usersig=${sig}&random=${random}&contenttype=json`
    try {
    const groupRes = await axios.post(url, data)
    return groupRes.data
    } catch (e) {
    return { ErrorCode: -1, ErrorInfo: e }
    }
    }
    
    const leaveGroup = async function (groupId, userId) {
    const sig = generateUserSig()
    const random = generateRandom()
    const data = { GroupId: groupId, MemberToDel_Account: [userId] }
    const url = `https://console.tim.qq.com/v4/group_open_http_svc/delete_group_member?sdkappid=${YOUR_SDKAPPID}&identifier=${ADMIN_USERID}&usersig=${sig}&random=${random}&contenttype=json`
    try {
    const groupRes = await axios.post(url, data)
    return groupRes.data
    } catch (e) {
    return { ErrorCode: -1, ErrorInfo: e }
    }
    }
    
    const deleteGroup = async function (groupId) {
    const sig = generateUserSig()
    const random = generateRandom()
    const data = { GroupId: groupId }
    const url = `https://console.tim.qq.com/v4/group_open_http_svc/destroy_group?sdkappid=${YOUR_SDKAPPID}&identifier=${ADMIN_USERID}&usersig=${sig}&random=${random}&contenttype=json`
    try {
    const groupRes = await axios.post(url, data)
    return groupRes.data
    } catch (e) {
    return { ErrorCode: -1, ErrorInfo: e }
    }
    }
    That's all for the web server side. Once you set up the server, call the endpoint /createticket and
    Check in Salesforce that a case is created.
    Check in the Tencent Cloud IM console for the group with the case ID as the group ID.

    Step 2. Use the Tencent Cloud IM Web UI Kit to build a Salesforce utilities component

    Here we show the steps to create a Salesforce utilities component with Tencent Cloud IM UI Kit. In Salesforce you may use Lightning Container to upload a third-party i-frame as a static resource, and host the content in an Aura component using lightning:container. And you can use Tencent Cloud IM Web UIKit to build an agent chat component, and deploy it in the Lightning Container as a Salesforce utilities bar widget at the bottom.
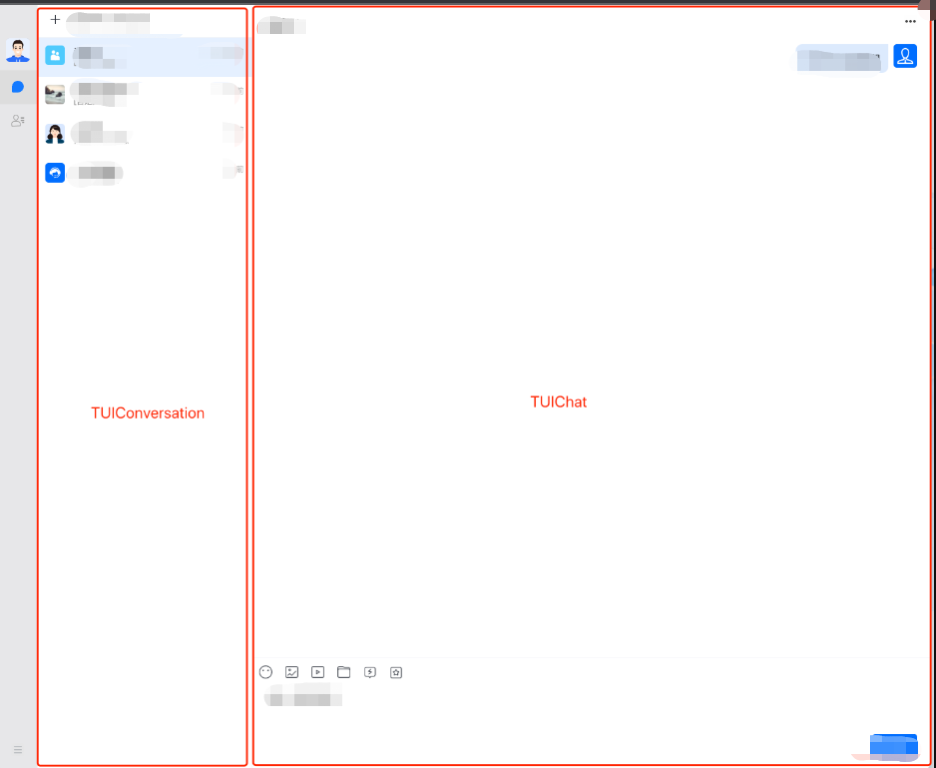
    1. First develop a chat component by using Tencent Cloud IM Web UIKit. Build it as a static resource with a root index.html and compress it as an zip file. Case agent's ID will be transmitted to the chat component, use that ID to init and login Tencent Cloud IM in the chat component.
    
    
    2. Create a Lightning Container for your component, details arehere.
    
    2.1 Go to Salesforce Developer Console 2.2 Click File -> New -> Lightning Component 2.3 Name = "tim_utilities_bar" 2.4 Click submit
    3. Render the custom component to your bar widget. 3.1 Set aura:component as a utility bar and provide an aura:id
    <!-- tim_utilities_bar.cmp -->
    <aura:component implements="flexipage:availableForAllPageTypes" access="global">
    <lightning:utilityBarAPI aura:id="utilitybar" />
    </aura:component>
    3.2 Upload the static resource to the Lightning Container
    a. Go to Salesforce static resources and create a new resource called "tim_bar" b. Upload the zip file of the resource and set "Cache Control" to "Public" c. Click Save
    Notes:
    Index.html should always be at the root level of the .zip file
    Be sure to click “save” after uploading your file.
    Salesforce saves the resource name, not the name of the .zip file.
    100% of the code and assets you use in a Lightning Component will need to be included in the .zip file. Any external code dependencies will not work even if they are whitelisted in the CSP trusted sites list.
    3.3 Reference the static resource "tim_bar" in the Utilities Bar widget
    a. Add a lightning:container tag to the Utilities Bar widget. The aura:id should be "TIM_Bar". b. Reference the static resource. "!$Resource.tim_bar + '/index.html'}" . Note that tim_bar is the saved "static resource", not the name of the uploaded .zip file.
    <!-- tim_utilities_bar.cmp -->
    <aura:component implements="flexipage:availableForAllPageTypes" access="global">
    <lightning:utilityBarAPI aura:id="utilitybar" />
    <aura:attribute name="recordId" type="String" />
    <aura:attribute name="data" type="String" />
    <lightning:navigation aura:id="navService" />
    <lightning:container
    aura:id="TIM_Bar"
    src="{!$Resource.tim_bar + '/index.html'}"
    />
    </aura:component>
    3.4 Add the Utilities Bar Widget to display in Salesforce
    a. Click "Setup" and search for "App Manager" to set where the Utilities Bar widget will appear b. Click "▾" and "Edit" in the App called Service Console c. In App Setting, click "Utility Items (Desktop Only)" d. Click "Add Utility Item" e. Select the "tim_utilities_bar" f. Set the width and height g. Check "Start automatically" h. Click -> "Save"
    3.5 Update the Salesforce CSP file to grant permissions to Access Tencent Cloud IM in Salesforce a. Go to Salesforce -> Setup -> Search -> "CSP Trusted sites" b. Add "New Trusted Sites" (allow all CSP Directives):
    wss://wss.im.qcloud.com c. Go to Salesforce -> Setup -> Search -> "CORS" d. Add "New" Allowed Origins List:
    https://*.qq.com
    https://*.qcloud.com e. Go to Salesforce -> Setup -> Search -> "" f. Add "New Remote Site" List:
    The Url of the web server!
    4. Initialize the Lightning Container
    Once Lightning Container is ready, send an LLC message to inform Utilities Bar Widget
    Utilities Bar Widget needs to send Agent's id to our component
    Once received messages from Utilities Bar Widget, we render the UIKit
    Follow the code shown below:
    // tim_utilities_barController.js
    ({
    handleMessage: function(component, message, helper) {
    var payload = message.getParams().payload
    // Once container is ready, initUIKit
    if (payload === "READY") helper.initUIKit(component, message, helper)
    }
    });
    ({
    initUIKit: function (component, message, helper) {
    // Get Agent's ID
    var userId = $A.get("$SObjectType.CurrentUser.Id")
    var message = { userId: userId }
    try {
    // Send the ID to the component
    component.find("TIM_Bar").message(message)
    } catch (err) {
    console.error("Error from Utilities Bar:", err)
    }
    },
    })
    
    Add onMessage handler to the Utilities Bar Widget:
    <!-- tim_utilities_bar.cmp -->
    <lightning:container
    aura:id="TIM_Bar"
    src="{!$Resource.tim_bar + '/index.html'}"
    onmessage="{!c.handleMessage}"
    />
    
    In your script, use LLC package to render your app when Lightning Container has loaded.
    // index.js
    try {
    const clientState = "READY";
    LLC.sendMessage(clientState);
    console.warn("Lightning Container --> TO SALESFORCE --> Sent:", clientState);
    } catch (e) {
    console.error("LLC NOT WORKING", e);
    }
    try {
    LLC.addErrorHandler((error) => console.log("LLC ERROR:", error));
    LLC.addMessageHandler((salesforceMessage) => {
    console.warn("SALESFORCE --> Lightning Container --> Arrived:", salesforceMessage);
    const app = createApp(App, {
    user: salesforceMessage
    });
    app
    .use(store)
    .use(router)
    .use(TUIKit)
    .use(Aegis)
    .use(ElementPlus)
    .mount('#app');
    });
    } catch (e) {
    console.error("Error from LLC!!", e);
    }
    

    Step 3. Listen for Salesforce Case assignment and set IM Chat Group members

    In Salesforce, a case is assigned to an agent manually or automatically. Hence we need to invite new agent to the group and make the previous agent leaves the group. We use Salesforce Apex Callous to listen for the changing of the case agent assignment. Here's what to do by calling the Salesforce Apex Callout.
    1. Listen to manual case assignment When the designated agent to one case is changed, the Apex Case Change Trigger calls the Apex Callout. In the callout, we a. delete the previous agent from the Tencent Cloud IM chat group and b. invite the new agent to the group. And when case is deleted, dismiss the Tencent Cloud IM group accordingly.
    Go to Salesforce Developer console –> New –> Apex Trigger –> Name = "AssignAgent" & sObject = "Case"
    // AssignAgent.apxt
    trigger AssignAgent on Case (after update, after delete) {
    if(trigger.isUpdate){
    // Case is updating
    System.debug('Case Update Fired:');
    for(Case a : trigger.new){
    Case oldCase = trigger.oldMap.get(a.ID);
    if(String.valueOf(a.OwnerId).substring(0, 3) == '005'){
    // Owner Agent ID is changed, 005 prefix means agent ID
    System.debug('Agent invited :' + a.OwnerId);
    // Assign new owner to the Tencent Cloud IM group
    String[] data = new String[2];
    data[0] = a.Id; // Case ID is group ID
    data[1] = a.OwnerId;
    TimCallouts.joinGroup(data); //Custom callout class
    }
    // New case agent is different fromthe current agent
    if(String.valueOf(oldCase.OwnerId).substring(0, 3) == '005' && oldCase.OwnerId != a.OwnerId && String.valueOf(a.OwnerId).substring(0, 3) == '005'){
    // Delete the old agent from the group.
    // Note: A Case's very first owner will be the system owner.
    System.debug('Old Agent will be removed from group' + a.Id);
    System.debug('leaveGroup: ' + oldCase.OwnerId);
    String[] removeData = new String[2];
    removeData[0] = a.Id; // Case ID is group ID
    removeData[1] = oldCase.OwnerId;
    TIMCallouts.leaveGroup(removeData);
    }
    }
    }
    if(trigger.isDelete ){
    // Case is deleting
    System.debug('Case Delete Fired:');
    for(Case a : trigger.old){
    if(String.valueOf(a.OwnerId).substring(0, 3) == '005'){
    System.debug('Delete Group :' + a.Id);
    String[] data = new String[1];
    data[0] = a.Id;
    TimCallouts.deleteGroup(data); //Custom callout class
    }
    }
    }
    }
    2. Listen to automatic case assignment by Salesforce Omni Channel Omni Channel detects a case assignment and Salesforce automatically creates an AgentWork object. If an agent accepts the assignment, the AgentWork Trigger may use Salesforce Callout to join the group. Go to Salesforce Developer console –> New –> Apex Trigger –> Name = "AgentOmniChannel" & sObject = "AgentWork"
    // AgentOmniChanne.apxt
    trigger AgentOmniChannel on AgentWork (after update, after insert) {
    if(Trigger.isUpdate){
    for(AgentWork a : Trigger.new){
    AgentWork oldCase = Trigger.oldMap.get(a.ID);
    if(a.Status == 'Opened' && String.valueOf(a.OwnerId).substring(0, 3) == '005' ){
    String[] data = new String[2];
    data[0] = a.WorkItemId;
    data[1] = a.OwnerId;
    TIMCallouts.joinGroup(data);
    }
    }
    }
    }
    3. Set Salesforce Callout to invite/remove agents. Go to Salesforce Developer console –> New –> Apex Class –> Name = "TIMCallOuts"
    // TIMCallOuts.apxc
    public class TIMCallouts {
    @future(callout=true)
    public static void joinGroup(String[] data) {
    String groupId = data[0];
    String userId = data[1];
    Http http = new Http();
    HttpRequest request = new HttpRequest();
    request.setEndpoint('https://{your_web_server}/joingroup');
    request.setMethod('POST');
    request.setHeader('Content-Type', 'application/json;charset=UTF-8');
    request.setBody('{"userId":"'+ userId +'", "groupId":"'+ groupId +'"}');
    HttpResponse response = http.send(request);
    // Parse the JSON response
    if (response.getStatusCode() != 200) {
    System.debug('Join group failed: '+response.getStatusCode()+' '+response.getStatus());
    } else {
    System.debug('Tencent Cloud IM Response: ' + response.getBody());
    }
    }
    
    @future(callout=true)
    public static void leaveGroup(String[] data) {
    String groupId = data[0];
    String userId = data[1];
    Http http = new Http();
    HttpRequest request = new HttpRequest();
    request.setEndpoint('https://{your_web_server}/leavegroup');
    request.setMethod('POST');
    request.setHeader('Content-Type', 'application/json;charset=UTF-8');
    // Set the body as a JSON object
    request.setBody('{"userId":"'+ userId +'", "groupId":"'+ groupId +'"}');
    HttpResponse response = http.send(request);
    // Parse the JSON response
    if (response.getStatusCode() != 200) {
    System.debug('Leave group failed: ' + response.getStatusCode() + ' ' + response.getStatus());
    } else {
    System.debug('Tencent Cloud IM Response: ' + response.getBody());
    }
    }
    
    @future(callout=true)
    public static void deleteGroup(String data) {
    String groupId = data;
    Http http = new Http();
    HttpRequest request = new HttpRequest();
    request.setEndpoint('http://{your_web_server}/deletegroup');
    request.setMethod('POST');
    request.setHeader('Content-Type', 'application/json;charset=UTF-8');
    // Set the body as a JSON object
    request.setBody('{"groupId":"'+ groupId + '}');
    HttpResponse response = http.send(request);
    // Parse the JSON response
    if (response.getStatusCode() != 200) {
    System.debug('Delete group failed: ' + response.getStatusCode() + ' ' + response.getStatus());
    } else {
    System.debug('Tencent Cloud IM Response: ' + response.getBody());
    }
    }
    }

    Conclusion

    That's all you need to know to allow end users from any appliction to start chatting with a Salesforce agent. If you have any further questions please send an e-mail at tencentcloud_im@tencent.com, we'd be delighted to give you more details about the solution or any other solutions to build a modern real-time communication system via Tencent Cloud IM.
    联系我们

    联系我们,为您的业务提供专属服务。

    技术支持

    如果你想寻求进一步的帮助,通过工单与我们进行联络。我们提供7x24的工单服务。

    7x24 电话支持