tencent cloud

Cloud Load Balancer

Release Notes and Announcements
CLB Release Notes
Product Announcements
Product Introduction
Overview
Strengths
Use Cases
Principles
Product Comparison
Use Limits
Service Regions and Service Providers
Purchase Guide
Billing Overview
Billing
CLB Resource Package
Purchase Methods
Payment Overdue
Product Attribute Selection
Getting Started
Getting Started with Domain Name-Based CLB
Getting Started with CLB
Getting Started with IPv6 CLB
Deploying Nginx on CentOS
Deploying Java Web on CentOS
Operation Guide
CLB Instance
CLB Listener
Real Server
Health Check
Certificate Management
Log Management
Monitoring and Alarm
Cloud Access Management
Classic CLB
Practical Tutorial
Deploy certificate to CLB (mutual authentication)
Enabling Gzip Compression & Testing
HTTPS Forwarding Configurations
Obtaining Real Client IPs
Best Practices for Configuring Load Balancing Monitoring Alerts
Implementing HA Across Multiple AZs
Load Balancing Algorithm Selection and Weight Configuration Examples
Configuring WAF protection for CLB listening domain names
Configure IAP to authenticate web access to the CLB domain and path
Configure IAP to authenticate programmatic access to CLB's domain and path
Ops Guide
Solution to Excessive Clients in TIME_WAIT Status
Load Balancer HTTPS Service Performance Test
Stress Testing FAQ
CLB Certificate Operation Permissions
Troubleshooting
UDP Health Check Exception
API Documentation
History
Introduction
API Category
Instance APIs
Listener APIs
Backend Service APIs
Target Group APIs
Redirection APIs
Other APIs
Classic CLB APIs
Load Balancing APIs
Making API Requests
Data Types
Error Codes
CLB API 2017
FAQs
Billing
CLB Configuration
Troubleshooting Health Check Issues
HTTPS
WS/WSS Protocol Support
HTTP/2 Protocol Support
Default Domain Name Blocking Prompt
Service Level Agreement
Contact Us
Glossary

Deploying Java Web on CentOS

PDF
Focus Mode
Font Size
Last updated: 2024-10-09 15:41:58
This document describes how to deploy Java Web projects on CentOS and is suitable for new individual users of Tencent Cloud.

Software Version

The versions of software tools used in this document are as follows, which may be different from your software versions during actual operations.
Operating system: CentOS 7.5
Tomcat: apache-tomcat-8.5.39
JDK: JDK 1.8.0_201

Installing JDK

After purchasing the CVM, you can click Login on the CVM details page to log in to your CVM instance where you can enter your username and password to set up the Java web environment. For more information on how to create a CVM instance, please see CVM - Creating Instance.

Downloading JDK

Enter the following command:
mkdir /usr/java # Create a `java` folder
cd /usr/java # Enter the `java` folder
# Upload JDK installation package (recommended)
You are recommended to use tools such as WinSCP to upload the JDK installation package to the above `java` folder and then decompress it.
Or
# Use a command (you are recommended to upload the installation package): run `wget` to download the package, which cannot be decompressed because a downloaded package declines the Oracle BSD License by default. Please go to https://www.oracle.com/technetwork/java/javase/downloads/jdk8-downloads-2133151.html to accept the license agreement and obtain the download link with your cookies.
wget --no-check-certificate --no-cookies --header "Cookie: oraclelicense=accept-securebackup-cookie" https://download.oracle.com/otn-pub/java/jdk/8u201-b09/42970487e3af4f5aa5bca3f542482c60/jdk-8u201-linux-x64.tar.gz
# Decompress
chmod +x jdk-8u201-linux-x64.tar.gz
tar -xzvf jdk-8u201-linux-x64.tar.gz

Setting environmental variable

1. Open the /etc/profile file.
vi /etc/profile
2. Press I to enter the editing mode and add the following information to the file.
# set java environment
export JAVA_HOME=/usr/java/jdk1.8.0_201
export CLASSPATH=$JAVA_HOME/lib/tools.jar:$JAVA_HOME/lib/dt.jar:$JAVA_HOME/lib
export PATH=$JAVA_HOME/bin:$PATH
3. Press Esc to exit the editing mode and enter :wq to save and close the file.
4. Load the environmental variable.
source /etc/profile

Viewing JDK installation result

Run the java -version command. If the JDK version information is displayed, JDK has been successfully installed.


Installing Tomcat

Downloading Tomcat

Enter the following commands:
# The mirror address may change and the Tomcat version may be continuously upgraded. If the download link expired, please go to [Tomcat official website](https://tomcat.apache.org/download-80.cgi) and select an appropriate installation package address.
wget http://mirrors.tuna.tsinghua.edu.cn/apache/tomcat/tomcat-8/v8.5.39/bin/apache-tomcat-8.5.39.tar.gz
tar -xzvf apache-tomcat-8.5.39.tar.gz
mv apache-tomcat-8.5.39 /usr/local/tomcat/
The following files are in the /usr/local/tomcat/ directory:
bin: script file, which contains scripts for starting and stopping the Tomcat service.
conf: global configuration files, of which the most important ones are server.xml and web.xml.
webapps: the main web release directory in Tomcat, which is the default directory for storing web application files.
logs: Tomcat log files.
Note:
If the download link expired, please replace it with the latest link at Tomcat's official website.

Adding user

# Add a general user `www` to run Tomcat
useradd www
# Create a website root directory
mkdir -p /data/wwwroot/default
# Upload the Java web project file (WAR package) to the website root directory and modify the file permission under the directory to `www`. This example shows how to create a Tomcat test page in the website root directory:
echo Hello Tomcat! > /data/wwwroot/default/index.jsp
chown -R www.www /data/wwwroot

Setting JVM memory parameter

1. Create a /usr/local/tomcat/bin/setenv.sh script file.
vi /usr/local/tomcat/bin/setenv.sh
2. Press I to enter the editing mode and add the following.
JAVA_OPTS='-Djava.security.egd=file:/dev/./urandom -server -Xms256m -Xmx496m -Dfile.encoding=UTF-8'
3. Press Esc to exit the editing mode and enter :wq to save and exit.

Configuring server.xml

1. Switch to the /usr/local/tomcat/conf/ directory.
cd /usr/local/tomcat/conf/
2. Back up the server.xml file.
mv server.xml server_default.xml
3. Create a new server.xml file.
vi server.xml
4. Press I to enter the editing mode and add the following.
<?xml version="1.0" encoding="UTF-8"?>
<Server port="8006" shutdown="SHUTDOWN">
<Listener className="org.apache.catalina.core.JreMemoryLeakPreventionListener"/>
<Listener className="org.apache.catalina.mbeans.GlobalResourcesLifecycleListener"/>
<Listener className="org.apache.catalina.core.ThreadLocalLeakPreventionListener"/>
<Listener className="org.apache.catalina.core.AprLifecycleListener"/>
<GlobalNamingResources>
<Resource name="UserDatabase" auth="Container"
type="org.apache.catalina.UserDatabase"
description="User database that can be updated and saved"
factory="org.apache.catalina.users.MemoryUserDatabaseFactory"
pathname="conf/tomcat-users.xml"/>
</GlobalNamingResources>
<Service name="Catalina">
<Connector port="8080"
protocol="HTTP/1.1"
connectionTimeout="20000"
redirectPort="8443"
maxThreads="1000"
minSpareThreads="20"
acceptCount="1000"
maxHttpHeaderSize="65536"
debug="0"
disableUploadTimeout="true"
useBodyEncodingForURI="true"
enableLookups="false"
URIEncoding="UTF-8"/>
<Engine name="Catalina" defaultHost="localhost">
<Realm className="org.apache.catalina.realm.LockOutRealm">
<Realm className="org.apache.catalina.realm.UserDatabaseRealm"
resourceName="UserDatabase"/>
</Realm>
<Host name="localhost" appBase="/data/wwwroot/default" unpackWARs="true" autoDeploy="true">
<Context path="" docBase="/data/wwwroot/default" debug="0" reloadable="false" crossContext="true"/>
<Valve className="org.apache.catalina.valves.AccessLogValve" directory="logs"
prefix="localhost_access_log." suffix=".txt" pattern="%h %l %u %t &quot;%r&quot; %s %b" />
</Host>
</Engine>
</Service>
</Server>
5. Press Esc to exit the editing mode and enter :wq to save and exit.

Starting Tomcat

Method 1

Enter the bin directory of the Tomcat server and run the ./startup.sh command to start the Tomcat server.
cd /usr/local/tomcat/bin
./startup.sh
The execution result is as follows:


Method 2

1. Set up quick start, so that the Tomcat server can be started anywhere through service tomcat start.
wget https://github.com/lj2007331/oneinstack/raw/master/init.d/Tomcat-init
mv Tomcat-init /etc/init.d/tomcat
chmod +x /etc/init.d/tomcat
2. Run the following command and set the JAVA_HOME startup script.
sed -i 's@^export JAVA_HOME=.*@export JAVA_HOME=/usr/java/jdk1.8.0_201@' /etc/init.d/tomcat
3. Set auto-run.
chkconfig --add tomcat
chkconfig tomcat on
4. Start Tomcat.
# Start Tomcat
service tomcat start
# View Tomcat server status
service tomcat status
# Stop Tomcat
service tomcat stop
The execution result is as follows:

5. If the system prompts that you have no permissions, switch to the root user and modify the permissions.
cd /usr/local
chmod -R 777 tomcat
6. Enter http://public IP:port (where the port is the connector port set in server.xml) in the address bar of the browser. If the following page appears, the installation is successful.


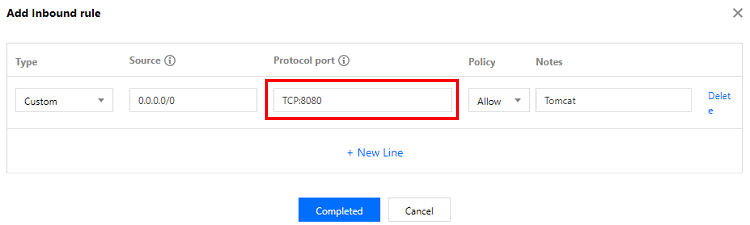
Configuring security group

In case of access failure, check the security group. As shown in the above example, the connector port is 8080 in server.xml, so you need to open TCP:8080 to the internet in the security group bound to the corresponding CVM instance.


Help and Support

Was this page helpful?

Help us improve! Rate your documentation experience in 5 mins.

Feedback