- Release Notes and Announcements
- CLB Release Notes
- [April 15, 2024] Domain Name Upgrade for Domain Name-based Public Network CLB
- [July 25, 2023] Adding Rate Limits on Shared CLB Instances
- [July 3, 2023] CLB API Authentication Upgrade
- [June 9, 2023] Adjusting the Grace Period for Pay-as-you-go CLB Instances
- [March 6, 2023] Launching Domain Name-Based Public CLBs
- [Feb. 24, 2023] Changing Health Check Source IP to 100.64.0.0/10 IP Range
- [July 8, 2022] Classic CLB Upgrade Prompt
- 【October 20, 2021】Classic CLB End-of-Sale Notice
- 【April 27, 2021】Announcement on the Authentication Upgrade for Certain CLB APIs
- Product Introduction
- Purchase Guide
- Getting Started
- Directions
- CLB Instance
- Directions for Upgrading to Domain Name-Based CLB
- Creating CLB Instances
- Creating an IPv6 CLB Instance
- Creating IPv6 NAT64 CLB Instances
- Creating an Anycast CLB Instance
- Configure CLB Forwarding Domain Name
- Configuring CLB Security Group
- Binding Private Network CLB to EIP
- Enabling or Disabling a CLB Instance
- Cloning CLB Instances
- Exporting CLB Instances
- Upgrade to a LCU-supported instances
- Adjusting Specification of LCU-supported CLBs
- Deleting CLB Instances
- Releasing Idle CLB Instances
- Configuring Deletion Protection
- Adjusting Instance Public Network Configurations
- CLB Listener
- CLB Listener Overview
- Configuring TCP Listener
- Configuring a UDP Listener
- Configuring TCP SSL Listener
- Configuring a QUIC Listener
- Configuring an HTTP Listener
- Configuring HTTPS Listener
- Load Balancing Methods
- Session Persistence
- Layer-7 Redirection Configuration
- Layer-7 Custom Configuration
- Layer-7 Domain Name Forwarding and URL Rules
- Using QUIC Protocol on CLB
- SNI Support for Binding Multiple Certificates to a CLB Instance
- Configuring gRPC Support for Layer-7 Protocols
- Real Server
- Health Check
- Certificate Management
- Log Management
- Monitoring and Alarm
- Cloud Access Management
- Classic CLB
- CLB Instance
- Best Practices
- Enabling Gzip Compression & Testing
- HTTPS Forwarding Configurations
- Obtaining Real Client IPs
- Best Practices for Configuring Load Balancing Monitoring Alerts
- Implementing HA Across Multiple AZs
- Load Balancing Algorithm Selection and Weight Configuration Examples
- Configuring WAF protection for CLB listening domain names
- Ops Guide
- Troubleshooting
- API Documentation
- History
- Introduction
- API Category
- Making API Requests
- Instance APIs
- Listener APIs
- Backend Service APIs
- Target Group APIs
- Redirection APIs
- Other APIs
- ModifyLoadBalancersProject
- InquiryPriceCreateLoadBalancer
- InquiryPriceModifyLoadBalancer
- InquiryPriceRenewLoadBalancer
- DescribeLoadBalancerTraffic
- DescribeTaskStatus
- DescribeClsLogSet
- CreateClsLogSet
- CreateTopic
- CreateLoadBalancerSnatIps
- DeleteLoadBalancerSnatIps
- SetLoadBalancerSecurityGroups
- SetSecurityGroupForLoadbalancers
- ReplaceCertForLoadBalancers
- DescribeLoadBalancerListByCertId
- SetLoadBalancerClsLog
- DescribeQuota
- DescribeResources
- Classic CLB APIs
- Load Balancing APIs
- Data Types
- Error Codes
- CLB API 2017
- FAQs
- Service Level Agreement
- Contact Us
- Glossary
This document describes how to deploy Java Web projects on CentOS and is suitable for new individual users of Tencent Cloud.
Software Version
The versions of software tools used in this document are as follows, which may be different from your software versions during actual operations.
- Operating system: CentOS 7.5
- Tomcat: apache-tomcat-8.5.39
- JDK: JDK 1.8.0_201
Installing JDK
After purchasing the CVM, you can click Login on the CVM details page to log in to your CVM instance where you can enter your username and password to set up the Java web environment. For more information on how to create a CVM instance, please see CVM - Creating Instance.
Downloading JDK
Enter the following command:
mkdir /usr/java  # Create a `java` folder
cd /usr/java     # Enter the `java` folder
# Upload JDK installation package (recommended)
You are recommended to use tools such as WinSCP to upload the JDK installation package to the above `java` folder and then decompress it.
Or
# Use a command (you are recommended to upload the installation package): run `wget` to download the package, which cannot be decompressed because a downloaded package declines the Oracle BSD License by default. Please go to https://www.oracle.com/technetwork/java/javase/downloads/jdk8-downloads-2133151.html to accept the license agreement and obtain the download link with your cookies.
wget --no-check-certificate --no-cookies --header "Cookie: oraclelicense=accept-securebackup-cookie" https://download.oracle.com/otn-pub/java/jdk/8u201-b09/42970487e3af4f5aa5bca3f542482c60/jdk-8u201-linux-x64.tar.gz
# Decompress
chmod +x jdk-8u201-linux-x64.tar.gz
tar -xzvf jdk-8u201-linux-x64.tar.gz
Setting environmental variable
- Open the
/etc/profilefile.vi /etc/profile - Press I to enter the editing mode and add the following information to the file.
# set java environment export JAVA_HOME=/usr/java/jdk1.8.0_201 export CLASSPATH=$JAVA_HOME/lib/tools.jar:$JAVA_HOME/lib/dt.jar:$JAVA_HOME/lib export PATH=$JAVA_HOME/bin:$PATH - Press Esc to exit the editing mode and enter
:wqto save and close the file. - Load the environmental variable.
source /etc/profile
Viewing JDK installation result
Run the java -version command. If the JDK version information is displayed, JDK has been successfully installed.
Installing Tomcat
Downloading Tomcat
Enter the following commands:
# The mirror address may change and the Tomcat version may be continuously upgraded. If the download link expired, please go to [Tomcat official website](https://tomcat.apache.org/download-80.cgi) and select an appropriate installation package address.
wget http://mirrors.tuna.tsinghua.edu.cn/apache/tomcat/tomcat-8/v8.5.39/bin/apache-tomcat-8.5.39.tar.gz
tar -xzvf apache-tomcat-8.5.39.tar.gz
mv apache-tomcat-8.5.39 /usr/local/tomcat/
The following files are in the /usr/local/tomcat/ directory:
- bin: script file, which contains scripts for starting and stopping the Tomcat service.
- conf: global configuration files, of which the most important ones are
server.xmlandweb.xml. - webapps: the main web release directory in Tomcat, which is the default directory for storing web application files.
- logs: Tomcat log files.
Note:If the download link expired, please replace it with the latest link at Tomcat's official website.
Adding user
# Add a general user `www` to run Tomcat
useradd www
# Create a website root directory
mkdir -p /data/wwwroot/default
# Upload the Java web project file (WAR package) to the website root directory and modify the file permission under the directory to `www`. This example shows how to create a Tomcat test page in the website root directory:
echo Hello Tomcat! > /data/wwwroot/default/index.jsp
chown -R www.www /data/wwwroot
Setting JVM memory parameter
- Create a
/usr/local/tomcat/bin/setenv.shscript file.vi /usr/local/tomcat/bin/setenv.sh - Press I to enter the editing mode and add the following.
JAVA_OPTS='-Djava.security.egd=file:/dev/./urandom -server -Xms256m -Xmx496m -Dfile.encoding=UTF-8' - Press Esc to exit the editing mode and enter
:wqto save and exit.
Configuring server.xml
- Switch to the
/usr/local/tomcat/conf/directory.cd /usr/local/tomcat/conf/ - Back up the
server.xmlfile.mv server.xml server_default.xml - Create a new
server.xmlfile.vi server.xml - Press I to enter the editing mode and add the following.
<?xml version="1.0" encoding="UTF-8"?> <Server port="8006" shutdown="SHUTDOWN"> <Listener className="org.apache.catalina.core.JreMemoryLeakPreventionListener"/> <Listener className="org.apache.catalina.mbeans.GlobalResourcesLifecycleListener"/> <Listener className="org.apache.catalina.core.ThreadLocalLeakPreventionListener"/> <Listener className="org.apache.catalina.core.AprLifecycleListener"/> <GlobalNamingResources> <Resource name="UserDatabase" auth="Container" type="org.apache.catalina.UserDatabase" description="User database that can be updated and saved" factory="org.apache.catalina.users.MemoryUserDatabaseFactory" pathname="conf/tomcat-users.xml"/> </GlobalNamingResources> <Service name="Catalina"> <Connector port="8080" protocol="HTTP/1.1" connectionTimeout="20000" redirectPort="8443" maxThreads="1000" minSpareThreads="20" acceptCount="1000" maxHttpHeaderSize="65536" debug="0" disableUploadTimeout="true" useBodyEncodingForURI="true" enableLookups="false" URIEncoding="UTF-8"/> <Engine name="Catalina" defaultHost="localhost"> <Realm className="org.apache.catalina.realm.LockOutRealm"> <Realm className="org.apache.catalina.realm.UserDatabaseRealm" resourceName="UserDatabase"/> </Realm> <Host name="localhost" appBase="/data/wwwroot/default" unpackWARs="true" autoDeploy="true"> <Context path="" docBase="/data/wwwroot/default" debug="0" reloadable="false" crossContext="true"/> <Valve className="org.apache.catalina.valves.AccessLogValve" directory="logs" prefix="localhost_access_log." suffix=".txt" pattern="%h %l %u %t "%r" %s %b" /> </Host> </Engine> </Service> </Server> - Press Esc to exit the editing mode and enter
:wqto save and exit.
Starting Tomcat
Method 1
Enter the bin directory of the Tomcat server and run the ./startup.sh command to start the Tomcat server.
cd /usr/local/tomcat/bin
./startup.sh
The execution result is as follows:
Method 2
- Set up quick start, so that the Tomcat server can be started anywhere through
service tomcat start.wget https://github.com/lj2007331/oneinstack/raw/master/init.d/Tomcat-init mv Tomcat-init /etc/init.d/tomcat chmod +x /etc/init.d/tomcat - Run the following command and set the
JAVA_HOMEstartup script.sed -i 's@^export JAVA_HOME=.*@export JAVA_HOME=/usr/java/jdk1.8.0_201@' /etc/init.d/tomcat - Set auto-run.
chkconfig --add tomcat chkconfig tomcat on - Start Tomcat.
# Start Tomcat
service tomcat start
# View Tomcat server status
service tomcat status
# Stop Tomcat
service tomcat stop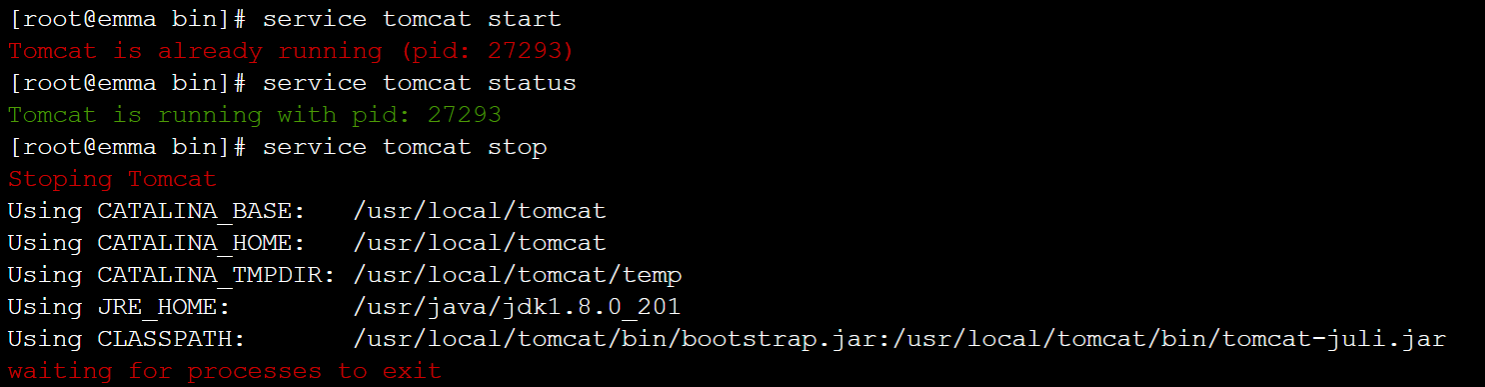
- If the system prompts that you have no permissions, switch to the root user and modify the permissions.
cd /usr/local chmod -R 777 tomcat - Enter
http://public IP:port(where the port is the connector port set inserver.xml) in the address bar of the browser. If the following page appears, the installation is successful.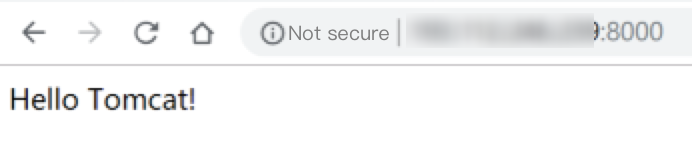
Configuring security group
In case of access failure, check the security group. As shown in the above example, the connector port is 8080 in server.xml, so you need to open TCP:8080 to the internet in the security group bound to the corresponding CVM instance.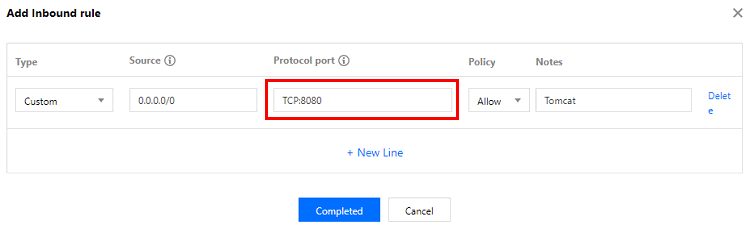

 Yes
Yes
 No
No
Was this page helpful?