tencent cloud

Chat

News and Announcements
Release Notes
Announcements
Product Introduction
Overview
Basic Concepts
Scenarios
Features
Account System
User Profile and Relationship Chain
Message Management
Group Related
Official Account
Audio/Video Call
Use Limits
Purchase Guide
Billing Overview
Pricing
Purchase Instructions
Renewal Guide
Service Suspension Explanation
Refund Policy
Development Guidelines
Demo Zone
Activate Service
Free Demos
Quick Run
Download
SDK and Demo Source Code
Update Log
Chat Interaction (UI Included)
TUIKit Introduction
Getting Started
Full-feature Integration
Single-function Integration
Build with AI
Build Basic Interfaces
More Features
Customizing Appearance
Internationalization
Push Service
Overview
Noun explanation
Activate the Service
Quick Start
Manufacturer Channel
Statistics
Troubleshooting Tool
Client APIs
REST API
Push Callback
Advanced Features
Release Notes
Error Codes
FAQS
Desk
Overview
Quick Start
Integration Guide
Admin Operation Manual
Agent Manual
More Practices
Live Streaming Setup Guide
AI Chatbot
Super Large Entertainment and Collaboration Community
Discord Implementation Guide
How to Integrate Chat into Games
WhatsApp Channel-style Official Account Integration Solution
Send Red Packet
Firewall Restrictions
No UI Integration
Quick Start
SDK Integration
Initialization
Login and Logout
Message
Conversation
Group
Community Topic
User Profile and Relationship Chain
Offline Push
Cloud Search
Local Search
Official Channel Management
Client APIs
JavaScript
Android
iOS & macOS
Swift
Flutter
Electron
Unity
React Native
C APIs
C++
Server APIs
Secure authentication with UserSig
RESTful APIs
Webhooks
Console Guide
New Console Introduction
Creating and Upgrading an Application
Basic Configuration
Feature Configuration
Account Management
Group Management
Official Channel Management
Webhook Configuration
Usage
Viewing Guide for Resource Packages
Real-Time Monitor
Auxiliary Development Tools
Access Management
Advanced Features
FAQs
uni-app FAQs
Purchase
SDK
Account Authentication
User Profile and Relationship Chain
Message
Group
Audio-Video Group
Nickname and Profile Photo
Security Compliance Certification
Service Level Agreement
Security Compliance Certification
Chat Policies
Privacy Policy
Data Privacy and Security Agreement
Migration
Migration Solutions
Migration Solutions Lite
Error Codes
Contact Us

React Native

PDF
Focus Mode
Font Size
Last updated: 2024-12-19 14:28:58

Feature Description

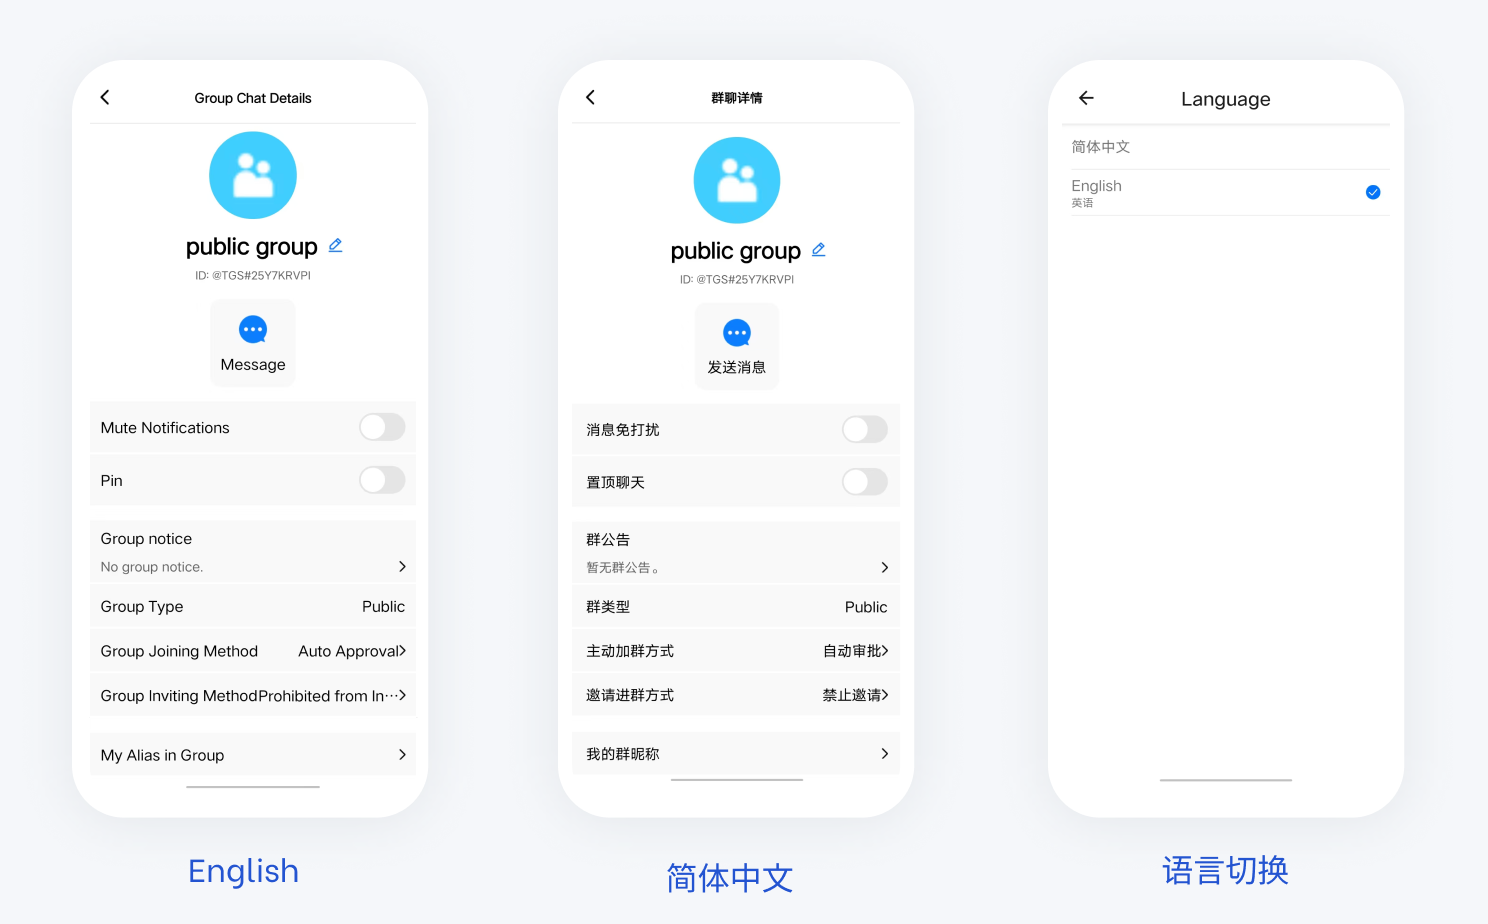
React Native UIKit comes with default language packs for English and Simplified Chinese as interface display languages.
Following this documentation, you can use the default language packs or customize the internationalization capabilities according to your needs, including adding new languages and updating translation content.


Using the Default Language

Initializing the Language

When initializing the app, you need to register and initialize the language resources for the translation engine in the App.tsx file.
import { TUITranslateService } from '@tencentcloud/chat-uikit-engine';
import uikitResources from '@tencentcloud/chat-uikit-react-native/i18n';

// Init localization
TUITranslateService.provideLanguages(uikitResources);
TUITranslateService.useI18n('en-US');

Switch Language

If your app has a language switch entry, you can call TUITranslateService.changeLanguage to implement the language switch feature.
import { TUITranslateService } from '@tencentcloud/chat-uikit-engine';

// language is the target language you switch to
TUITranslateService.changeLanguage(language)

Adding App Language Resources

If your app needs to translate other pages (e.g., Login page, Setting page) besides UIKit, you can create an i18n resource directory in the root directory of the app to add corresponding entries. Use TUITranslateService for translation. You can initialize it with the following sample code, assuming there is an i18n directory in the root directory of your project.
import { TUITranslateService } from '@tencentcloud/chat-uikit-engine';
import uikitResources from '@tencentcloud/chat-uikit-react-native/i18n';
import appResources from './i18n';
// Init localization
TUITranslateService.provideLanguages({
'en-US': {
...appResources['en-US'],
...uikitResources['en-US'],
},
'zh-CN': {
...appResources['zh-CN'],
...uikitResources['zh-CN'],
},
});
TUITranslateService.useI18n('en-US');

Updating Translation Terms

If the default translation terms do not meet your needs, you can update the translation terms by following these steps.
Copy node_modules/@tencentcloud/chat-uikit-react-native/ i18n to the root directory of your project and rename it to i18n-uikit. Modify the translation content as needed. After modification, change uikitResources to import from your local import.
import uikitResources from './i18n-uikit';

Adding a Language Type

If you need to add a new language, copy node_modules/@tencentcloud/chat-uikit-react-native/i18n en-US to the i18n directory in the root directory of your project, rename it to the new language name (e.g., 'zh-TW'), and modify the translation content as needed.

Using the Translation API

If your app needs to use the translation capabilities provided by the translation engine, you can use it as follows.
For example, if you add a translation term for a Login module and need to internationalize [username], the terms for Login module are defined as follows:
en-US
export const Login = {
USER_NAME: 'UserName',
};
zh-CN


Use the translation function on the Login page:
import { TUITranslateService } from '@tencentcloud/chat-uikit-engine';
TUITransalteService.t('Login.USER_NAME')
For how to implement language switching, you can refer to UIKit Demo Source Code.


Help and Support

Was this page helpful?

Help us improve! Rate your documentation experience in 5 mins.

Feedback