- Release Notes and Announcements
- Announcements
- Notification on Service Suspension Policy Change in Case of Overdue Payment for COS Pay-As-You-Go (Postpaid)
- Implementation Notice for Security Management of COS Bucket Domain (Effective January 2024)
- Notification of Price Reduction for COS Retrieval and Storage Capacity Charges
- Daily Billing for COS Storage Usage, Request, and Data Retrieval
- COS Will Stop Supporting New Default CDN Acceleration Domains
- Release Notes
- Announcements
- Product Introduction
- Purchase Guide
- Getting Started
- Console Guide
- Console Overview
- Bucket Management
- Bucket Overview
- Creating Bucket
- Deleting Buckets
- Querying Bucket
- Clearing Bucket
- Setting Access Permission
- Setting Bucket Encryption
- Setting Hotlink Protection
- Setting Origin-Pull
- Setting Cross-Origin Resource Sharing (CORS)
- Setting Versioning
- Setting Static Website
- Setting Lifecycle
- Setting Logging
- Accessing Bucket List Using Sub-Account
- Adding Bucket Policies
- Setting Log Analysis
- Setting INTELLIGENT TIERING
- Setting Inventory
- Domain Name Management
- Setting Bucket Tags
- Setting Log Retrieval
- Setting Cross-Bucket Replication
- Enabling Global Acceleration
- Setting Object Lock
- Object Management
- Uploading an Object
- Downloading Objects
- Copying Object
- Previewing or Editing Object
- Viewing Object Information
- Searching for Objects
- Sorting and Filtering Objects
- Direct Upload to ARCHIVE
- Modifying Storage Class
- Deleting Incomplete Multipart Uploads
- Setting Object Access Permission
- Setting Object Encryption
- Custom Headers
- Deleting Objects
- Restoring Archived Objects
- Folder Management
- Data Extraction
- Setting Object Tag
- Exporting Object URLs
- Restoring Historical Object Version
- Batch Operation
- Monitoring Reports
- Data Processing
- Content Moderation
- Smart Toolbox User Guide
- Data Processing Workflow
- Application Integration
- User Tools
- Tool Overview
- Installation and Configuration of Environment
- COSBrowser
- COSCLI (Beta)
- COSCLI Overview
- Download and Installation Configuration
- Common Options
- Common Commands
- Generating and Modifying Configuration Files - config
- Creating Buckets - mb
- Deleting Buckets - rb
- Tagging Bucket - bucket-tagging
- Querying Bucket/Object List - ls
- Obtaining Statistics on Different Types of Objects - du
- Uploading/Downloading/Copying Objects - cp
- Syncing Upload/Download/Copy - sync
- Deleting Objects - rm
- Getting File Hash Value - hash
- Listing Incomplete Multipart Uploads - lsparts
- Clearing Incomplete Multipart Uploads - abort
- Retrieving Archived Files - restore
- Getting Pre-signed URL - signurl
- FAQs
- COSCMD
- COS Migration
- FTP Server
- Hadoop
- COSDistCp
- Hadoop-cos-DistChecker
- HDFS TO COS
- Online Auxiliary Tools
- Diagnostic Tool
- Best Practices
- Overview
- Access Control and Permission Management
- ACL Practices
- CAM Practices
- Granting Sub-Accounts Access to COS
- Authorization Cases
- Working with COS API Authorization Policies
- Security Guidelines for Using Temporary Credentials for Direct Upload from Frontend to COS
- Generating and Using Temporary Keys
- Authorizing Sub-Account to Get Buckets by Tag
- Descriptions and Use Cases of Condition Keys
- Granting Bucket Permissions to a Sub-Account that is Under Another Root Account
- Performance Optimization
- Data Migration
- Accessing COS with AWS S3 SDK
- Data Disaster Recovery and Backup
- Domain Name Management Practice
- Image Processing
- Audio/Video Practices
- Workflow
- Direct Data Upload
- Content Moderation
- Data Security
- Data Verification
- Big Data Practice
- Using COS in the Third-party Applications
- Use the general configuration of COS in third-party applications compatible with S3
- Storing Remote WordPress Attachments to COS
- Storing Ghost Attachment to COS
- Backing up Files from PC to COS
- Using Nextcloud and COS to Build Personal Online File Storage Service
- Mounting COS to Windows Server as Local Drive
- Setting up Image Hosting Service with PicGo, Typora, and COS
- Managing COS Resource with CloudBerry Explorer
- Developer Guide
- Creating Request
- Bucket
- Object
- Data Management
- Data Disaster Recovery
- Data Security
- Cloud Access Management
- Batch Operation
- Global Acceleration
- Data Workflow
- Monitoring and Alarms
- Data Lake Storage
- Cloud Native Datalake Storage
- Metadata Accelerator
- Metadata Acceleration Overview
- Migrating HDFS Data to Metadata Acceleration-Enabled Bucket
- Using HDFS to Access Metadata Acceleration-Enabled Bucket
- Mounting a COS Bucket in a Computing Cluster
- Accessing COS over HDFS in CDH Cluster
- Using Hadoop FileSystem API Code to Access COS Metadata Acceleration Bucket
- Using DataX to Sync Data Between Buckets with Metadata Acceleration Enabled
- Big Data Security
- GooseFS
- Data Processing
- Troubleshooting
- API Documentation
- Introduction
- Common Request Headers
- Common Response Headers
- Error Codes
- Request Signature
- Action List
- Service APIs
- Bucket APIs
- Basic Operations
- Access Control List (acl)
- Cross-Origin Resource Sharing (cors)
- Lifecycle
- Bucket Policy (policy)
- Hotlink Protection (referer)
- Tag (tagging)
- Static Website (website)
- Intelligent Tiering
- Bucket inventory(inventory)
- Versioning
- Cross-Bucket Replication(replication)
- Log Management(logging)
- Global Acceleration (Accelerate)
- Bucket Encryption (encryption)
- Custom Domain Name (Domain)
- Object Lock (ObjectLock)
- Origin-Pull (Origin)
- Object APIs
- Batch Operation APIs
- Data Processing APIs
- Image Processing
- Basic Image Processing
- Scaling
- Cropping
- Rotation
- Converting Format
- Quality Change
- Gaussian Blurring
- Adjusting Brightness
- Adjusting Contrast
- Sharpening
- Grayscale Image
- Image Watermark
- Text Watermark
- Obtaining Basic Image Information
- Getting Image EXIF
- Obtaining Image’s Average Hue
- Metadata Removal
- Quick Thumbnail Template
- Limiting Output Image Size
- Pipeline Operators
- Image Advanced Compression
- Persistent Image Processing
- Image Compression
- Blind Watermark
- Basic Image Processing
- AI-Based Content Recognition
- Media Processing
- File Processing
- File Processing
- Image Processing
- Job and Workflow
- Common Request Headers
- Common Response Headers
- Error Codes
- Workflow APIs
- Workflow Instance
- Job APIs
- Media Processing
- Canceling Media Processing Job
- Querying Media Processing Job
- Media Processing Job Callback
- Video-to-Animated Image Conversion
- Audio/Video Splicing
- Adding Digital Watermark
- Extracting Digital Watermark
- Getting Media Information
- Noise Cancellation
- Video Quality Scoring
- SDRtoHDR
- Remuxing (Audio/Video Segmentation)
- Intelligent Thumbnail
- Frame Capturing
- Stream Separation
- Super Resolution
- Audio/Video Transcoding
- Text to Speech
- Video Montage
- Video Enhancement
- Video Tagging
- Voice/Sound Separation
- Image Processing
- Multi-Job Processing
- AI-Based Content Recognition
- Sync Media Processing
- Media Processing
- Template APIs
- Media Processing
- Creating Media Processing Template
- Creating Animated Image Template
- Creating Splicing Template
- Creating Top Speed Codec Transcoding Template
- Creating Screenshot Template
- Creating Super Resolution Template
- Creating Audio/Video Transcoding Template
- Creating Professional Transcoding Template
- Creating Text-to-Speech Template
- Creating Video Montage Template
- Creating Video Enhancement Template
- Creating Voice/Sound Separation Template
- Creating Watermark Template
- Creating Intelligent Thumbnail Template
- Deleting Media Processing Template
- Querying Media Processing Template
- Updating Media Processing Template
- Updating Animated Image Template
- Updating Splicing Template
- Updating Top Speed Codec Transcoding Template
- Updating Screenshot Template
- Updating Super Resolution Template
- Updating Audio/Video Transcoding Template
- Updating Professional Transcoding Template
- Updating Text-to-Speech Template
- Updating Video Montage Template
- Updating Video Enhancement Template
- Updating Voice/Sound Separation Template
- Updating Watermark Template
- Updating Intelligent Thumbnail Template
- Creating Media Processing Template
- AI-Based Content Recognition
- Media Processing
- Batch Job APIs
- Callback Content
- Appendix
- Content Moderation APIs
- Submitting Virus Detection Job
- SDK Documentation
- SDK Overview
- Preparations
- Android SDK
- Getting Started
- Android SDK FAQs
- Quick Experience
- Bucket Operations
- Object Operations
- Uploading an Object
- Downloading Objects
- Copying and Moving Objects
- Listing Objects
- Deleting Objects
- Restoring Archived Objects
- Querying Object Metadata
- Generating Pre-Signed URLs
- Configuring Preflight Requests for Cross-origin Access
- Server-Side Encryption
- Single-Connection Bandwidth Limit
- Extracting Object Content
- Remote Disaster Recovery
- Data Management
- Cloud Access Management
- Data Verification
- Image Processing
- Setting Custom Headers
- Setting Access Domain Names (CDN/Global Acceleration)
- Troubleshooting
- C SDK
- C++ SDK
- .NET(C#) SDK
- Getting Started
- .NET (C#) SDK
- Bucket Operations
- Object Operations
- Uploading Objects
- Downloading Objects
- Copying and Moving Objects
- Listing Objects
- Deleting Objects
- Checking Whether Objects Exist
- Restoring Archived Objects
- Querying Object Metadata
- Object Access URL
- Getting Pre-Signed URLs
- Configuring Preflight Requests for Cross-Origin Access
- Server-Side Encryption
- Single-URL Speed Limits
- Extracting Object Content
- Cross-Region Disaster Recovery
- Data Management
- Cloud Access Management
- Image Processing
- Content Moderation
- Setting Custom Headers
- Setting Access Domain Names (CDN/Global Acceleration)
- Troubleshooting
- Backward Compatibility
- SDK for Flutter
- Go SDK
- iOS SDK
- Getting Started
- iOS SDK
- Quick Experience
- Bucket Operations
- Object Operations
- Uploading Objects
- Downloading Objects
- Listing Objects
- Copying and Moving Objects
- Extracting Object Content
- Checking Whether an Object Exists
- Deleting Objects
- Restoring Archived Objects
- Querying Object Metadata
- Server-Side Encryption
- Object Access URL
- Generating Pre-Signed URL
- Configuring CORS Preflight Requests
- Cross-region Disaster Recovery
- Data Management
- Cloud Access Management
- Image Processing
- Content Recognition
- Setting Custom Headers
- Setting Access Domain Names (CDN/Global Acceleration)
- Troubleshooting
- Java SDK
- Getting Started
- FAQs
- Bucket Operations
- Object Operations
- Uploading Object
- Downloading Objects
- Copying and Moving Objects
- Listing Objects
- Deleting Objects
- Checking Whether Objects Exist
- Querying Object Metadata
- Modifying Object Metadata
- Object Access URL
- Generating Pre-Signed URLs
- Restoring Archived Objects
- Server-Side Encryption
- Client-Side Encryption
- Single-URL Speed Limits
- Extracting Object Content
- Uploading/Downloading Object at Custom Domain Name
- Data Management
- Cross-Region Disaster Recovery
- Cloud Access Management
- Image Processing
- Content Moderation
- File Processing
- Media Processing
- AI-Based Content Recognition
- Troubleshooting
- Setting Access Domain Names (CDN/Global Acceleration)
- JavaScript SDK
- Node.js SDK
- PHP SDK
- Python SDK
- Getting Started
- Python SDK FAQs
- Bucket Operations
- Object Operations
- Uploading Objects
- Downloading Objects
- Copying and Moving Objects
- Listing Objects
- Deleting Objects
- Checking Whether Objects Exist
- Querying Object Metadata
- Modifying Object Metadata
- Object Access URL
- Getting Pre-Signed URLs
- Restoring Archived Objects
- Extracting Object Content
- Server-Side Encryption
- Client-Side Encryption
- Single-URL Speed Limits
- Cross-Region Disaster Recovery
- Data Management
- Cloud Access Management
- Content Recognition
- Setting Access Domain Names (CDN/Global Acceleration)
- Troubleshooting
- Image Processing
- React Native SDK
- Mini Program SDK
- Getting Started
- FAQs
- Bucket Operations
- Object Operations
- Uploading an Object
- Downloading Objects
- Listing Objects
- Deleting Objects
- Copying and Moving Objects
- Restoring Archived Objects
- Querying Object Metadata
- Checking Whether an Object Exists
- Object Access URL
- Generating Pre-Signed URL
- Configuring CORS Preflight Requests
- Single-URL Speed Limits
- Server-Side Encryption
- Remote disaster-tolerant
- Data Management
- Cloud Access Management
- Data Verification
- Content Moderation
- Setting Access Domain Names (CDN/Global Acceleration)
- Image Processing
- Troubleshooting
- Error Codes
- FAQs
- Service Level Agreement
- Appendices
- Glossary
Background
Data matters, we all know that. Digital photos, e-documents, work products, saved game…none of them we can easily afford to lose. It will be a huge headache if we lose all of our files due to a disk failure, or a single file due to misoperation, computer shutdown, or software crash, or if we cannot provide a requested “callback version” just because we haven’t saved one. This is why backups are absolutely important.
When it comes to backups, the first idea that occurs to our mind is most probably using a portable hard drive or building a NAS within an individual network so that we can just move files into it. Well, is it really as simple as all that?
In fact, backup involves a lot of work to do. Copy our files onto backup media, check if the backups are correct, and we may have to do both of them regularly in order to minimize lost files. Besides, backup media require maintenance, so we need to replace our hard drives promptly once they are dead.
Given all this, is there an easier way to keep our files safe? The answer is Yes.
As Tencent Cloud’s business grows, it has already developed a suite of enterprise cloud storage services, including COS. Now, we need backup software to connect the files in our PC with cloud storage services. It will help us back up files automatically onto the cloud, and check backup correctness on a regular basis.
Software Introduction
Arq® Backup is commercial backup software for Windows and macOS. Running in the background, it automatically backs up specified directories at intervals you configure. Besides, it retains backup files for each point in time so that you can easily get an old version. This software offers minimal backup size and maximum backup speed by backing up only files that are different from those at the last point in time, and by backing up repeated files across paths only once. It encrypts backups with a password only you know before they leave your computer. Therefore, you can be assured that your sensitive data is well-protected from being stolen during the transfer over Internet or on-cloud storage.
To get a commercial license of Arq® Backup, each user needs to pay $49.99. This software, which is used on a single computer, offers a 30-day free trial which you may want to try before purchase.
Note:
Arq® Backup currently does not support the simplified Chinese language. You can download, purchase it and read its instructions from the Official Website.
Preparing Tencent Cloud COS
Note:
Please skip Steps 1-2 if you are using COS.
1. Sign up for Tencent Cloud, and complete Identity Verification.
2. Log in to the COS Console, and activate COS service as instructed.
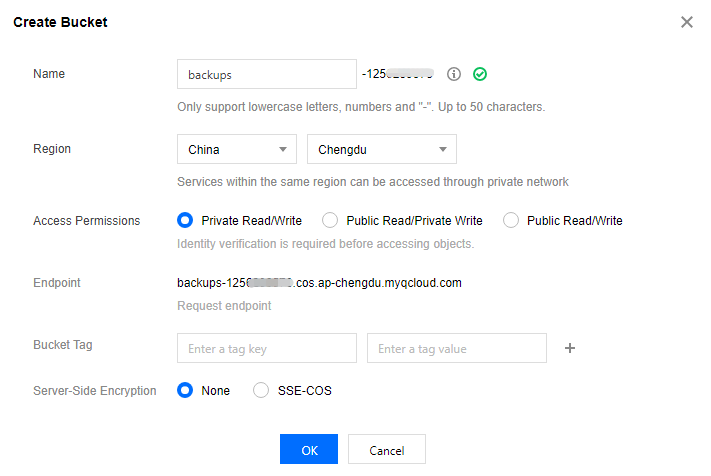
3. In the COS console, click Bucket List in the left sidebar first, and then Create Bucket to add a new bucket.
Name: bucket name, e.g. “backups”.
Region: you can choose a region closest to your location. Currently, we offer price discounts for regions in southwest China, so you may alternatively choose “Chengdu” or “Chongqing” to enjoy this offer.

Note:
4. Log in to the API Key Management Console, and create and save your SecretId and SecretKey.


Installing and Configuring Arq® Backup
Note:
Take Arq® Backup Version 6.2.11 for Windows as an example.
1. Download it from Arq® Backup Website.
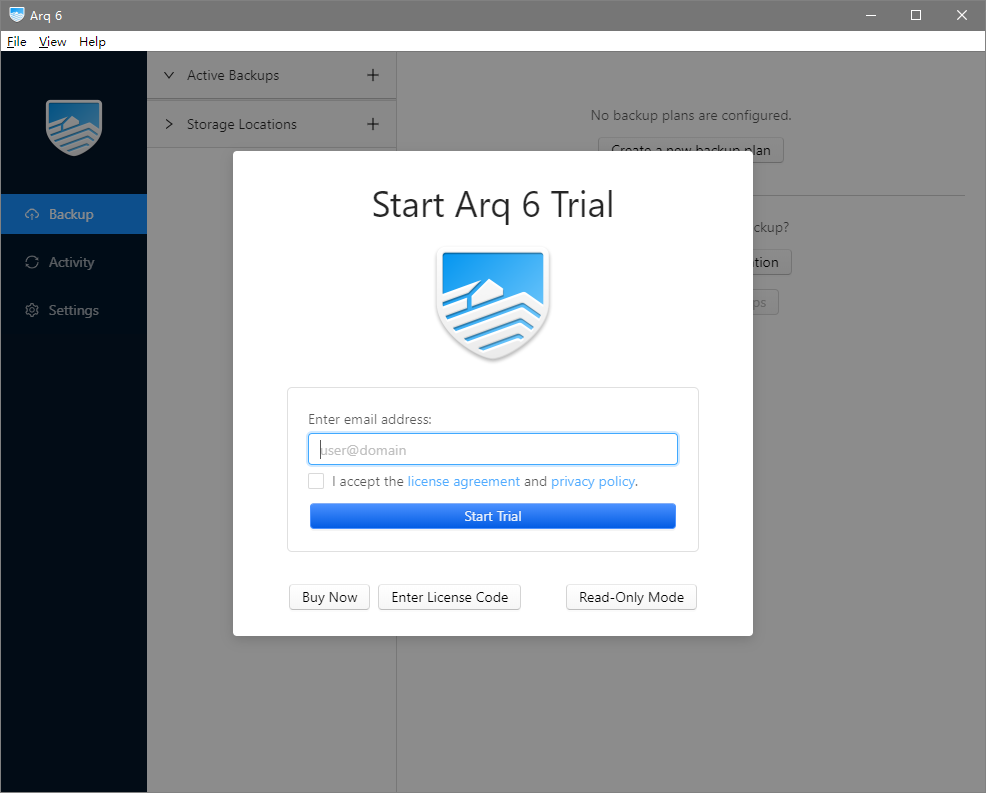
2. Follow the wizard to install the software. Once completed, it will start automatically while prompting you to log in. Then, enter your email address and click Start Trial.

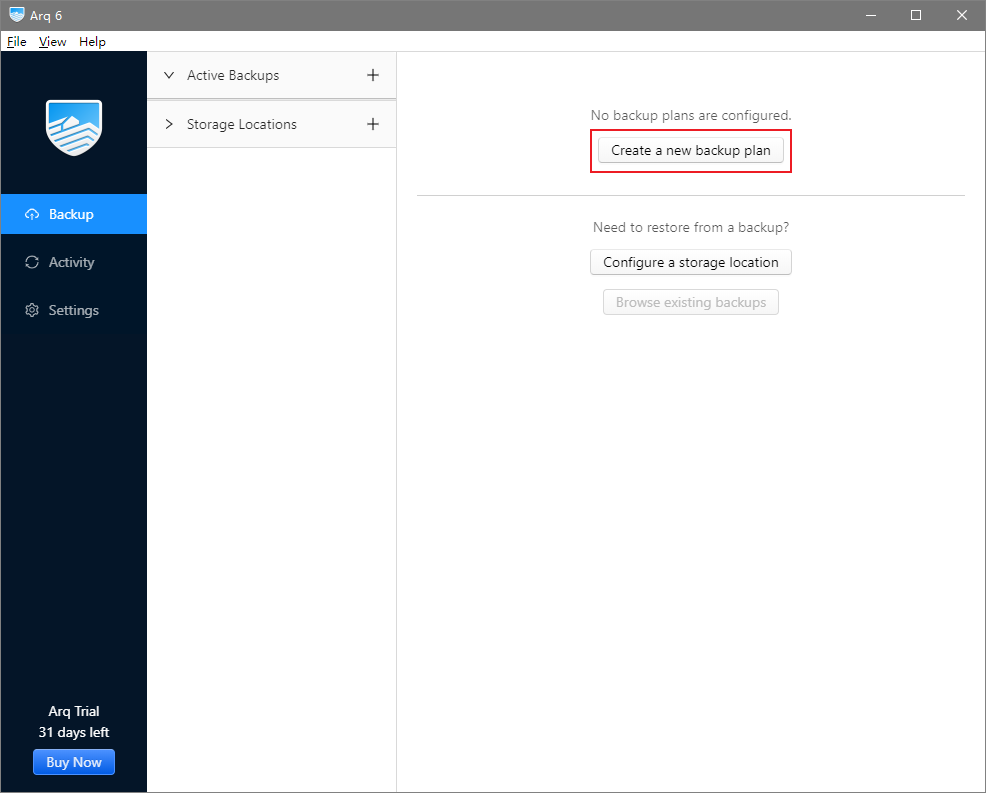
3. In the Backup pane, click Create a new backup plan to add a backup plan.

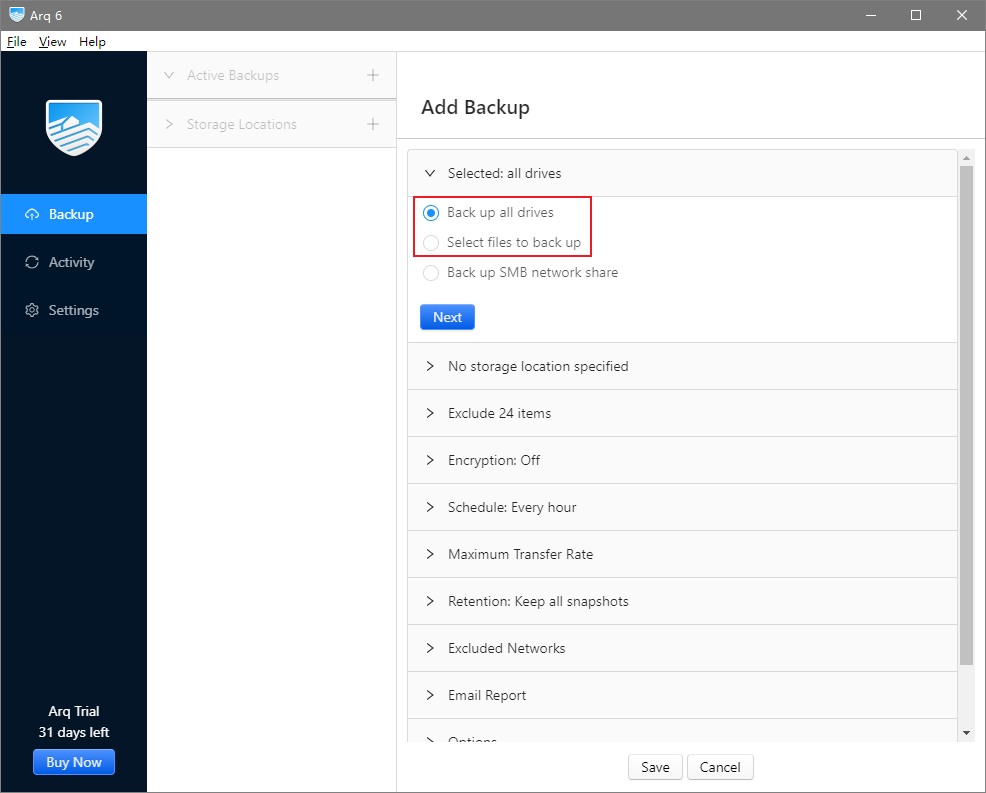
4. In the opened window, select Back up all drives* or Select files to back up.

5. Click Add storage location to add a location for storing your backups as shown below:
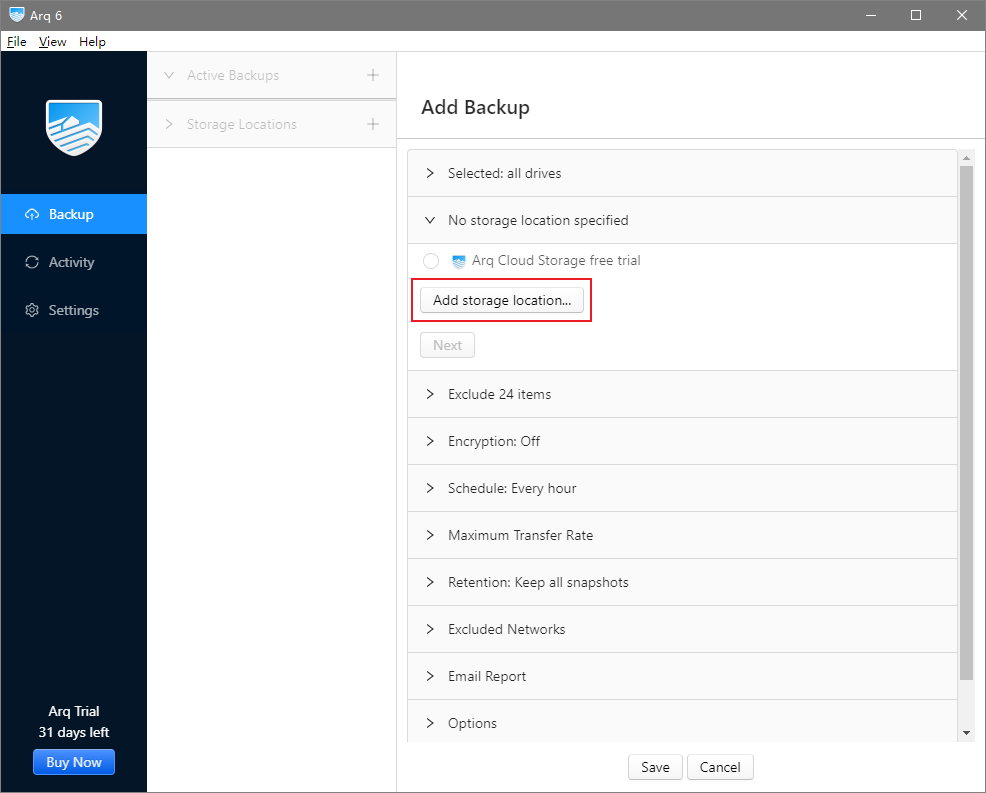

6. In this example, we select S3-Compatible Server.


7. In the opened window, configure the following as instructed, and click Continue.
Server URL: enter the above-mentioned request endpoint, starting from
cos and prepending https:// to the beginning of it, such as https://cos.ap-chengdu.myqcloud.com. Note that the bucket name is excluded here.Access Key ID: the above-mentioned SecretId.
Secret Access Key: the above-mentioned SecretKey.
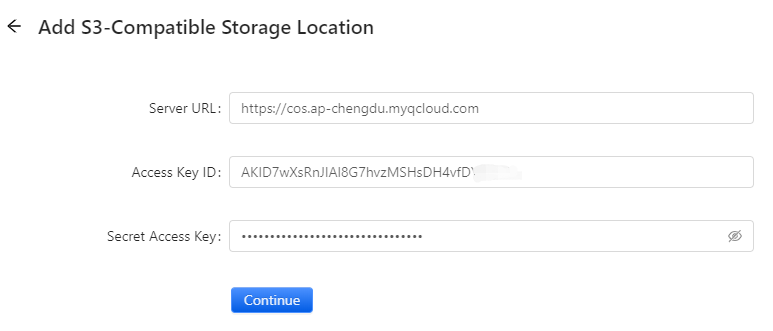

8. In the new window, click Use an existing bucket, select the above bucket you created, such as 
backups-1250000000, and click Save.

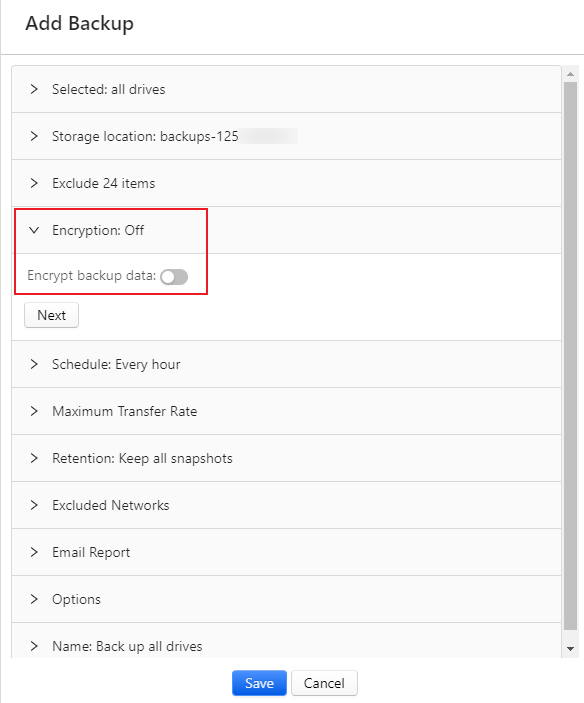
9. (Optional) You may choose to encrypt backup data. Here, we select On.

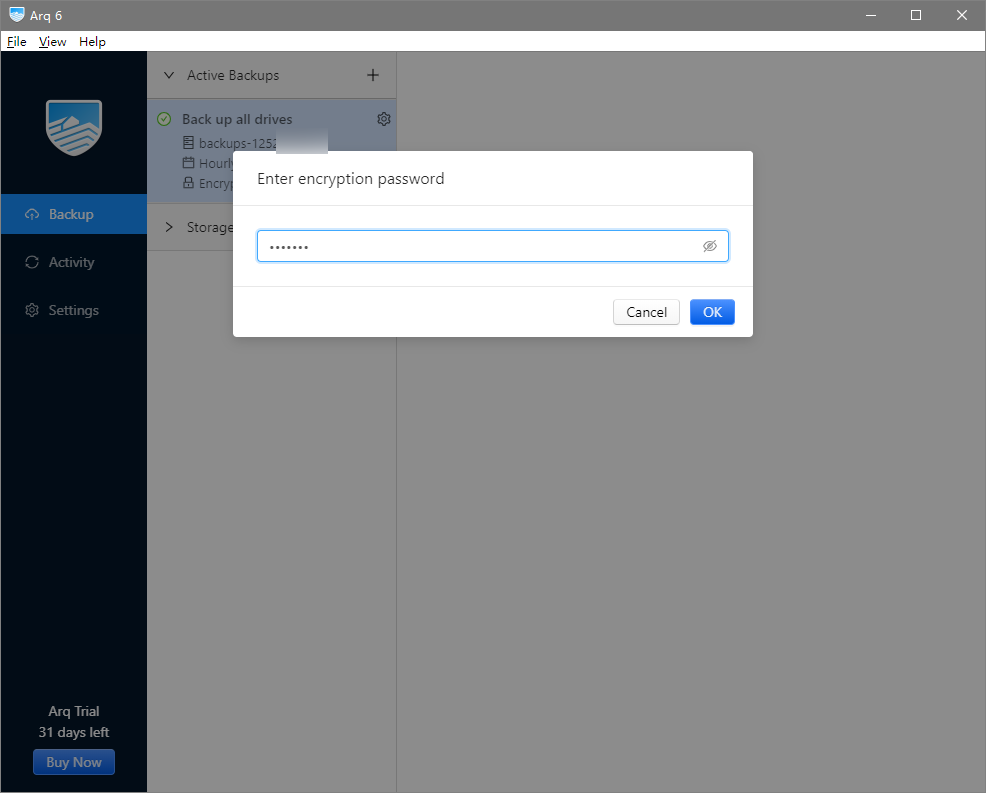
10. In the pop-up window, set your encryption password. Enter it twice and click OK. Please keep your password in mind, otherwise, you may not be able to restore your files from backup.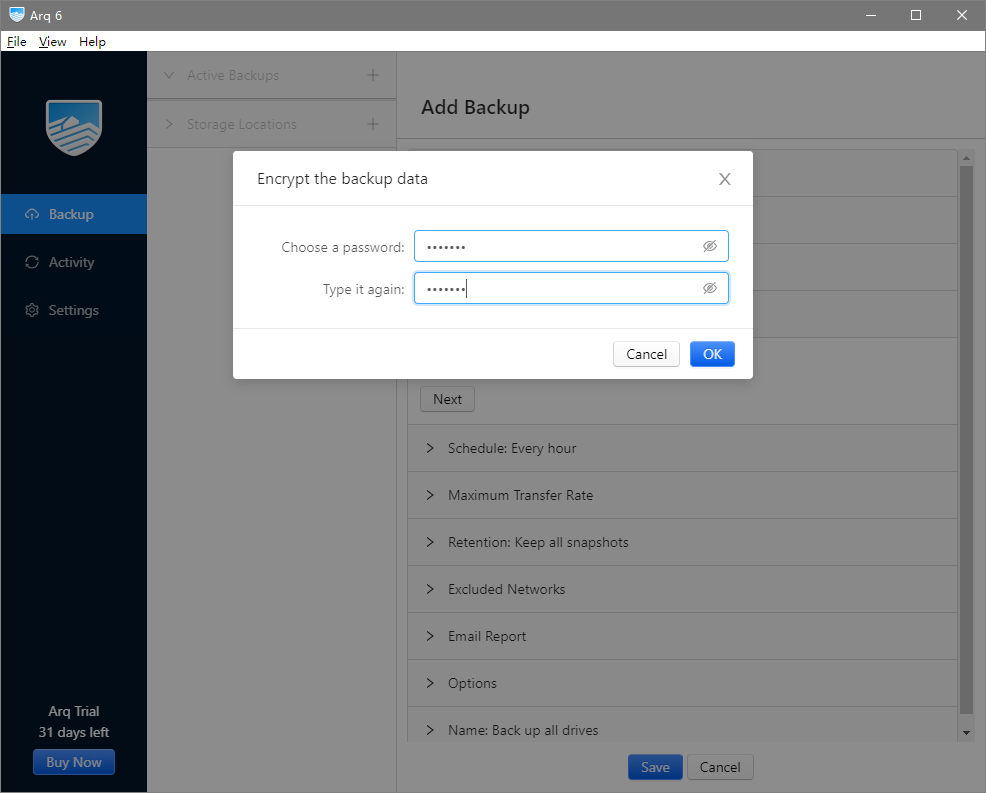

11. (Optional) You may configure a backup schedule.
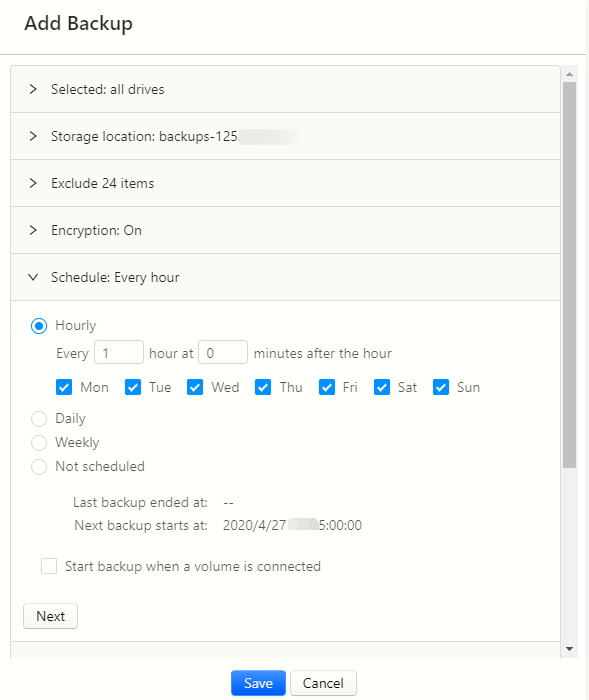

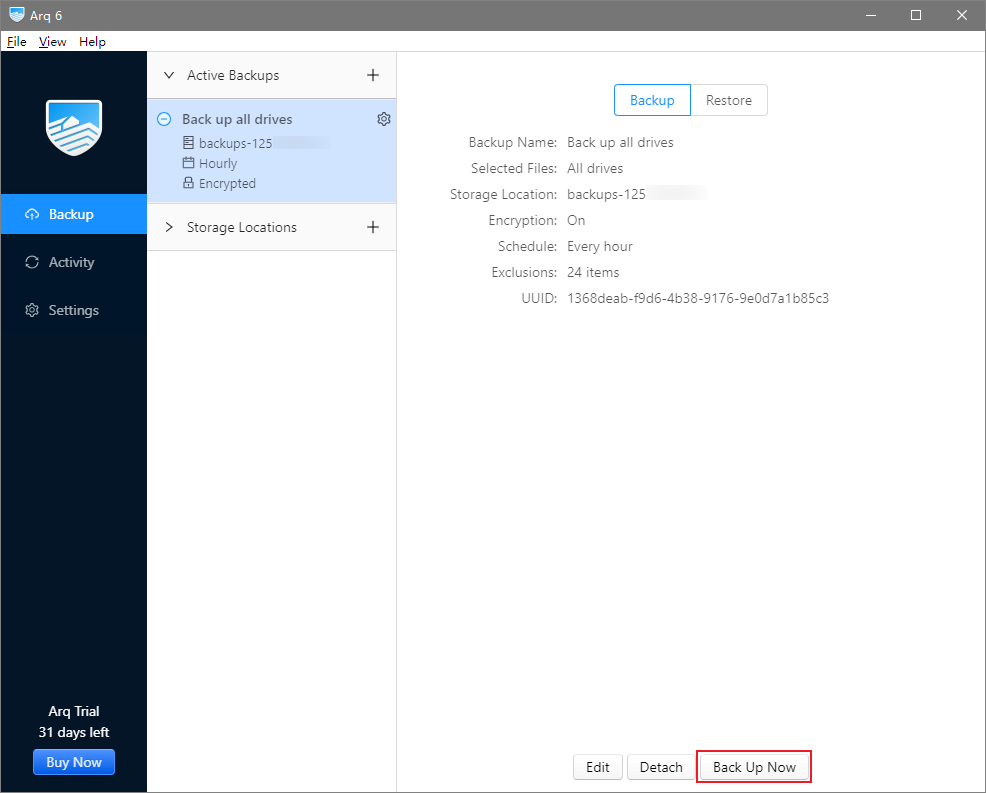
12. Click Save, and then Back Up Now to start the backup.

Restoring Files from Backup
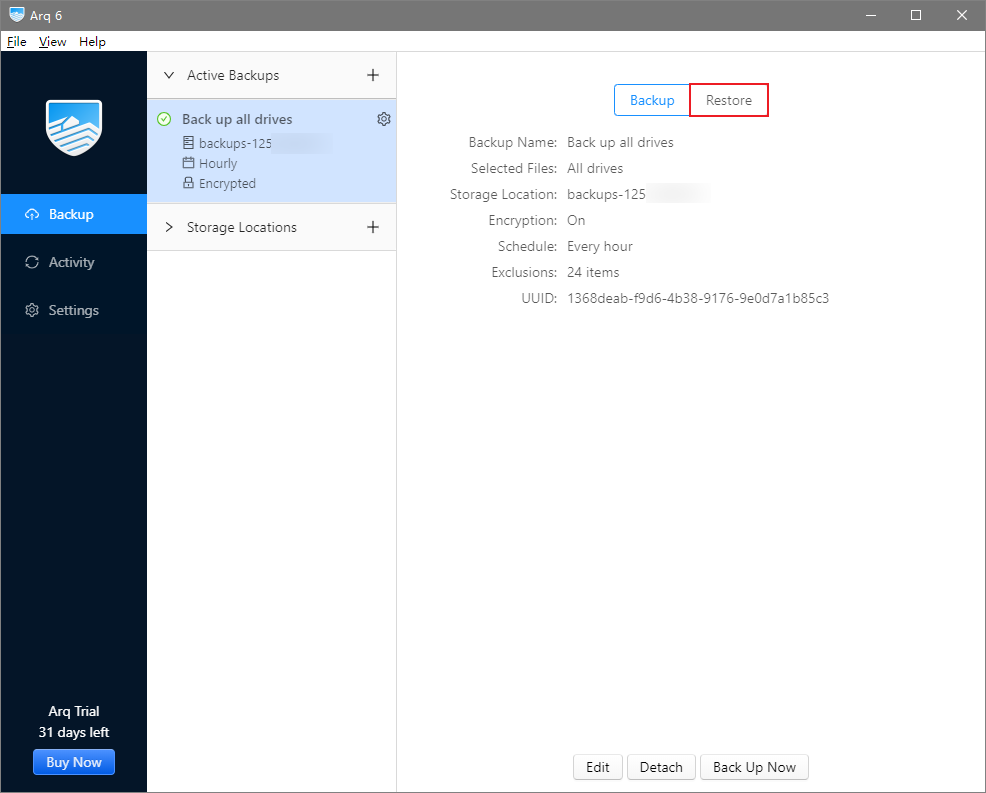
1. Click Restore in the list of Backup in the left sidebar.

2. Enter your password if you have enabled Encrypt backup data in Step 9.

3. Select the directories or files to restore, and the location to save them, and then click Restore.
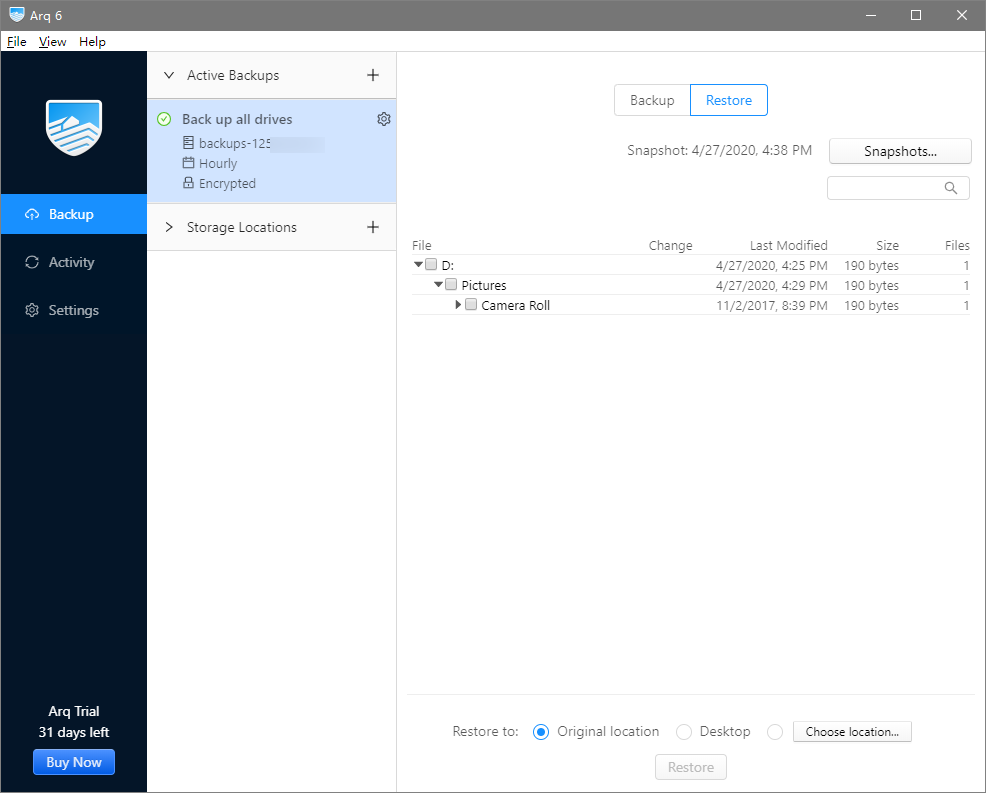

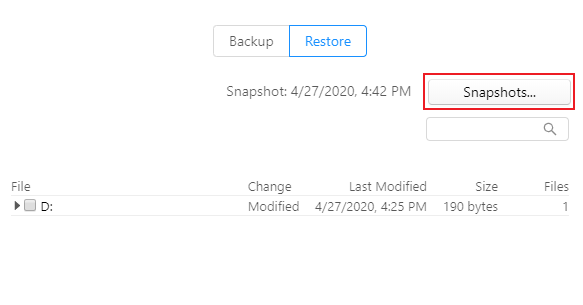
4. By default, files are restored from their latest backup. If necessary, you can choose to restore from an old version of backup in snapshots, which can be viewed by clicking Snapshots.

5. Choose a snapshot.
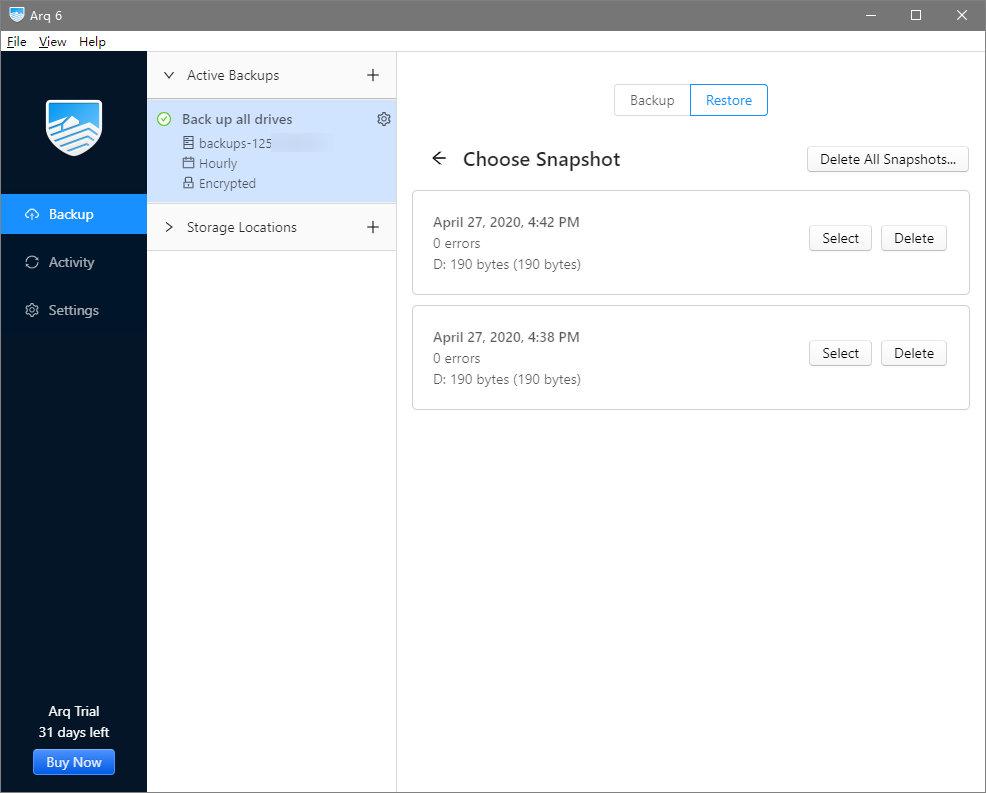

6. Select the snapshot directories or files to restore, and the location to save them, and then click Restore.
7. Once prompted that the restore operation is completed, you can go to the specified directories and view your restored files.

 Ya
Ya
 Tidak
Tidak
Apakah halaman ini membantu?