- Release Notes and Announcements
- Release Notes
- Announcements
- Announcement on Changing External Network Links
- Interface Authentication Upgrade Announcement
- Maintenance Time Change from Local Time to Beijing Time
- Account Type and Permission Changes
- Product Architecture Name Change
- Disk Storage Space Composition Change
- Ending Support for Classic Network [2022.12.31]
- Backup Billing Start [2022.07.10]
- Ending Sale for Basic Edition 1-Core Specification [2022.03.07]
- User Guide
- Product Introduction
- Purchase Guide
- Getting Started
- Operation Guide
- Constraints and Limits
- Usage Specifications and Suggestions
- Maintaining Instance
- Renaming Instance
- Setting Instance Remarks
- Setting Instance Tag
- Setting Instance Project
- Modify Instance-level Character Set Collation
- Modify System Time Zone
- Setting Instance Maintenance Information
- Multi-AZ Disaster Recovery
- Restarting Instance
- Terminating Instance
- Migrating Across AZs
- Manual Primary-Secondary Switching
- Recycle Bin
- Adjusting Instance Configuration
- Read-Only Instance
- Network and Security
- Account Management
- Database Management
- Data Security
- Parameter Configuration
- Monitoring and Alarms
- Backup and Restoration
- Log Management
- Publish-Subscribe
- SSIS
- Data Migration (New)
- Data Migration (Legacy)
- Best Practice
- API Documentation
- History
- Introduction
- API Category
- Making API Requests
- Instance Management APIs
- CreateCloudDBInstances
- CreateCloudReadOnlyDBInstances
- ModifyInstanceEncryptAttributes
- UpgradeDBInstance
- RollbackInstance
- RestoreInstance
- RestartDBInstance
- ResetAccountPassword
- ModifyDBRemark
- ModifyDBName
- ModifyDBInstanceProject
- ModifyDBInstanceName
- ModifyAccountPrivilege
- InquiryPriceUpgradeDBInstance
- InquiryPriceCreateDBInstances
- DescribeZones
- DescribeRollbackTime
- DescribeRegions
- DescribeProductConfig
- DescribeFlowStatus
- DescribeDBs
- DescribeDBInstances
- DescribeAccounts
- DeleteDB
- DeleteAccount
- CreateDBInstances
- CreateDB
- CreateAccount
- TerminateDBInstance
- RecycleDBInstance
- CloneDB
- DescribeDBCharsets
- ModifyDatabaseMdf
- ModifyDatabaseCT
- ModifyDatabaseCDC
- DescribeDBsNormal
- ModifyInstanceParam
- DescribeInstanceParams
- DescribeInstanceParamRecords
- OpenInterCommunication
- DescribeDBInstanceInter
- DescribeBusinessIntelligenceFile
- DeleteBusinessIntelligenceFile
- CreateBusinessIntelligenceFile
- CreateBusinessDBInstances
- CloseInterCommunication
- Network Management APIs
- Backup APIs
- RunMigration
- ModifyMigration
- DescribeMigrations
- DescribeMigrationDetail
- DescribeBackups
- DeleteMigration
- CreateMigration
- CreateBackup
- ModifyBackupStrategy
- StartIncrementalMigration
- StartBackupMigration
- ModifyIncrementalMigration
- ModifyBackupMigration
- DescribeUploadBackupInfo
- DescribeIncrementalMigration
- DescribeBackupUploadSize
- DescribeBackupMigration
- DescribeBackupCommand
- DeleteIncrementalMigration
- DeleteBackupMigration
- CreateIncrementalMigration
- CreateBackupMigration
- DescribeBackupFiles
- Extended Event APIs
- Database APIs
- Other APIs
- Data Types
- Error Codes
- FAQs
- Overview
- Model Selection
- Pricing and Selection
- Connection and Network
- Account and Permission
- Backup and Rollback
- Data Migration
- Publish/Subscribe
- Read-Only Instance
- Version and Architecture Upgrade
- Disk Space and Specification Adjustment
- Monitoring and Alarms
- Log
- Parameter Modification
- Features
- Performance/Space/Memory
- Service Agreement
- Performance Evaluation
- Glossary
- Contact Us
Overview
TencentDB for SQL Server supports both private and public network addresses, with the former enabled by default for you to access your instance over the private network and the latter enabled or disabled as needed.
Note
After enabling the public network address, you can access your TencentDB for SQL Server instance by using the system-assigned domain name and port. It takes about five minutes for the configuration to take effect.
After the public network access is enabled, it will be controlled by the security group policy. You should configure the database access source in the security group's inbound rules and open the protocol ports (both the private network port (1433 by default) and public network port) as instructed in Configuring Security Group.
Enabling the public network address will expose your database services to the public network, which may lead to database intrusions or attacks. We recommend that you use the private network to connect to the database in the production environment, as public network access may become unavailable due to uncontrollable factors, such as DDoS attacks and large traffic surges.
A public network address makes it less secure to access an instance, and service availability cannot be guaranteed by SLA. Therefore, we recommend that you access your instance at the public network address only when developing, testing, or managing databases. To make transfer faster and ensure a higher security level, use the private network address for database connection. Do not use the public network to sustain the business load, and if you need this, we recommend that you follow the instructions described in Enabling Public Network Access Through CLB.
Currently, enabling the public network address and the resulting traffic are free of charge, but the stability of the public network bandwidth and traffic cannot be guaranteed.
The instance service downtime caused by public network errors won't be counted into the "Single Instance Service Downtime" in TencentDB for SQL Server Service Level Agreement (SLA).
Prerequisites
The instance uses a VPC.
The instance resides in the following regions: Guangzhou, Shanghai, Beijing, Chengdu, Chongqing, Nanjing, Hong Kong (China), Singapore, Seoul, Tokyo, Silicon Valley, or Frankfurt.
Note:
If you can't enable public network access for an instance in the above regions, submit a ticket for assistance.
Private/Public network address description
Address Type | Description |
Private network address | A private network address is an IP address that cannot be accessed by an external device on the internet. It is the implementation form of the Tencent Cloud private network service. A private network address is provided by the system by default and cannot be disabled. You can switch the network type though. If your CVM and TencentDB for SQL Server instances are in the same VPC in the same region under the same Tencent Cloud root account, they can be interconnected over the private network, and there is no need to enable the public network address. It is highly secure. |
Public network address | A public network address is a non-reserved address on the internet. A public network address needs to be manually enabled and can be disabled when no longer needed. As a public network address will expose your instance to security risks, it should be used with caution. A device not in Tencent Cloud can access a TencentDB for SQL Server instance at its public network address. |
Directions
The procedures for enabling or disabling public network addresses for the primary instance and read-only groups are slightly differently. For the primary instance, configurations must be made within the instance details page. As for read-only groups, configurations must be made within the read-only group of the corresponding primary instance. The following sections will elaborate on the steps respectively.
Note:
The independent enabling or disabling of public network addresses is not supported by read-only instances. It is only supported by the read-only group which the read-only instance belongs to. Moreover, it can only be configured within the read-only group which the read-only instance belongs to, and cannot be set from the details page of the read-only instance.
Enabling Public IP Addresses for Primary Instances
1. Log in to the TencentDB for SQL Server console.
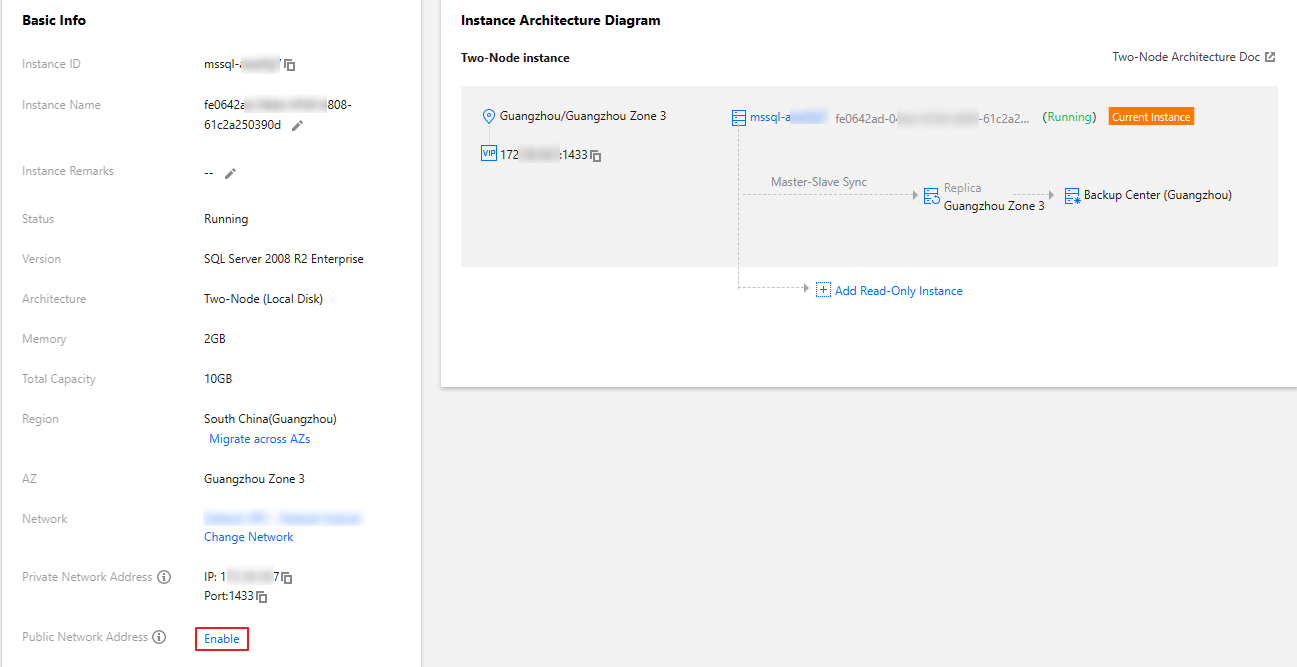
2. Select the region and click the ID or Manage in the Operation column of the target instance in the instance list.
3. On the Instance Details page, click Enable in Basic Info > Public Address.

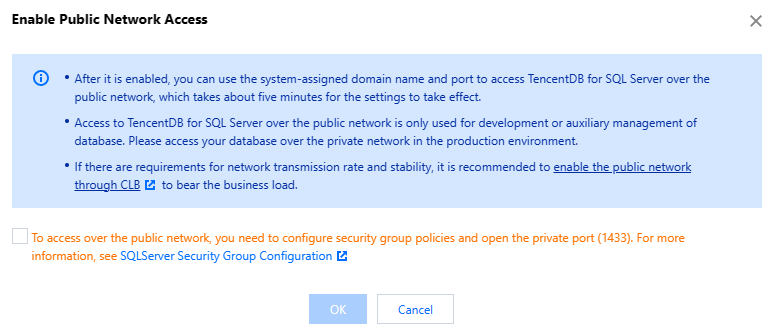
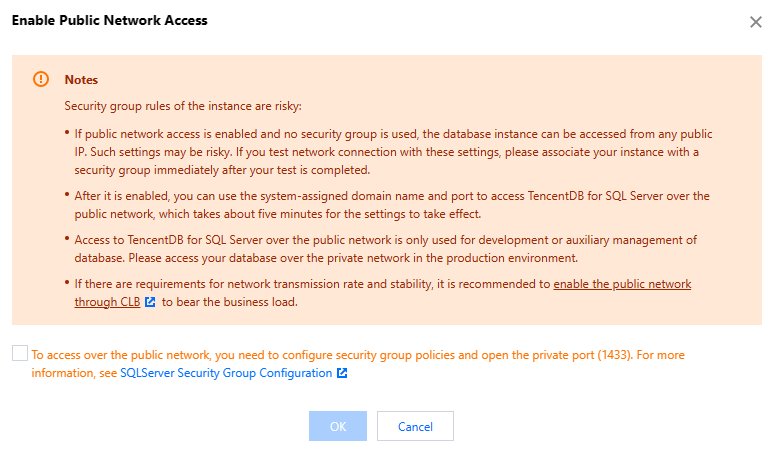
4. In the Enabling public network window, read the note, indicate your consent, and click OK (before the public network address is enabled, a note will be displayed depending on whether a security group is configured).
Note:
After the public network address is enabled, it can be viewed in Basic Info. The public network access can be toggled off. When it is enabled again, the public network address corresponding to the domain name remains the same.
If your instance is bound to a security group, and no high-risk policy is involved, the public network address can be enabled, and a note will be displayed as follows:
If your instance is bound to a security group, but there is a high-risk inbound rule such as
0.0.0.0/0 or ::/0, a note will be displayed as follows: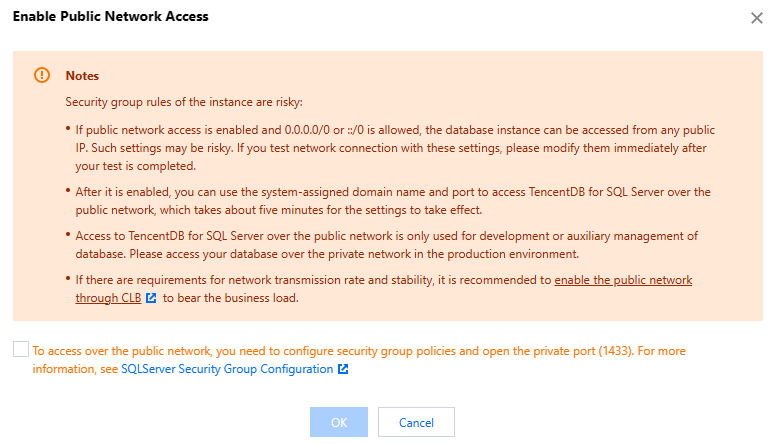
If your instance is not bound to a security group, enabling public network access will lead to a high risk, and a note will be displayed as follows:
5. After the instance status becomes Running, you can view the public network address on the instance details page.
Disabling the public network address
1. Log in to the TencentDB for SQL Server console.
2. Select the region and click the ID or Manage in the Operation column of the target instance in the instance list.
3. On the Instance Details tab, click Disable in Basic Info > Public Network Address.
4. In the Disabling public network pop-up window, click OK.
Note:
After it is disabled, you can no longer use the domain name and port to access TencentDB for SQL Server over the public network. To minimize potential losses, make sure that no public address is used in your system before disabling it.
Enabling Public Network Addresses for Read-Only Groups
1. Log in to the SQL Server Console.
2. Select the region, and in the instance list, locate the primary instance for which you want to enable the public network address of the read-only group. Click Instance ID or Manage option in the Operation column.
3. Go to the Read-Only Instance page from the Instance Details page, then click Enable following the Public Network Address under the RO group .

4. In the window for enabling public network settings, read and check the prompt, then click OK .
Note:
When the public network address is enabled, it can be viewed in the RO group or the basic information of the corresponding read-only instance. The public network connection can be enabled via the toggle switch. And when you re-enable the public network, the public network address corresponding to the domain remains unchanged.
Disabling Public Network Addresses for Read-Only Groups
1. Log in to the SQL Server Console.
2. Select the region, and in the instance list, locate the primary instance for which you want to disable the public network address of the read-only group. Click Instance ID or Manage option in the Operation column.
3. Go to the Read-Only Instance page from the Instance Details page, then click Close following the Public Network Address under the RO group .
4. In the pop-up window for disabling public network access, click **OK .
Note:
After the public network access is disabled, you cannot access the read-only group corresponding to the SQL Server primary instance via the public domain names and ports. Please ensure that your application system does not use public access addresses to avoid losses.

 Yes
Yes
 No
No
Was this page helpful?