Sample of Security Group Change
Download
Mode fokus
Ukuran font
Use Case
VPC A and VPC B are connected through a CCN connection or peering connection, allowing CVMs on the VPC B to access CVMs on VPC A through port 80.
It’s detected that two IPs from VPC B,
172.21.10.13 and 172.21.10.17, keep scan the non-open ports of VPC A. Need to add a policy in the security group to block the IP
172.21.10.13 and 172.21.10.17.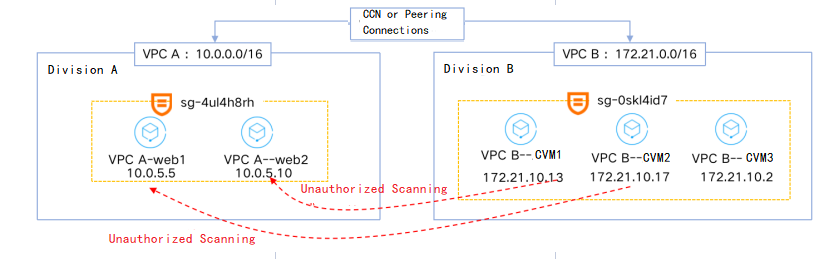
Directions
Note:
It is recommended to operate during downtime or off-peak hours of your business.
Step 1. Clone the security group
1. Log in to the VPC console and select Security > Security Groups in the left sidebar.
2. Locate the security group that is associated with the attacked instance (
sg-4ul4h8rh in this example). Click More > Clone.
3. Enter a name for the new security group and click OK.
Step 2. Modify the cloned security group
Note:
In this example, the security group is associated with multiple instances. Instance
web1 in VPC A is used as a test instance, to which the cloned security group will be bound after the modification.1. Click Clone security group ID.
2. Click Add rule on the tab of inbound rule.
3. In the pop-up dialog box, select Refuse for source IP addresses (in this sample,
172.21.10.13 and 172.21.10.17). Click OK.Note:
Common errors:
Incorrect policy: in this sample, you should select "Refuse" to block the traffic from source IP addresses. If you select "Allow", the traffic will not be blocked as desired.
IP range too wide: in this sample, only the two CVMs (CVM1 and CVM2) in VPC B need to be blocked, and CVM3 still needs to communicate with CVMs in VPC A. If
172.21.10.0/24 is also entered as the source IP address, CVM3 in VPC B will unable to access the CVMs in VPC A. Therefore, you should enter the specific IP addresses or narrow the IP range.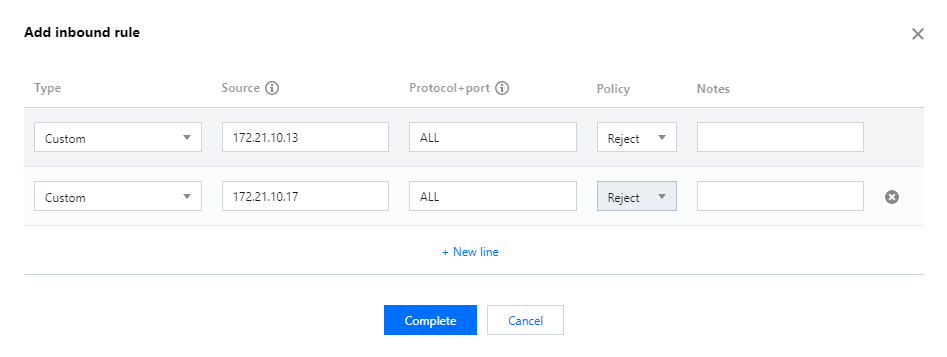
Step 3. Bind the modified cloned security group to the test instance
Note:
When multiple security groups are bound, they will be matched from top to bottom. In this sample, we move the cloned security group to the top to ensure that it is matched first.
1. Click Manage instances on the right of the cloned security group to go to the Associate with instance page.
2. Click Add instance, and select the desired instance. In this sample, it is the test instance web1.
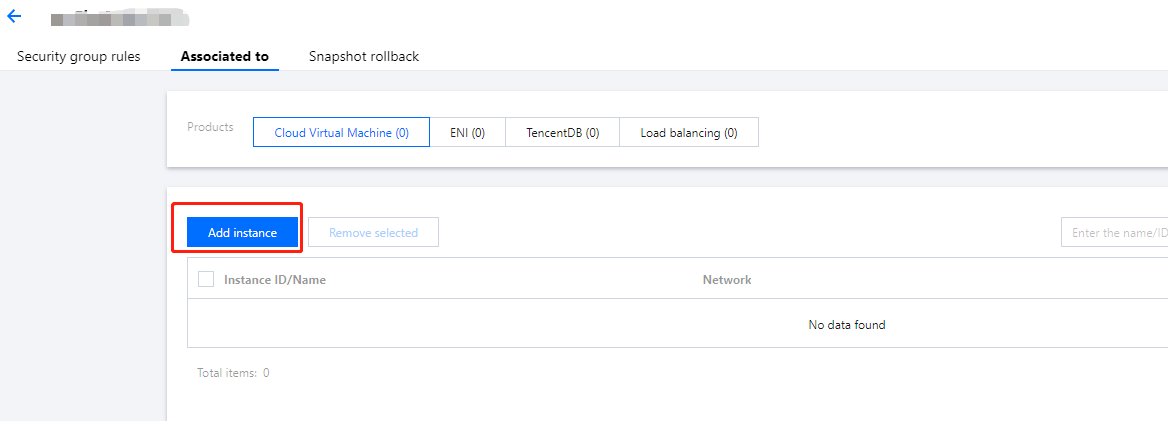
3. Click OK.
4. Observe if the test instance continues to run properly.
If it runs properly, proceed to the next step.
If there is any exception, roll back the change and backtrack the issue. If the issue is identified in the change process, assess whether continue to modify the cloned security group and proceed the change. If yes, repeat step 2. If no, end the process.
Note:
It is observed that the test instance runs properly, which means the modification for the cloned security group meets expectation.
Step 4. Unbind the cloned security group from the test instance
Note:
Unbind the cloned security group from the test instance and modify the original security group.
Note that if only one security group is associated with an instance, you cannot unbind the security group.
1. Click Manage instances on the right of the cloned security group to go to the Associate with instance page.
2. Click Remove from the security group on the right of the instance, from which the security group needs to be unbound (in this sample, it is the test instance web1).

Step 5. Modify the original security group
1. Click Original security group ID. In this sample, it is the ID of the security group bound with web1 and web2 in VPC A.
2. Click Add rule on the tab of inbound rule.
3. In the pop-up dialog box, select "Refuse" for source IP addresses (in this sample,
172.21.10.13 and 172.21.10.17). Click OK.Step 6. Roll back the change unconditionally after two minutes
Note:
The purpose is to find out in time whether there is a temporary impact on associated CVMs caused by the change of the security group, so as to make response decisions and reduce the impact.
1. Wait about two minutes after the original security group rule is modified, then delete the modification made to the security group in step 5.
2. Observe whether the associated CVMs run properly for at least 30 minutes.
If all CVMs run properly, proceed to the next step.
If there is any exception, it is suggested that you end the change immediately and restart it after backtracking the issue and assessing the impact.
Note:
In this sample, all CVMs run properly during the 30 minutes.
Step 7. Modify the original security group again
1. Click Original security group ID. In this sample, it is the ID of the security group bound with web1 and web2 in VPC A.
2. Click Add rule on the tab of inbound rule.
3. In the pop-up dialog box, select "Refuse" for source IP addresses (in this sample,
172.21.10.13 and 172.21.10.17). Click OK.4. Observe whether associated CVMs run properly for at least 30 minutes.
If all CVMs run properly, it indicates the change is successful.
If there is any exception, it is suggested that you end the change immediately and restart it after backtracking the issue and assessing the impact.
Note:
In this sample, all CVMs run properly. The change process is completed.
Bantuan dan Dukungan
Apakah halaman ini membantu?
Anda juga dapat Menghubungi Penjualan atau Mengirimkan Tiket untuk meminta bantuan.
masukan