- Release Notes and Announcements
- Release Notes
- TRTC Live (TUILiveKit) Product Launch Announcement
- TRTC Conference Official Editions Launched
- The commercial version of Conference is coming soon
- Terms and Conditions Applicable to $9.9 Starter Package
- Rules for the "First Subscription $100 Discount" Promotion
- Announcement on the Start of Beta Testing for Multi-person Audio and Video Conference
- TRTC Call Official Editions Launched
- License Required for Video Playback in New Version of LiteAV SDK
- TRTC to Offer Monthly Packages
- Product Introduction
- Purchase Guide
- Billing Overview
- RTC-Engine Packages
- TRTC Call Monthly Packages
- TRTC Conference Monthly Packages
- TRTC Live Monthly Packages
- Pay-As-You-Go
- Billing Explanation for Subscription Package Duration
- Billing of On-Cloud Recording
- Billing of MixTranscoding and Relay to CDN
- Free Minutes
- FAQs
- Billing of Monitoring Dashboard
- Billing of Recording Delivery
- Overdue and Suspension Policy
- Refund Policies
- User Tutorial
- Free Demo
- Video Calling (Including UI)
- Overview (TUICallKit)
- Activate the Service(TUICallKit)
- Integration (TUICallKit)
- UI Customization (TUICallKit)
- Offline Call Push (TUICallKit)
- On-Cloud Recording (TUICallKit)
- Additional Features(TUICallKit)
- Server APIs (TUICallKit)
- Client APIs (TUICallKit)
- ErrorCode
- Release Notes (TUICallKit)
- FAQs(TUICallKit)
- Multi-Participant Conference (with UI)
- Overview (TUIRoomKit)
- Activate the Service (TUIRoomKit)
- Integration (TUIRoomKit)
- UI Customization (TUIRoomKit)
- Conference Control (TUIRoomKit)
- Cloud Recording (TUIRoomKit)
- API Documentation(TUIRoomKit)
- In-Conference Chat (TUIRoomKit)
- FAQs (TUIRoomKit)
- Error Code (TUIRoomKit)
- Live Streaming (Including UI)
- Voice Chat Room (with UI)
- Integration (No UI)
- SDK Download
- API Examples
- Integration Guide
- Client APIs
- Advanced Features
- Relay to CDN
- Enabling Advanced Permission Control
- RTMP Streaming with TRTC
- Utilizing Beautification Effects
- Testing Hardware Devices
- Testing Network Quality
- On-Cloud Recording
- Custom Capturing and Rendering
- Custom Audio Capturing and Playback
- Sending and Receiving Messages
- Event Callbacks
- Access Management
- How to push stream to TRTC room with OBS WHIP
- Server APIs
- Console Guide
- Solution
- FAQs
- Legacy Documentation
- Protocols and Policies
- TRTC Policy
- Glossary
iOS and macOS
Last updated: 2022-03-09 16:43:44
Application Scenarios
TRTC supports four room entry modes. Video call (VideoCall) and audio call (AudioCall) are the call modes, and interactive video streaming (Live) and interactive audio streaming (VoiceChatRoom) are the live streaming modes.
The call modes allow a maximum of 300 users in each TRTC room, and up to 50 of them can speak at the same time. The call modes are suitable for scenarios such as one-to-one video calls, video conferencing with up to 300 participants, online medical consultation, remote interviews, video customer service, and online Werewolf playing.
How It Works
TRTC services use two types of server nodes: access servers and proxy servers.
- Access server
This type of nodes use high-quality lines and high-performance servers and are better suited to drive low-latency end-to-end calls, but the unit cost is relatively high. - Proxy server
This type of servers use mediocre lines and average-performance servers and are better suited to power high-concurrency stream pulling and playback. The unit cost is relatively low.
In the call modes, all users in a TRTC room are assigned to access servers and are in the role of “anchor”. This means the users can speak to each other at any point during the call (up to 50 users can send data at the same time). This makes the call modes suitable for use cases such as online conferencing, but the number of users in each room is capped at 300.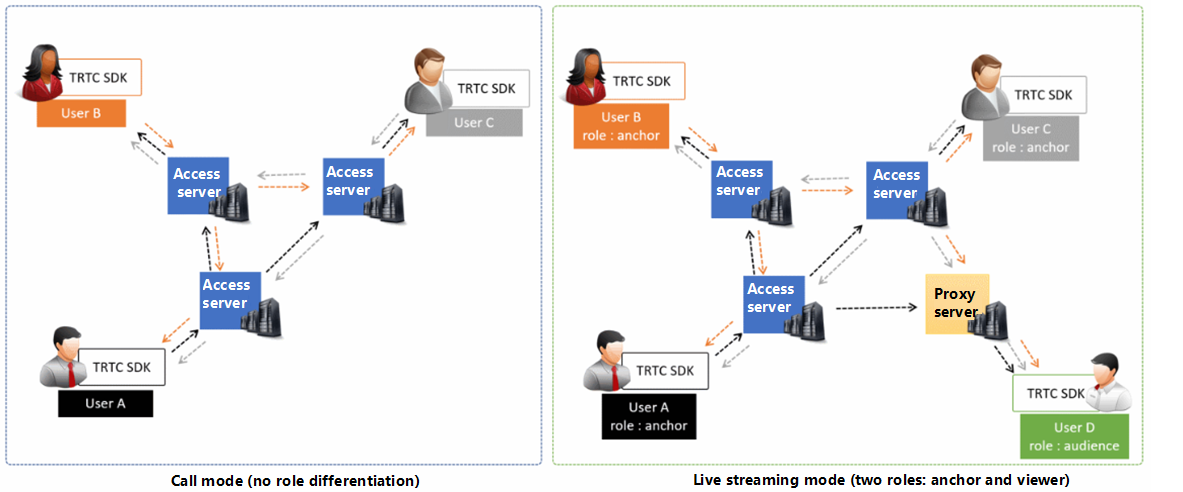
Sample Code
You can visit GitHub to obtain the sample code used in this document.
Note:If your access to GitHub is slow, download the ZIP file here.
Directions
Step 1. Integrate the SDKs
You can integrate the TRTC SDK into your project in the following ways:
Method 1: integrating through CocoaPods
Install CocoaPods. For detailed directions, please see Getting Started.
Open the
Podfilefile in the root directory of your project and add the code below.Note:If you cannot find a
Podfilefile in the directory, run thepod initcommand to create one and add the code below.target 'Your Project' do pod 'TXLiteAVSDK_TRTC' endRun the command below to install the TRTC SDK.
pod install
After successful installation, an XCWORKSPACE file will be generated in the root directory of your project.
4. Open the XCWORKSPACE file.
Method 2: manual integration
If you do not want to install CocoaPods, or your access to CocoaPods repositories is slow, you can download the ZIP file of the SDK and integrate it into your project as instructed in SDK Quick Integration > iOS.
Step 2. Add device permission requests
Add camera and mic permission requests in the Info.plist file.
| Key | Value |
|---|---|
| Privacy - Camera Usage Description | The reason for requesting camera permission, for example, “camera access is required to capture video” |
| Privacy - Microphone Usage Description | The reason for requesting mic permission, for example, “mic access is required to capture audio” |
Step 3. Initialize an SDK instance and configure event callbacks
Call sharedInstance() to create a
TRTCCloudinstance.// Create a `TRTCCloud` instance _trtcCloud = [TRTCCloud sharedInstance]; _trtcCloud.delegate = self;Set the attributes of
delegateto subscribe to event callbacks and listen for event and error notifications.// Error events must be listened for and captured, and error messages should be sent to users.
- (void)onError:(TXLiteAVError)errCode errMsg:(NSString *)errMsg extInfo:(NSDictionary *)extInfo {
if (ERR_ROOM_ENTER_FAIL == errCode) {
[self toastTip:@"Failed to enter room"];
[self.trtcCloud exitRoom];
}
}
Step 4. Assemble the room entry parameter TRTCParams
When calling the enterRoom() API, you need to pass in a key parameter TRTCParams, which includes the following required fields:
| Parameter | Type | Description | Example |
|---|---|---|---|
| sdkAppId | Number | Application ID, which you can view in the TRTC console. | 1400000123 |
| userId | String | Can contain only letters (a-z and A-Z), digits (0-9), underscores, and hyphens. We recommend you set it based on your business account system. | test_user_001 |
| userSig | String | userSig is calculated based on userId. For the calculation method, see UserSig. |
eJyrVareCeYrSy1SslI... |
| roomId | Number | Numeric room ID. For string-type room ID, use strRoomId in TRTCParams. |
29834 |
Note:In TRTC, users with the same
userIdcannot be in the same room at the same time as it will cause a conflict.
Step 5. Create and enter a room
- Call enterRoom() to enter the room specified by the
roomIdfield inTRTCParams. If the room does not exist, the SDK will create a room whose room number is the value ofroomId. - Set the
appSceneparameter according to your actual application scenario. InappropriateappScenevalues may lead to increased lag or decreased clarity.
- For video calls, set the parameter to
TRTCAppScene.videoCall. - For audio calls, set the parameter to
TRTCAppScene.audioCall.
- You will receive the
onEnterRoom(result)callback. Ifresultis greater than 0, room entry succeeds, and the value ofresultindicates the time (ms) room entry takes; ifresultis less than 0, room entry fails, and the value is the error code for the failure.
- (void)enterRoom() {
    TRTCParams *params = [TRTCParams new];
    params.sdkAppId = SDKAppID;
    params.roomId = _roomId;
    params.userId = _userId;
    params.role = TRTCRoleAnchor;
    params.userSig = [GenerateTestUserSig genTestUserSig:params.userId];
    [self.trtcCloud enterRoom:params appScene:TRTCAppSceneVideoCall];
}

- (void)onEnterRoom:(NSInteger)result {
    if (result > 0) {
        [self toastTip:@"Entered room successfully"];
    } else {
        [self toastTip:@"Failed to enter room"];
    }
}
Note:
- If room entry fails, you will also receive the
onErrorcallback, which containserrCode(error code),errMsg(error message), andextraInfo(reserved parameter).- If you are already in a room, you must call
exitRoomto exit the room before entering another room.- The value of
appScenemust be the same on each client. InconsistentappScenemay cause unexpected problems.
Step 6. Subscribe to remote audio/video streams
The SDK supports automatic subscription and manual subscription.
Automatic subscription (default)
In the automatic subscription mode, after room entry, the SDK will automatically pull audio streams from other users in the room. This enables instant streaming.
- If other users in the room are sending audio data, you will receive the onUserAudioAvailable() notification, and the SDK will automatically play back the users’ audio.
- Call muteRemoteAudio(userId, mute: true) to mute a specified user (
userId), or muteAllRemoteAudio(true) to mute all remote users. The SDK will stop pulling the audio data of the user(s). - If a remote user in the room is sending video data, you will receive the onUserVideoAvailable() notification, but since the SDK has not received instructions on how to display the video, it will not process the video data. You must call startRemoteView(userId, view: view) to associate the remote user’s video data with
view. - Call setRemoteViewFillMode() to specify the display mode of a remote video.
Fill: aspect fill. The image may be scaled up and cropped, but there are no black bars.Fit: aspect fit. The image may be scaled down to ensure that it’s displayed in its entirety, and there may be black bars.
- Call stopRemoteView(userId) to block the video data of a specified user (
userId) or stopAllRemoteView() to block the video data of all remote users. The SDK will stop pulling the video data of the user(s).
// Sample code: subscribe to or unsubscribe from the video image of a remote user based on the notification received
- (void)onUserVideoAvailable:(NSString *)userId available:(BOOL)available {
    UIView* remoteView = remoteViewDic[userId];
    if (available) {
        [_trtcCloud startRemoteView:userId streamType:TRTCVideoStreamTypeSmall view:remoteView];
    } else {
        [_trtcCloud stopRemoteView:userId streamType:TRTCVideoStreamTypeSmall];
    }
}Note:If you do not call
startRemoteView()to subscribe to the video stream immediately after receiving theonUserVideoAvailable()event callback, the SDK will stop pulling the remote video within 5 seconds.
Manual subscription
You can call setDefaultStreamRecvMode() to switch the SDK to the manual subscription mode. In this mode, the SDK will not pull the data of other users in the room automatically. You have to start the process manually via APIs.
- Before you enter a room, call the setDefaultStreamRecvMode(false, video: false) API to switch the SDK to the manual subscription mode.
- If other users in the room are sending audio data, you will receive the onUserAudioAvailable() notification, and you need to call muteRemoteAudio(userId, mute: false) to manually subscribe to the users’ audio. The SDK will decode and play the audio data received.
- If a remote user in the room is sending video data, you will receive the onUserVideoAvailable() notification, and you need to call startRemoteView(userId, view: view) to manually subscribe to the user's video data. The SDK will decode and play the video data received.
Step 7. Publish the local stream
- Call startLocalAudio() to enable local mic capturing and encode and send the audio captured.
- Call startLocalPreview() to enable local camera capturing and encode and send the video captured.
- Call setLocalViewFillMode() to set the display mode of the local video:
Fill: aspect fill. The image may be scaled up and cropped, but there are no black bars.Fit: aspect fit. The image may be scaled down to ensure that it’s displayed in its entirety, and there may be black bars.
- Call setVideoEncoderParam() to set the encoding parameters for the local video, which determine the quality of your video seen by other users in the room.
// Sample code: publish the local audio/video stream
[self.trtcCloud startLocalPreview:_isFrontCamera view:self.view];
[self.trtcCloud startLocalAudio:TRTCAudioQualityMusic];Note:The SDK for macOS uses the default camera and mic. You can call setCurrentCameraDevice() and setCurrentMicDevice() to switch to a different camera and mic.
Step 8. Exit the room
Call exitRoom() to exit the room. The SDK disables and releases devices such as cameras and mics during room exit. Therefore, room exit is not an instant process. It completes only after the onExitRoom() callback is received.
// Please wait for the `onExitRoom` callback after calling the room exit API.
[self.trtcCloud exitRoom];

- (void)onExitRoom:(NSInteger)reason {
    NSLog(@"Exited room: reason: %ld", reason)
}Note:If your application integrates multiple audio/video SDKs, please wait after you receive the
onExitRoomcallback to start other SDKs; otherwise, the device busy error may occur.

 Yes
Yes
 No
No
Was this page helpful?