TUICallKit components support offline push through the integration of the push plugin. To help developers easily implement offline push in their projects, we recommend using the TIMPush plugin (paid). TIMPush push plugin has the following advantages:
The integration cycle is short, with full-manufacturer access expected to take only 30 minutes.
Supports data statistics and link tracking, making it convenient for you to view various indicators such as push reach rate, click-through rate, and conversion rate.
Supports full-staff/Tag push, allowing you to push marketing ads, notifications, news information, and other content to all users or specified groups.
Supports cross-platform frameworks like uni-app and Flutter.
Description:
In order to achieve better notification effects for audio and video calls, we recommend that you use the TUIVoIPExtension plug-in to access the VoIP push function. For Chinese mainland, we recommend that you use TUIVoIPExtension/LiveCommunicationKit for access, and for non-Chinese mainland, we recommend that you use TUIVoIPExtension/CallKit for access.
1. The TIMPush component supports CocoaPods integration. You need to add the component dependencies in the Podfile.
target 'YourAppName'do
# Uncommment the next line if you're using Swift or would like to use dynamic frameworks
use_frameworks!
use_modular_headers!
# Pods for Example
pod 'TIMPush','7.9.5668'
end
2. Run the following command to install the TIMPush component.
pod install
# If you cannot install the latest version of TUIKit, run the following command to update the local CocoaPods repository list.
pod repo update
Step 2: Activate remote push for the app
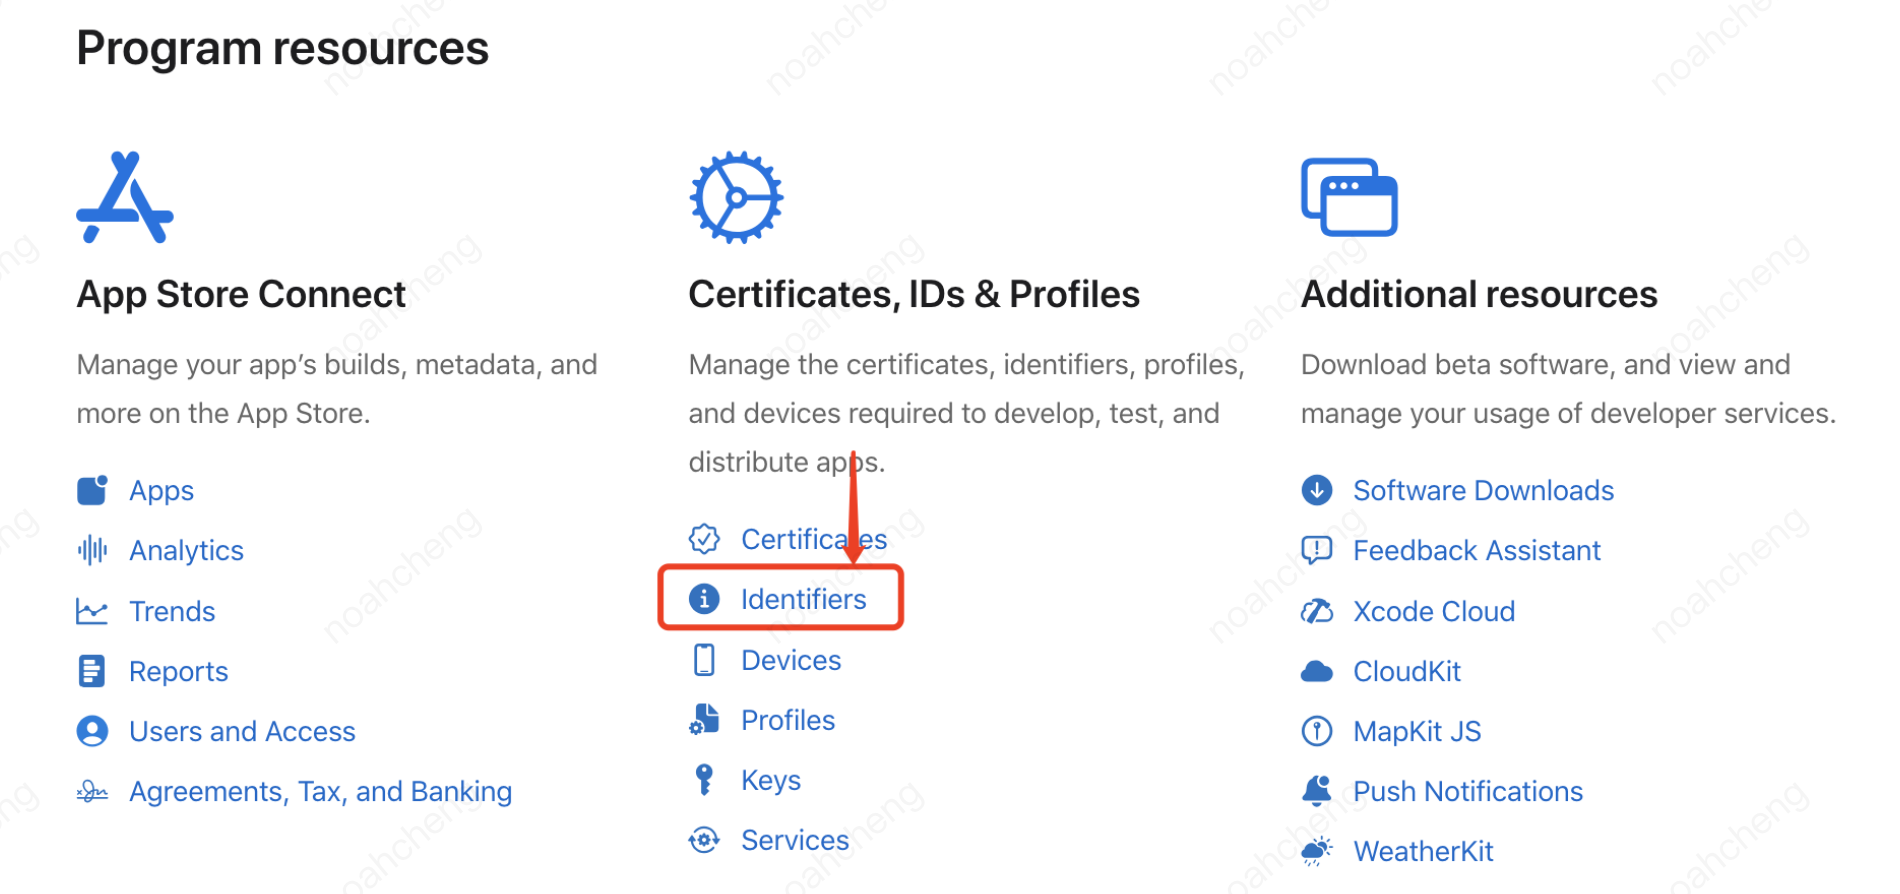
1. Log in to the Apple Developer Center website, click on the Certificates, IDs & Profiles tab, then Identifiers, and enter Certificates, Identifiers & Profiles page.
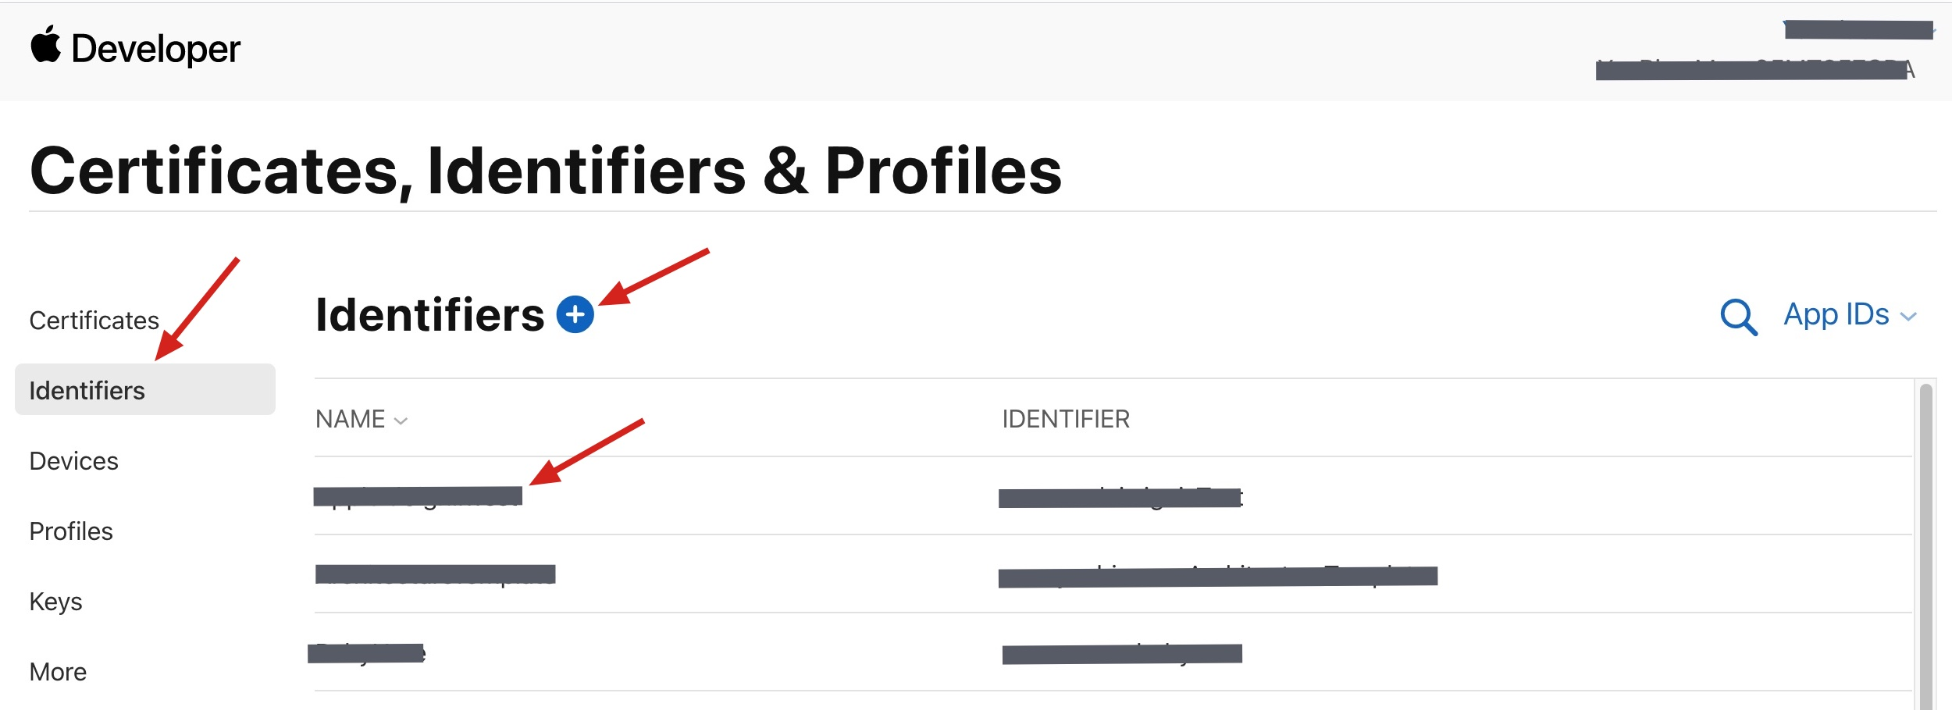
2. Click the + next to Identifiers.
3. You can follow the steps below to create a new AppID, or add the Push NotificationService to your existing AppID.
Note:
It's important to note that your app's Bundle ID must not use the wildcard *, otherwise, the remote push service cannot be used.
4. Select App IDs, click Continue to proceed to the next step.
5. Select App, click Continue to proceed to the next step.
6. Configure the Bundle ID and other information, click Continue to proceed to the next step.
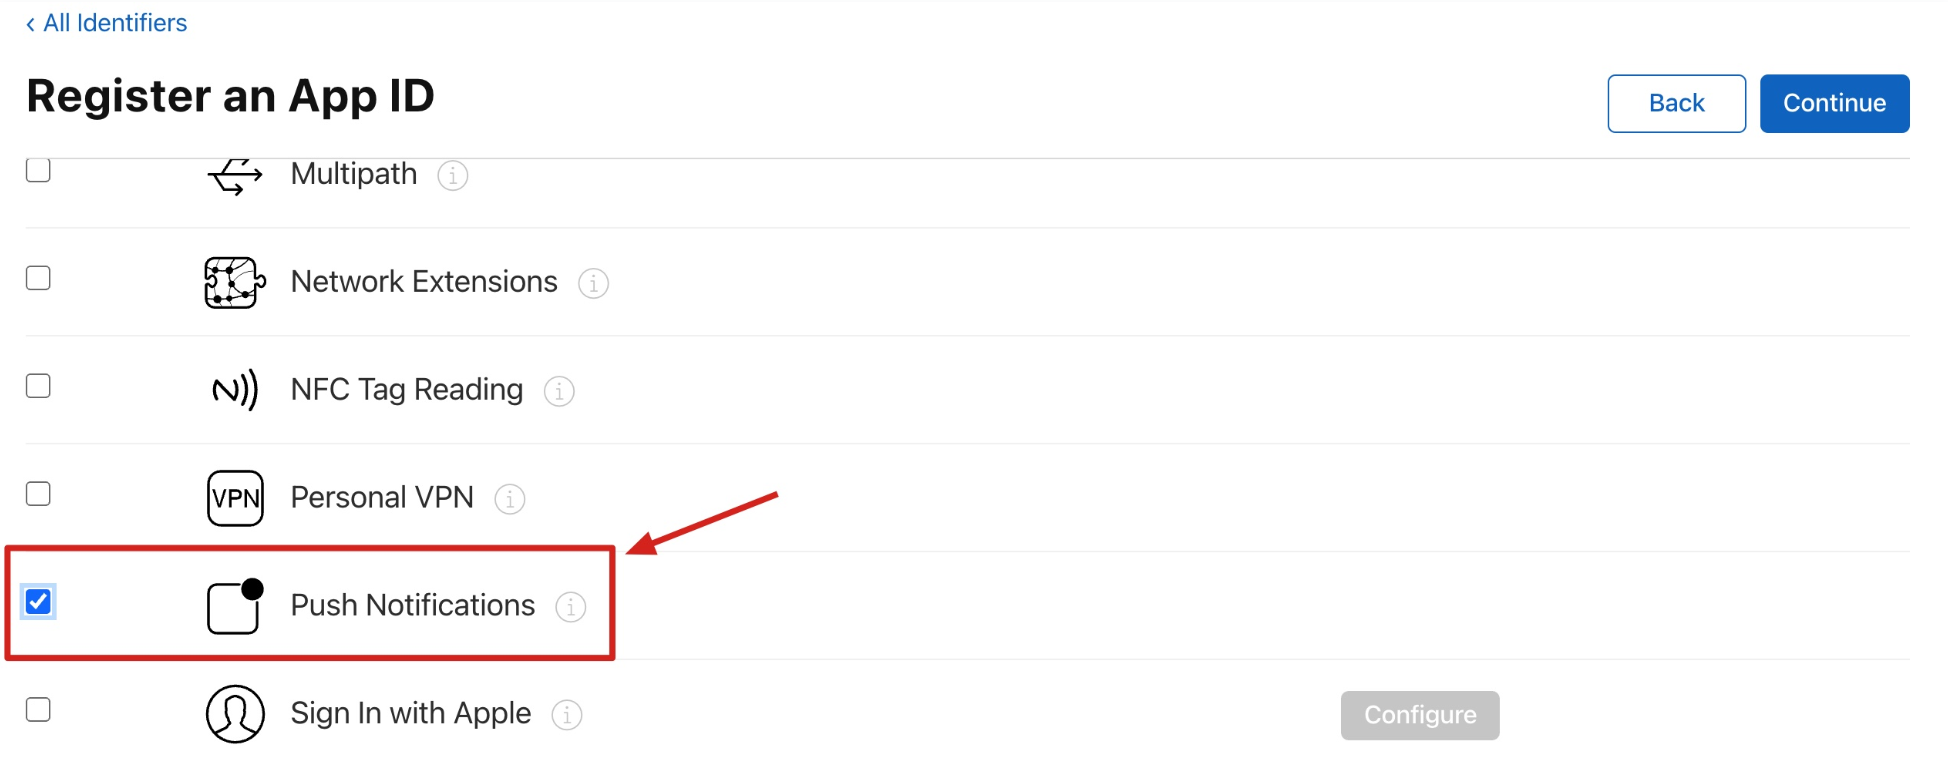
7. Select Push Notifications to activate the remote push service.
Step 3: Generate the push certificate
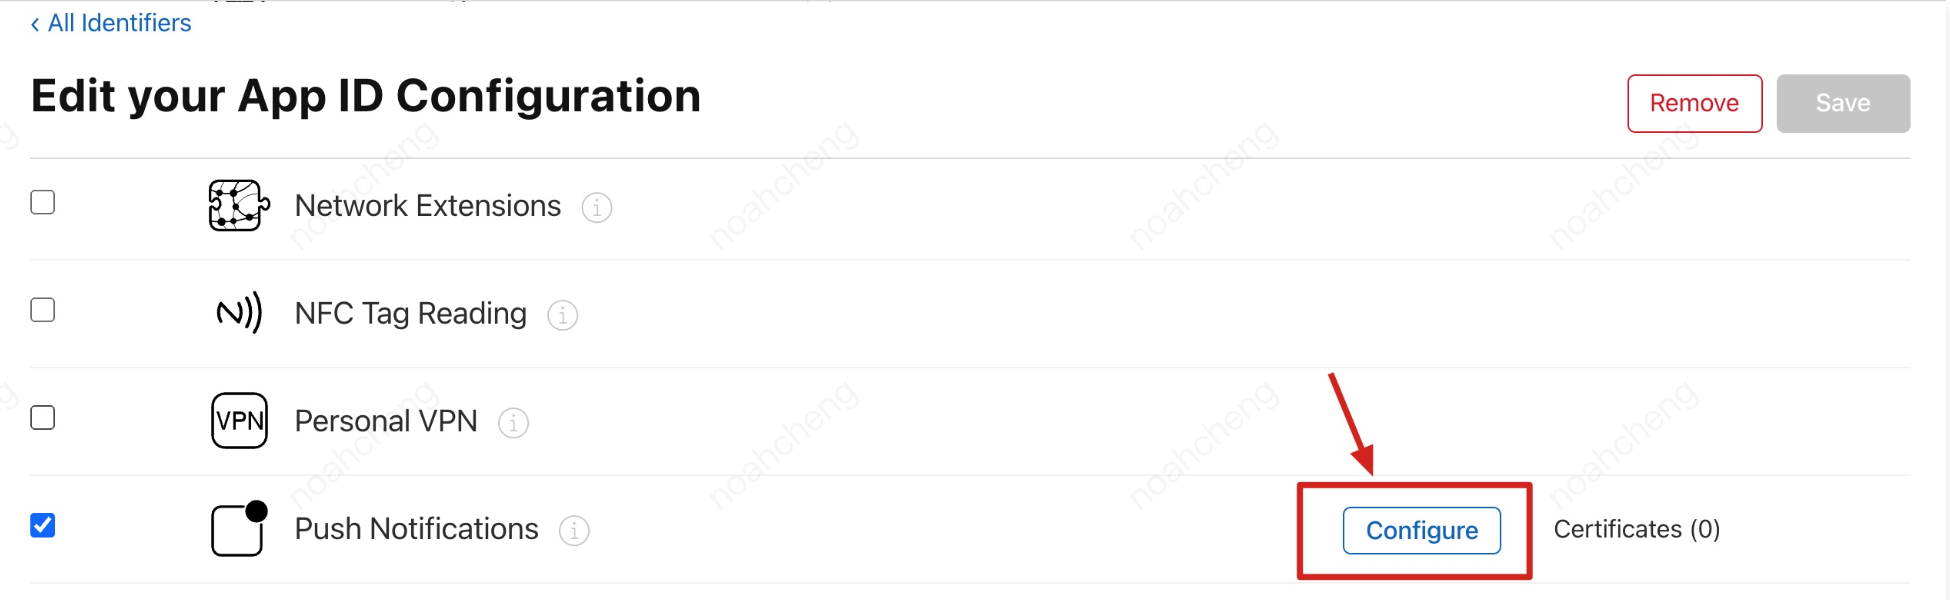
1. Select your AppID, find the Push Notifications configuration option, and choose Configure.
2. In the Apple Push Notification service SSL Certificates window, you will see two SSL Certificates, one for the Development environment and one for the Production environment.
3.
We
first select the development environment (Development) option Create Certificate, and the system will prompt us that a Certificate Signing Request (CSR) is needed.
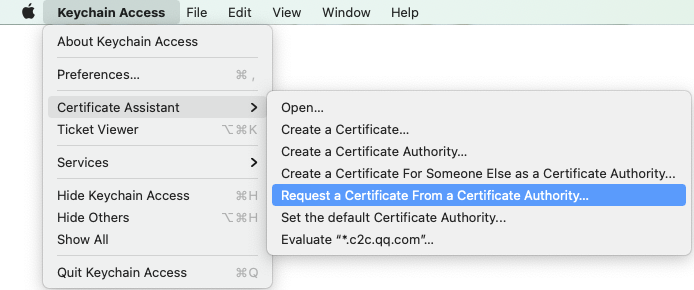
4. On a Mac, open the Keychain Access tool (Keychain Access), and from the menu, select Keychain Access > Certificate Assistant > Request a Certificate From a Certificate Authority (Keychain Access > Certificate Assistant > Request a Certificate From a Certificate Authority).
5. Enter your email address, common name (your name or company name), select Saved to disk, and click Continue. The system will generate a *.certSigningRequest file.
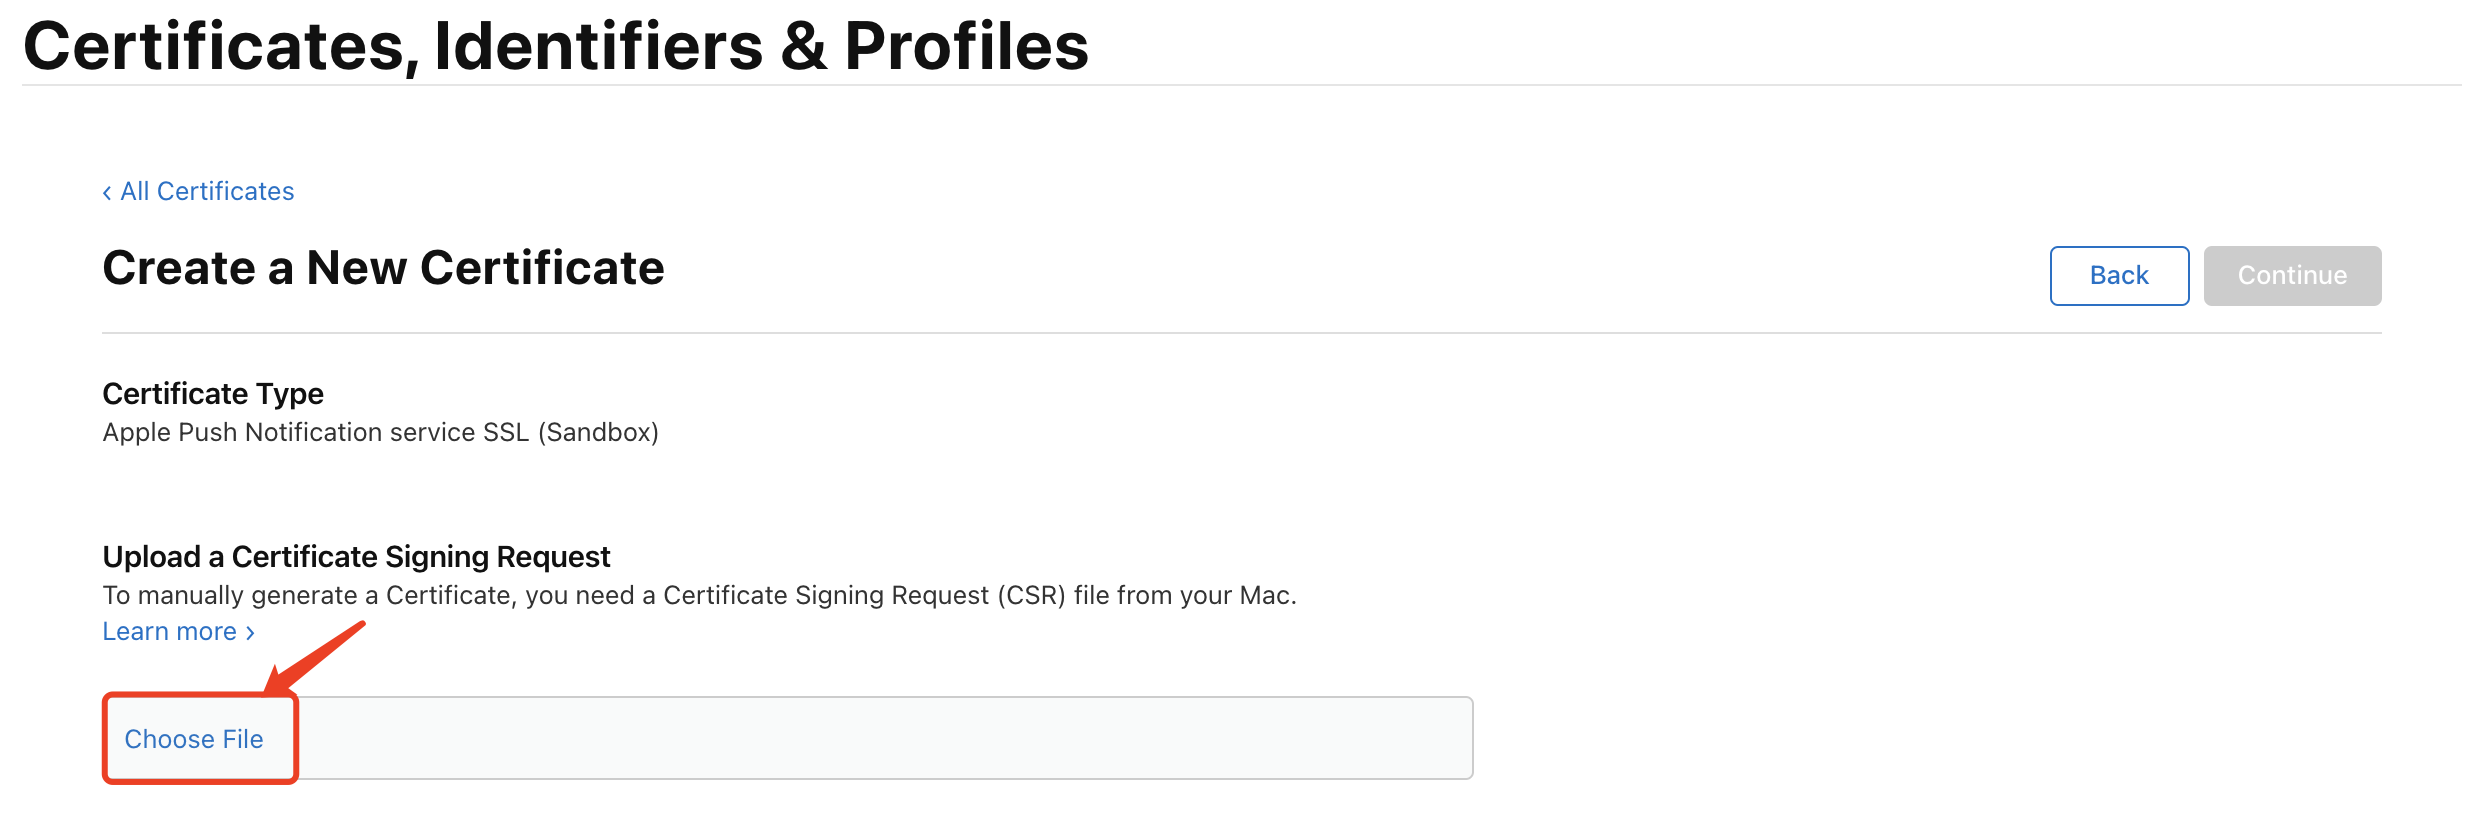
6. Go back to the page on the Apple Developer website from Step 3 just now and click "Choose File" to upload the generated *.certSigningRequest file.
7. Click Continue to generate the push certificate.
8. Click Download to download the Development SSL Certificate for the development environment to your local machine.
9. Follow the steps 1-8 again to download the Production SSL Certificate for your production environment to your local system.
Note:
The production environment certificate is actually a merged certificate of Sandbox and Production, which can be used for both the development and production environments.
10. Double-click the downloaded SSL Certificate for both the development and production environments, and the system will import it into your keychain.
11. Open the Keychain Access app, log in toMy Certificates, right-click to export the P12 files for both the newly created development environment (Apple Development IOS Push Service) and the production environment (Apple Push Services).
Note:
When saving the P12 file, be sure to set a password.
Step 4: Upload the certificate to the Tencent RTC console
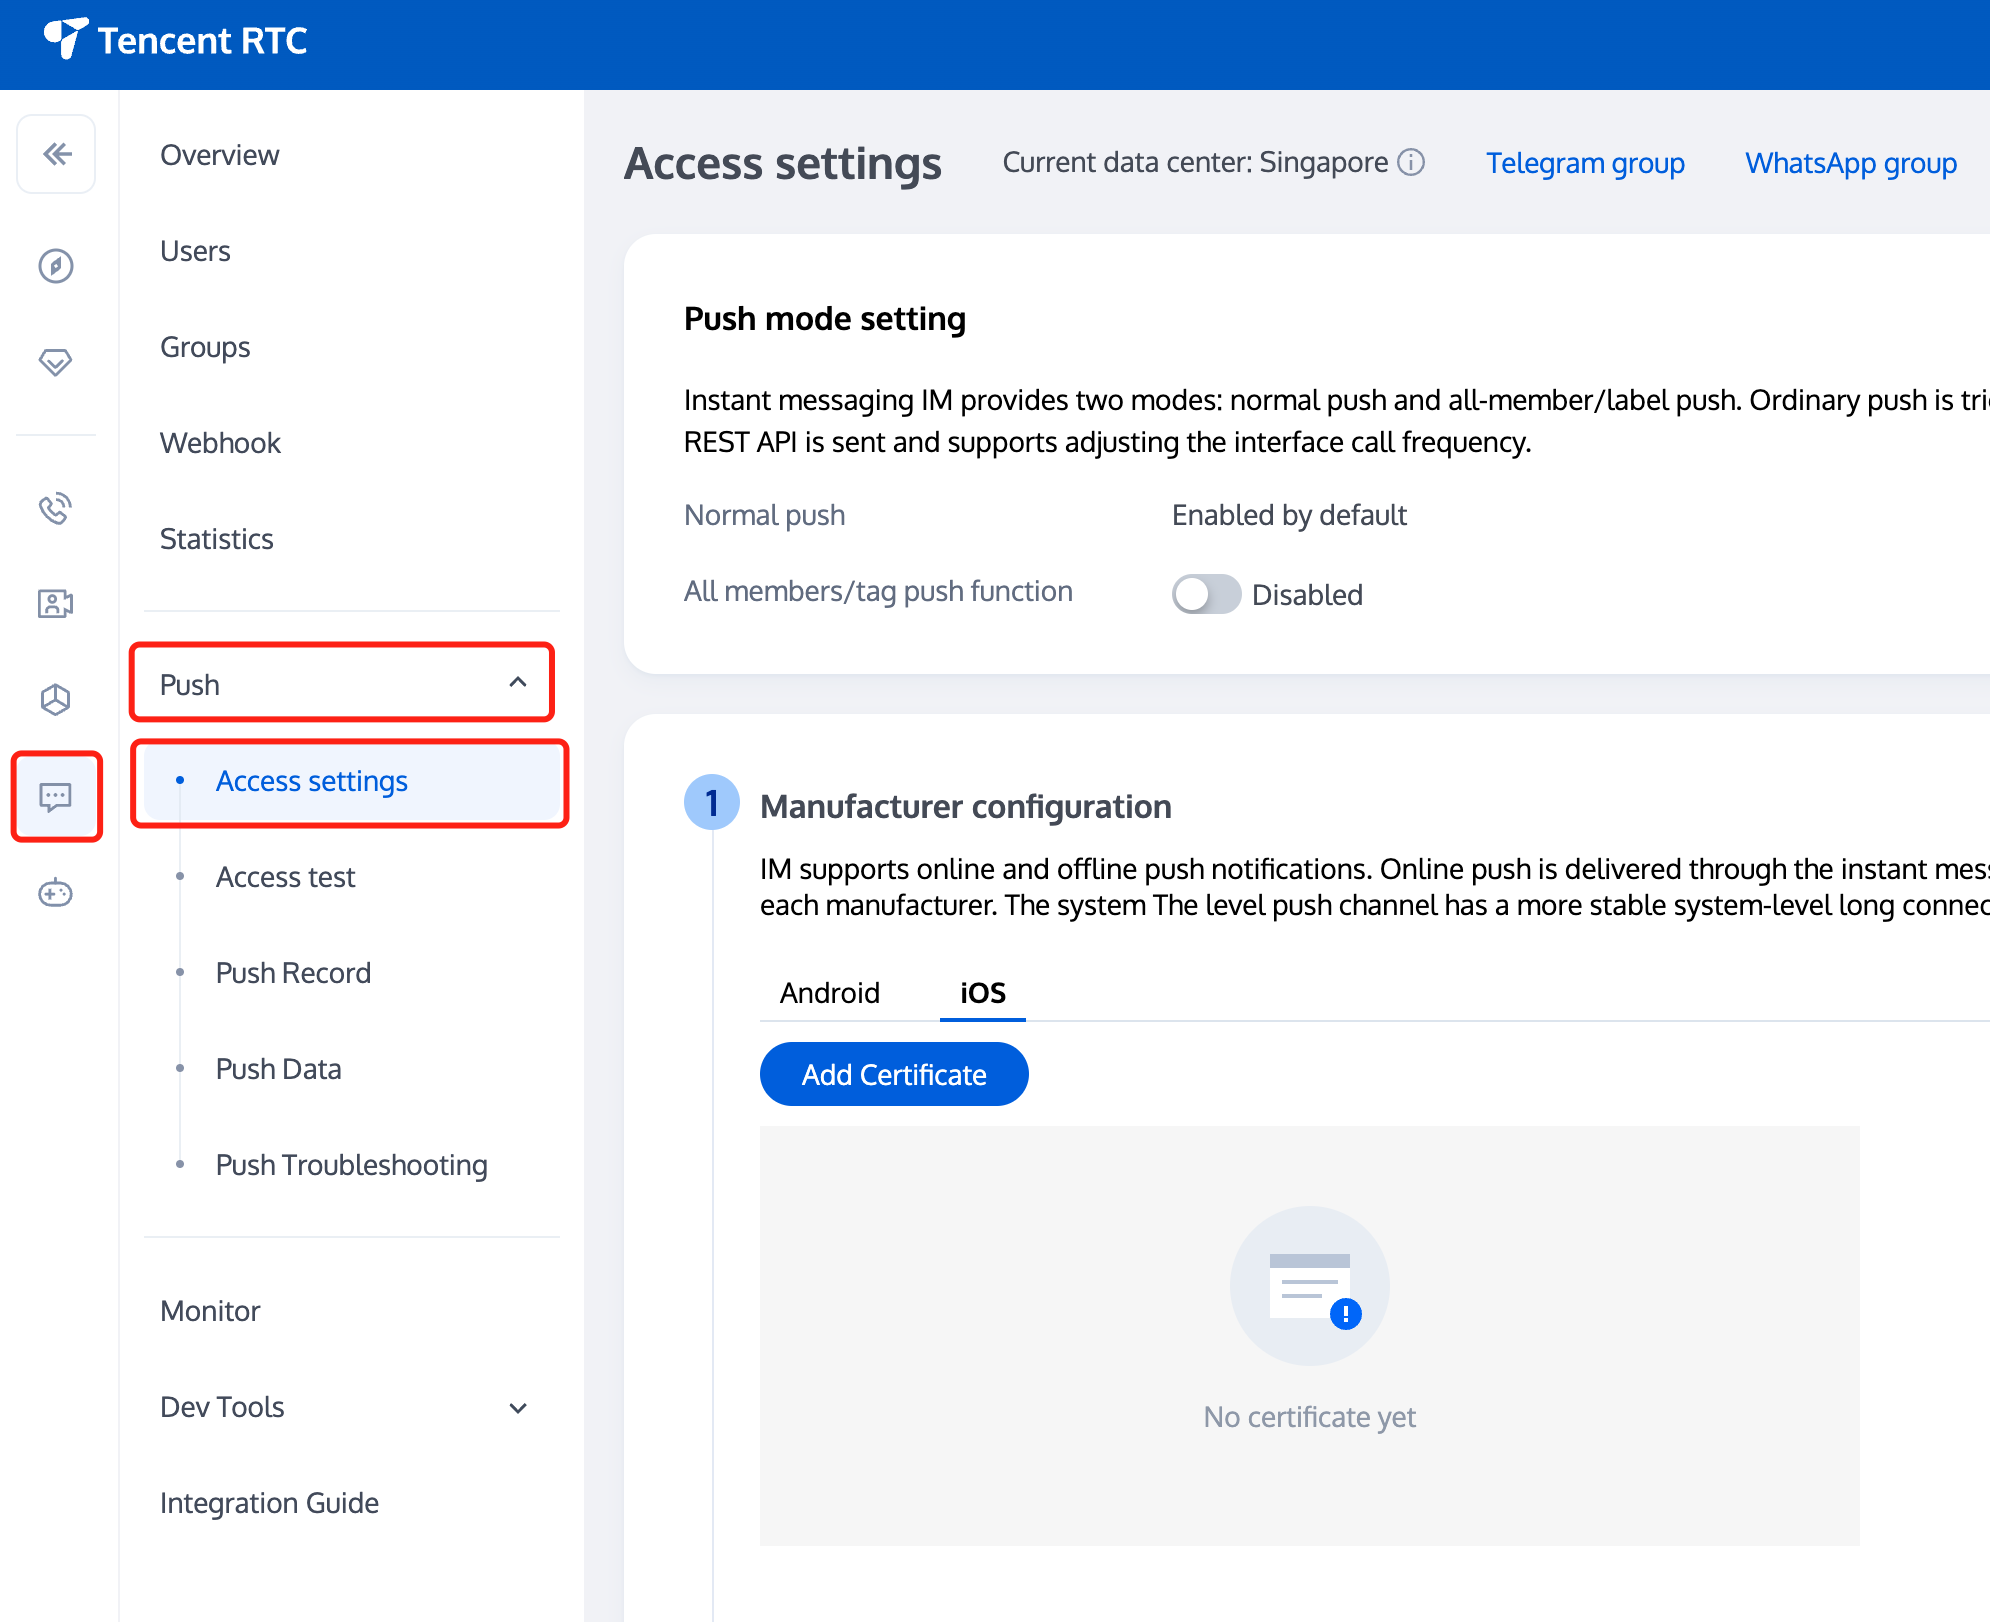
2. Click on the Target Application Card, select the Chat Tag on the left, click on Push, then click on Access settings.
3. Click on iOS Native Offline Push Settings on the right side to Add Certificate.
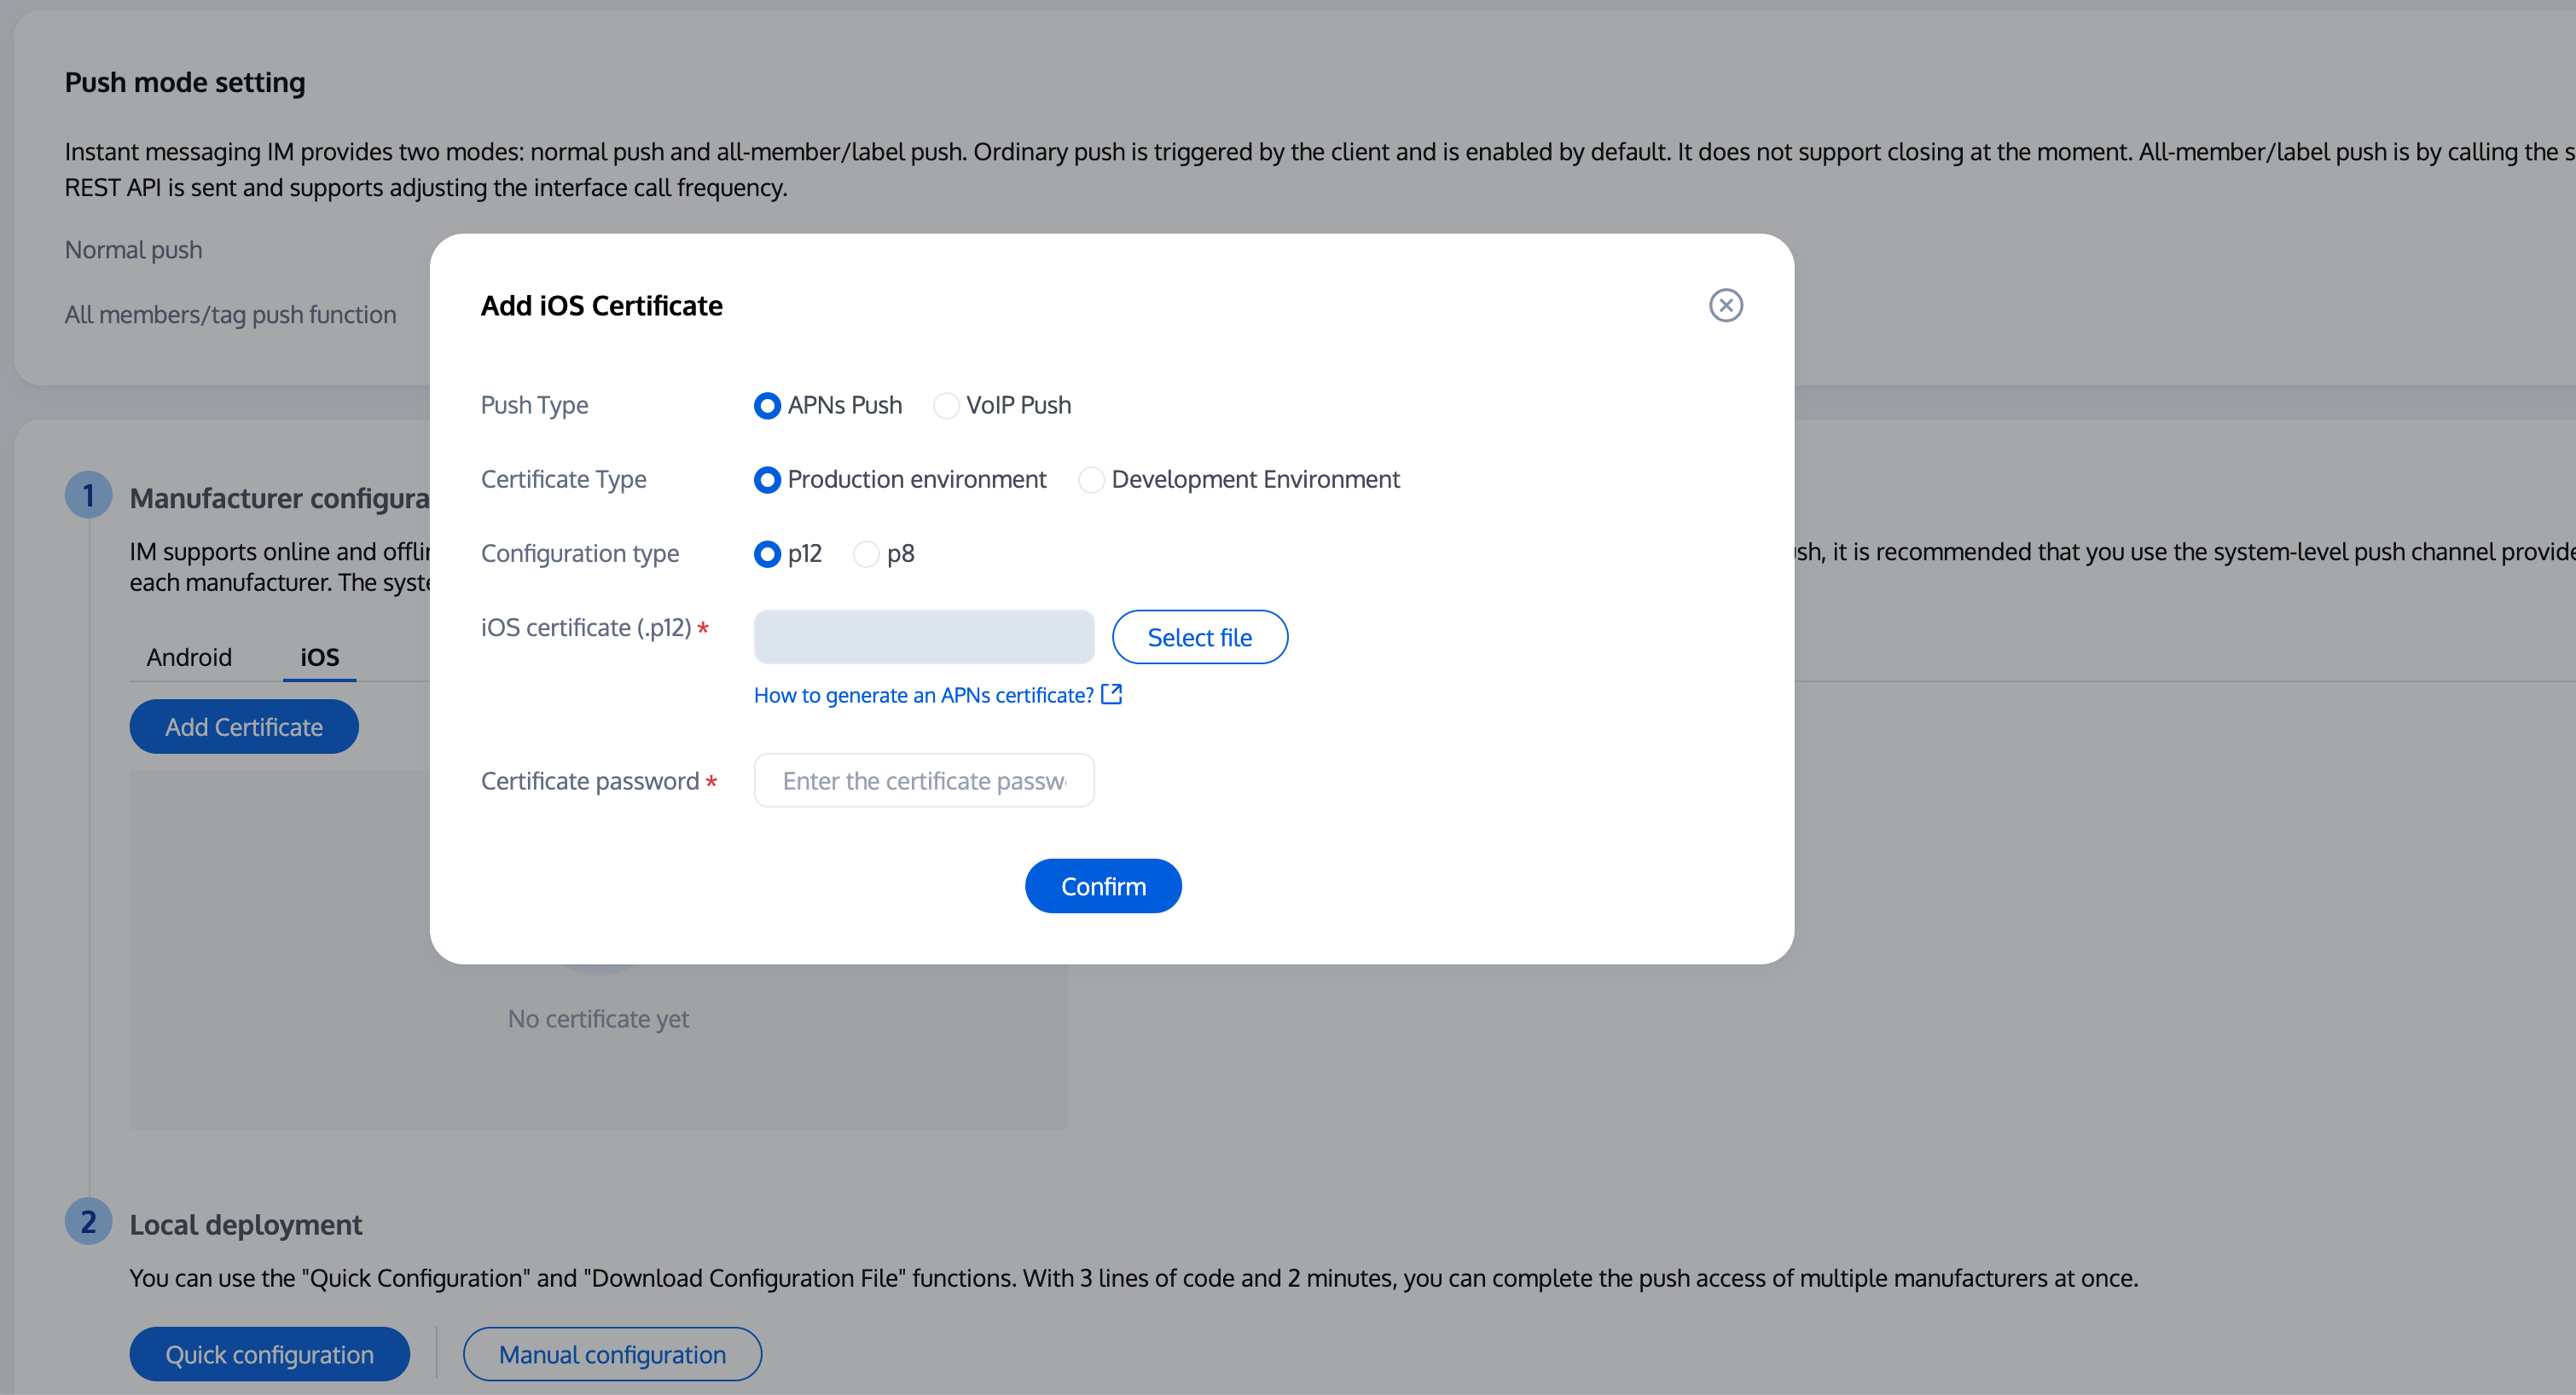
4. Select Certificate Type, upload the iOS Certificate (p12), set the Certificate Password, and click on Confirm.
Note:
We recommend naming the uploaded certificate in English (special characters such as brackets are not allowed).
You need to set a password for the uploaded certificate. Without a password, push notifications cannot be received.
For an app published on App Store, the environment of the certificate must be the production environment. Otherwise, push notifications cannot be received.
The uploaded .p12 certificate must be your own authentic and valid certificate.
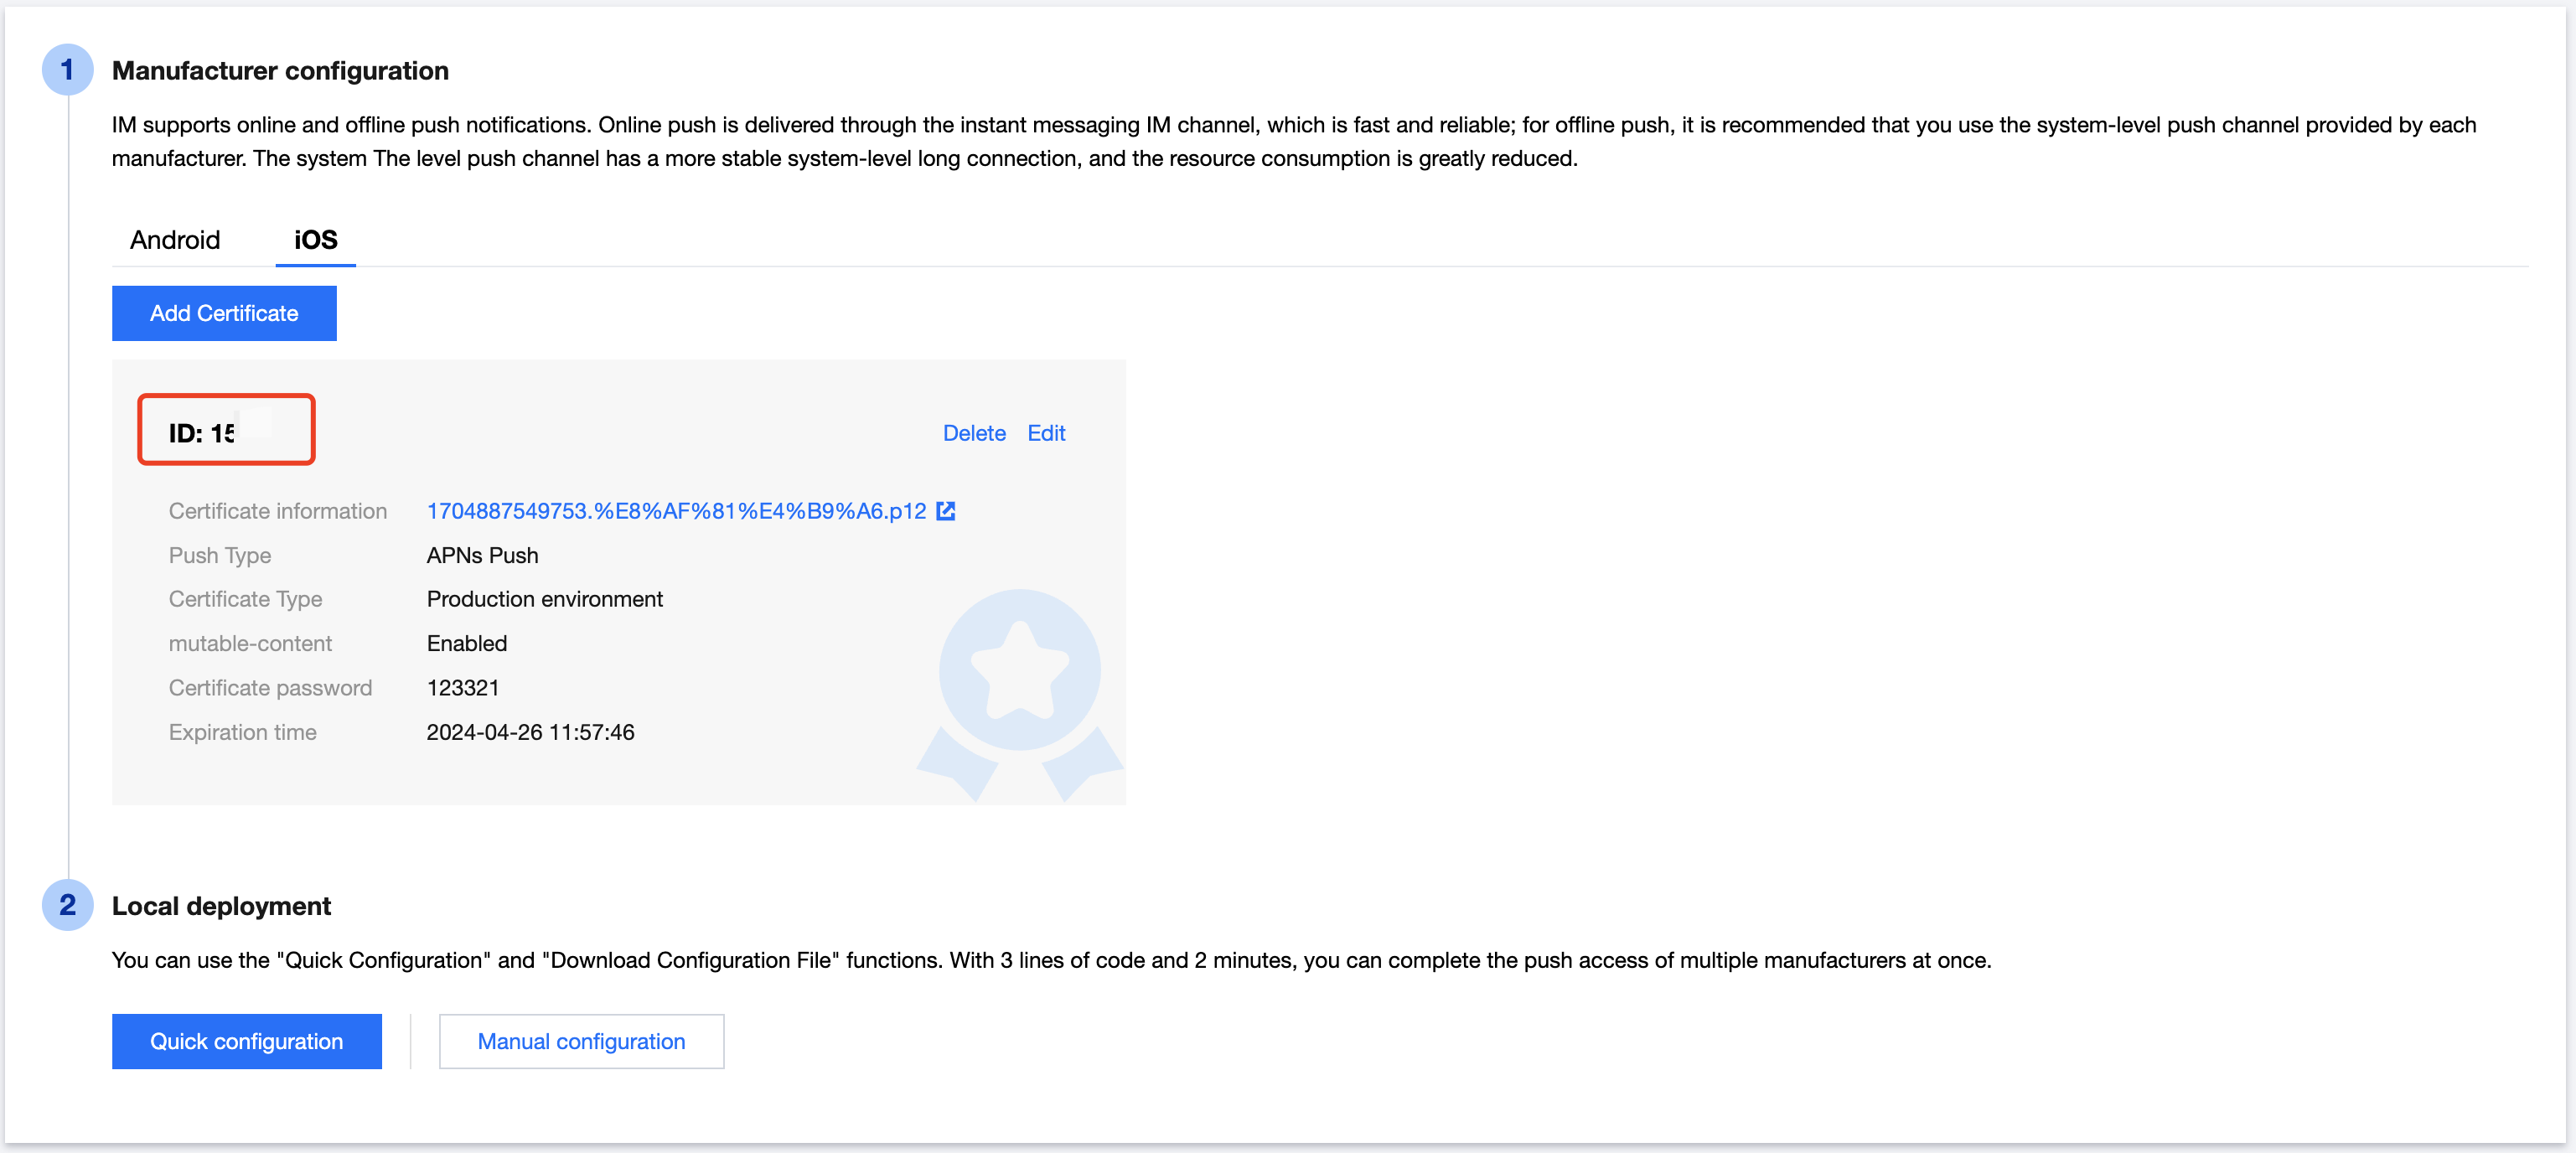
5. After the push certificate information is generated, record the certificate ID. It will be used as a mandatory parameter in Step 6: Configure push parameters.
Step 5: Complete the project configuration
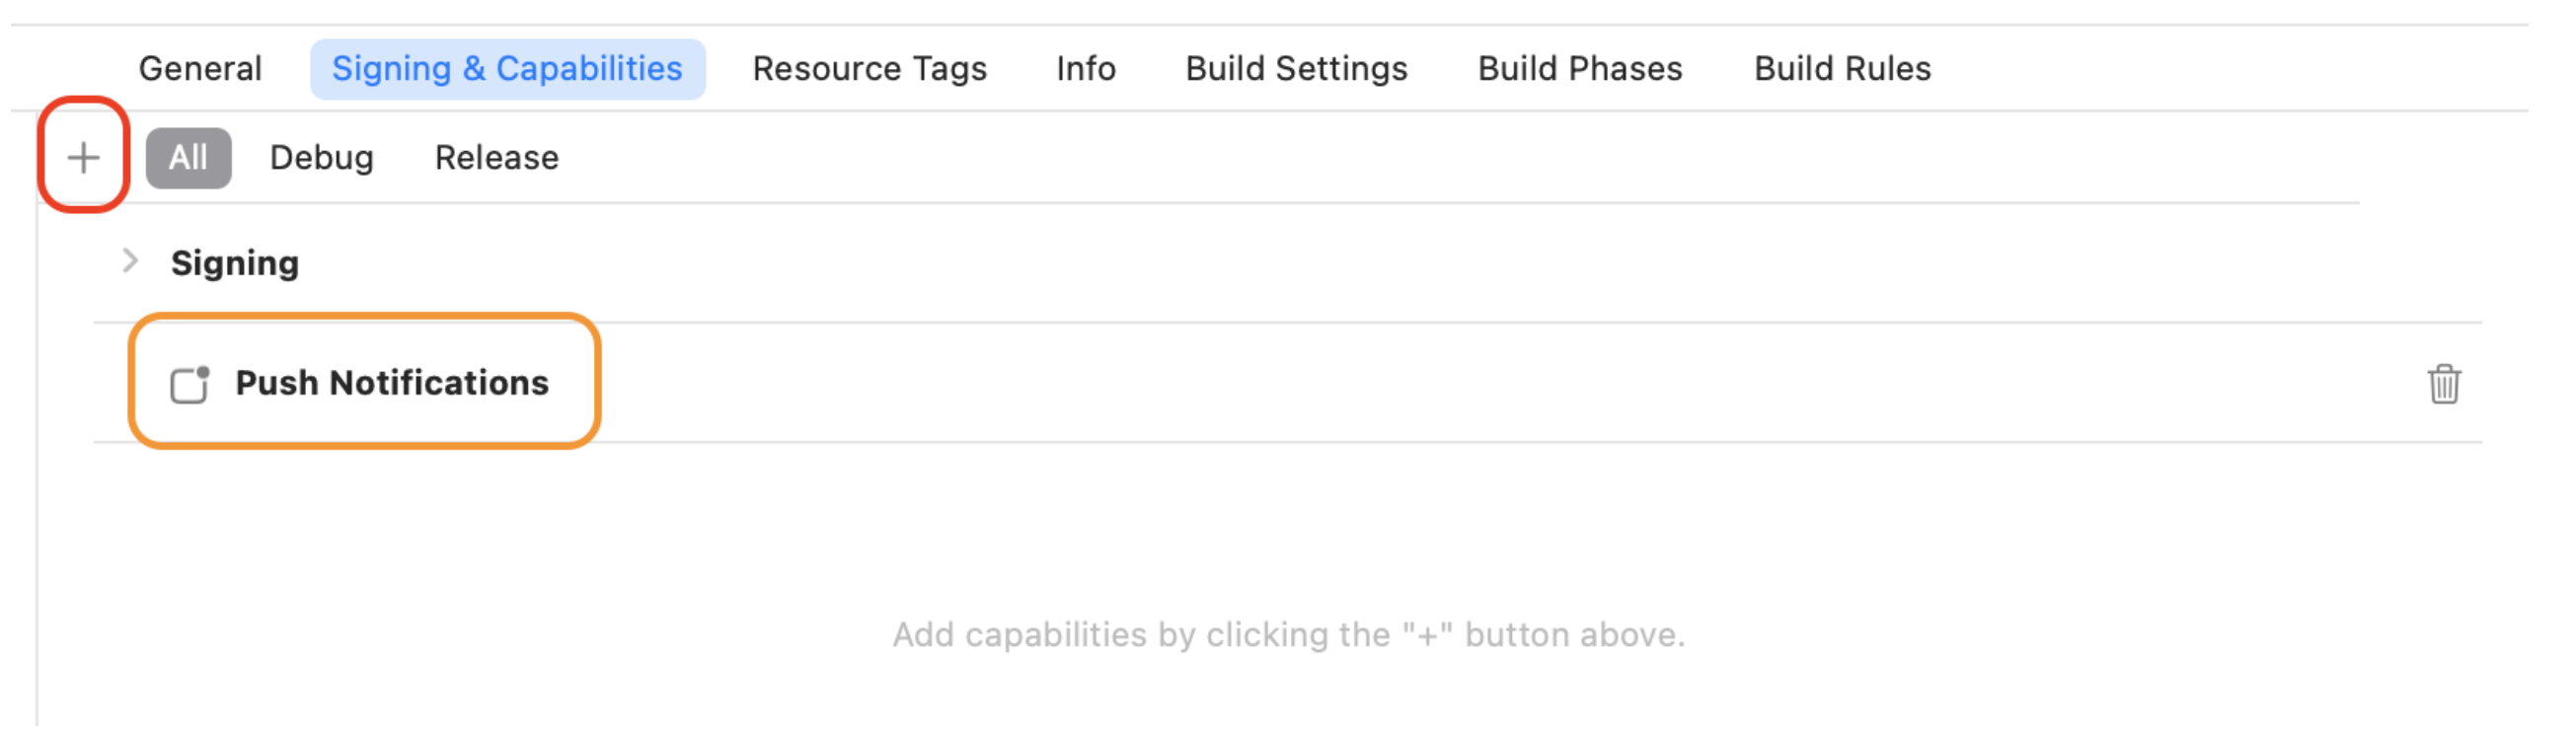
To add the required permissions to your application, enable the push notification feature in your Xcode project.
Open the Xcode project, go to Project > Target > Capabilities page, click the + inside the red frame, then select and add Push Notifications. The result after adding is shown in the yellow frame in the picture:
Step 6: Configure push parameters
You need to implement the protocol method offlinePushCertificateID in AppDelegate to return the Certificate ID.
Swift
Objective-C
importTIMPush
funcofflinePushCertificateID()->Int32{
returnkAPNSBusiId
}
#pragma mark - TIMPush
-(int)offlinePushCertificateID {
return kAPNSBusiId;
}
Step 7: Dial offline push calls
Please set the offlinePushInfo field of params when making a call using calls.
Swift
Objective-C
importTUICallKit_Swift
importRTCRoomEngine
let pushInfo:TUIOfflinePushInfo=TUIOfflinePushInfo()
pushInfo.title =""
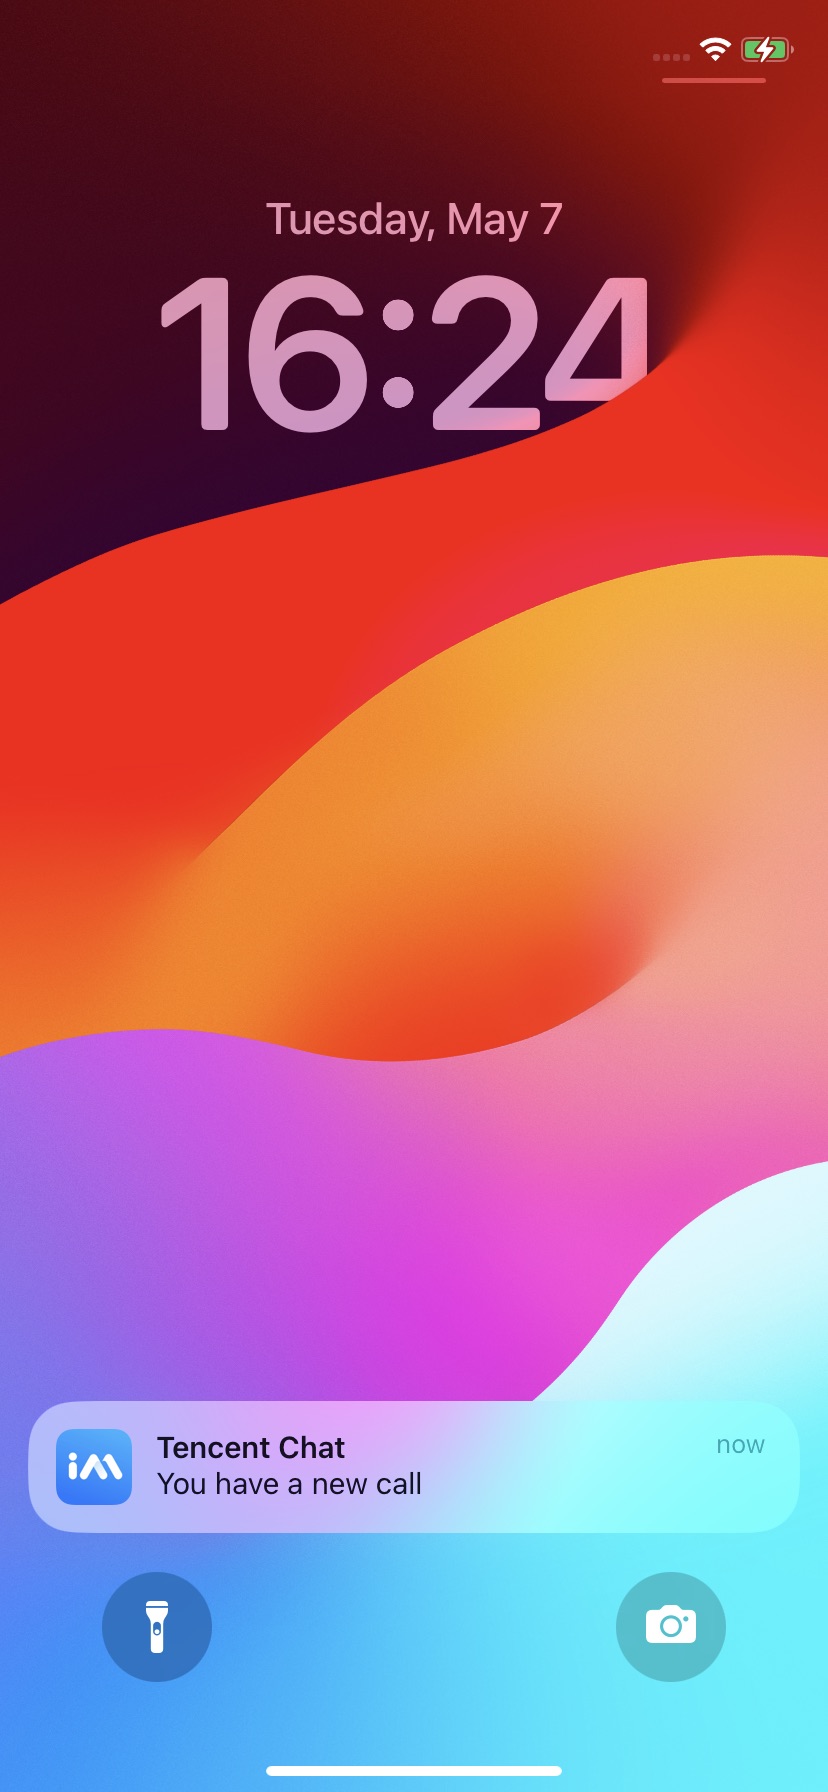
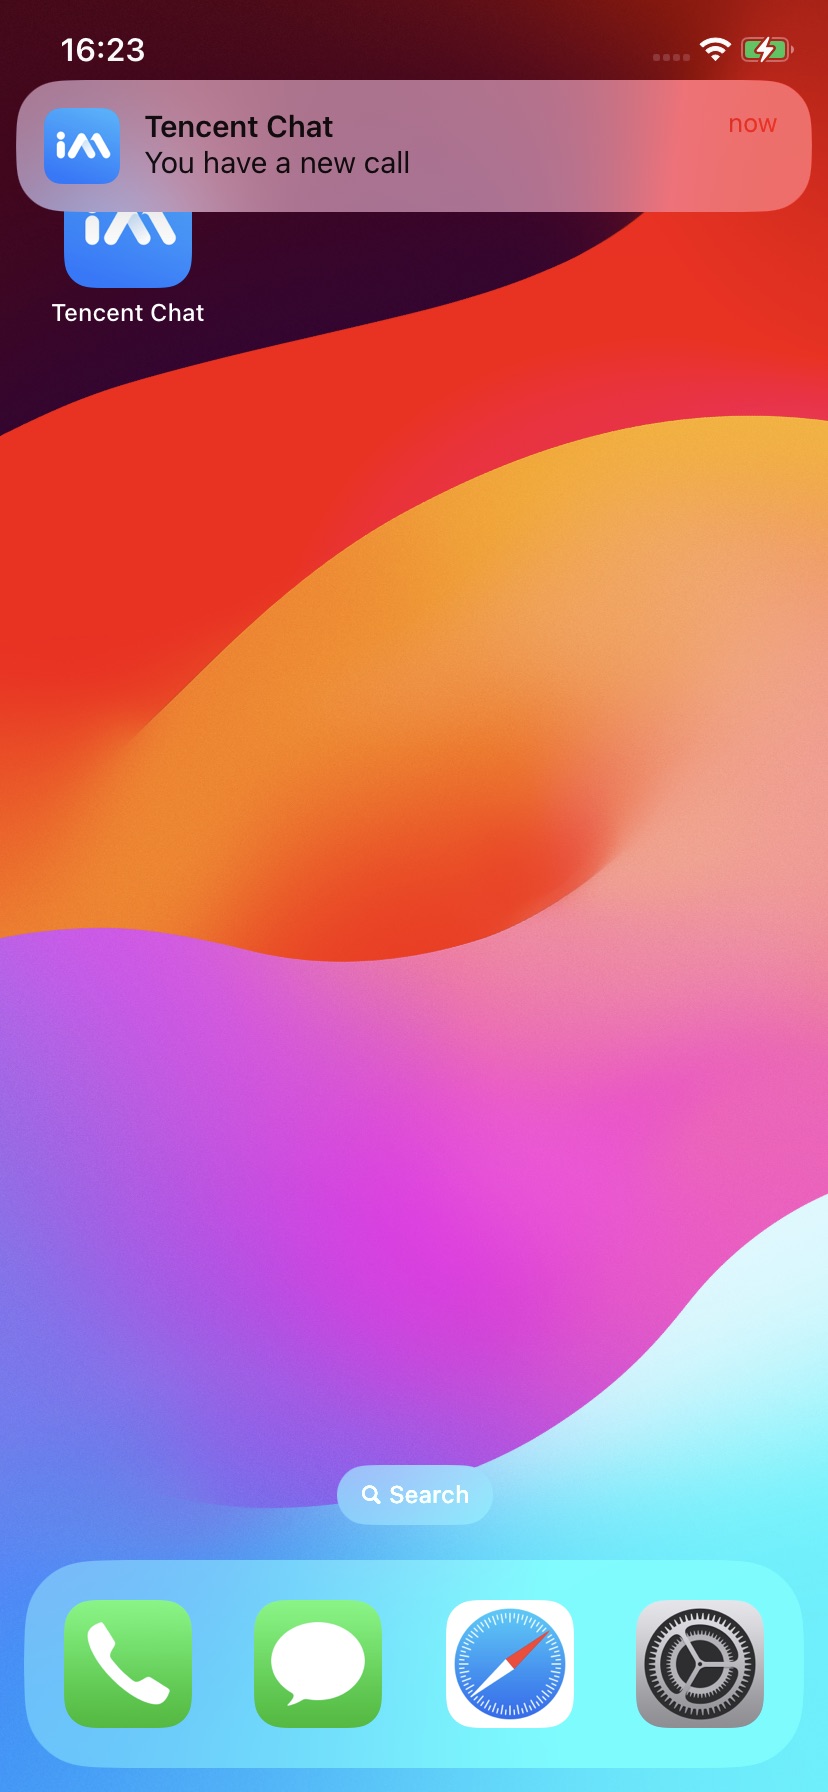
pushInfo.desc ="You have a new call"
pushInfo.iOSPushType =.apns
pushInfo.ignoreIOSBadge =false
pushInfo.iOSSound ="phone_ringing.mp3"
pushInfo.androidSound ="phone_ringing"
// For OPPO, you must set the `ChannelID` to receive push messages. The `ChannelID` must be identical with that in the console.
// OPPO must set a ChannelID to receive push messages. This channelID needs to be the same as the console.
pushInfo.androidOPPOChannelID ="tuikit"
// FCM channel ID, you need change PrivateConstants.java and set "fcmPushChannelId"
pushInfo.androidFCMChannelID ="fcm_push_channel"
// VIVO message type: 0-push message, 1-System message(have a higher delivery rate)
// Single person call example, similar for group call
[[TUICallKit createInstance] calls:@[@"123456"]
callMediaType:TUICallMediaTypeAudio
params:[self getCallParams] succ:^{
} fail:^(int code,NSString* _Nullable errMsg){
}];
Advanced features: continuous vibration, ringing
APNs (Apple Push Notification service) push can specify features such as pushing audio files, but it cannot vibrate or ring continuously. The notification duration is short, and inbound call information is easy to miss in audio/video call scenarios. You can use our Demo experience APNs continuous vibration and ringing feature.
1. Ring
APNs push can set the iOSSound field in TUIOfflinePushInfo of params when calling call, calls, groupCall APIs to make a phone call. Pass the audio filename to iOSSound.
Note:
If you want to customize iOSSound, you need to first link the audio file into the Xcode project, and then set the audio filename (with extension) to iOSSound.
Notification Service Extension (abbreviated as Extension) is an Extension in iOS used to intercept and modify push notification content. With the aid of the Extension, long-term vibration can be achieved.
The primary application and Extension are two independent processes. After receiving an APNs push, the primary application will not be activated, while the Extension will be activated. Turn on continuous vibration in the Extension. When the application switches to the foreground, inform the Extension via inter-process communication to turn off the vibration and ringtone.
2.1 Enable Mutable Content
Use Notification Service Extension to achieve continuous vibration. First, enable the mutable-content switch in the console.
2.2 Create an Extension Project
In the Xcode project, select Editor > Add Target > Notification Service Extension to create an Extension. The newly created Extension Target needs to configure the Apple certificate. For specific methods, you can refer here.
The newly created Extension contains a source code file named NotificationService, with the following content:
didReceive: When a push notification is received and the Extension is activated, the didReceive callback is executed. Users can complete the modification of push notification information in didReceive. After completing the modification, call the contentHandler() method. The Extension execution ends.
serviceExtensionTimeWillExpire: When a push notification is received and the Extension is activated, if the Extension does not respond (does not execute the contentHandler() method) for more than 30 seconds, the serviceExtensionTimeWillExpire callback method will be called, and the contentHandler() method will be called within this method. The Extension execution ends.
2.3 Vibrate When a Push Notification Is Received
1. When a push notification is received and the Extension is activated, turn on vibration when the didReceive callback is executed.
2. Turn off vibration and ringtone after receiving serviceExtensionTimeWillExpire.
/// If there is no response for more than 30 seconds, the vibration and ringing function will be turned off.
// stop ringing, RingingFeature.shared.stop() needs to be implemented by yourself
VibratorFeature.stop()
contentHandler(bestAttemptContent)
}
}
}
Note:
The methods of starting vibration VibratorFeature.start() and stopping vibration VibratorFeature.stop() used in the above code need to be implemented by the customer.
2.4 Turn Off Vibration in Main Application
Upon receiving a push, start vibration and ringing. When the user enters the APP, the vibration in the Extension should be turned off. The primary application and the Extension are two independent processes. CFNotificationCenterGetDarwinNotifyCenter can be used to send notifications. When the APP enters the foreground, the primary application sends a notification to the Extension. The Extension listens for the notification and turns off the vibration upon receipt.
The modified code is as follows:
// Versions prior to iOS 13 monitor the foreground or background status through AppDelegate applicationWillEnterForeground
Not receiving push notifications, and the backend reports a bad deviceToken?
Apple's deviceToken is related to the current compilation environment. If the certificate ID and token used to log in to IMSDK and upload the deviceToken to Tencent Cloud do not match, an error will occur.
If compiled in the Release environment, the - application:didRegisterForRemoteNotificationsWithDeviceToken: callback returns a token for the deployment environment. In this case, the businessID should be set to the production environment's Certificate ID.
If compiled in the Debug environment, the - application:didRegisterForRemoteNotificationsWithDeviceToken: callback returns a token for the development environment. In this case, the businessID should be set to the development environment's Certificate ID.
In the iOS development environment, is there an occasional lack of return for the deviceToken or a failure in the APNs request for the token?
This problem is caused by instability of APNs. You can fix it in the following ways:
1. Insert a SIM card into the phone and use the 4G network.
2. Uninstall and reinstall the application, restart the application, or shut down and restart the phone.