This document describes how to quickly integrate the Conference (TUIRoomKit) component. The following steps generally take about one hour to complete, after which you can implement audio and video room features with ready-made UI.
Environment Preparation
Platform
Version
Flutter
3.7.0 and above versions.
Android
Android 4.1 (SDK API level 16) or later (Android 5.0 (SDK API level 21) or later is recommended).
Android Studio 3.5 or later (Gradle 3.5.4 or later).
Mobile phone on Android 4.1 or later.
iOS
iOS 12.0 and higher.
Step 1: Activate the Service
Before initiating a meeting with TUIRoomKit, you need to activate the exclusive multi-person audio and video interaction service for TUIRoomKit on the console. For specific steps, please refer to Activate Service.
Execute the following command to install the plugin.
flutter pub get
Step 3: Complete Project Configuration
Since the tencent_conference_uikit has utilized the relevant features of the GetX state management library, you need to replace MaterialApp with GetMaterialApp in your application. Alternatively, you can set the navigatorKey attribute in your MaterialApp to Get.key for the same effect.
// This step requires importing the get package before proceeding.
// Since the tencent_conference_uikit already has a dependency on get, you don't need to make any additional configurations in your pubspec.yaml.
import 'package:get/get.dart';
classMyAppextendsStatelessWidget{
@override
Widgetbuild(BuildContext context){
returnGetMaterialApp(// Use GetMaterialApp to replace MaterialApp
// Your original MaterialApp content
);
}
}
Open your project with Xcode, choose Targets > Building Settings > Deployment, and set Strip Style to Non-Global Symbols to maintain the necessary global symbol information.
If you need to use audio and video features on iOS, authorize the microphone and camera usage rights (Android has declared the relevant permissions in the SDK, and no manual configuration is necessary).
Add the following two items to your application's Info.plist. They correspond to the messages in the popup licensing dialog box while microphone and camera permissions are requested.
<key>NSCameraUsageDescription</key>
<string>TUIRoom requires access to your camera.</string>
<key>NSMicrophoneUsageDescription</key>
<string>TUIRoom requires access to your microphone.</string>
After the above are added, add the following preprocessor definitions in your ios/Podfile to enable camera and microphone permissions.
Add the following code to your project, which serves to log in to the component by calling the relevant APIs in TUIRoomKit. This step is extremely critical, as only after logging in can you use the various functions of TUIRoomKit, so please be patient and check if the relevant parameters are configured correctly:
UserID:The ID of the current user, which is a string that can only contain English letters (a-z and A-Z), numbers (0-9), hyphens (-), and underscores (_).
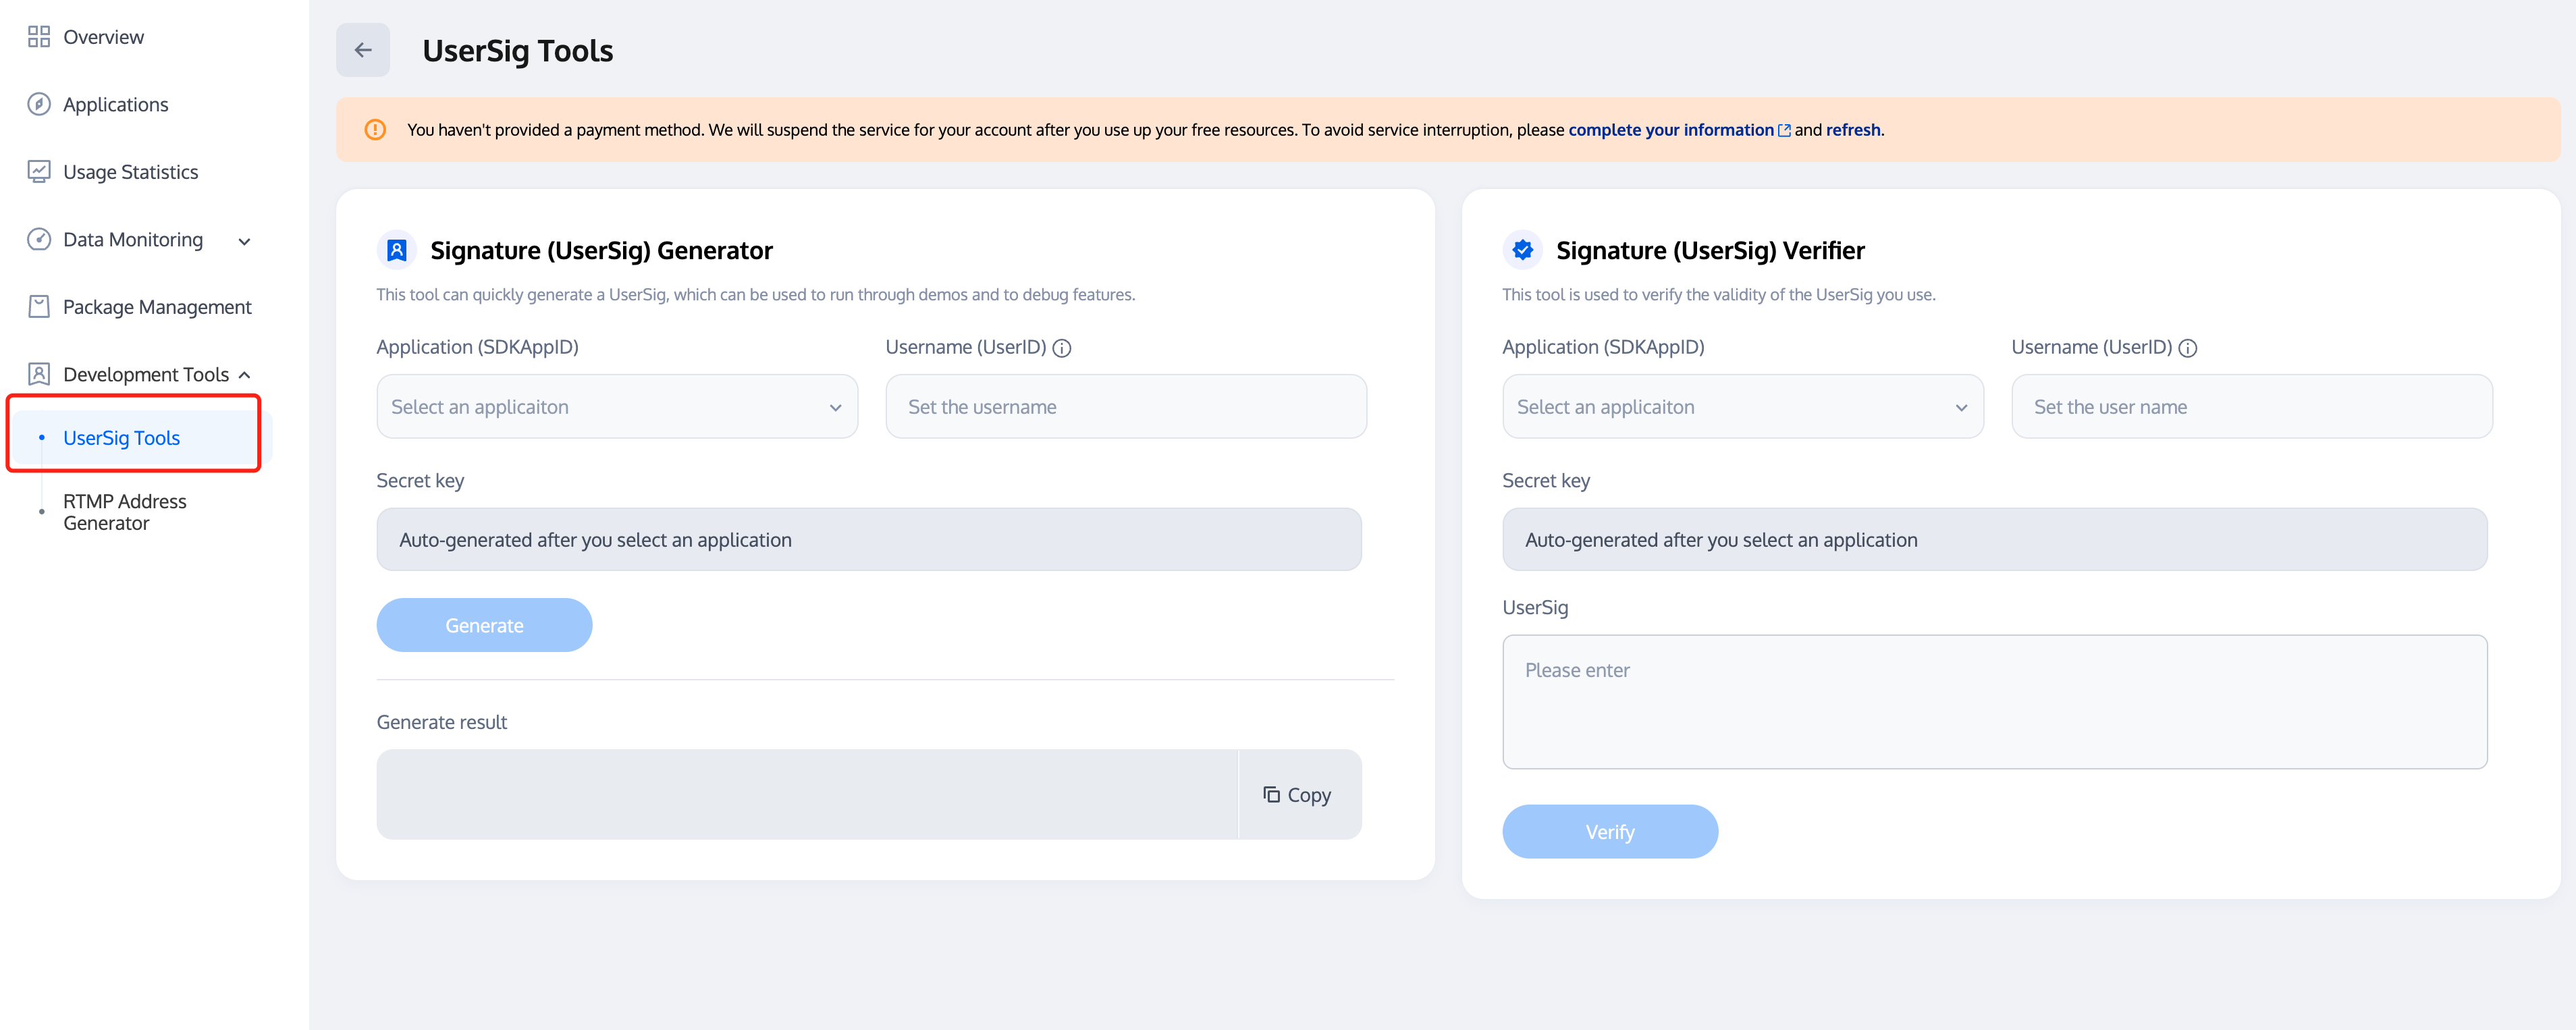
UserSig:The authentication credential used by Tencent Cloud to verify whether the current user is allowed to use the TRTC service. You can get it by using the SDKSecretKey to encrypt information such as SDKAppID and UserID. You can generate a temporary UserSig on the UserSig Tools page in the TRTC console.
For more information, please refer to the UserSig.
Note:
Many developers have contacted us with questions regarding this step. Below are some of the frequently encountered problems:
The SDKAppID is incorrect.
UserSig is set to the value of Secretkey mistakenly. The UserSig is generated by using the SecretKey for the purpose of encrypting information such as SDKAppID, UserID, and the expiration time. But the value of the UserSig cannot be directly substituted with the value of the SecretKey.
The UserID is set to a simple string such as 1, 123, or 111, and your colleague may be using the same UserID while working on a project simultaneously. In this case, login will fail as TRTC doesn't support login on multiple terminals with the same UserID. Therefore, we recommend you use some distinguishable UserID values during debugging.
The sample code on GitHub uses the genTestUserSig function to calculate UserSig locally, so as to help you complete the current integration process more quickly. However, this scheme exposes your SecretKey in the application code, which makes it difficult for you to upgrade and protect your SecretKey subsequently. Therefore, we strongly recommend you run the UserSig calculation logic on the server and make the application request the UserSig calculated in real time every time the application uses the TUIRoomKit component from the server.
Log in to Floating Chat (optional)
Flutter TUIRoomKit (tencent_conference_uikit) introduced the floating chat feature starting from version 2.4.1. If you need to use the floating chat feature, you need to complete the following initialization and login (If you also need to use the In-Conference Chat page, you can Ignore this step and complete the initialization and login for In-Conference Chat):
The floating chat feature is enabled by default in TUIRoomKit. If you do not need the floating chat feature, you do not need to perform the above initialization and login steps. You can disable the floating chat feature through the Bottom toolbar > Setting > Open Floating Chat option.
Step 5: Use TUIRoomKit
Set User Information (optional)
You can set the username and profile photo by calling TUIRoomEngine's setSelfInfo.
In the above sample code, only the simplest way to create/join a conference is shown. If you need to complete more settings before entering the conference, please refer to Pre-conference Control.
More Features
TUIRoomEngine SDK provides more rich features for audio and video rooms. For more information, see, Specific Content Please Refer API Overview.
Suggestions and Feedback
If you have any suggestions or feedback, please contact info_rtc@tencent.com.