TUIRoom (Flutter)の統合
Download
フォーカスモード
フォントサイズ
当社のAppをダウンロードしてインストールし、多人数オーディオビデオルームの効果をご体験いただけます。これには、画面共有、美顔、低遅延ミーティングなど、TRTCの多人数オーディオビデオルームシーン関連の機能が含まれています。
説明:
TUIKitシリーズコンポーネントはTencent CloudのTRTCとIMという2つの基本的なPaaSサービスを同時に使用し、TRTCをアクティブにした後、IMサービスを同期的にアクティブにすることができます。IMサービスの課金ルールの詳細については、Instant Messagingの料金説明をご参照ください。TRTCをアクティブにすると、デフォルトでは、100DAUまでサポートするIM SDK体験版もアクティブになります。
AppのUIの再利用
ステップ1:新規アプリケーションの作成
1. TRTCコンソールにログインし、開発支援 > Demoクイックスタートを選択します。
2. アプリケーション名(例:
TestMeetingRoom)を入力し、作成をクリックします。3. ダウンロードしました。次のステップをクリックすると、この手順をスキップします。
ご注意:
本機能はTencent CloudのTRTCとIMという2つの基本的なPaaSサービスを同時に使用し、TRTCをアクティブにした後、IMサービスを同期的にアクティブにすることができます。IMは付加価値サービスであり、課金ルールの詳細については 、Instant Messagingの料金説明をご参照ください。
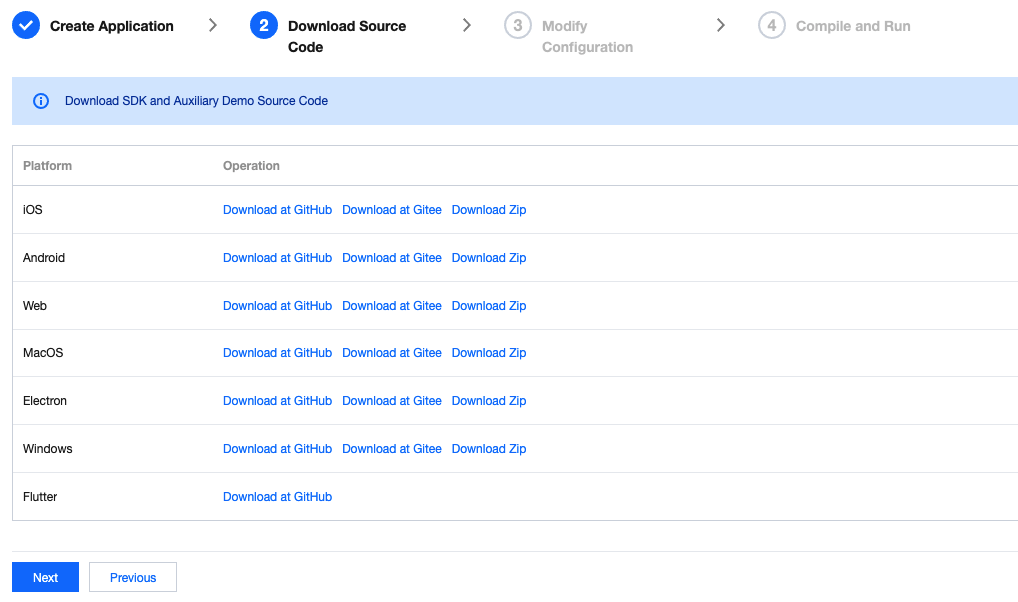
ステップ2:Appソースコードのダウンロード
ステップ3:Appファイルの設定
1. 設定変更画面に進み、ダウンロードしたソースコードパッケージに基づき、対応する開発環境を選択します。
2.
/lib/debug/GenerateTestUserSig.dartファイルを見つけて開きます。3.
GenerateTestUserSig.dart ファイル内の関連パラメータを設定します:SDKAPPID: A placeholder by default. Set it to the actual `SDKAppID`.
SECRETKEY: A placeholder by default. Set it to the actual secret key.
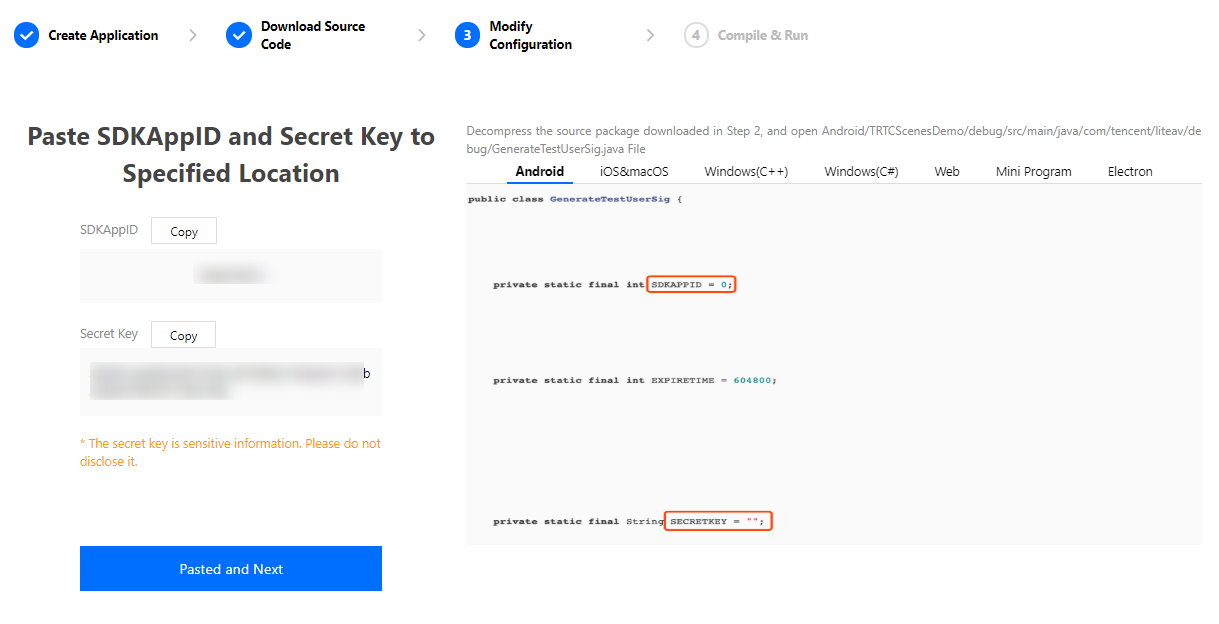
4. 貼り付け完了後、貼り付けました。次のステップをクリックすれば、作成が完了します。
5. コンパイル完了後、 コンソール概要に戻る をクリックすれば終了です。
ご注意:
ここで言及したUserSigの新規作成ソリューションでは、クライアントコードでSECRETKEYを設定します。この手法のうちSECRETKEYは逆コンパイルによって逆向きにクラッキングされやすく、キーがいったん漏洩すると、攻撃者はTencent Cloudトラフィックを盗用できるようになります。そのためこの手法は、ローカルのDemoクイックスタートおよび機能デバッグにのみ適合します。
UserSigの正しい発行方法は、UserSigの計算コードをサーバーに統合し、App向けのインターフェースを提供します。UserSigが必要なときは、Appから業務サーバーにリクエストを発出し動的にUserSigを取得します。詳細はサーバーでUserSigを生成するをご参照ください。
ステップ4:コンパイルと実行
ご注意:
Android端末は実際のマシンで実行する必要があり、エミュレーターのデバッグはサポートされていません。
1.
flutter pub getを実行します。2. コンパイルを実行し、デバッグを行います:
1. XCode(11.0およびそれ以降のバージョン)を使用して、ソースコードディレクトリの
/iosプロジェクト を開きます。2. コンパイルを行い、Demoプロジェクトを実行します。
1.
flutter runを実行します。2. Android Studio(3.5およびそれ以降のバージョン)を使用して、ソースプロジェクトを開き、実行をクリックすれば完了です。
ステップ5:Demoソースコードの修正
ソースコードのTRTCMeetingDemoフォルダには、uiとmodelの2つのサブフォルダが含まれ、uiフォルダの中はいずれもインターフェースコードです。以下の表にはファイルまたはフォルダおよび対応するUIをリストアップし、二次調整に便利です:
ファイルまたはフォルダ | 機能説明 |
TRTCMeetingIndex.dart | ミーティング作成または参加インターフェース |
TRTCMeetingRoom.dart | ビデオミーティングのメインインターフェース |
TRTCMeetingMemberList.dart | 参加者リストインターフェース |
TRTCMeetingSetting.dart | ビデオミーティング関連パラメータ設定インターフェース |
UIカスタマイズの実装
ソースコードの中のTRTCMeetingDemoフォルダにはuiとmodelの2つのサブフォルダが含まれ、modelフォルダには再利用可能なオープンソースコンポーネントTRTCMeetingが含まれています。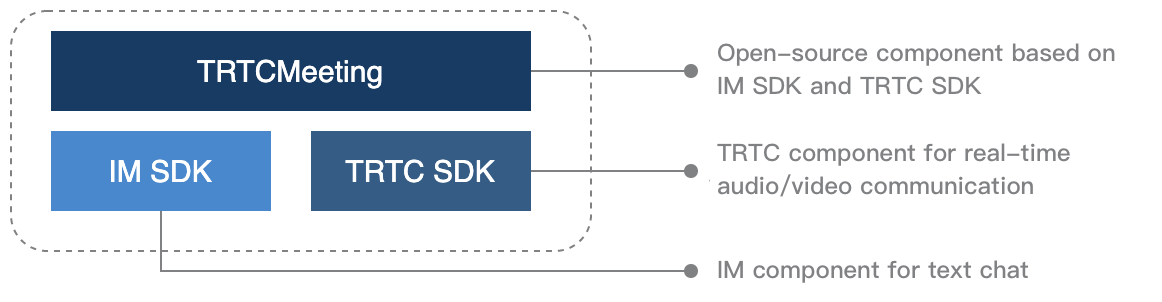
TRTCMeeting.dartファイルの中からこのコンポーネントが提供するインターフェース関数を見つけ、対応するインターフェースを使用してカスマイズUIを実装することが可能です。
ステップ1:SDKの統合
プロジェクトの
pubspec.yaml に次の依存関係を記述します:dependencies:tencent_trtc_cloud: 最新バージョン番号tencent_im_sdk_plugin: 最新バージョン番号
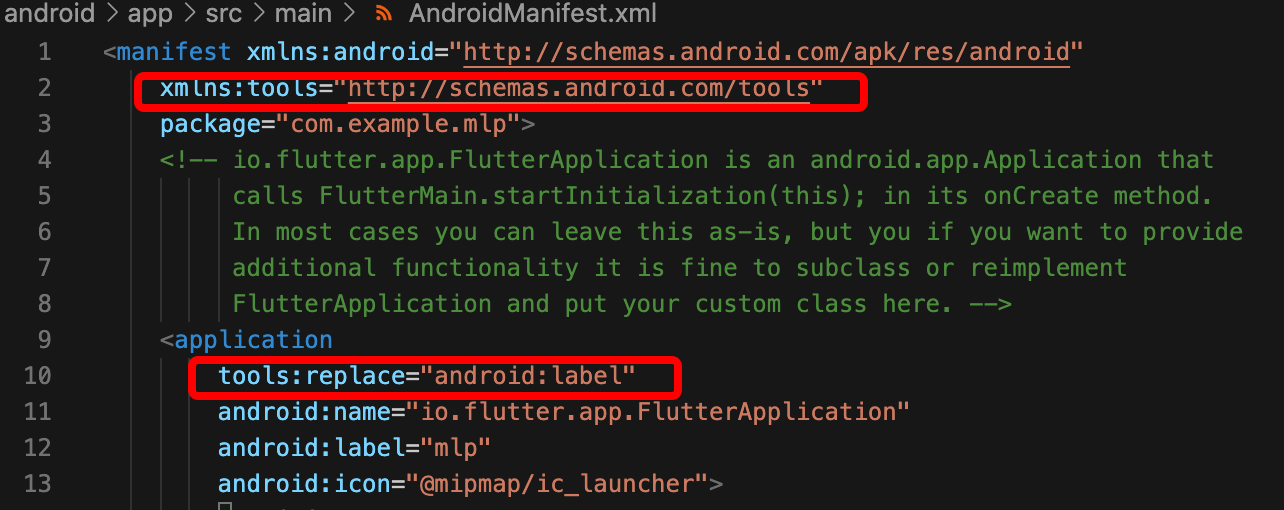
ステップ2:権限の設定および難読化ルール
Info.plistにカメラとマイクの権限申請を追加してください:<key>NSMicrophoneUsageDescription</key><string>通常の音声通話が行えるようにマイクの権限を承認します</string>
1.
/android/app/src/main/AndroidManifest.xmlファイルを開きます。2.
xmlns:tools="http://schemas.android.com/tools" をmanifestの中に追加します。3. `tools:replace="android:label"をapplicationの中に追加します。
explain
ステップ3:TRTCMeetingコンポーネントのインポート
次のディレクトリ内のすべてのファイルをプロジェクトにコピーします:
lib/TRTCMeetingDemo/model/
ステップ4:コンポーネントの作成およびログイン
1.
sharedInstanceインターフェースを呼び出すと、TRTCMeetingコンポーネントのインスタンスオブジェクトを作成できます。2.
registerListener関数を呼び出して、コンポーネントのイベント通知を登録します。3.
login関数を呼び出してコンポーネントのログインを完了します。下表を参考にキーパラメータを入力してください:パラメータ名 | 作用 |
sdkAppId | TRTCコンソール で SDKAppIDを表示できます。 |
userId | 現在のユーザーID。文字列タイプであり、英語のアルファベット(a-z、A-Z)、数字(0-9)、ハイフン(-)とアンダーライン(_)のみ使用できます。業務の実際のアカウントシステムと組み合わせてご自身で設定することをお勧めします。 |
userSig |
TRTCMeeting trtcMeeting = TRTCMeeting.sharedInstance();trtcMeeting.registerListener(onListener);ActionCallback res = await trtcMeeting.login(GenerateTestUserSig.sdkAppId,userId,GenerateTestUserSig.genTestSig(userId),);if (res.code == 0) {// ログイン成功}
ステップ5:多人数ミーティングの新規作成
1. キャスターは、手順4でログインした後、
setSelfProfileを呼び出して自身のニックネームおよびプロフィール画像を設定することができます。2. キャスターがcreateMeetingを呼び出し、新しいミーティングルームを作成します。
3. キャスターは、
startCameraPreviewを呼び出してビデオ画面をキャプチャすることができ、startMicrophoneを呼び出して音声をキャプチャすることもできます。4. キャスターに美顔のニーズがある場合は、インターフェース上に美顔調節ボタンを設定して呼び出すことができ、getBeautyManager を介して美顔設定を行います。
説明:
エンタープライズ版以外のSDKは変顔やスタンプの機能をサポートしていません。
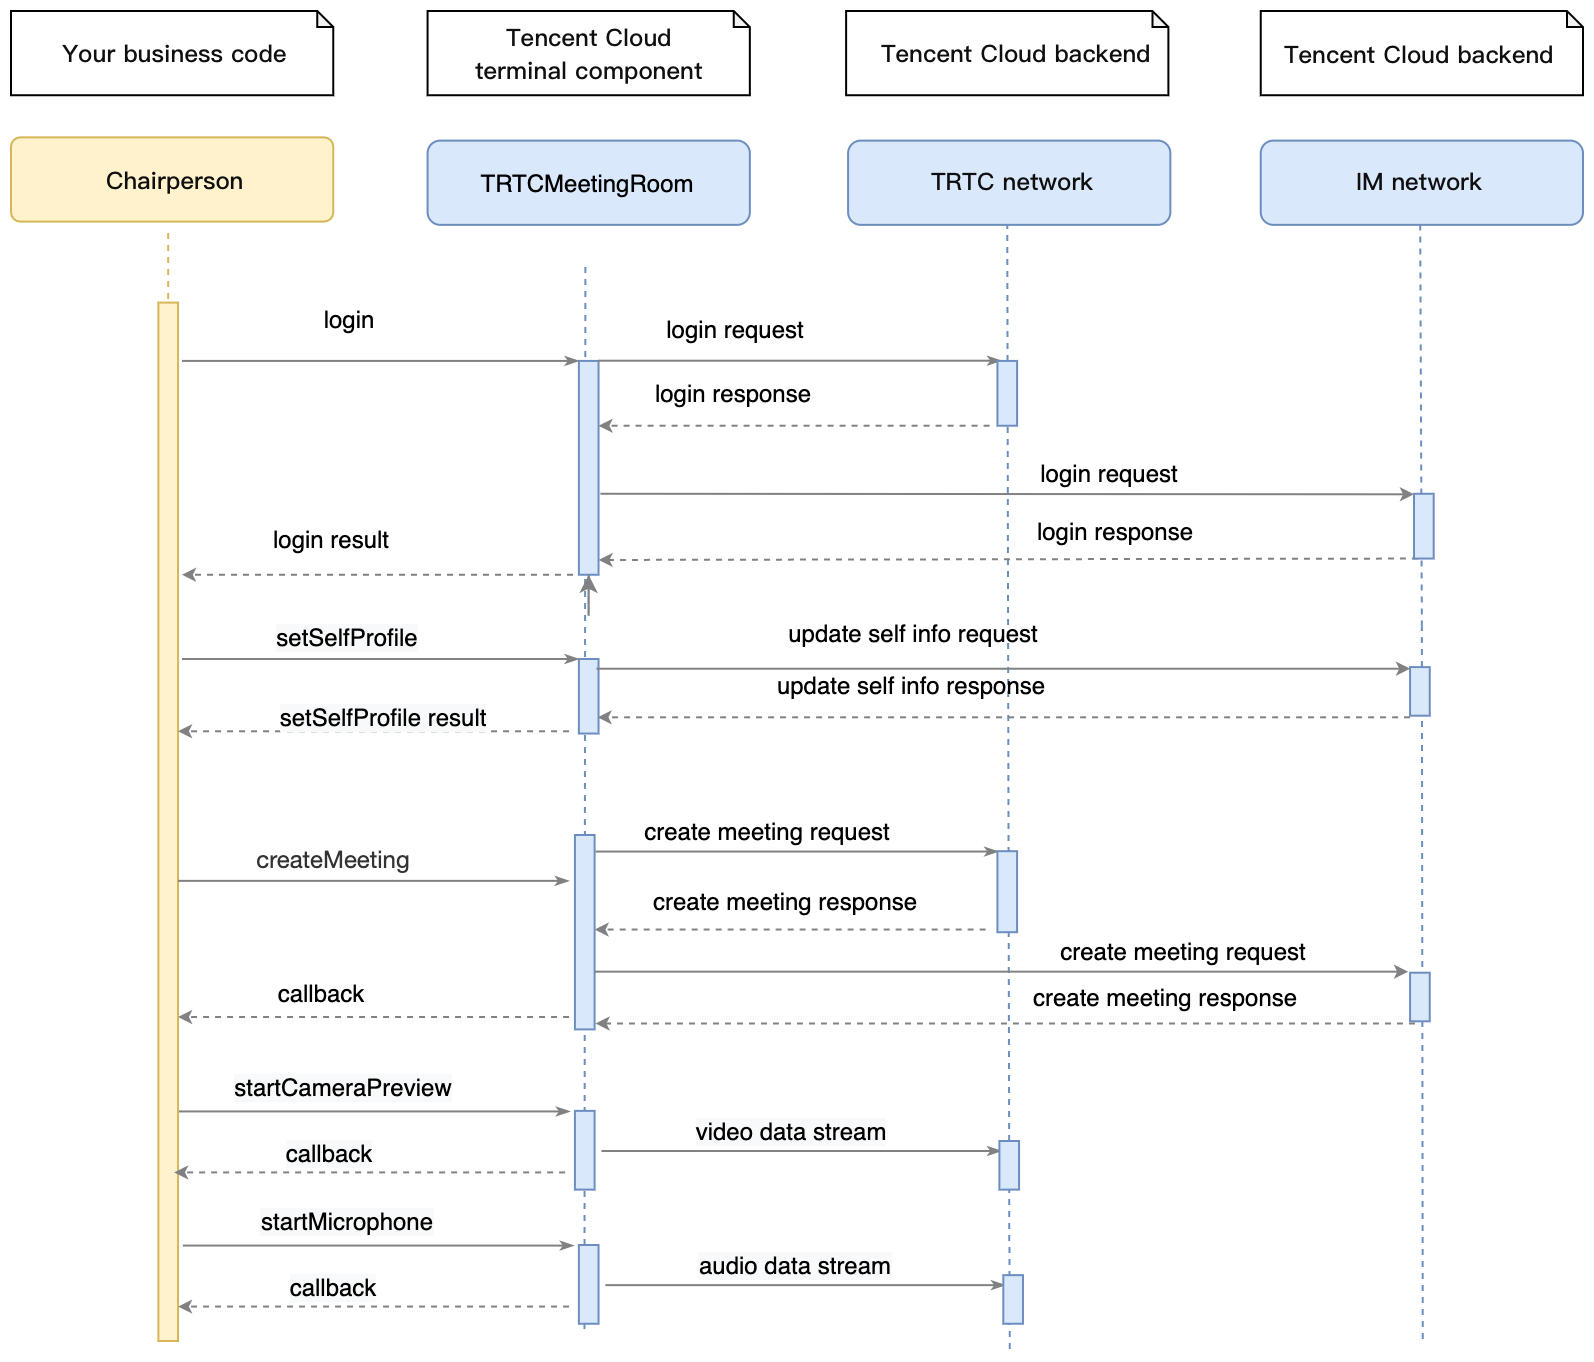
// 1. キャスターがニックネームとプロフィール画像を設定trtcMeeting.setSelfProfile('my_name', 'my_avatar');// 2. キャスターがミーティングを作成ActionCallback res = await trtcMeeting.createMeeting(roomId);if (res.code == 0) {// ミーティング作成に成功// 3. カメラと音声キャプチャを起動trtcMeeting.startCameraPreview(true, TRTCCloudVideoViewId);trtcMeeting.startMicrophone();// 4. 美顔設定trtcMeeting.getBeautyManager().setBeautyStyle(TRTCCloudDef.TRTC_BEAUTY_STYLE_PITU);trtcMeeting.getBeautyManager().setBeautyLevel(6);}
ステップ6:参加者の多人数ミーティングへの参加
1. 参加者は、手順4でログインした後、setSelfProfileを呼び出して自身のニックネームおよびプロフィール画像を設定することができます。
2. 参加者は、enterMeeting呼び出してミーティングルーム番号を渡すと、ミーティングルームに参加できます。
3. 参加者は、startCameraPreviewを呼び出してビデオ画面をキャプチャすることができ、またstartMicrophoneを呼び出して音声をキャプチャすることもできます。
4. 他の参加者がカメラを起動すると、onUserVideoAvailableのイベントを受け取ります。この時、startRemoteViewを呼び出してuserIdを渡すと再生を開始できます。
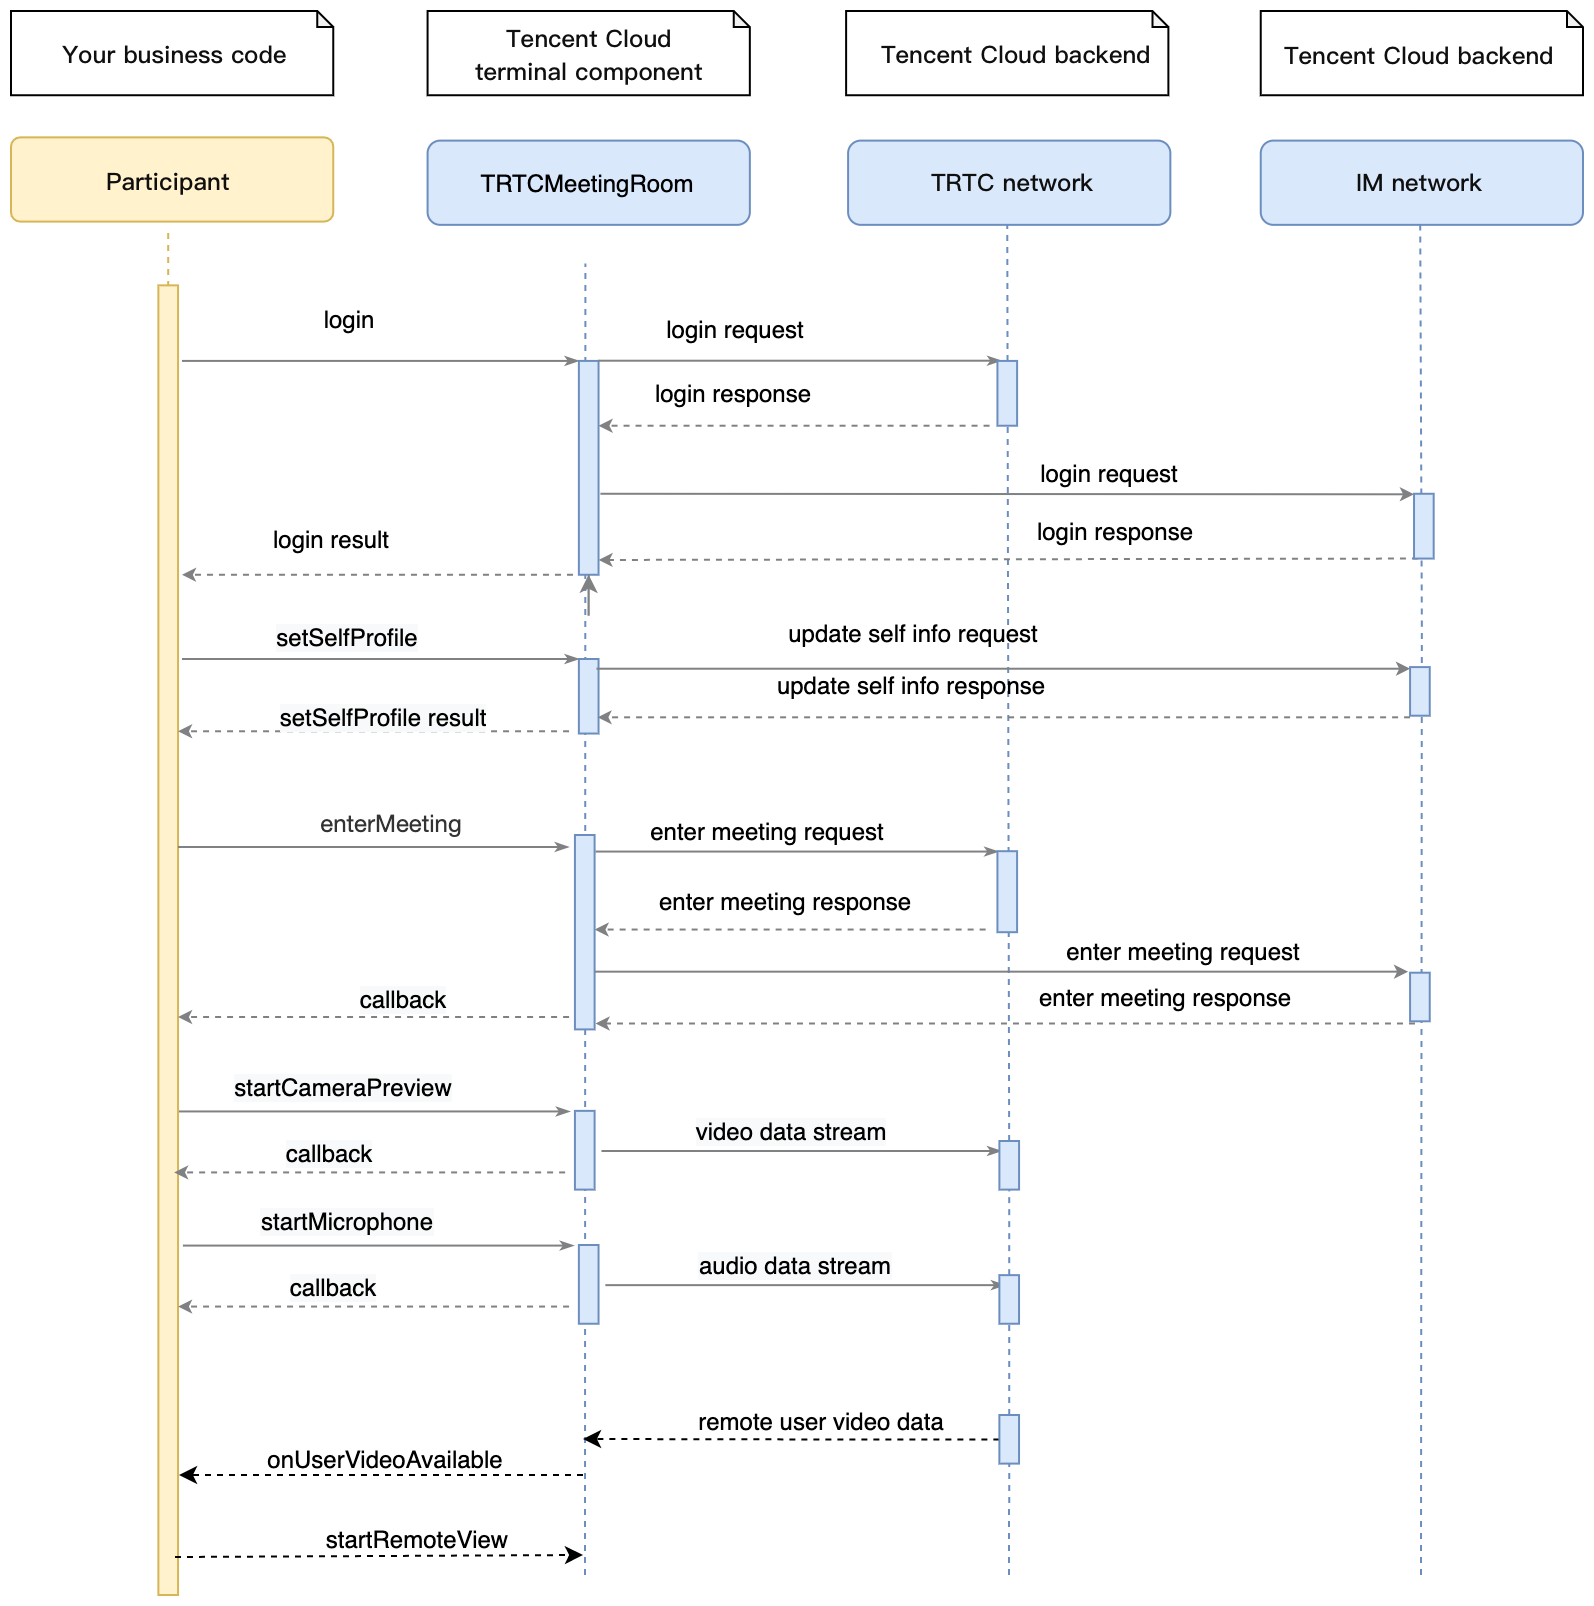
// 1. 参加者がニックネームとプロフィール画像を設定trtcMeeting.setSelfProfile('my_name', 'my_avatar');// 2. 参加者がenterMeetingを呼び出してミーティングルームに参加ActionCallback res = await trtcMeeting.enterMeeting(roomId);if (res.code == 0) {// ミーティング参加に成功// 3. カメラと音声キャプチャを起動trtcMeeting.startCameraPreview(true, TRTCCloudVideoViewId);trtcMeeting.startMicrophone();// 4. 美顔設定trtcMeeting.getBeautyManager().setBeautyStyle(TRTCCloudDef.TRTC_BEAUTY_STYLE_PITU);trtcMeeting.getBeautyManager().setBeautyLevel(6);}// 5. 参加者が他のメンバーのカメラ起動の通知を受信し、再生が開始されますtrtcMeeting.registerListener(onListener);onListener(TRTCMeetingDelegate type, param) {switch (type) {case TRTCMeetingDelegate.onUserVideoAvailable:if (param['available']) {trtcMeeting.startCameraPreview(param['userId'],TRTCCloudDef.TRTC_VIDEO_STREAM_TYPE_BIG,TRTCCloudVideoViewId);}else{trtcMeeting.stopRemoteView(param['userId'],TRTCCloudDef.TRTC_VIDEO_STREAM_TYPE_BIG);}break;}}
ステップ7:画面共有
1. 画面共有機能は、システムにフローティングウィンドウの権限を申請する必要があり、自分でUIの中で特定のロジックを実装してください。
2. startScreenCaptureを呼び出し、エンコードパラメータとスクリーンキャプチャのプロセスのフローティングウィンドウを渡すと、画面共有機能を実装できます。具体的な情報については、TRTC SDKをご参照ください。
3. ミーティング中の他メンバーがonUserVideoAvailableのイベント通知を受け取ります。
ご注意:
画面共有とカメラキャプチャは相互排他的な操作です。画面共有機能をアクティブにしたい場合は、先にstopCameraPreviewを呼び出してカメラキャプチャを停止してください。詳細については、TRTC SDKをご参照ください。
await trtcMeeting.stopCameraPreview();trtcMeeting.startScreenCapture(videoFps: 10,videoBitrate: 1600,videoResolution: TRTCCloudDef.TRTC_VIDEO_RESOLUTION_1280_720,videoResolutionMode: TRTCCloudDef.TRTC_VIDEO_RESOLUTION_MODE_PORTRAIT,appGroup: iosAppGroup,);
ステップ8:文字チャットとミュートメッセージの実現
sendRoomTextMsgにより、ノーマルなテキストメッセージを送信でき、そのミーティングのすべての参加者がonRecvRoomTextMsgのコールバックを受信します。IMバックエンドにはデフォルトのセンシティブワードフィルタリングルールが備わっており、センシティブワードと判定されたテキストメッセージがクラウドで転送されることはありません。
// 発信側:テキストメッセージの発信trtcMeeting.sendRoomTextMsg('Hello Word!');// 受信側:テキストメッセージのモニタリングtrtcMeeting.registerListener(onListener);onListener(TRTCMeetingDelegate type, param) {switch (type) {case TRTCMeetingDelegate.onRecvRoomTextMsg:print( param['userName'] + 'からのメッセージ:' + param['message']+'を受信' );break;}}
sendRoomCustomMsgにより、カスタム(シグナリング)メッセージを送信でき、そのミーティングのすべての参加者がonRecvRoomCustomMsgのコールバックを受信します。カスタムメッセージは、通常カスタマイズしたシグナリングの転送に使用されます(例:ミュートの会場内制御など)。
// 送信側:カスタマイズしたcmdでミュートの通知を区別できます// eg: "CMD_MUTE_AUDIO"はミュートの通知を表しますtrtcMeeting.sendRoomCustomMsg('CMD_MUTE_AUDIO', '1');// 受信側:カスタムメッセージのモニタリングtrtcMeeting.registerListener(onListener);onListener(TRTCMeetingDelegate type, param) {switch (type) {case TRTCMeetingDelegate.onRecvRoomCustomMsg:if (param['command'] == 'CMD_MUTE_AUDIO') {// ミュートの通知を受信しますprint(param['userName'] +'から' + 'のミュートの通知:' + param['message']'を受信');trtcMeeting.muteLocalAudio(message == '1');}break;}}
フィードバック