You can view and modify some parameters via the MySQL Console, and query the parameter modification history in the console.
Note:
Primary instances, read-only instances, read-only analysis engines, and disaster recovery instances all support parameter modification via the console. The process is essentially the same for each, with only slight differences in how you enter the parameter settings page. The specific differences are described below. This document uses primary instances as an example in the operation steps.
To ensure the stability of the instance, the console only allows modification of some parameters. The parameters displayed on the console's parameter configuration page are the parameters that users can modify.
If the modified parameters require a reboot to take effect, the system will prompt you whether to reboot. It is recommended that you perform this operation during off-peak hours and ensure that your application has a reconnection mechanism.
If you wish to restore the default formula, clear the input parameter content and apply.
Modifying Parameters via the Parameter List
Modifying Parameters in Batches
1. Log in to the TencentDB for MySQL console. In the instance list, click the Instance ID or Manage in the Operation column to go to the instance management page.
3. In the Current Value column, select the parameters you need to modify. After confirming the changes, click Confirm Modification.
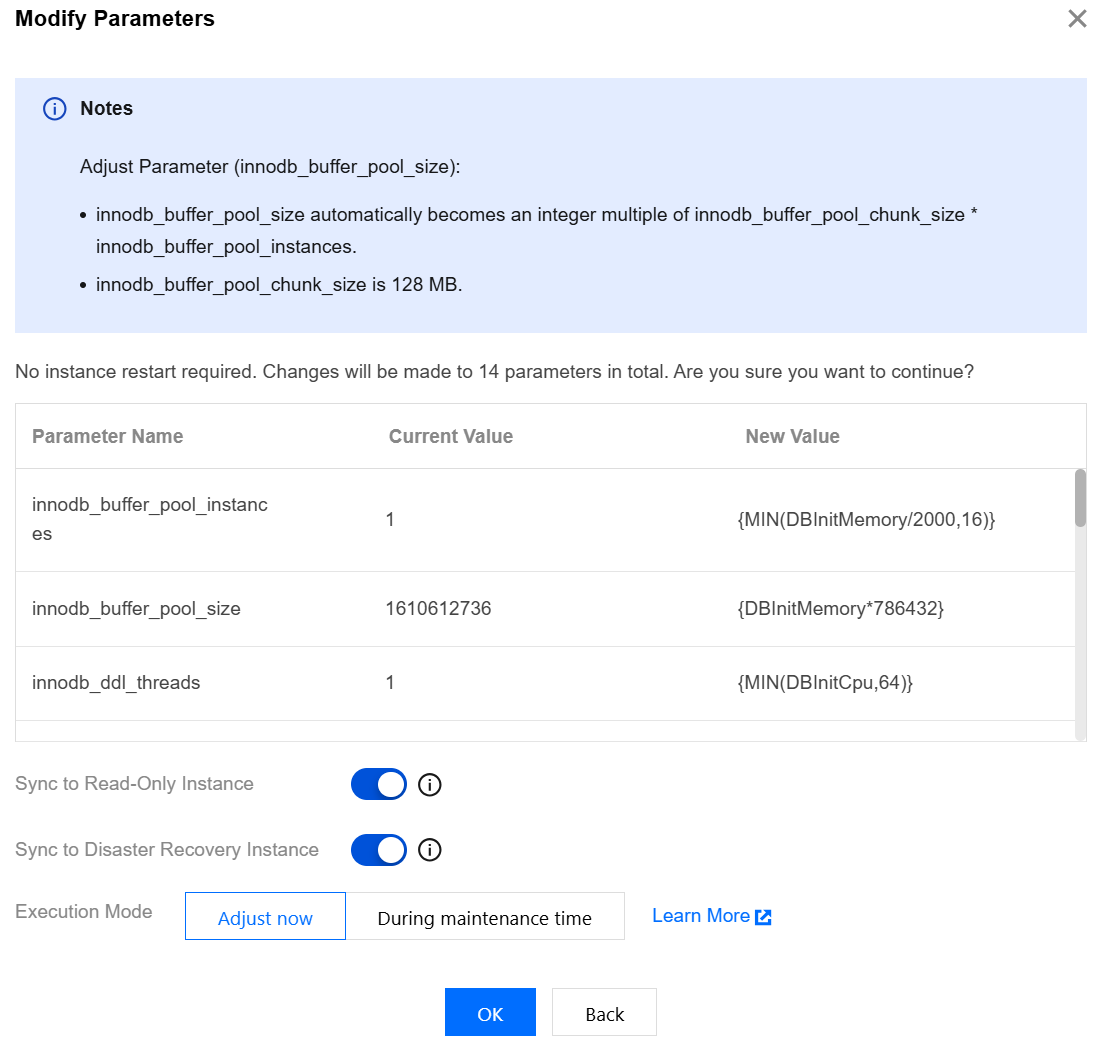
4. In the pop-up dialog box, select the Execution Method for the parameter task and click OK.
Note:
If you select Adjust Now, the parameter modification task for the selected instance will be executed and take effect immediately.
If you select During maintenance time, the parameter modification task for the selected instance will be executed and take effect during the maintenance window of the instance.
Modifying a Single Parameter
1. Log in to the TencentDB for MySQL console and click the Instance ID in the instance list to go to the instance management page.
2. Choose Database Management > Parameter Settings page, select the row of the target parameter, and in the Current Value column, click
to modify the parameter value.
3. Based on the prompt in the Acceptable Values column, enter the target parameter value, click
to save, or click
to cancel the operation.
4. In the pop-up dialog box, select the Execution Method for the parameter task and click OK.
Note:
If you select Adjust Now, the parameter modification task for the selected instance will be executed and take effect immediately.
If you select During maintenance time, the parameter modification task for the selected instance will be executed and take effect during the maintenance window of the instance.
Modifying Parameters During Parameter Template Import
Scenario 1: Modifying Parameters When Importing a Local Parameter Configuration File
1. Log in to the TencentDB for MySQL console and click the Instance ID in the instance list to go to the instance management page.
3. In the pop-up window, click Select File to select a .cnf file (no larger than 1 MB) from your local device, and then click Import and Overwrite Original Parameters.
4. After confirming the parameter values, click Confirm Modification.
5. In the pop-up dialog box, select the Execution Method for the parameter task and click OK.
Note:
If you select Adjust Now, the parameter modification task for the selected instance will be executed and take effect immediately.
If you select During maintenance time, the parameter modification task for the selected instance will be executed and take effect during the maintenance window of the instance.
Scenario 2: Modifying Parameters Based on the Default Parameter Template
1. Log in to the TencentDB for MySQL console and click the Instance ID in the instance list to go to the instance management page.
3. In the pop-up window, select High Stability Template (Hot) or High Performance Template as needed, and then click Import and Overwrite Original Parameters.
4. After confirming the parameter values, click Confirm Modification.
5. In the pop-up dialog box, select the execution method for the parameter modification task, and then click OK.
Note:
If you select Adjust Now, the parameter modification task for the selected instance will be executed and take effect immediately.
If you select During maintenance time, the parameter modification task for the selected instance will be executed and take effect during the maintenance window of the instance.
Scenario 3: Modifying Parameters Based on a Custom Parameter Template
Log in to the TencentDB for MySQL console and click the Instance ID in the instance list to go to the instance management page.
2. In the pop-up window, locate and select the custom template you created, and then click Import and Overwrite Original Parameters.
Note:
Only parameter templates with the same database version as the current instance can be selected.
If you have not created a custom template, refer to the instructions in Applying Parameter Templates to create one.
3. After confirming the parameter values, click Confirm Modification.
4. In the pop-up dialog box, select the execution method for the parameter modification task, and then click OK.
Note:
If you select Adjust Now, the parameter modification task for the selected instance will be executed and take effect immediately.
If you select During maintenance time, the parameter modification task for the selected instance will be executed and take effect during the maintenance window of the instance.
Parameter Formula
Instance parameter settings support the use of expressions. By setting parameters related to instance specifications as expressions, parameter values configured here will dynamically change when instance specifications are modified. This ensures continued applicability to the updated specifications, allowing the instance to always maintain the optimal state required for business operations.
Refer to the setting of the parameter innodb_buffer_pool_size: {DBinitMemory*786432}. When DBinitMemory in the instance specifications is modified, no manual modification is required for the parameter configuration here. The value of innodb_buffer_pool_size will be automatically updated.
For details on the supported expression syntax, refer to the table below.
Supported Categories
Support Notes
Example
Variables
DBinitMemory: The memory size of the instance specifications, measured in MB, integer type. For example, if the memory size of the instance specifications is 1000MB, the value of DBinitMemory is 1024. DBInitCpu: The number of CPU cores of the instance specifications, integer type. For example, if the instance specifications are 8 cores, the value of DBInitCpu is 8.
{DBinitMemory * 786432} that is: memory size (DBinitMemory) * percentage (system default 75%) * 1024 * 1024 (unit conversion).
Operator
Formula syntax: Enclose the formula within {}. Division operator (/): Divides the dividend by the divisor and returns an integer quotient. If the calculation result is a decimal, it is truncated to the integer part. Decimal numbers are not supported. For example, considering the operator for the max_connections parameter, the system supports {MIN(DBInitMemory/4+500,100000)} but does not support {MIN(DBInitMemory*0.25+500,100000)}. Multiplication operator (*): Multiplies two multipliers and returns an integer product. If the calculation result is a decimal, it is truncated to the integer part. Decimal arithmetic is not supported.
-
Functions
The MAX() function returns the maximum value among integers or in the parameter formula list. The MIN() function returns the minimum value among integers or in the parameter formula list.
{MAX(DBInitCpu/2,4)}
Parameters Supporting Parameter Formulas
Note:
TencentDB for MySQL continuously optimizes parameter settings. This section lists only some parameters that support parameter formulas. You can learn more about parameter formulas in the console's parameter templates.
Parameter Name
Parameter Description
Default Formula
thread_pool_size
This parameter sets the number of thread groups in the thread pool. The default value indicates that the number of thread groups aligns with the number of CPUs.
{MIN(DBInitCpu,64)}
table_open_cache_instances
It refers to the number of partitions for MySQL caching table handles.
{MIN(DBInitMemory/1000,16)}
table_open_cache
Table descriptor cache size, which reduces the frequency of file open/close operations.
{MAX(DBInitMemory*512/1000,2048)}
table_definition_cache
The number of open table cache instances.
{MAX(DBInitMemory*512/1000,2048)}
max_connections
The maximum connections.
{MIN(DBInitMemory/4+500,100000)}
join_buffer_size
The minimum size of the buffer used for ordinary index scans, range index scans, and table joins that perform full-table scans.
{MIN(DBInitMemory*128,262144)}
innodb_write_io_threads
The number of I/O threads for write operations in InnoDB.
{MAX(DBInitCpu/2,4)}
innodb_read_io_threads
The number of I/O threads for read operations in InnoDB.
{MAX(DBInitCpu/2,4)}
innodb_buffer_pool_instances
The number of partitions in the InnoDB buffer pool.
{MIN(DBInitMemory/2000,16)}
innodb_buffer_pool_size
The size of the buffer pool (in bytes), which is the memory area where InnoDB caches table and index data.
{DBInitMemory*786432}
Exporting the Parameter Configuration File to a Local Path
1. Log in to the TencentDB for MySQL console and click the Instance ID in the instance list to go to the instance management page.
Saving the Parameter Configuration of the Current Instance as a Parameter Template
1. Log in to the TencentDB for MySQL console and click the Instance ID in the instance list to go to the instance management page.
2. Choose Database Management > Parameter Settings page, and click Save as Template.
Synchronizing Changes to Read-only or Disaster Recovery Instances
When modifying parameters and selecting the execution method, you can enable synchronization to apply the changes to read-only or disaster recovery instances if needed.
Cancel Parameter Modification Task
After submitting a parameter modification task scheduled During maintenance time, if you need to cancel the modification, go to the page in the left sidebar before the task is executed (that is, when the task status is Pending Execution), and click Cancel in the Operation column to cancel the parameter modification task.
Viewing Parameter Modification Records
1. Log in to the TencentDB for MySQL console and click the Instance ID in the instance list to go to the instance management page.
2. Choose Database Management > Parameter Settings page, and click Recent Modifications on the right.
3. On the Recent Parameter Modification Records page, recent parameter modification records can be viewed.
Subsequent Operation Steps
You can use database parameter templates to batch manage the parameter configurations of your databases. See Using Parameter Templates.