VODに保存
Download
フォーカスモード
フォントサイズ
CSSでは、ライブストリーミングの画面をレコーディングし、ファイルをVODの中に保存する機能を提供しています。VOD経由でレコーディングしたビデオには、ダウンロード、プレビューなどの処理を行うことができます。ここでは、レコーディングテンプレートの作成、バインド、バインド解除、修正および削除の方法をご紹介します。
レコーディングテンプレートの作成には次の2つの方法があります:
CSSコンソールによるレコーディングテンプレートの作成。具体的な操作手順は、レコーディングテンプレートの作成をご参照ください。
APIによるレコーディングテンプレートの作成。具体的なパラメータ、サンプル、説明については、 レコーディングテンプレートの作成をご参照ください。
注意事項
レコーディングしたビデオファイルは、デフォルトで VOD コンソールに保存されます。事前にVODのサービスをアクティブ化し、またVOD関連のリソースパックを購入して、VODのサービスの支払い延滞による使用停止を回避することをお勧めします。詳細については、VODクイックスタートをご参照ください。
レコーディング機能を有効にした後、VODサービスが正常な使用状態にあることを確認してください。VODサービスが非アクティブ状態またはアカウントの支払い延滞によりサービス停止になるなどの状況が起きた場合は、ライブストリーミングに影響して、レコーディングができなくなります。この期間はレコーディングファイルとレコーディングの費用は発生しません。
ライブストリーミングの過程では、レコーディング終了後5分前後で対応するファイルを取得できます。例えば、あるライブストリーミングを12:00からレコーディング開始、12:30にレコーディング終了とした場合は、12:35前後に12:00 - 12:30の対応するフィルムを取得でき、以下は同様です。
音声/ビデオファイル形式(FLV/MP4/HLS)のコーディックタイプのサポート制限により、ビデオコーディックのタイプはH.264をサポートし、音声のコーディックのタイプはAACをサポートしています。
レコーディングテンプレートの作成完了後、プッシュドメイン名へのバインドを行います。関連ドキュメントについては、 レコーディング設定をご参照ください。バインド完了の約5分 - 10分後に有効となります。
発行されるレコーディングファイルの命名ルールについてお知りになりたい場合は、レコーディングテンプレートパラメータ-VodFileNameをご参照ください。
テンプレートのバインド、修正、バインド解除はいずれも更新後のライブストリーミングにのみ影響し、すでにライブストリーミング中にあるストリームは影響を受けません。ライブストリーミング中のストリームが新しいルールを使用するには、一度切断して再度プッシュする必要があります。
ミクスストリーミングのレコーディングは、レコーディングファイルエラーが発生し、通常の視聴と再生に影響を与えるため、中国大陸(中国本土)とグローバル/中国香港・中国マカオ・中国台湾のライブミクスストリーミングをサポートしていません。
前提条件
Tencent CSSサービスをアクティブ化し、プッシュドメイン名を追加済みであること。
VODサービスを有効化していること。
レコーディングテンプレートの作成
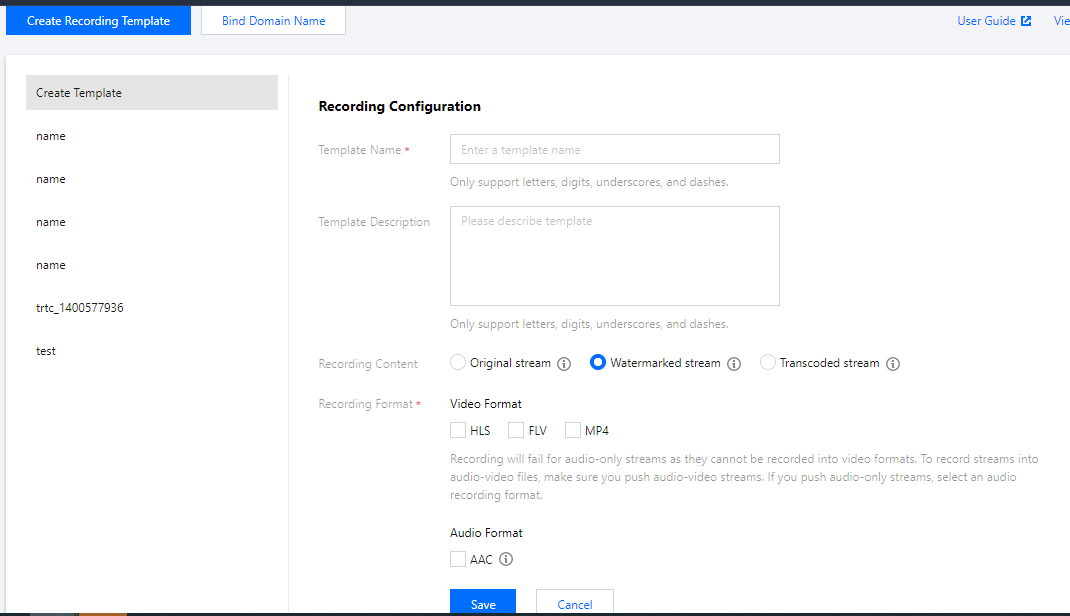
1. CSSコンソールにログインし、機能設定 > CSSレコーディングに進みます。
2. レコーディングテンプレート作成をクリックしてテンプレート情報を設定します。以下の設定を行います:
設定項目 | 設定説明 | |
テンプレート名 | | CSSレコーディングのテンプレート名。カスタマイズ可能です(中国語、英語、数字、「_」、「-」のみ対応)。 |
テンプレートの説明 | | CSSレコーディングのテンプレートの概要説明。カスタマイズ可能です(中国語、英語、数字、「_」、「-」のみ対応)。 |
コンテンツのレコーディング | オリジナルストリームのレコーディング | ビデオは、ライブストリーミングのオリジナルビットレートでレコーディングされ、デフォルトでは、オリジナルストリームをレコーディングします。レコーディングしたビデオには、トランスコード、ウォーターマーク、ミクスストリーミングがありません。 |
| ウォーターマーク付きレコーディング | この設定を指定した場合、ウォーターマークテンプレートに設定されたウォーターマークをライブストリーミングに追加してレコーディングします。 |
| 指定されたトランスコードストリームのレコーディング | 指定されたトランスコードストリームのレコーディングをクリックすると、設定済みのトランスコードテンプレートを選択するか、テンプレート名をクリックしてトランスコードテンプレート設定の変更へ遷移できます。この設定を指定した場合、ストリーミングプッシュ後にトランスコードテンプレートidによって、自動でトランスコードを開始してレコーディングを行います。レコーディングしたビデオにウォーターテンプレートに設定されたウォーターがあります。トランスコードテンプレートを間違えて削除した場合、ウォーターマーク付きレコーディングでレコーディングされます。 |
レコーディング形式 | | ビデオレコーディングの出力形式にはHLS、MP4、FLV、AACの4種類があります。そのうちAACはオーディオのみのレコーディングです。 |
ご注意:
WebRTCストリーミングプッシュでオリジナルストリームをレコーディングするとき、 音声が紛失するため、他のレコーディング内容を選択することを推奨します。
タイムシフトの運用シーンでは、トランスコードストリーミングのレコーディング機能は使用できません。レコーディングテンプレートにタイムシフトの設定が関連付けられている場合、オリジナルストリームでレコーディングされます。
指定されたトランスコードストリームのレコーディングにおいて、オーディオのみのトランスコードテンプレートを選択した場合、レコーディング形式はオーディオ形式のみ選択できます。
トランスコードストリームをレコーディングするには、まずトランスコードタスクを開始する必要があり、トランスコード料金が追加で発生します。 同一のトランスコードテンプレートを使用して再生する場合、重複して課金されることはありません。
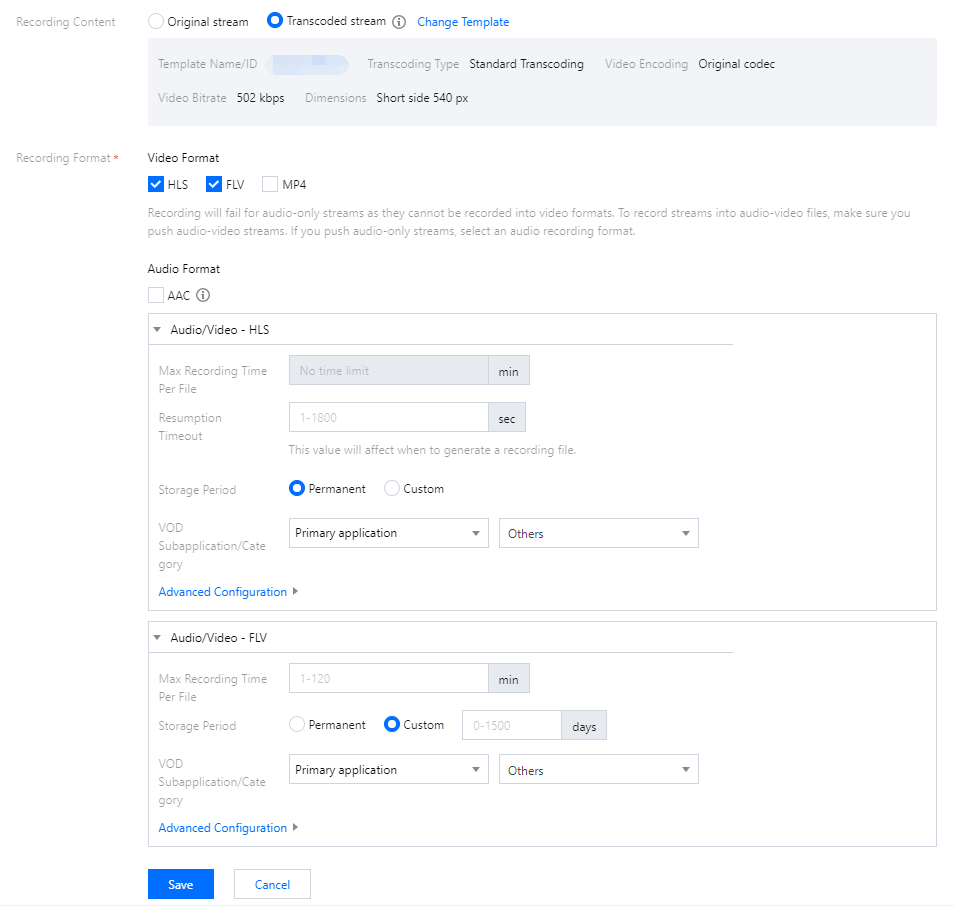
3. レコーディングコンテンツを選択し、必要なレコーディング形式にチェックを入れると、該当する形式の設定インターフェースがポップアップ表示され、同時に設定する1つまたは複数のレコーディング形式を選択できます。以下の設定を行ってください:
設定項目 | 設定説明 | |
レコーディングファイル1つあたりの長さ(分) | | HLS形式でレコーディングするファイル1つあたりのレコーディング時間は無制限です。レコーディング継続の待機時間を超えた場合は、ファイルを新規作成し、レコーディングを継続します。 FLV形式でレコーディングするファイル1つあたりの長さは1分~720分です。 MP4またはAAC形式でレコーディングするファイル1つあたりの長さは1分~120分です。 |
レコーディング継続の待機時間(秒) | | HLS形式のファイルのみ、プッシュ中断のレコーディング継続をサポートし、レコーディング継続の待機時間を1s~1800sに設定できます。 |
保存時間(日) | | レコーディングファイル1つあたりの最大保存時間は1500日で、ファイル保存時間が0の場合は永久保存です。永続ストレージ または 指定期間を選択できます。 |
オンデマンドアプリケーション/カテゴリーの指定 | | VODの指定 するサブアプリケーションのオンデマンドカテゴリーにレコーディングする機能をサポートしています。デフォルトではアカウントのメインアプリケーションにレコーディングされ、書き込みステータスが有効になっているサブアプリケーションにのみ対応できます。 |
高度な設定 | オンデマンドタスクフロー処理 | バインドするタスクフローの選択をクリックすると、オンデマンドサブアプリケーションで作成されたタスクフローをバインドするか、現在のオンデマンドタスクフロー選択インターフェースでタスクフロー名をクリックしてVODコンソールに移動し、タスクフローの設定を追加/変更するかを選択できます。バインドに成功すると、レコーディングファイルの発行後にオンデマンドタスクフローテンプレートが実行され、対応するBilling Overview | Tencent Cloudが発生します。 |
| レコーディングとアップロードの同時実行 | 現在、レコーディングとアップロードの同時実行機能を有効にできるのはFLV形式のみです。有効にすると、レコーディング終了後すぐにファイルをアップロードできます。1つのレコーディングファイルの長さは最大12時間で、FLVレコーディングの障害復旧も強化されています。また、再生ファイルをオンラインでドラッグするとラグが生じることがありますが、ローカルでの再生には影響を与えません。 |
4. 保存をクリックすれば完了です。
ドメイン名のバインド
1. CSSコンソールにログインし、機能設定 > CSSレコーディングに進みます。
ドメイン名の直接的関連付け:左上にあるドメイン名のバインドをクリックします。
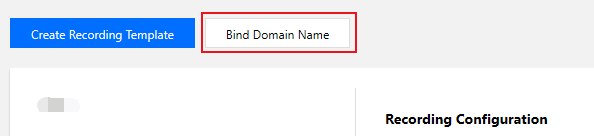
新規レコーディングテンプレート作成完了後のドメイン名関連付け:レコーディングテンプレートの作成の完了後、プロンプトボックスの中のドメイン名のバインドに進むをクリックします。
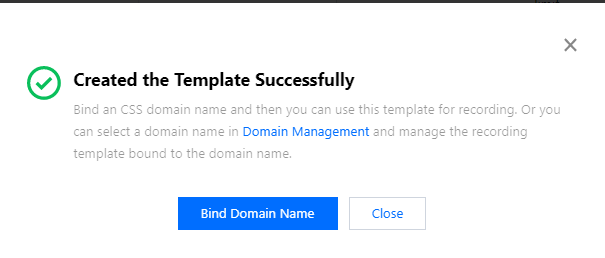
2. ドメイン名バインドのウィンドウの中で、バインドしたいレコーディングテンプレートおよびプッシュドメイン名を選択し、OKをクリックすればバインドが完了します。
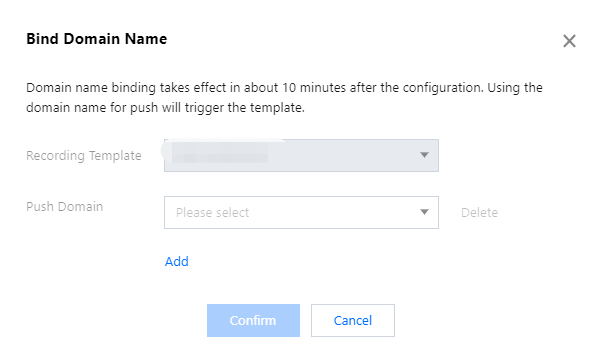
説明:
追加をクリックして現在のテンプレートに複数のプッシュドメイン名をバインドする機能をサポートしています。
バインドの解除
1. CSSコンソールにログインし、機能設定 > CSSレコーディングに進みます。
2. すでに関連付けしたドメイン名のレコーディングテンプレートを選択し、バインドを解除したいドメイン名を選択して右側のバインド解除をクリックします。
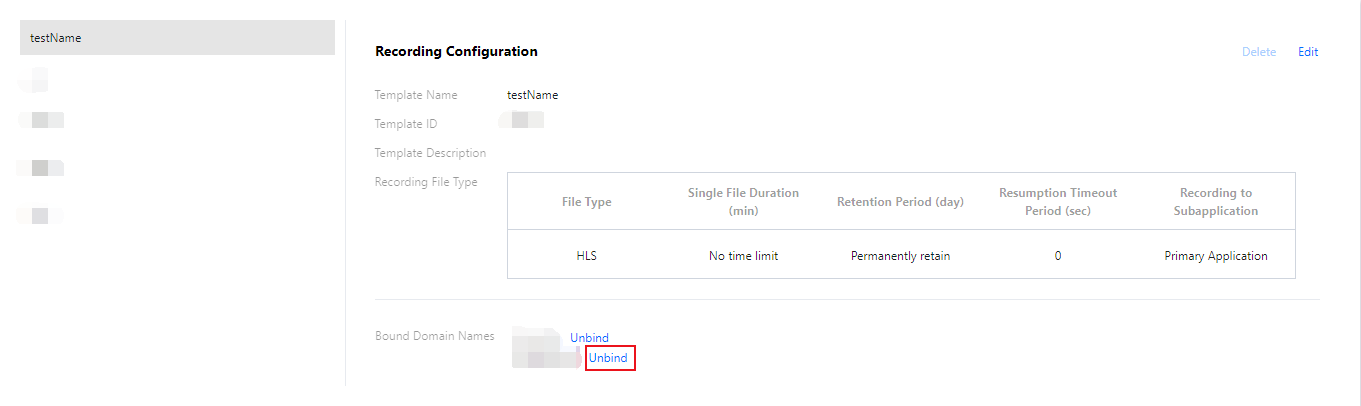
3. 現在関連付けられているドメイン名のバインドを解除するかどうかを確認して、OKをクリックすればバインドが解除されます。
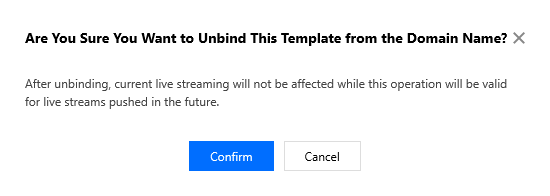
説明:
レコーディングテンプレートのバインド解除後、ライブストリーミング中のストリームには影響しません。
バインド解除を有効にしたい場合は、バインド解除後にストリームを停止して再度ライブストリーミングをプッシュしてください。新規ライブストリーミングにレコーディングファイルが生成されなくなります。
テンプレートの修正
1. 機能設定 > CSSレコーディングに進みます。
2. 作成済みのレコーディングテンプレートを選択し、右側の編集をクリックすれば、テンプレートの情報を変更でき、保存をクリックすると完了します。
テンプレートの削除
1. CSSコンソールにログインし、機能設定 > CSSレコーディングに進みます。
2. 作成済みのレコーディングテンプレートを選択し、右上の削除をクリックします。
3. 現在のレコーディングテンプレートを削除するかどうかを確認し、OKをクリックすれば削除が完了します。
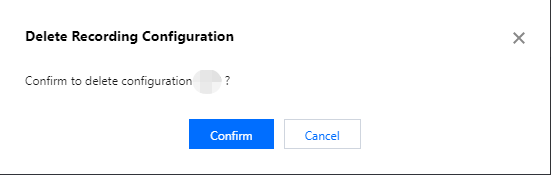
ご注意:
テンプレートがすでにバインドされている場合は、先にバインドの解除を行ってから、削除操作を行うことができます。
コンソールのレコーディングテンプレートの管理はドメイン次元となり、現在はインターフェース関連付けの作成ルールを取り消しすることができません。レコーディング管理インターフェースの関連付けによってストリームを指定している場合は、レコーディングルールの削除を呼び出して、関連付けを解除する必要があります。
関連する操作
関連する質問
CSSレコーディング後に生成されるビデオ名はどのようなルールで生成されますか?
コンソールで作成したレコーディングテンプレートにより、コールバック後に生成されるレコーディングファイルは、デフォルトでは接合方式による命名となっています。形式は次のとおりです。
{StreamID}*{StartYear}-{StartMonth}-{StartDay}-{StartHour}-{StartMinute}-{StartSecond}*{EndYear}-{EndMonth}-{EndDay}-{EndHour}-{EndMinute}-{EndSecond} このうち:
プレースホルダー | 意味 |
{StreamID} | ストリームID |
{StartYear} | 開始時間-年 |
{StartMonth} | 開始時間-月 |
{StartDay} | 開始時間-日 |
{StartHour} | 開始時間-時 |
{StartMinute} | 開始時間-分 |
{StartSecond} | 開始時間-秒 |
{EndYear} | 終了時間-年 |
{EndMonth} | 終了時間-月 |
{EndDay} | 終了時間-日 |
{EndHour} | 終了時間-時 |
{EndMinute} | 終了時間-分 |
{EndSecond} | 終了時間-秒 |
フィードバック