Adding Your Own Domain
Download
Focus Mode
Font Size
To use the CSS Service, at least two domain names are needed: one as the push domain name and one as the playback domain name. The push domain name and the playback domain name cannot be the same. However, they can be distinguished by second-level domain names, not limited to two subdomains. For example,
a.example.com can be used as the push domain name and b.example.com can be used as the playback domain name for push and pull services.Note
CSS provides a test domain name
xxxx.livepush.myqcloud.com by default. You can use it for push testing, but we do not recommend using it as the push domain name for your real business. This domain name cannot be deleted.Prerequisites
Adding Your Own Domain
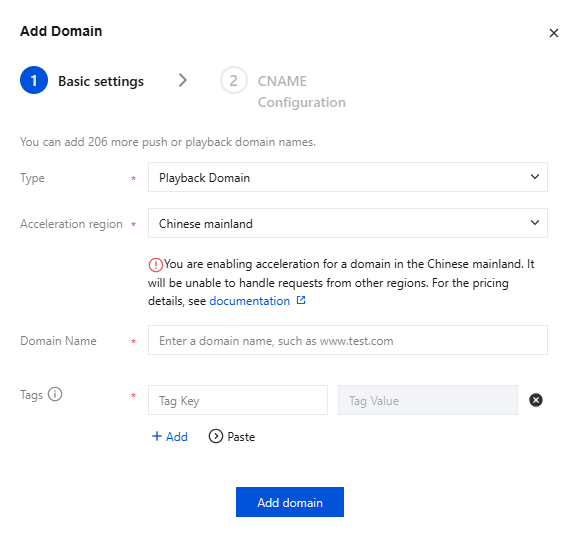
1. Log in to the CSS console and select Domain Management on the left sidebar.
2. Click Add Domain and complete the following settings in the pop-up window:
2.1 If you need to add a push domain: Enter the domain name and select the domain type as Push Domain.
2.2 If you need to add a playback domain: Enter the domain name, select the domain type as Playback Domain, and choose the acceleration region, with the default being Chinese mainland.
2.3 Tags are used to classify and manage resources from different dimensions. If the existing tag does not meet your requirements, you can also go to the Tag Console for unified tag management.
2.4 Click on Add domain.
Note:
The domain name can be up to 45 characters long and cannot contain uppercase letters.
By default, you can add up to 100 domains under each Tencent Cloud account. If you you need to add more than 100 domains, please submit a ticket to raise the limit.
You can change the acceleration region of a domain added. On the Domain Management page, click the name of the domain or click Manage on the right. Select the Advanced Configuration tab, click Edit in the Region configuration area, select the acceleration region again in the pop-up window, and click Save.
Verifying Your Domain
To make sure that a domain can only be added by its owner, you need to verify your ownership of a domain before you can add it in the CSS console. For example, to add
a.test.com, you need to verify your ownership of test.com. You don’t need to verify again when adding domains with the same parent domain, such as b.test.com. You can verify a domain either by adding a DNS record or by uploading an HTML file. If a previously added domain is not verified, when you add a domain with the same parent domain, verification is still required.DNS record
You can verify your ownership of a domain by adding a DNS record at your DNS provider. If you use Tencent Cloud’s DNS service, follow the steps below to add a DNS record.
1. Log in to the DNSPod console.
2. Select DNS > My Domains on the left sidebar and click the parent domain of the domain you want to add.
3. On the Record Management page, click Add Record.
4. Enter the following information:
Parameter | Description |
Host | Enter “cssauth”. |
Record Type | Select “TXT”. |
Record Value | CSS assigns a unique record value for each domain. You can view it in the CSS console when adding your domain. |
5. Click Confirm. The TXT record will take effect in about five minutes.
6. Click Verify and add domain . If the verification succeeds, you can proceed to the next step.
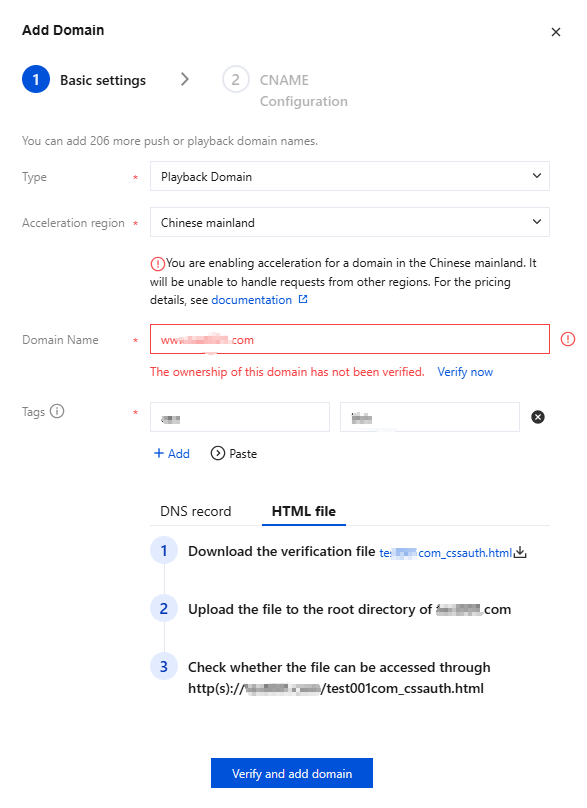
HTML file
You can also verify your domain by uploading an HTML file.
1. When asked to verify your domain in the CSS console, select HTML file.
2. Download the file.
3. Upload the file to the root directory of the second-level domain.
4. Confirm that the file is accessible at
http://second-level domain/second-level domain_cssauth.html .5. Click Verify and add domain . If the verification succeeds, you can proceed to the next step.
Note:
After finishing the Basic settings, you can proceed to the CNAME configuration step. For more information about CNAME configuration, see Configuring CNAME for Domain Name.
Help and Support
Was this page helpful?
You can also Contact sales or Submit a Ticket for help.
Help us improve! Rate your documentation experience in 5 mins.
Feedback