With remote authentication, after authenticating a push/playback request for hotlink protection, CSS will call your server API to send the request to your server so that you can determine whether the request is legitimate. Based on the result your server returns, CSS will approve or reject the push/playback request. This ensures more precise authentication and improves security. However, you need to develop your own authentication server.
Workflow
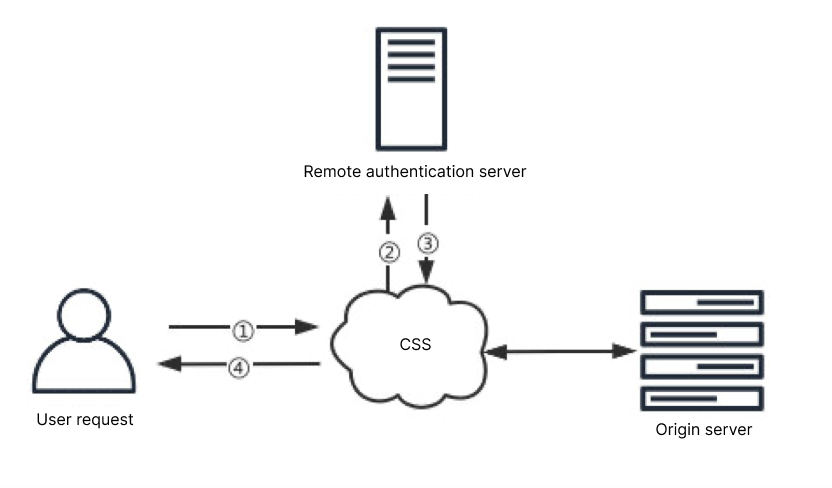
Remote authentication works as follows:
No
Description
1
A request is sent to CSS.
2
If remote authentication is enabled for the domain, CSS will process the request as specified and then send it to your authentication server.
3
Your authentication server returns the result. The HTTP status code 200 indicates that the request should be approved, while the code 403 indicates that the request should be rejected.
4
CSS approves or rejects the request based on the result.
Prerequisites
You have activated CSS and logged in to the CSS console.
You have added the push domain.
Configuring Remote Authentication
1. Log in to the CSS Console, select Domain Management, click on the push domain that needs remote authentication configuration or click on Manage on the right side, and enter the Domain Management page.
2. In Advanced Configuration > Remote authentication, you can choose to enable or disable Remote Authentication Configuration.
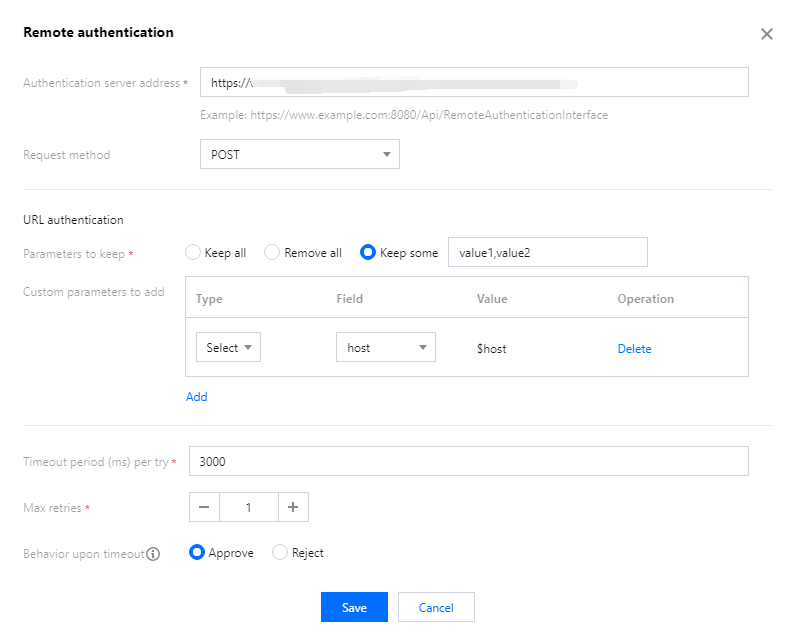
3. Click
to enable remote authentication and complete the following settings:
Configuration Item
Description
Authentication server address
The address of your authentication server (required). Format: http(s)://+Domain or IP address+Port+Path.
Request method
POST is selected by default. You can also use HEAD or GET.
URL authentication
Parameters to keep
All URL parameters are kept by default. You can also specify parameters to keep or remove all parameters.
When choosing to keep specific parameters, you need to enter the parameters to be retained in the input box. Chinese characters and spaces are not supported. Separate multiple parameters with English commas, for example: value1,value2.
Authentication parameters are case-sensitive; "key" and "KEY" are considered as two different parameters.
Custom parameters to add
Click Add, and the parameter type can be either Select Parameter or Custom. (Up to 50 parameters can be added)
The uri parameter represents: the original request URL.
The client_ip parameter represents: the request client IP.
The cdn_ip parameter represents: the request CDN side IP.
When selecting Custom, the input boxes for parameters and values are required fields, and you need to fill in the relevant information. Chinese characters and spaces are not supported. Authentication parameters are case-sensitive; "key" and "KEY" are considered as two different parameters.
Timeout period (ms) per try
This is required. Enter a value between 500 and 3000. The default is 3000.
Max retries
Enter a value between 0 and 3. The default is 1.
Behavior upon timeout
Whether to approve or reject a request if the system does not receive a response (HTTP status code 200or 403) after the total timeout period elapses (Total timeout period = Timeout period per try x (Max retries + 1)). The default is "Approve". You can also set it to "Reject".
4. Click Save.
Caution:
The remote authentication feature configuration will take effect in about 10 minutes after completion. Please be patient and wait for it to be activated.
Modifying Remote Authentication Settings
1. Select Domain Management on the left sidebar. click on the push domain that needs remote authentication configuration or click on Manage on the right side, and enter the Domain Management page.
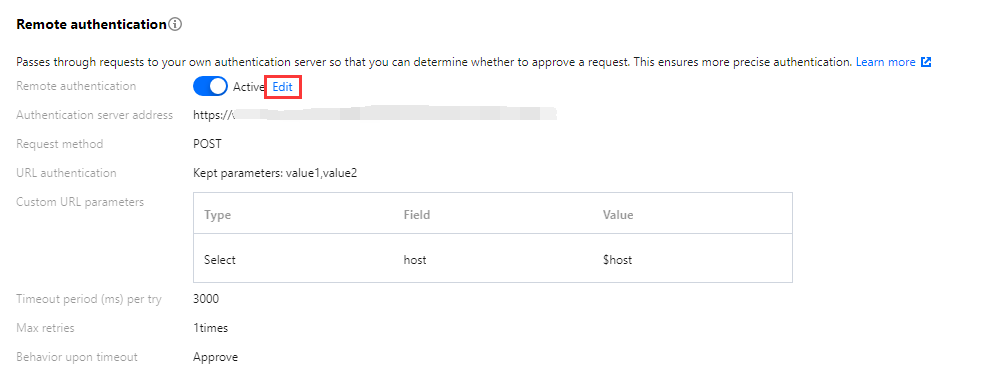
2. In Advanced Configuration > Remote Authentication, click Edit to enter the Remote Authentication Configuration page.
3. Modify the settings and click Save.
Disabling Remote Authentication
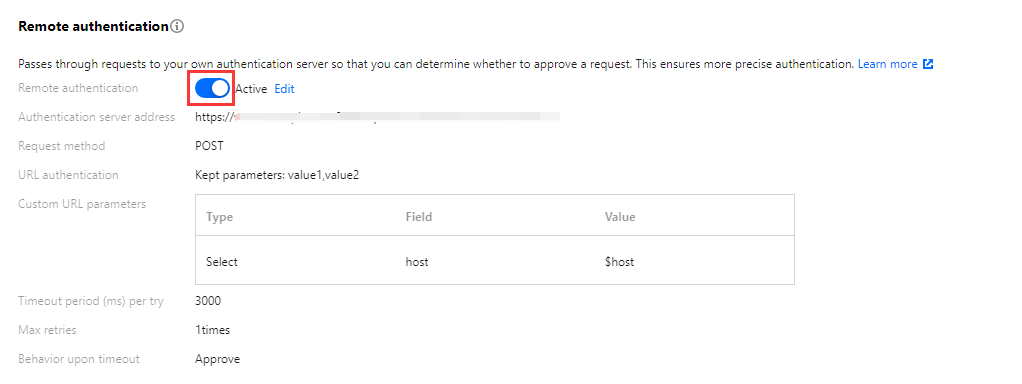
1. Select Domain Management on the left sidebar. Click on the push domain that requires remote authentication to be turned off, or click Manage on the right side to enter the Domain Management page.
2. In Advanced Configuration > Remote Authentication, click on the toggle switch


 Yes
Yes
 No
No
Was this page helpful?