This document describes how to create a TKE Serverless cluster in the TKE console.
Prerequisite
You have activated required permissions for EKS in the CAM console.
Directions
1. Log in to the TKE console and click Cluster in the left sidebar.
2. On the page that appears, select the region where you want to create the cluster, and then click Create.
3. In the “Select a cluster type” pop-up window, select Serverless cluster, and then click Create.
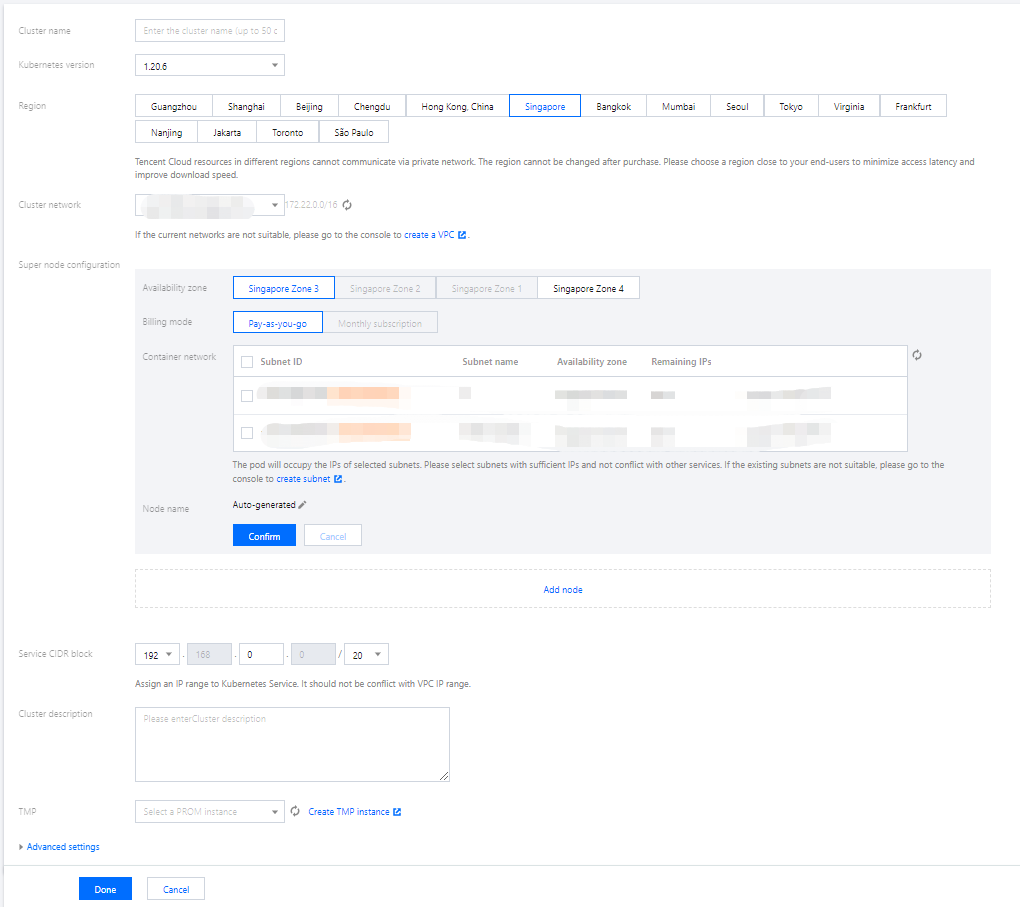
4. On the “Create cluster” page that appears, specify the cluster information as instructed below.
Cluster name: The name of the cluster to be created. Up to 60 characters are allowed.
Kubernetes version: The Kubernetes version of the cluster to be created. It supports V1.16 and later. For a comparison of the features of different versions, see Supported Versions of the Kubernetes Documentation.
Region: The region where the cluster to be created is located. We recommend that you select the region closest to you to help minimize access latency and improve the download speed.
Cluster network: All VPCs you have created in this region are displayed. Please select a suitable VPC as the cluster network. If no network information is available, or the existing VPCs are not suitable, please create a VPC in the console. For details, see Overview. The subnet of the VPC will be used as the container network of the Serverless cluster.
Super node configuration:
Availability zone: Select the availability zone where the super node is located.
Billing mode: The pay-as-you-go billing mode is supported in all regions.
Container network: Assign IPs within the container IP range to containers in the cluster. Pods on super nodes will occupy IPs in the subnet of the VPC. The number of Pods can be scheduled to super nodes are limited by the number of remaining IPs. Please select subnets with sufficient available IPs and without conflict with that of other services. Pods on super nodes will run in the specified VPC. Each Pod is bound to an ENI in the specified VPC. You can check the ENI associated with the Pod in the ENI list.
Multiple subnets can be selected in the pay-as-you-go billing mode, and a pay-as-you-go super node is created for a subnet. The super nodes are billed based on the Pod specifications and running duration after the workloads are created and the Pods are scheduled to the super nodes.
Note:
We recommend that you configure multiple availability zones for the container network so that your workloads can be automatically distributed to multiple availability zones, which improves usability.
Ensure that the subnet assigned to the container network has sufficient available IPs, so as to prevent pod creation failure caused by insufficient IPs when creating a large-scale workload.
Service CIDR block: The ClusterIP Service of the cluster defaults to be assigned in the selected VPC subnet. Please select a subnet with sufficient available IPs and without conflict with that of other services.
Cluster description: Specify the information about the cluster to be created. This description will be displayed on the Cluster information page.
Advanced settings:
CoreDNS: Two replica nodes of Deployment:coredns are automatically deployed in the cluster namespace kube-system. This service is free of charge, and we recommend that you do not modify it.
Tag: Tencent Cloud tags, which are used to manage resources by category from different dimensions.
5. Click Done to start creating the cluster. You can view the creation progress on the “Cluster” page.