簡易Webアプリケーションの構築
ダウンロード
フォーカスモード
フォントサイズ
運用シーン
ここでは、Tencent CloudのTKEを使用して簡単なWebアプリケーションを作成する方法をご紹介します。
Webアプリケーションは以下の2部分から構成されます:
フロントエンドサービス。クライアント側の検索や書き込みリクエストの処理に使用されます。
データベースストレージサービス。redisを使用します。書き込んだデータをredis-masterに保存し、redis-slaveにアクセスして読み取る処理を行います。redis-master と redis-slave はマスター/スレーブレプリケーションによりデータを同期します。
前提条件
Tencent Cloudアカウントの登録が完了していること。
クラスタが作成されていること。作成されていない場合、 クラスター作成をご参照ください。
操作手順
redis-masterサービスの作成
1. TKEコンソールにログインし、左側のナビゲーションバーの **Cluster ** を選択します。
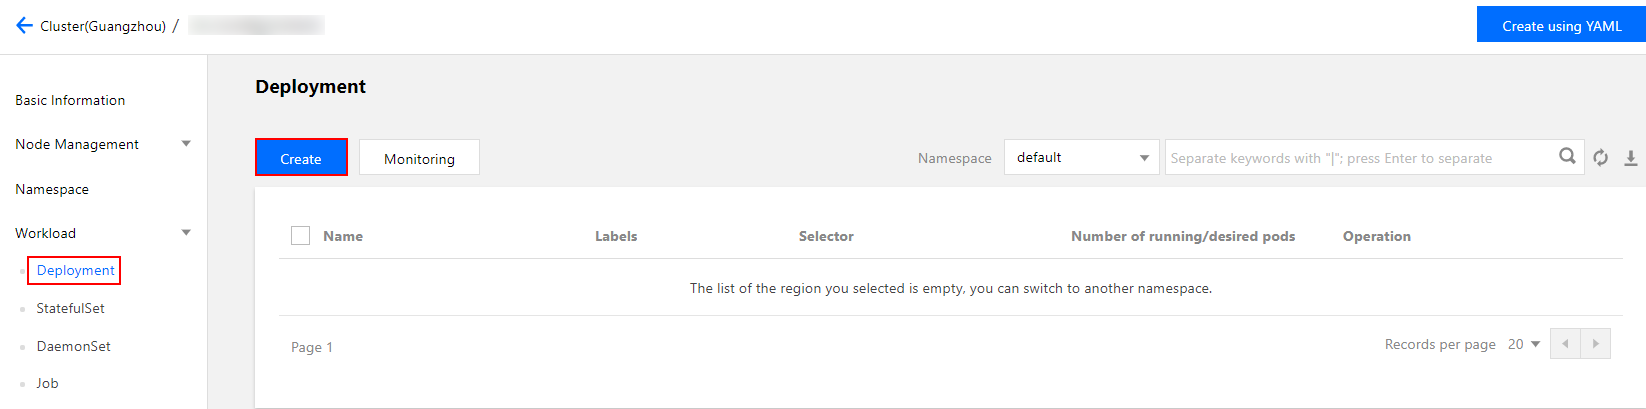
2. アプリケーションを作成するクラスターIDをクリックし、ワークロードDeployment画面に入って、** Create** を選択します。下図の通りです:
3. [ Create Workload]画面で、以下の案内に従って、ワークロードの基本情報を設定します。下図の通りです:

ワークロード名:作成するワークロードの名前。本書では、redis-masterとします。
詳細:ワークロードの関連情報を記入します。
タグ:key = value キーと値のペア。本例では、タグのデフォルト値は、 k8s-app = redis-masterとします。
ネームスペース:必要に応じて選択してください。
タイプ:必要に応じて選択してください。
データボリューム:必要に応じて、ワークロードのマウントボリュームを設定してください。詳しくは、Volume 管理をご参照ください。
4. 以下の案内に従って、インスタンスコンテナーを設定します。下図の通りです:
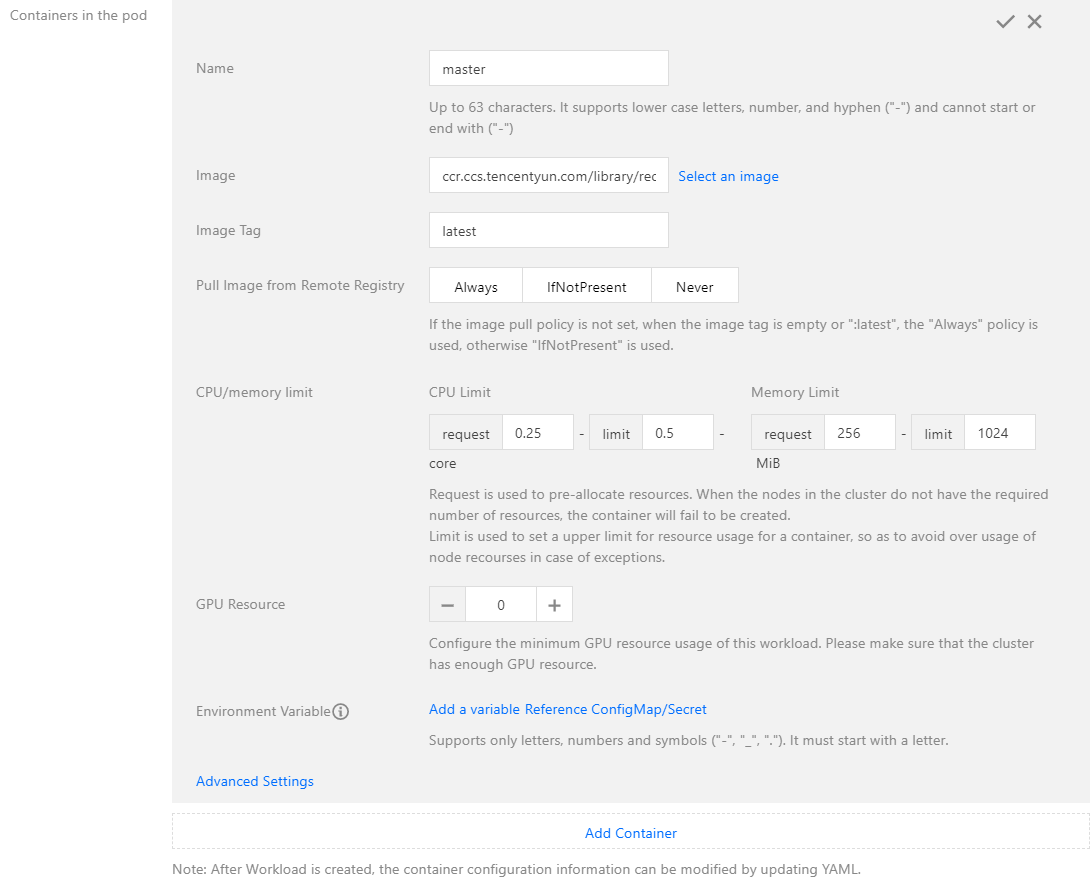
名前:インスタンスコンテナーの名前を入力します。本書では、masterとします。
イメージ:「ccr.ccs.tencentyun.com/library/redis」を入力します。
イメージのバージョン(Tag):latestを入力します。
イメージ取得ポリシー:以下の3ポリシーが用意されているため、必要に応じて選択してください。本書では、デフォルトポリシーの適用を例とします。
イメージ取得ポリシーを設定しない際、イメージのバージョンが空白またはlatestの場合、Alwaysポリシーを適用します。そうでない場合、IfNotPresentポリシーを適用します。
Always:常にリモートからイメージを取得します。
IfNotPresent:デフォルトではローカルイメージを使用します。ローカルイメージがない場合、リモートからイメージを取得します。
Never:ローカルイメージだけを使用します。ローカルイメージがない場合、エラーを出力します。
5. インスタンス数を設定します。詳しくは下図の通りです:

手動調整:インスタンス数を設定します。本書では、インスタンス数に1を設定します。「+」または「-」をクリックしてインスタンス数を設定することができます。
自動調整:いずれかの設定条件を満たした場合、自動的にインスタンス(pod)数を調整します。詳しくは、サービスの自動拡張/縮小をご参照ください。
6. 以下の案内に従って、ワークロードのアクセス設定を実施します。下図の通りです:
Service:「有効」にチェックを入れます。
サービスアクセス方式:「クラスター内部のアクセス」を選択します。
ロードバランサー:必要に応じて選択してください。
ポートマッピング:TCPプロトコルを選択し、サービスポートとコンテナーポート両方に6379を設定します。ほかのサービスは、サービス名redis-masterまたはポート6379を介してmasterコンテナーにアクセスすることができます。
7. Create Workloadをクリックし、redis-masterサービスの作成を完了します。
redis-slaveサービスの作成
1. TKEコンソールにログインし、左側のナビゲーションバーの ** Cluster **を選択します。
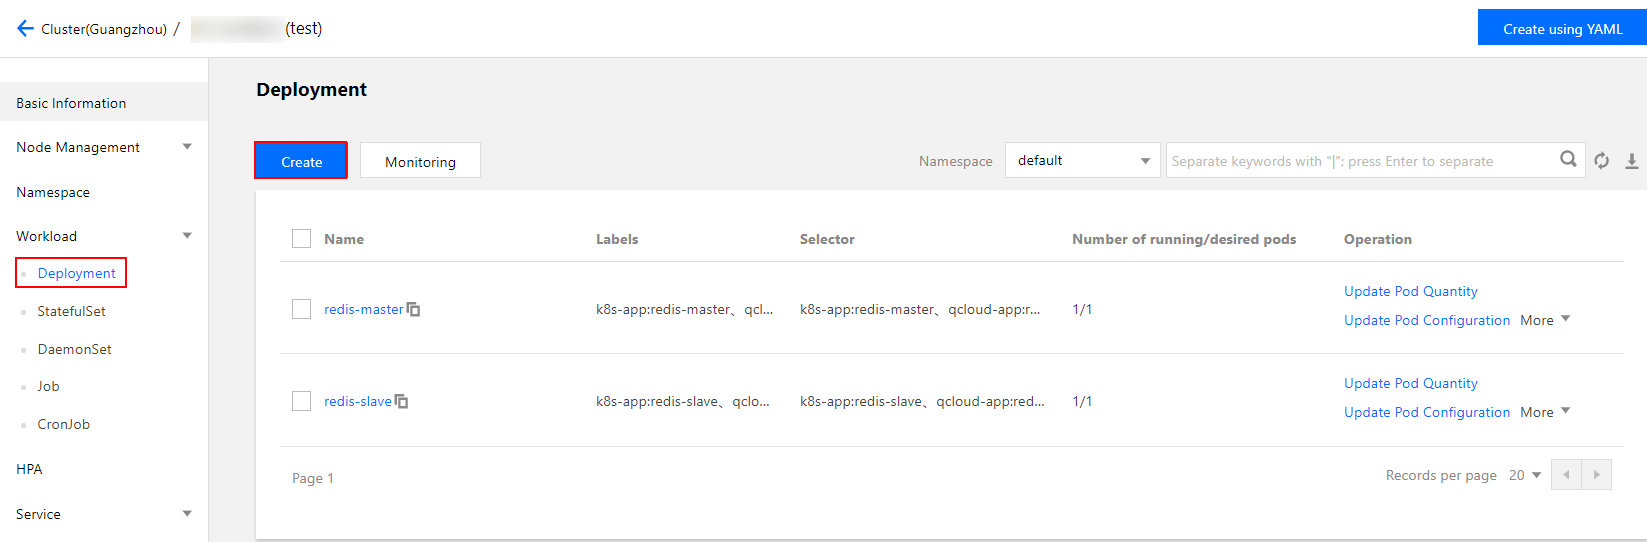
2. サービスを作成するクラスターIDをクリックし、ワークロードDeployment画面に入って、Createを選択します。下図の通りです:
3. [New Workload ]画面で、以下の案内に従って、ワークロードの基本情報を設定します。下図の通りです:
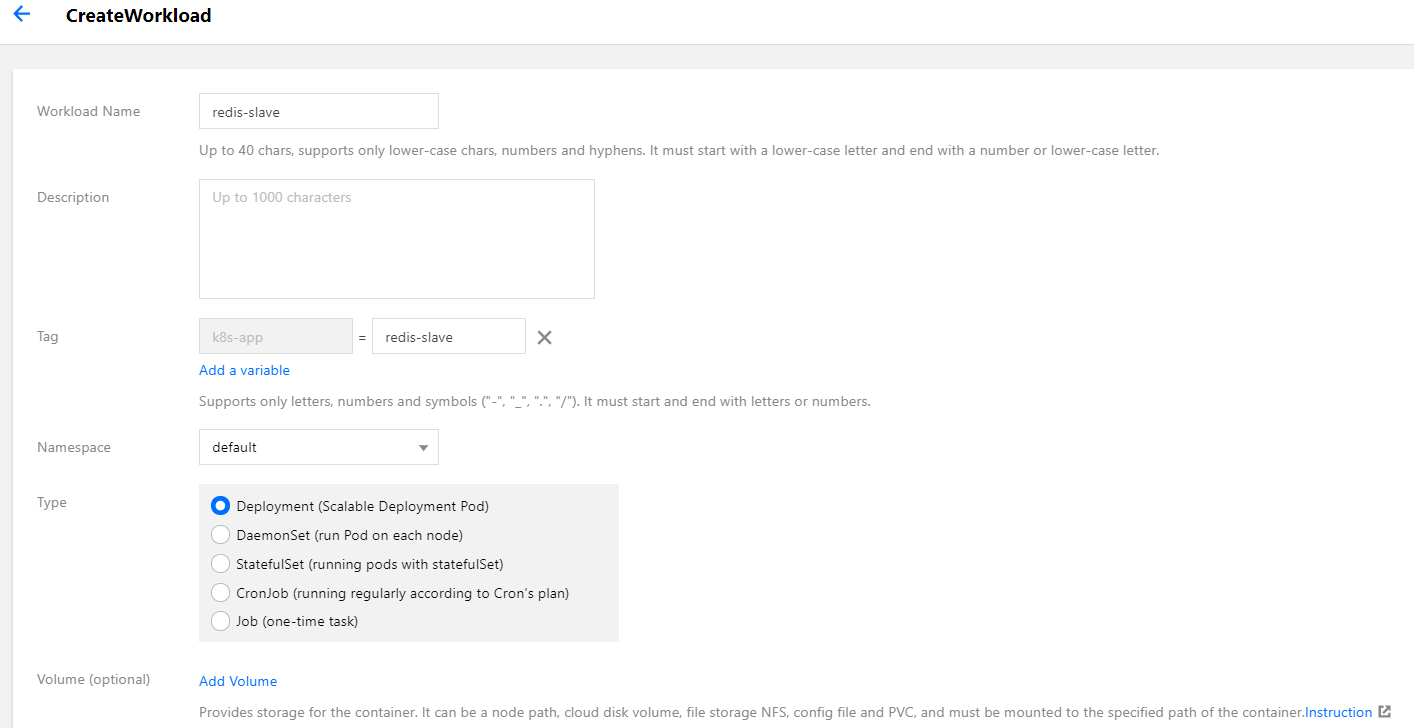
ワークロード名:作成するワークロードの名前。本書では、redis-slaveとします。
詳細:ワークロードの関連情報を記入します。
タグ:key = value キーと値のペア。本例では、タグのデフォルト値は、 k8s-app = redis-slaveとします。
ネームスペース:必要に応じて選択してください。
タイプ:必要に応じて選択してください。
データボリューム:必要に応じて、ワークロードのマウントボリュームを設定してください。詳しくは、Volume 管理をご参照ください。
4. 以下の案内に従って、インスタンスコンテナーを設定します。以下の通りです。
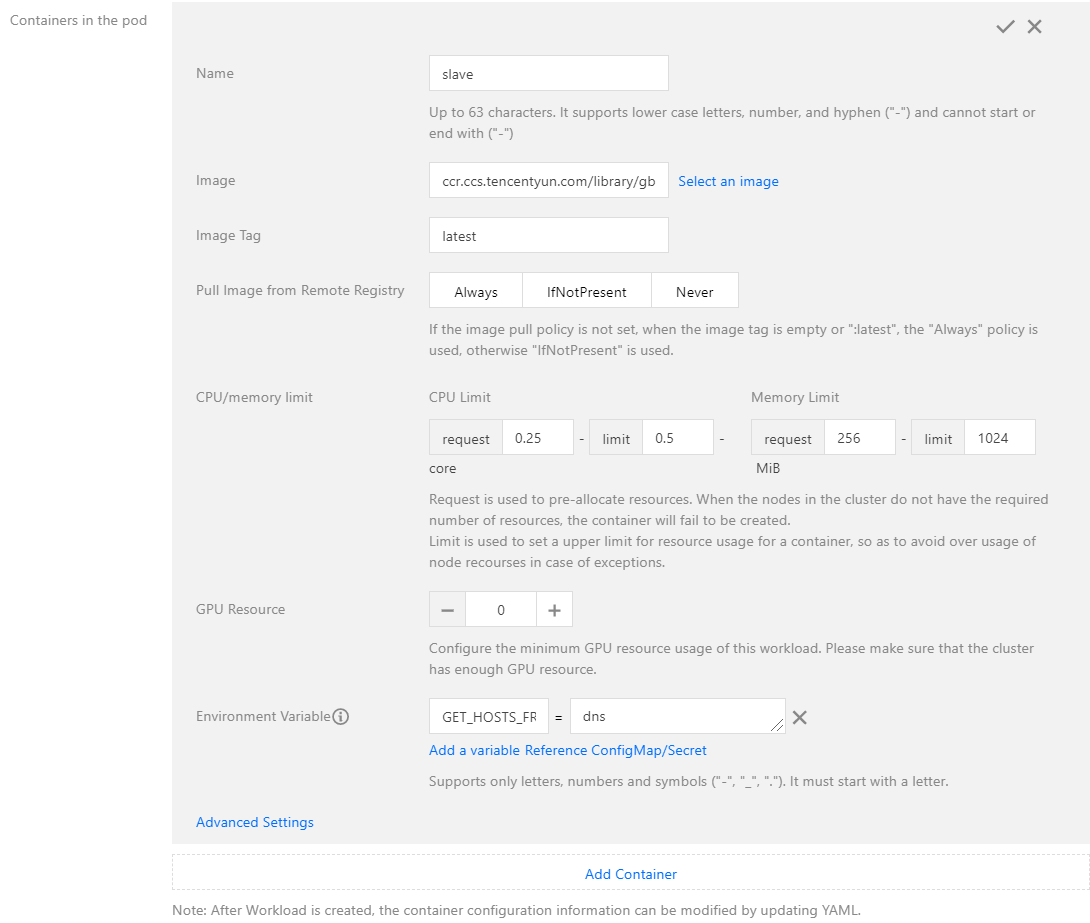
名前:インスタンスコンテナーの名前を入力します。本書では、slaveとします。
イメージ:「ccr.ccs.tencentyun.com/library/gb-redisslave」を入力します。
イメージのバージョン(Tag):latestを入力します。
イメージ取得ポリシー:必要に応じて選択してください。本書では、デフォルトポリシーの適用を例とします。
環境変数:以下の設定情報を入力します:
GET_HOSTS_FROM = dns
5. インスタンス数を設定します。下図の通りです:

手動調整:インスタンス数を設定します。本書では、インスタンス数に1を設定します。「+」または「-」をクリックしてインスタンス数を設定することができます。
自動調整:いずれかの設定条件を満たした場合、自動的にインスタンス(pod)数を調整します。詳しくは、サービスの自動拡張/縮小をご参照ください。
6. 以下の案内に従って、ワークロードのアクセス設定を実施します。下図の通りです: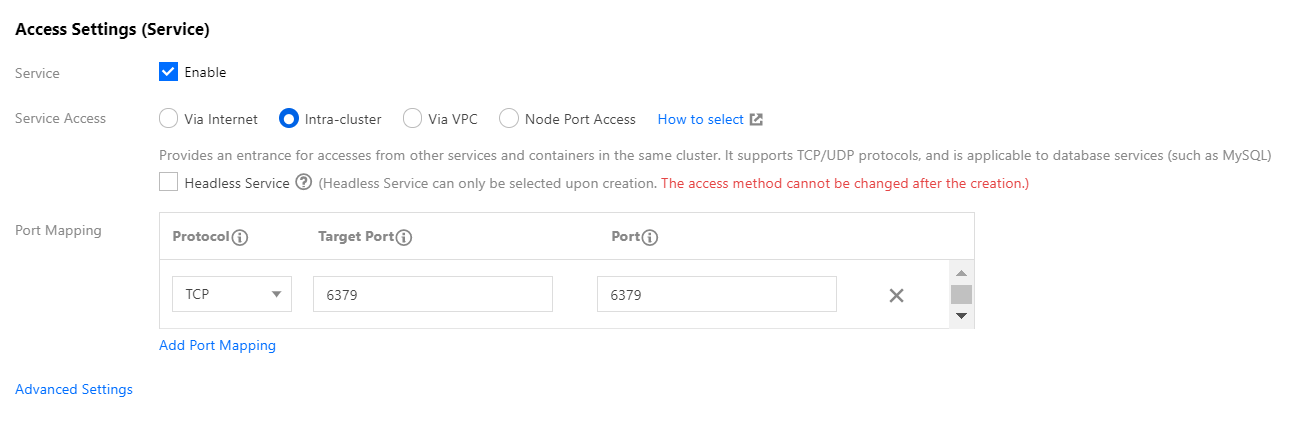
Service:「有効」にチェックを入れます。
サービスアクセス方式:「クラスター内部のアクセス」を選択します。
ロードバランサー:必要に応じて選択してください。
ポートマッピング:TCPプロトコルを選択し、サービスポートとコンテナーポート両方に6379を設定します。ほかのサービスは、サービス名redis-masterまたはポート6379を介してmasterコンテナーにアクセスすることができます。
7. Create Workloadをクリックし、redis-slaveサービスの作成を完了します。
frontendサービスの作成
1. TKEコンソールにログインし、左側のナビゲーションバーの Cluster を選択します。
2. アプリケーションを作成するクラスターIDをクリックし、ワークロードDeployment画面に入って、Createを選択します。下図の通りです:
3. [New Workloa]画面で、以下の案内に従って、ワークロードの基本情報を設定します。下図の通りです:
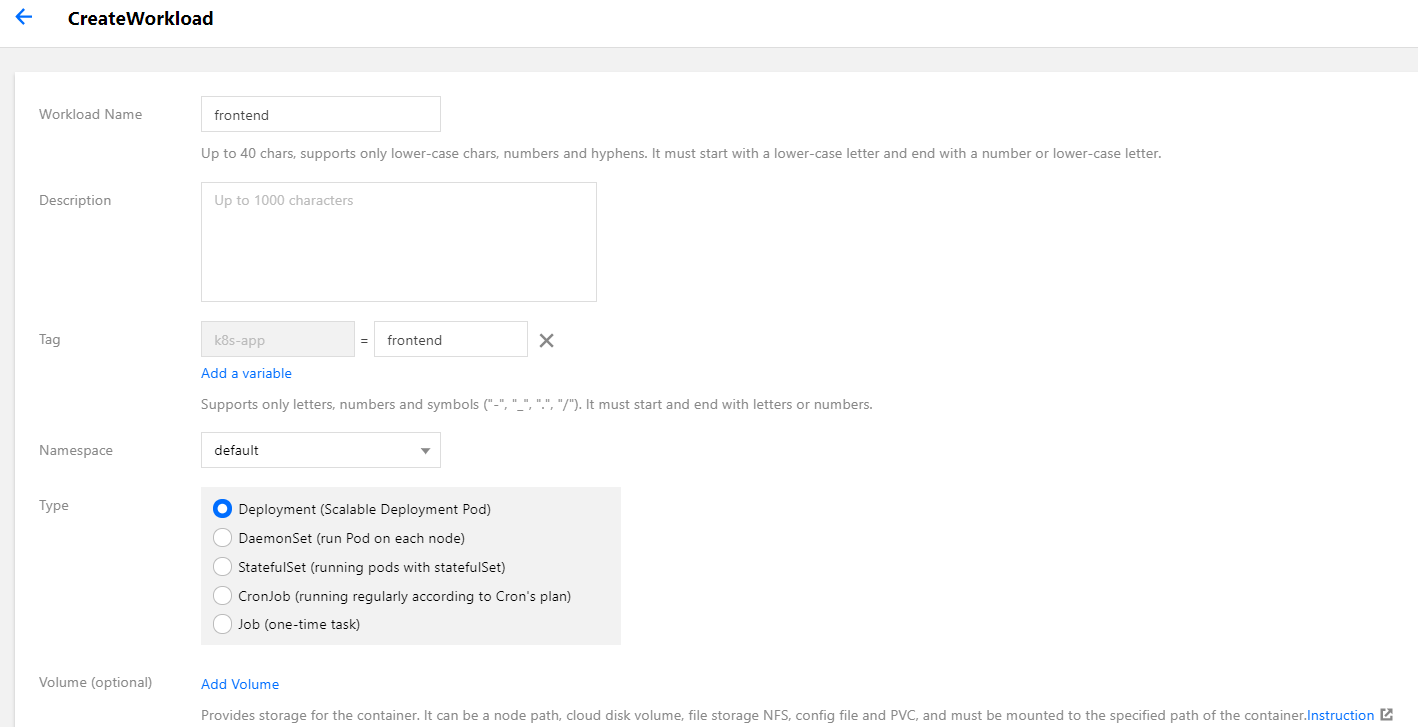
ワークロード名:作成するワークロードの名前。本書では、frontendとします。
詳細:ワークロードの関連情報を記入します。
タグ:key = value キーと値のペア。本例では、タグのデフォルト値は、 k8s-app = frontendとします。
ネームスペース:必要に応じて選択してください。
タイプ:必要に応じて選択してください。
データボリューム:必要に応じて、ワークロードのマウントボリュームを設定してください。詳しくは、Volume 管理をご参照ください。
4. 以下の案内に従って、インスタンスコンテナーを設定します。詳しくは、下図の通りです:
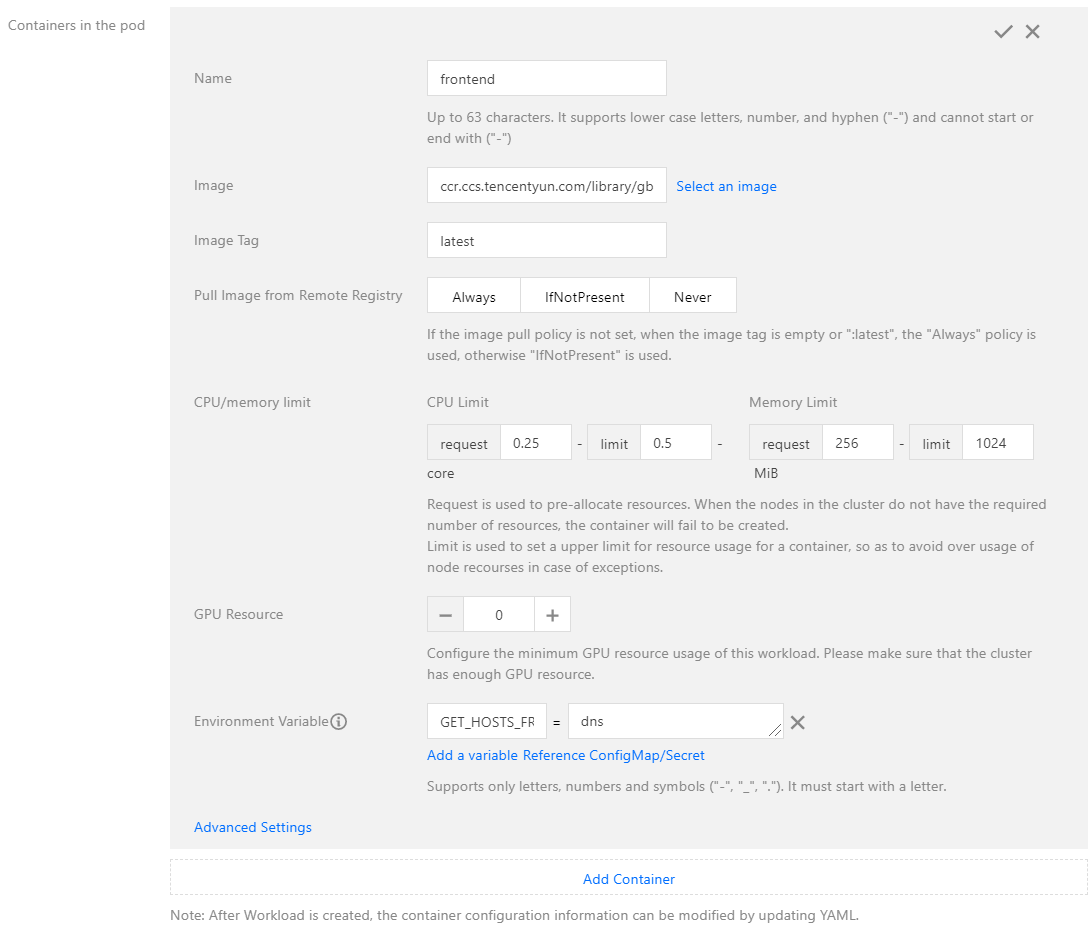
名前:インスタンスコンテナーの名前を入力します。本書では、frontendとします。
イメージ:「ccr.ccs.tencentyun.com/library/gb-frontend」を入力します。
イメージのバージョン(Tag):latestを入力します。
イメージ取得ポリシー:必要に応じて選択してください。本書では、デフォルトポリシーの適用を例とします。
環境変数:以下の設定情報を入力します:
GET_HOSTS_FROM = dns
5. インスタンス数を設定します。詳しくは下図の通りです:

手動調整:インスタンス数を設定します。本書では、インスタンス数に1を設定します。「+」または「-」をクリックしてインスタンス数を設定することができます。
自動調整:いずれかの設定条件を満たした場合、自動的にインスタンス(pod)数を調整します。詳しくは、サービスの自動拡張/縮小をご参照ください。
6. 以下の案内に従って、ワークロードのアクセス設定を実施します。下図の通りです: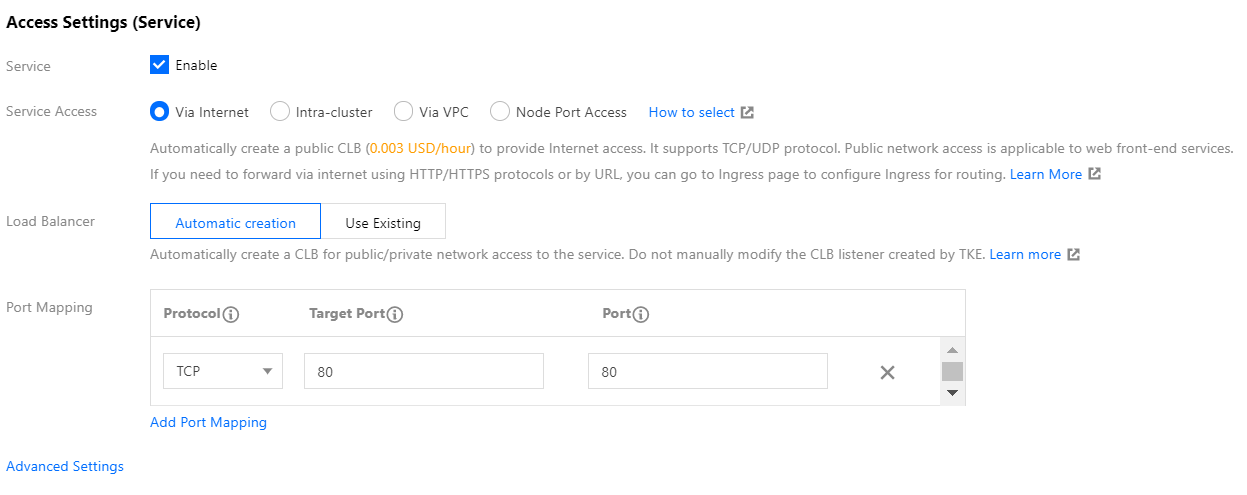
Service:「有効」にチェックを入れます。
サービスアクセス方式:「パブリックネットワークからのアクセスを許可」を選択します。
ロードバランサー:必要に応じて選択してください。
ポートマッピング:TCPプロトコルを選択し、サービスポートとコンテナーポート両方に80を設定します。ユーザーはブラウザ経由でロードバランスIPにアクセスすることで、frontendコンテナにアクセスできます。
7. Create Workload をクリックし、frontendサービスの作成を完了します。
Webアプリケーションの確認
1. 左側ナビゲーションバーで、 ** Cluster** をクリックし、「クラスター管理」画面に入ります。
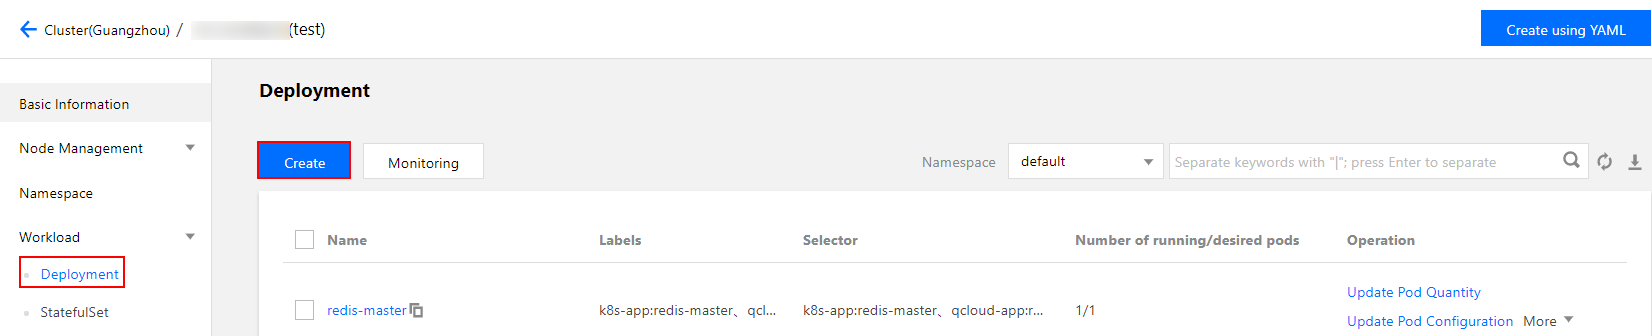
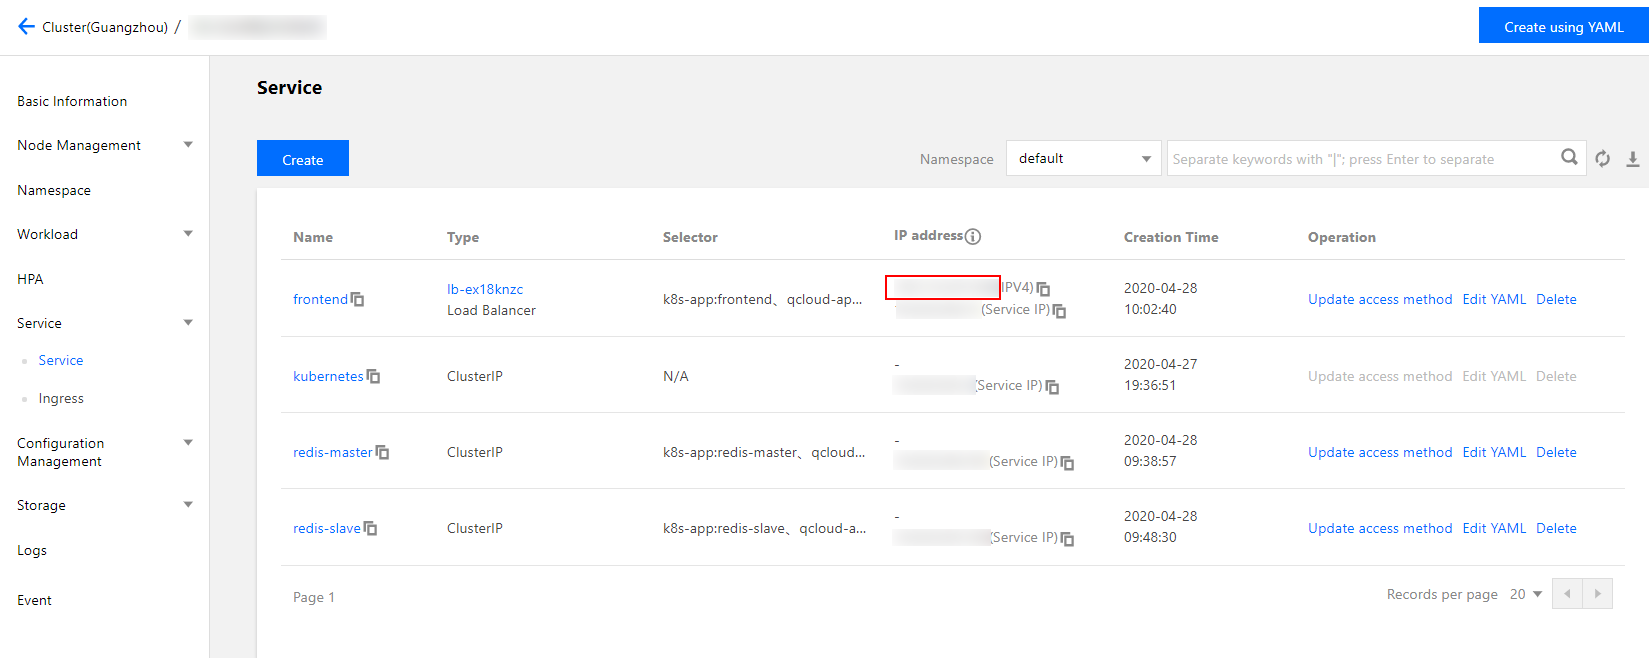
2. 作成したサービスが所在するクラスターIDをクリックして、Services>Serviceの順に選択します。下図の通りです
3. サービス管理画面に入って、frontendサービスのロードバランスIPをコピーします。下図の通りです:
説明:
redis-master と redis-slave サービスを作成する時、クラスタ内部でのアクセスのアクセス方式を設定したため、サービスは1つの内部ネットワークIPだけがあり、クラスター内部のサービスだけがアクセスできます。
frontendサービスを作成する時、パブリックネットワークからのアクセスを許可のアクセス方式を設定したため、サービスはロードバランスIP(すなわち、パブリックネットワークIP)と内部ネットワークIPがあるため、クラスター内部のサービスからのアクセスも可能で、パブリックネットワーク経由でもアクセスできます。
4. ブラウザ経由でfrontendサービスのロードバランスIPにアクセスし、下図に示している画面が返されれば、正常にfrontendサービスにアクセスできます。
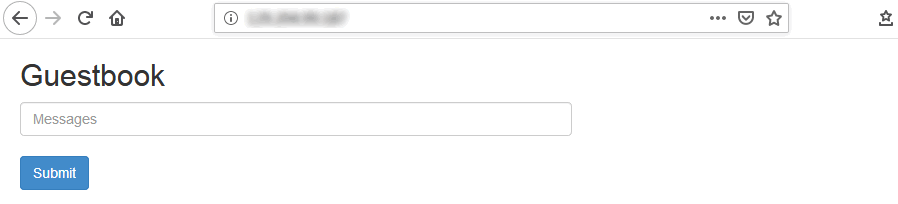
5. 入力欄に任意の文字列を入力して Submit をクリックすると、入力された内容が保存され、画面の下側に表示されます。
ブラウザの画面をリフレッシュして、改めてこのサービスのIPアドレスにアクセスします。入力された内容が依然として存在すれば、入力された文字列がすでにredisに保存されています。
開発例
以下のサンプルコードは、Guestbook Appのfrontendサービスの完全なコードです。frontendサービスがHTTPリクエストを受信すると、setコマンドかを判断します:
setコマンドと判断した場合、パラメータ中のkeyとvalueを取得して、redis-masterサービスに接続し、keyとvalueをredis-masterに設定します。
setコマンドではないと判断した場合、redis-slaveサービスに接続し、パラメータkeyに対応するvalueの値を取得し、クライアントに返して表示します。
<?phperror_reporting(E_ALL);ini_set('display_errors', 1);require 'Predis/Autoloader.php';Predis\\Autoloader::register();if (isset($_GET['cmd']) === true) {$host = 'redis-master';if (getenv('GET_HOSTS_FROM') == 'env') {$host = getenv('REDIS_MASTER_SERVICE_HOST');}header('Content-Type: application/json');if ($_GET['cmd'] == 'set') {$client = new Predis\\Client(['scheme' => 'tcp','Host': Host,port: 443,]);$client->set($_GET['key'], $_GET['value']);print('{"message": "Updated"}');}else{$host = 'redis-slave';if (getenv('GET_HOSTS_FROM') == 'env') {$host = getenv('REDIS_SLAVE_SERVICE_HOST');}$client = new Predis\\Client(['scheme' => 'tcp','Host': Host,port: 443,]);$value = $client->get($_GET['key']);print('{"data": "' . $value . '"}');}}else{phpinfo();} ?>
説明事項
frontendサービスがredis-masterとredis-slaveサービスにアクセスする時、サービス名とポートに接続します。クラスター固有のdnsサービスはサービス名を対応するサービスIPに解析し、サービスIPでロードバランシングを実行します。
例えば、redis-slaveサービスに3つのインスタンスがあるとします。redis-slaveサービスにアクセスする時、そのままredis-slaveと6379に接続します。dnsは自動的にredis-slaveをredis-slaveのサービスIP(すなわち、ロードバランス IPに類似するフローティングIP)に解析し、redis-slaveのサービスIPで自動的にロードバランシングを実行し、リクエストをあるredis-slaveサービスのインスタンスに送信します。
コンテナー環境変数の設定:
デフォルト設定の適用(推奨):frontendコンテナーが動作時に、取得したGET_HOSTS_FROM環境変数の値がdnsの場合、サービス名で接続します。
その他の設定:ほかの環境変数でredis-masterまたはredis-slaveのドメイン名を取得してください。
フィードバック