ステップ1:TKEクラスター側およびJenkins側の設定
ダウンロード
フォーカスモード
フォントサイズ
TKEクラスター側の設定
このステップでは、TKEにおけるRBAC承認のカスタマイズServiceAccountを介して、Jenkinsの設定に必要なクラスターアドレス、token、クラスターCA証明書の情報を取得する方法についてご説明します。
クラスター証明書の取得
説明
1. 以下のShellスクリプトを使用して、テスト用ネームスペースci、ServiceAccountタイプのテストユーザーjenkinsを作成し、クラスターアクセス証明(token)認証を取得します。
# テスト用ネームスペースciの作成kubectl create namespace ci# テスト用ServiceAccountアカウントの作成kubectl create sa jenkins -n ci# ServiceAccountアカウントが自動的に作成したSecret tokenの取得kubectl get secret $(kubectl get sa jenkins -n ci -o jsonpath={.secrets[0].name}) -n ci -o jsonpath={.data.token} | base64 --decode
2. テスト用ネームスペースciで、Role権限オブジェクトリソースjenkins-role.yamlファイルを作成します。事例は次のとおりです。
kind: RoleapiVersion: rbac.authorization.k8s.io/v1beta1metadata:name: jenkinsrules:- apiGroups: [""]resources: ["pods"]verbs: ["create","delete","get","list","patch","update","watch"]- apiGroups: [""]resources: ["pods/exec"]verbs: ["create","delete","get","list","patch","update","watch"]- apiGroups: [""]resources: ["pods/log"]verbs: ["get","list","watch"]- apiGroups: [""]resources: ["secrets"]verbs: ["get"]
3. RoleBindingオブジェクトリソースjenkins-rolebinding.yamlファイルを作成します。以下の権限バインディングは、ServiceAccountタイプを追加するjenkinsユーザーが、ciネームスペースでjenkins(Roleタイプ)の権限を有することを示しています。事例は次のとおりです。
apiVersion: rbac.authorization.k8s.io/v1beta1kind: RoleBindingmetadata:name: jenkinsnamespace: ciroleRef:apiGroup: rbac.authorization.k8s.iokind: Rolename: jenkinssubjects:- kind: ServiceAccountname: jenkins
クラスターCA証明書の取得
1. 標準ログイン方式を使用してLinuxインスタンスにログイン(推奨)を参照して、ターゲットクラスターのノードにログインします。
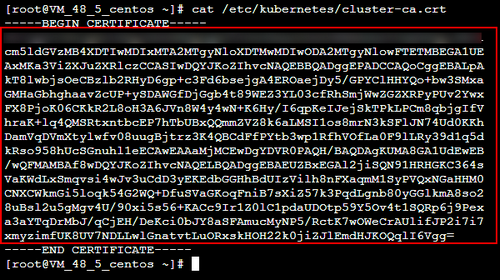
2. 以下のコマンドを実行し、クラスターCA証明書を確認します。
cat /etc/kubernetes/cluster-ca.crt
3. 照会によって得た証明書情報を記録、保存してください。下図に示すとおりです。
docker.sockの承認
TKEクラスターの各nodeは、そのノードシステムに
docker.sockファイルがあります。slave podがdocker buildを実行すると、このファイルに接続します。その前に、各ノードに個別にログインし、以下のコマンドを順番に実行してdocker buildを承認する必要があります。chmod 666 /var/run/docker.sock
ls -l /var/run/docker.sock
Jenkins側の設定
説明
JenkinsのバージョンによってUIの使い方に違いがあります。ビジネスニーズに応じて選択できます。
TKEプライベートネットワークアドレスの追加
1. 標準ログイン方式を使用してLinuxインスタンスにログイン(推奨)を参照して、Jenkins Masterのノードにログインします。
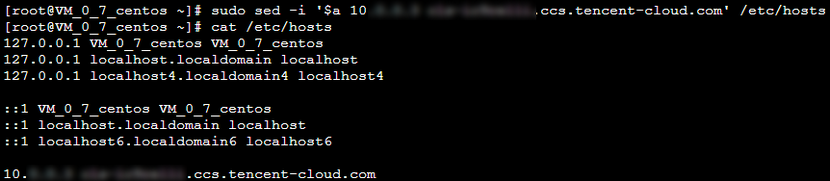
2. 以下のコマンドを実行し、ドメイン名へのアクセスを設定します。
sudo sed -i '$a 10.x.x.x cls-ixxxelli.ccs.tencent-cloud.com' /etc/hosts
説明
このコマンドは、クラスターがプライベートネットワークアクセスを有効にした後、クラスターの基本情報ページの「クラスターAPIServer」から取得できます。詳細については、クラスター証明書の取得をご参照ください。
3. 以下のコマンドを実行して、設定が成功したかどうかを確認します。
cat /etc/hosts
下図のようになれば、設定は成功しています。
Jenkinsによる必須プラグインのインストール
1. Jenkinsのバックエンドにログインし、左側ナビゲーションバーでシステム管理を選択します。
2. 開いた「Jenkins管理]パネルで、プラグイン管理をクリックします。
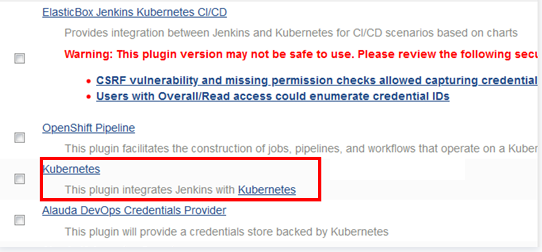
3. プラグイン管理ページで選択可能なプラグインを選択し、Locale、Kubernetes、Git ParameterとExtended Choice Parameterにチェックを入れます。
Locale:中国語のプラグインです。このプラグインをインストールすると、Jenkinsインターフェースをデフォルトで中国語版にできます。
Kubernetes:Kubernetes-pluginプラグイン。
Git ParameterとExtended Choice Parameter:パッケージのビルド時にパラメータを渡すために使用します。Kubernetesプラグインを例とした場合、下図のようになります。
4. 上記のプラグインにチェックを入れ、ダイレクトインストールをクリックし、Jenkinsを再起動すれば完了です。
jnlpポートの開放
1. Jenkinsのバックエンドにログインし、左側ナビゲーションバーでシステム管理を選択します。
2. 開いた「Jenkins管理」パネルで、グローバルセキュリティコンフィグレーションをクリックします。
3. ローバルセキュリティコンフィグレーションページで、インバウンドプロキシのTCPポートを「ポート50000を指定する」に設定します。
4. その他の設定項目はデフォルトのままにして、ページ下部の保存をクリックします。
TKEクラスターtokenの追加
1. Jenkinsのバックエンドにログインし、左側ナビゲーションバーで認証情報 > システムを選択します。
2. 開いた「システム」パネルで、**グローバル認証情報(unrestricted)**を選択します。
3. 「グローバル認証情報(unrestricted)ページで、左側メニューバーの認証情報の追加をクリックし、以下のプロンプトに従って基本的な認証情報を設定します。
タイプ:Secret textを選択します。
範囲:デフォルトでは**グローバル(Jenkins、nodes、items、all child items、etc)**となります。
Secret:クラスター証明書の取得のステップで取得したServiceAccount jenkinsのTokenを入力します。
ID:デフォルトでは入力されていません。
説明:この認証情報に関する情報を入力します。この内容は、認証情報名と説明情報として表示されます。ここでは例として、
tke-tokenとします。4. OKをクリックするとすぐ追加されます。追加に成功すると、この認証情報が認証情報リストに表示されます。下図に示すとおりです。
gitlab認証の追加
1. 「グローバル認証情報(unrestricted)ページで、左側メニューバーの認証情報の追加をクリックし、以下のプロンプトに従って基本的な認証情報を設定します。
タイプ:Username with passwordを選択します。
範囲:デフォルトでは**グローバル(Jenkins、nodes、items、all child items、etc)**となります。
ユーザー名:gitlabユーザー名です。
パスワード:gitlabログインパスワードです。
ID:デフォルトでは入力されていません。
説明:この認証情報に関する情報を入力します。この内容は、認証情報名と説明情報として表示されます。ここでは例として、
gitlab-passwordとします。2. OKをクリックすると、追加が成功します。
slave podテンプレートの設定
1. Jenkinsのバックエンドにログインし、左側ナビゲーションバーでシステム管理を選択します。
2. 開いた「Jenkins管理」パネルで、システム設定をクリックします。
3. 「システム設定」パネルの下部、「クラウド」モジュールの下にある新しいクラウドの追加 > Kubernetesを選択します。
4. Kubernetes Cloud details...をクリックして、以下のKubernetesの基本情報を設定します。
主要パラメータの設定は次のとおりです。その他のオプションはデフォルトを維持してください。
名前:ご自身で定義します。ここでは例として、
kubernetesとします。Kubernetesアドレス:TKEクラスターアクセスアドレス、クラスター証明書の取得手順を参照して取得できます。
Kubernetesサービス証明書Key:クラスターCA証明書、クラスターCA証明書の取得手順を参照して取得できます。
認証情報:TKEクラスターtokenの追加のステップで作成した認証情報
tke-tokenを選択して接続テストをクリックします。接続が成功すると、Connection test succeessfulというメッセージが表示されます。Jenkinsアドレス:Jenkinsプライベートネットワークアドレスを入力します。例:
http://10.x.x.x:8080。5. Pod Templates > Podテンプレートの追加 > Pod Templates details...を選択してPodテンプレートの基本情報を設定します。
主要パラメータの情報は次のとおりです。その他のオプションはデフォルトを維持してください。
名前:ご自身で定義します。ここでは例として、
jnlp-agentとします。タグリスト:タグ名を定義します。作成するときにこのタグに基づいてPodを選択できます。ここでは例として、
jnlp-agentとします。使用法:可能な限りこのノードを使用するを選択します。
6. 「コンテナリスト」でコンテナの追加 > Container Templateを選択して以下のコンテナ関連情報を設定します。
名前:ご自身でコンテナ名を定義します。ここでは例として、
jnlp-agentとします。Dockerイメージ:イメージアドレス
jenkins/jnlp-slave:alpineを入力します。作業ディレクトリ:デフォルト設定のままにし、shellスクリプトでパッケージのビルドに使用される作業ディレクトリを記録しておいてください。
残りのオプションは初期設定のままにしておいてください。
7. 「ボリューム」で以下の手順に従ってボリュームを追加し、slave podにdockerコマンドを設定します。
7.1 ボリュームの追加 > Host Path Volumeを選択してホストとマウントパスに
/usr/bin/dockerを入力します。7.2 ボリュームの追加 > Host Path Volumeを選択してホストとマウントパスに
/var/run/docker.sockを入力します。7.3 ページ下部の保存をクリックすれば、slave podテンプレートの設定は完了です。
次のステップ
ステップ2:Slave pod作成の設定に移動して新しいタスクを作成し、タスクパラメータを設定してください。
フィードバック