This article describes the causes that lead to Pods remaining in the Pending status and how to troubleshoot these issues. Refer to the following instructions for troubleshooting.
Error Description
A Pending Pod has not been scheduled to a node. Use kubectl describe pod <pod-name> to look up event information, which can be used to analyze the cause.
$ kubectl describe pod tikv-0
...
Events:
Type Reason Age From Message
---- ------ ---- ---- -------
Warning FailedScheduling 3m (x106 over 33m) default-scheduler 0/4 nodes are available: 1 node(s) had no available volume zone, 2 Insufficient cpu, 3 Insufficient memory.
Possible Reasons
Insufficient node resources
nodeSelector and affinity conditions not met
The node contains a taint that the pod cannot tolerate
Bugs in earlier versions of kube-scheduler
kube-scheduler is not running properly
The stateful application on other usable nodes is not in the same availability zone as the drained node
Troubleshooting
Checking if the node has sufficient resources
Analysis
The following are likely causes of insufficient node resources:
The CPU utilization is too high.
There is not enough memory left for allocation.
There are not enough GPUs left (usually in machine learning and GPU cluster use cases).
Run the following command to query resource allocation information for further analysis:
kubectl describe node<node-name>
Focus on the following returned items to judge if a node has sufficient resources:
Allocatable: all resources the current node can apply for.
Allocated resources: resources that have been allocated (Allocatable minus all Requests by all Pods on the node).
Impact
The remaining resources a node has is equal to Allocatable minus Allocated resources. If it is less than the Request from the Pod, then the node does not have enough resources to accommodate the Pod, which means the Scheduler skips the Pod in the Predicates stage. Therefore, the pod is not scheduled to the node.
Checking for nodeSelector and affinity configurations
If the nodeSelector of a Pod specifies a label, the scheduler will only schedule the Pod to a node with that label. If no such node exists, the Pod will not be scheduled. For more information, refer to the official Kubernetes website.
If the Pod has affinity configured and the scheduler cannot find a node that satisfies the affinity conditions, the Pod is not scheduled. Affinity has the following types:
nodeAffinity: affinity to nodes. You can think of this as an enhanced version of nodeSelector. It limits the Pod to the nodes that meet certain conditions.
podAffinity: affinity to Pods. This schedules related Pods to the same node or nodes in the same availability zone.
podAntiAffinity: anti-affinity to pods. This is used to prevent the scheduling of the same type of Pods to the same place in order to avoid single point of failure. For example, you can schedule the Pods that provide DNS service to the cluster to different nodes in order to prevent the DNS service crashes causing business interruptions because a single node fails.
Checking if the node has taints that the Pod cannot tolerate
Analysis
If a node has taints for which the Pod has no corresponding tolerations, the Pod will not be scheduled to that node. You can run kubectl describe node <node-name> to query existing node taints, as shown below:
$ kubectl describe nodes host1
...
Taints: special=true:NoSchedule
...
You can add taints automatically or manually. For more information, refer to Adding Taints.
Solution
This document provides the following solutions. Solution 2 is the most often used.
Solution 1: delete the taints
Run the following command to delete the taint named special:
kubectl taint nodes host1 special-
Solution 2: add corresponding tolerations to the Pod
Note:
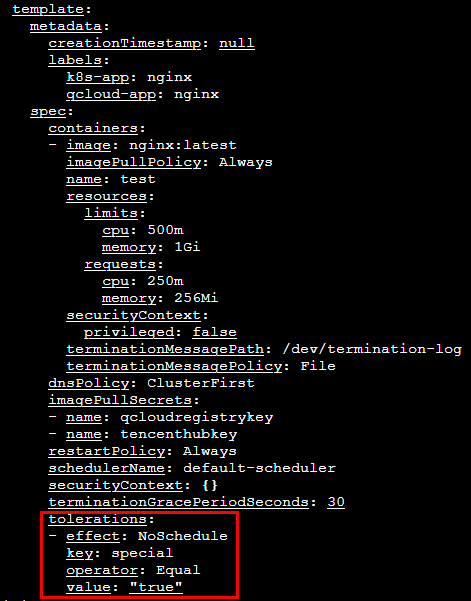
The following uses a Pod created in the Deployment (named nginx) as an example to describe how to add a toleration:
1.2 Run the following command to edit the YAML file:
kubectl edit deployment nginx
1.3 Add tolerations under spec in the template section. The following adds a toleration for the existing taint special:
tolerations:
-key:"special"
operator:"Equal"
value:"true"
effect:"NoSchedule"
The result should be as follows:
1.4 Save and exit to complete the process.
Checking if there is a bug in kube-scheduler
There is a bug in earlier versions of kube-scheduler that causes Pods to remain in the Pending status. You can solve the issue by upgrading kube-scheduler.
Checking if kube-scheduler is running properly
Check if the Master kube-scheduler is running properly. If not, restart the scheduler.
Checking if the stateful application on the drained node is scheduled to a node in another availability zone
If a node fails after a service is deployed, the Pod is evicted and a new Pod is created and scheduled to another node. Pods with mounted disks mounted are usually scheduled to nodes in the same availability zone as the drained node and the disks. However, if the cluster does not have a node that meets the rescheduling requirements, these nodes are not scheduled even if there are nodes in other availability zones that meet the requirements.
The reason that Pods with disks mounted cannot be scheduled to nodes in other availability zones is as follows:
Cloud disks can be dynamically mounted to different machines in the same IDC. However, they are not allowed to be mounted to machines in other IDCs to avoid severe I/O degradation due to network latency.
In some cases, you may not want Pods to be scheduled to a new node before certain configurations are finished. In this case, you can add a taint called node.kubernetes.io/unschedulable to the node.
Adding taints automatically
Kubernetes v1.12 Beta provides the feature TaintNodesByCondition. With this feature, controller manager will check conditions defined in the node when the node does not run properly. If a condition is met, then the corresponding taint is added automatically.
For example, if the condition of OutOfDisk=true is met, then a taint called node.kubernetes.io/out-of-disk is added to the node.
Conditions and corresponding taints:
The specific values for each Condition indicate specific meanings as described below:
If OutOfDisk is True, the node is out of storage space.
If Ready is False, the node is unhealthy.
If Ready is Unknown, the node is unreachable. If a node does not report to controller-manager in the time defined by node-monitor-grace-period (40s by default), it is marked as Unknown.
If MemoryPressure is True, the node has little available memory.
If PIDPressure is True, the node has too many processes running and it is running out of PIDs.
If DiskPressure is True, the node has little available storage space.
If NetworkUnavailable is True, the node cannot communicate with other Pods because the network is not properly configured.
Note:
Taints are added if the above conditions are met. TKE also adds/removes taints actively in the following case:
When a node is created, a taint called node.cloudprovider.kubernetes.io/uninitialized is added to it. Then, after successful node initialization, the taint is automatically removed. This is to prevent Pods from being scheduled to an uninitialized node.