The dynamic admission controller Webhook can change the request object or completely reject a request during access authentication. The way it calls the Webhook service makes it independent of cluster components.
The dynamic admission controller has a high degree of flexibility and allows you to configure various custom admission control settings. The following figure shows the position of dynamic admission control in the API request call chain. For more information, visit the official Kubernetes website.
As shown in the figure, dynamic admission control is divided into two phases: Mutating and Validating. During the Mutating phase, incoming requests can be modified. Subsequently, during the Validating phase, the dynamic admission controller validates incoming requests to determine whether to allow them to pass. These two phases can be used independently or in combination.
This document introduces a simple use case for calling the dynamic admission controller in TKE. You can refer to this document and take your actual requirements into consideration when performing the relevant operations.
Directions
Viewing and verifying the plug-in
The existing TKE cluster versions (1.10.5 and later) enable the validating admission webhook and mutating admission webhook APIs by default. If your cluster version is earlier than 1.10.5, you can run the following command to check whether the plug-in has been enabled in your current cluster.
kube-apiserver -h |grep enable-admission-plugins
If the returned result includes MutatingAdmissionWebhook and ValidatingAdmissionWebhook, the dynamic admission controller is already enabled in the cluster, as shown in the figure below:
Certificate issuance
To ensure that the dynamic admission controller calls a trustworthy Webhook server, it needs to call the Webhook service (TLS certification) via HTTPS. Therefore, you need to issue a certificate to the Webhook server. During registration of the dynamic admission controller Webhook, you need to bind the caBundle field (caBundle field in the resource list of ValidatingWebhookConfiguration and MutatingAdmissionWebhook) with a trustworthy certificate authority (CA) to verify whether the Webhook server certificate is trustworthy. This document introduces two recommended methods for issuing certificates: making a self-signed certificate and using the K8S CSR API to issue a certificate.
Note:
When ValidatingWebhookConfiguration and MutatingAdmissionWebhook use the clientConfig.service configuration (and the Webhook service is in the cluster), the domain name of the certificate issued to the server must be <svc_name>.<svc_namespace>.svc.
Method 1: making a self-signed certificate
This method is not dependent on Kubernetes clusters and is relatively independent. It’s similar to the way in which websites make their own self-signed certificates. Currently, many tools can be used to make a self-signed certificate. This document uses OpenSSL as an example. The procedure is as follows:
1. Run the following command to generate a ca.key with 2048 key digits.
openssl genrsa -out ca.key 2048
2. Run the following command to generate a ca.crt based on the ca.key.
"webserver.default.svc" is the domain name of the Webhook server in the cluster. The -days parameter is used to specify the validity period of the certificate.
7. Run the following command to view the Webhook server certificate.
openssl x509 -noout -text -in ./server.crt
The generated certificates and key files are described as follows:
ca.crt: the CA certificate.
ca.key: the CA certificate key, used to issue a server certificate.
server.crt: the issued server certificate.
server.key: the issued server certificate key.
Method 2: using the K8S CSR API to issue a certificate
You can also use the Kubernetes CA system to issue a certificate. You can execute the following script to use the Kubernetes cluster root certificate and root key to issue a trustworthy certificate user.
Note:
The username must be the domain name of the Webhook service in the cluster.
USERNAME='webserver.default.svc'# Set the username to be created to the domain name of the Webhook service in the cluster
# Use OpenSSL to generate a self-signed certificate key
openssl genrsa -out ${USERNAME}.key 2048
# Use OpenSSL to generate a self-signed CSR file, with CN indicating the user name and O indicating the group name
kubectl get csr ${USERNAME} -o jsonpath={.status.certificate}>${USERNAME}.crt
${USERNAME}.crt: the Webhook server certificate
${USERNAME}.key: the Webhook server certificate key
Use Cases
This document uses ValidatingWebhookConfiguration resources to illustrate how to call the dynamic admission controller Webhook.
To ensure accessibility, the sample code is forked from the original code library to implement a simple API for dynamic admission Webhook requests and responses. For the detailed API format, see Webhook request and response. The sample code can be obtained in Sample Code. This document uses it as the Webhook server code.
1. Prepare the caBundle content corresponding to the actual certificate issuance method.
If you use method 1 to issue a certificate, run the following command to use base64 to encode ca.crt and generate the caBundle field content.
cat ca.crt | base64 --wrap=0
If you use method 2 to issue a certificate, the cluster root certificate is the caBundle field content. The procedure for obtaining it is as follows:
1.1.1 Log in to the TKE console and click Clusters in the left sidebar.
1.1.2 On the "Cluster Management" page, click the ID of the target cluster.
1.1.3 On the cluster details page, click Basic Information on the left.
1.1.4 On the "Basic Information" page, obtain the clusters.cluster[].certificate-authority-data field in "Kubeconfig" in the "Cluster APIServer Info" module. This field has been encoded in base64, and no further processing is needed.
2. Copy the generated ca.crt (CA certificate), server.crt (HTTPS certificate), and server.key (HTTPS key) to the main directory of the project, as shown in the figure below:
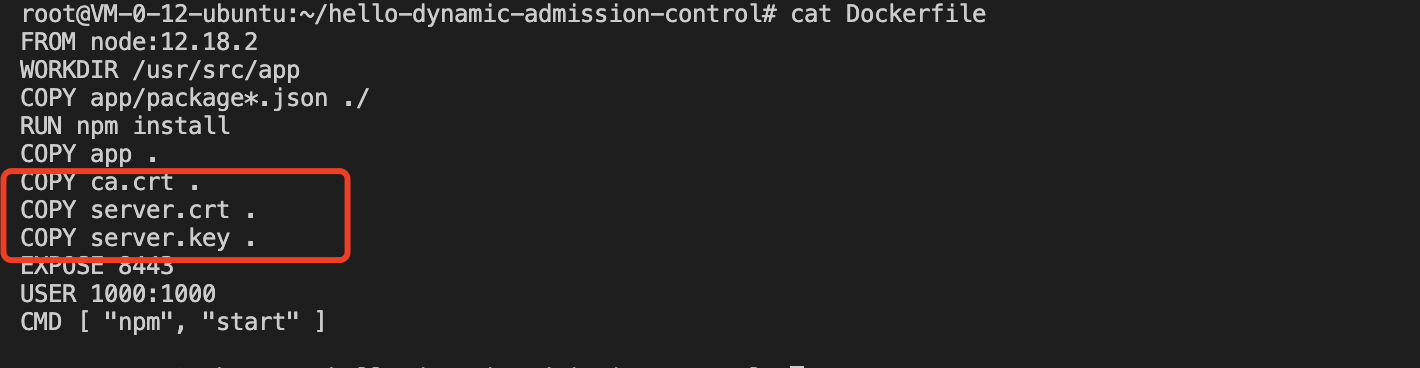
3. Modify the Dockerfile in the project and add three certificate files to the container working directory, as shown in the figure below:
4. Run the following command to build a Webhook server image.
docker build -t webserver .
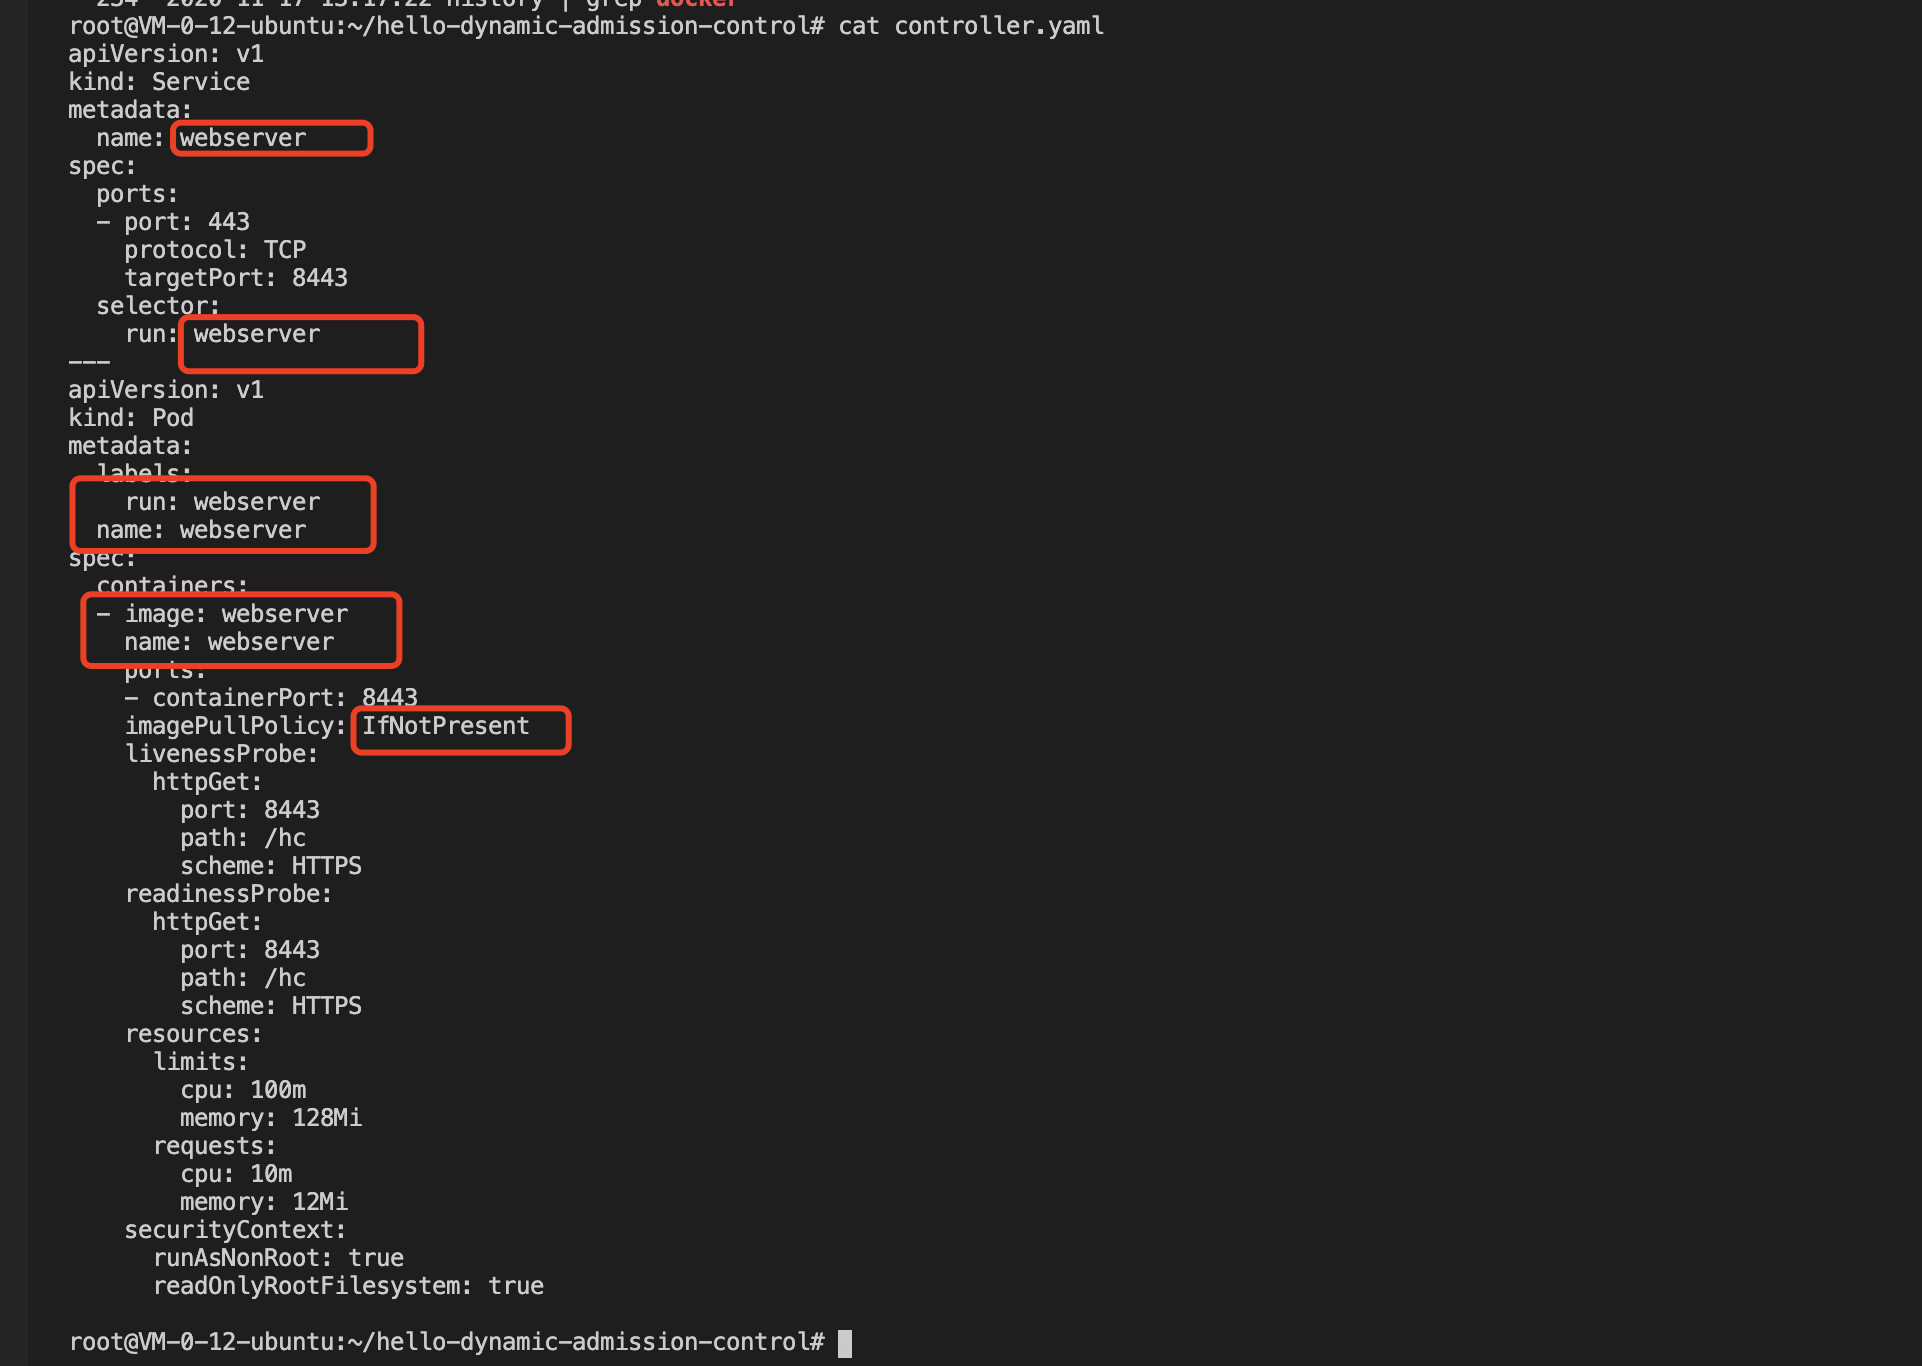
5. Deploy a Webhook backend service with the domain name of "weserver.default.svc" and modify the adapted controller.yaml, as shown in the figure below:
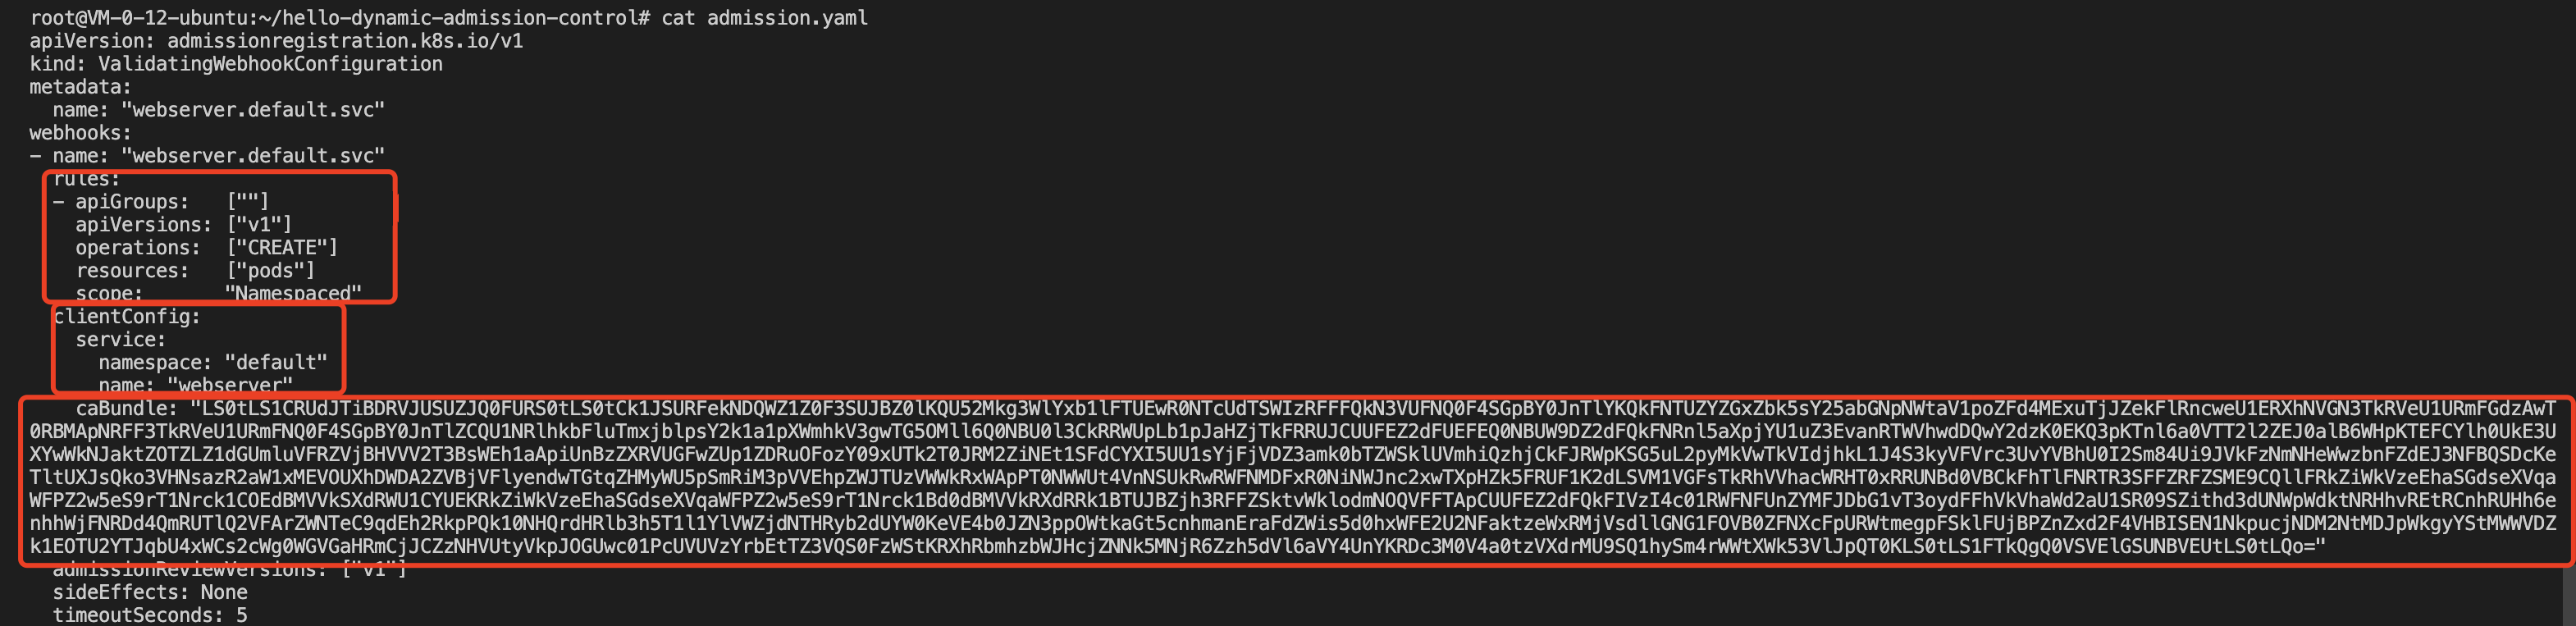
6. Register and create resources of the ValidatingWebhookConfiguration type, and modify the admission.yaml file in the adapted project, as shown in the figure below:
The Webhook triggering rule configured in this sample is as follows: when an API of pods type and version "v1" is created, Webhook is triggered. The configuration of clientConfig corresponds to the above Webhook backend service created in the cluster. The caBundle field content is the content of the ca.crt obtained in method 1.
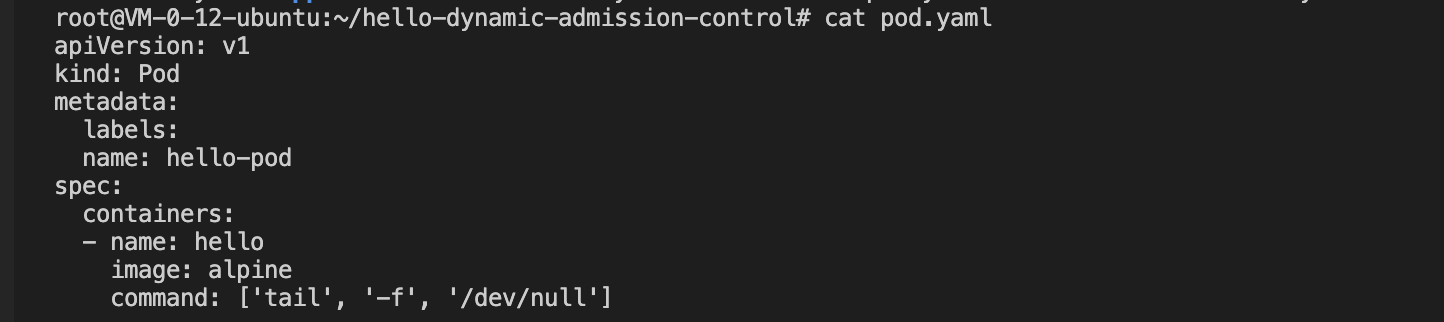
7. After registration, create test resources of the Pod type and the API version of "v1", as shown in the figure below:
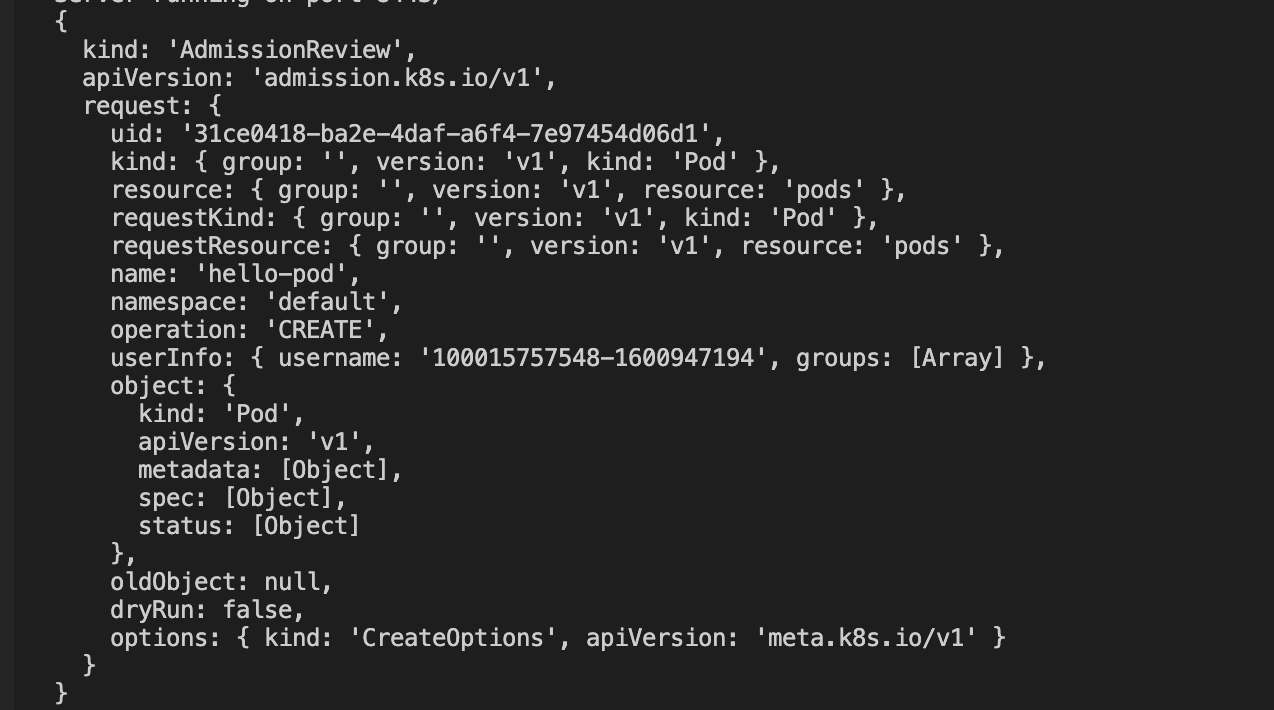
8. The test code prints the request log. You can view the Webhook server log to see that the dynamic admission controller has triggered a webhook call, as shown in the figure below:
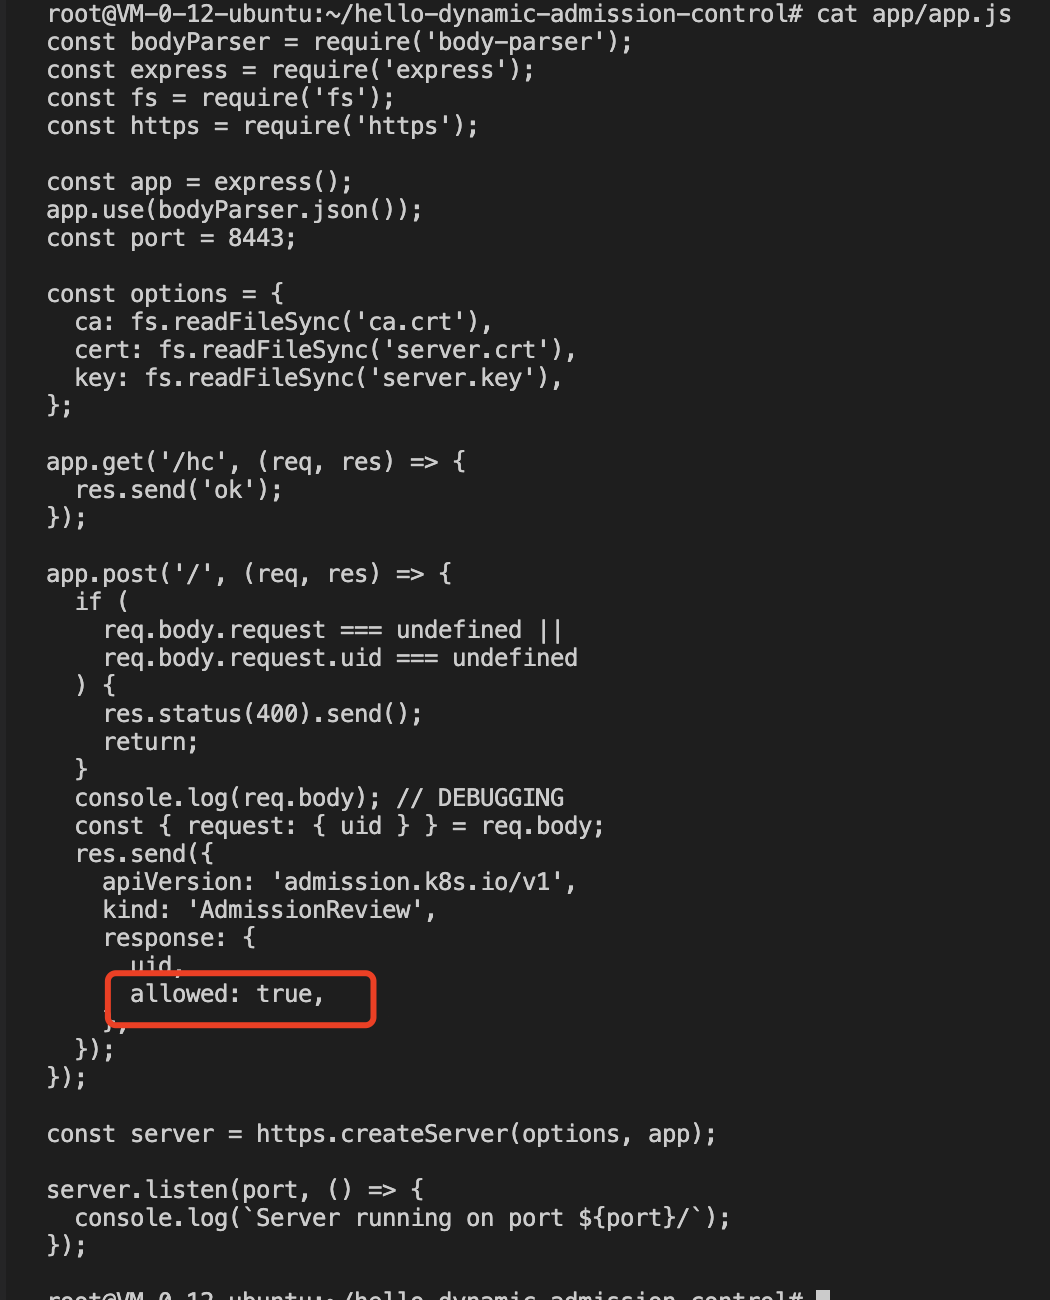
9. At this moment, you can see that the test pod has been created successfully. As the test Webhook server code includes the allowed: true configuration item, the test pod has been created successfully, as shown in the figure below:
For further verification, you can change "allowed" to "false" and then repeat the above steps to rebuild a Webserver server image and redeploy controller.yaml and admission.yaml resources. If the request of your reattempt to create pods resources is intercepted by the dynamic admission controller, then the configured dynamic admission policy has taken effect, as shown in the figure below:
Summary
This document mainly introduces the concept and functionality of the dynamic admission controller Webhook, as well as how to issue certificates needed by the dynamic admission controller in a TKE cluster. This document also describes a simple use case for configuring and using the dynamic admission Webhook feature.