1. Log in to the TKE console and select Cluster in the left sidebar.
2. On the Cluster page, click the ID of the target cluster to go to the cluster details page.
3. In the left sidebar, click Add-on management to go to the Add-on list page.
4. On the Add-On List page, select Create. On the Create add-on page, select NginxIngress.
5. Click Done. You can view the Addon Details under Services and Routes > NginxIngress.
Reminders
The architecture of Tencent Cloud Load Balancer (CLB) has been upgraded on March 6, 2023. After the upgrade, public network CLB instances deliver services through domain names. As service traffic increases, the VIP changes dynamically. Therefore, the VIP of a CLB instance is no longer displayed in the console. For more information, see Launch of Domain Name-Based Public CLB Instances.
For new Tencent Cloud users, the upgraded domain name-based CLB instances are used by default.
Existing users can choose to continue to use the original CLB instances, which are not affected by the upgrade. If you need to upgrade the CLB service, you need to upgrade both CLB and TKE. Otherwise, the synchronization of all public network Service/Ingress add-ons in TKE may be affected. For information about upgrading CLB, see Upgrading to Domain Name-based CLB. For information about upgrading TKE Service/Ingress add-ons, submit a ticket.
Installation Methods
You can use the following installation methods to install Nginx-ingress in TKE based on the requirements of your business scenarios:
Deploying via specifying a node pool as a DaemonSet (recommended)
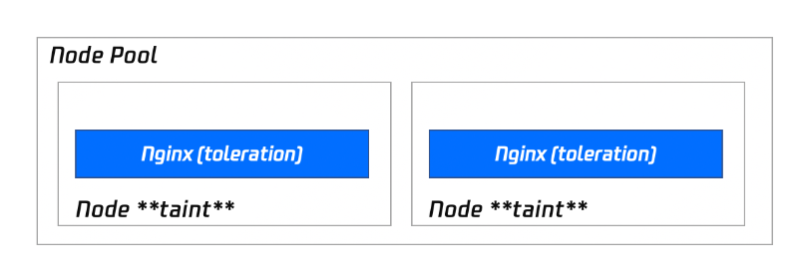
As Nginx is a key traffic Ingress gateway, we recommend you deploy Nginx-ingress in the specified node pool rather than on the same node with other businesses. The deployment architecture is as shown below:
Installation procedure
Note
If you use this installation method, you can enjoy the complete scaling capabilities of the node pool and can remove and add Nginx replicas simply by adjusting the number of nodes in the node pool subsequently.
1. Prepare the node pool for deploying Nginx-ingress, and set the taint to prevent other Pods from scheduling this node pool. For information about how to deploy node pool, see Node Pool Overview.
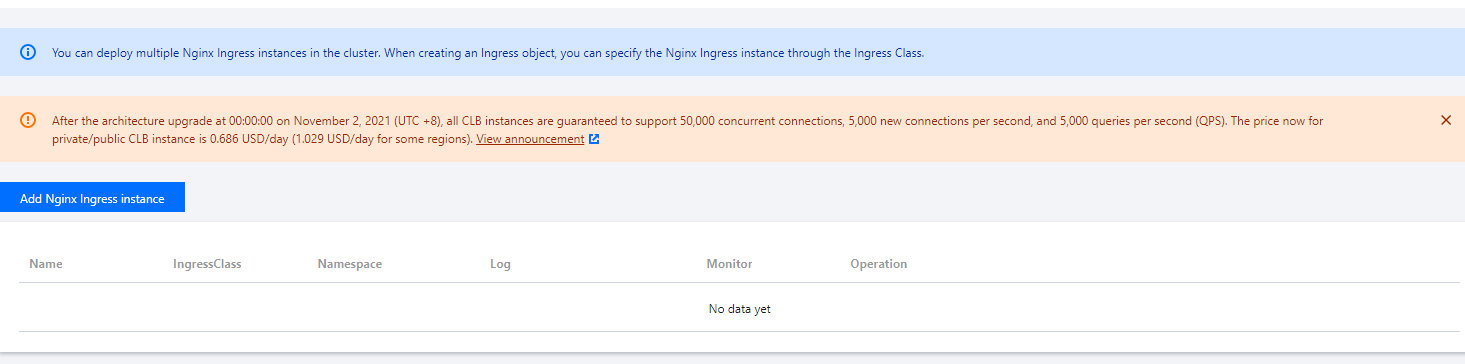
3. On the cluster information page, choose Services and Routes > NginxIngress and click Add Nginx Ingress instance. A cluster can have multiple Nginx instances.
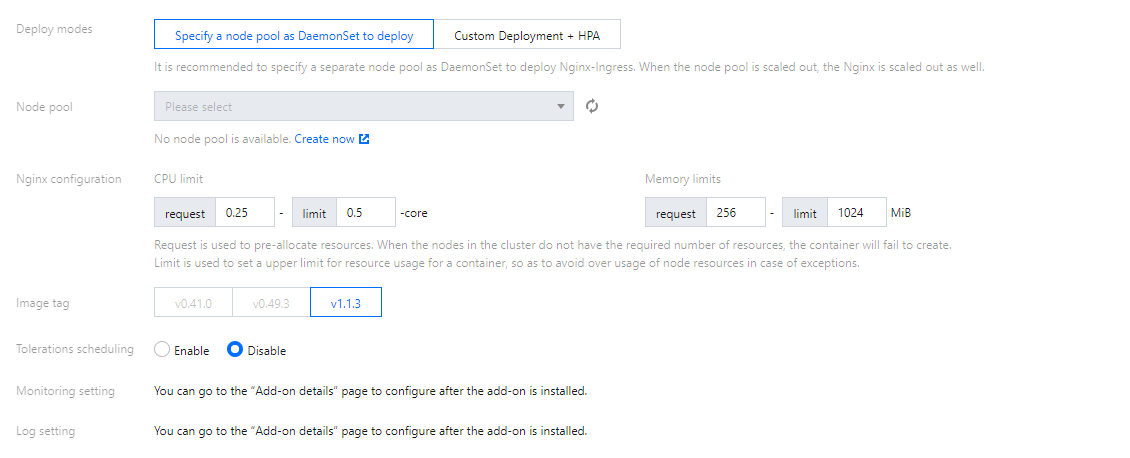
4. In the Create NginxIngress pop-up window, select Specify a node pool as DaemonSet to deploy for Deploy modes and set other parameters as needed.
Node pool: Configure the node pool.
Nginx configuration: You need to set request to a value lower than the model configuration of the node pool (as the nodes have reserved resources). limit is optional.
Image tag:
Kubernetes Versions
Versions Supported by Nginx-ingress
Image Versions Supported by Nginx Instances
<=1.18
1.1.0 and 1.2.0
v0.41.0 and v0.49.3
1.0.0
v0.41.0
1.20
1.1.0 and 1.2.0
v1.1.3
1.0.0
v0.41.0
>=1.22
1.1.0 and 1.2.0
v1.1.3
Note
1. Note on Elastic IP (EIP) usage: The 1.0.0 and 1.1.0 versions of the Nginx-ingress add-on rely on EIP and the 1.2.0 and later versions no longer require EIP. If your EIP service is subject to use limits, we recommend that you upgrade your Nginx-ingress add-on. The upgrade does not affect existing Nginx Ingress instances, service access, or data security.
2. Note on upgrades: For more information about Nginx instance versions, visit GitHub. For more information about how to upgrade a cluster, see Upgrading a Cluster. For more information about how to upgrade the Nginx-ingress add-on, see Add-On Lifecycle Management.
5. Click OK.
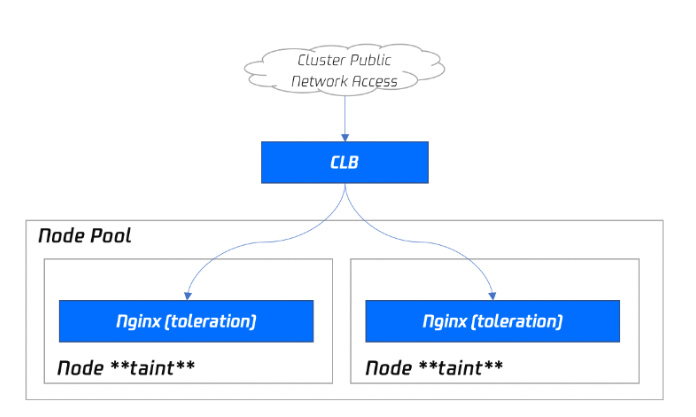
Deploying via "Deployment + HPA" and specifying a scheduling policy
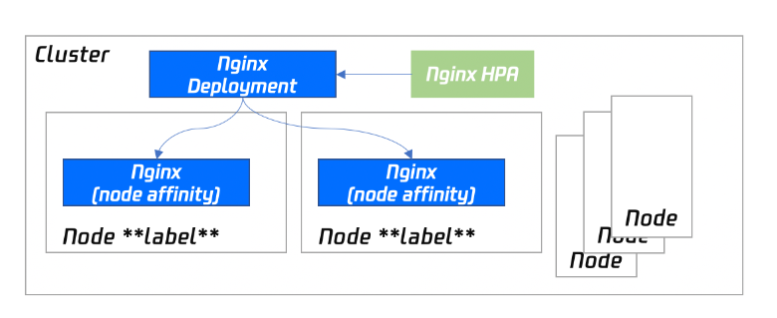
If you use the Deployment + HPA mode to deploy Nginx-ingress, you can configure a taint and tolerance to deploy Nginx instances and business Pods in a distributed manner based on your business needs. With HPA, you can configure auto scaling for Nginx instances based on metrics such as CPU and memory utilization. The deployment architecture is as shown below:
Installation procedure
1. Prepare the node pool for deploying Nginx-ingress, and set the taint to prevent other Pods from scheduling this node pool. For information about how to deploy node pool, see Node Pool Overview.
3. On the cluster information page, choose Services and Routes > NginxIngress and click Add Nginx Ingress Instance. A cluster can have multiple Nginx instances.
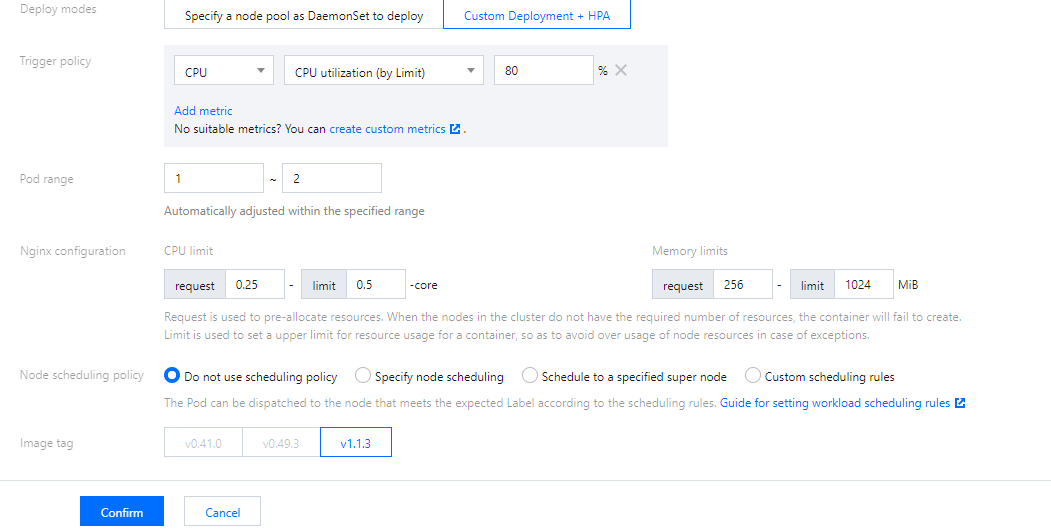
4. In the Create NginxIngress pop-up window, select Custom Deployment + HPA for Deploy modes and set other parameters as needed.
Nginx configuration: You need to set request to a value lower than the model configuration of the node pool (as the nodes have reserved resources). limit is optional.
Node scheduling policy: Specify a policy as needed.
Image tag:
For Kubernetes clusters on v1.20 or earlier, the Nginx-ingress add-on is on v1.0.0, and the Nginx instance image can only be on v41.0.
For Kubernetes clusters on v1.20 or earlier, the Nginx-ingress add-on is on v1.1.0, and the Nginx instance image can only be on v41.0 or v49.3.
For Kubernetes clusters on v1.22 or later, the Nginx-ingress add-on can only be on v1.1.0, and the Nginx instance image can only be on v1.1.3.
Note
For more information about Nginx instance versions, visit GitHub. For more information about how to upgrade a cluster, see Upgrading a Cluster. For more information about how to upgrade the Nginx-ingress add-on, see Add-On Lifecycle Management.
5. Click OK.
Deploying via Nginx frontend accessing an LB
If only Nginx is deployed in the cluster, external traffic cannot be received, so you also need to configure the Nginx frontend load balancer. TKE currently provides a product-like installation capability, and you can also select different deployment modes based on your business needs.
Directly connecting cluster in VPC-CNI mode to Nginx Service (recommended)
If your cluster is in VPC-CNI mode, we recommend you directly connect to the Nginx Service through CLB. The load of node pool deployment is used as an example in the following figure:
This solution, with high performance and without manual maintenance of CLB, is the optimal solution. It requires the cluster to enable VPC-CNI. This solution is recommended for the cluster that has configured the VPC-CNI network plug-in, or the Global Router network plug-in with VPC-CNI enabled (both modes are enabled).
Using common Service in LoadBalancer mode in cluster in Global Router mode
If your cluster does not support the VPC-CNI mode, you can also use a common Service in LoadBalancer mode for traffic access. Currently, Services in LoadBalancer mode in TKE are implemented based on NodePorts by default. CLB is bound to the NodePort of a node to use the NodePort as a real server and forwards the traffic to the NodePort, and then the request is routed to the backend Pod of the Service through iptables or IPVS on the node. This scheme is the simplest, but the traffic passes through the NodePort, which means that there is one more layer for forwarding, and the following problems may exist:
The forwarding path is relatively long. After reaching the NodePort, traffic goes through the CLB within Kubernetes and is then forwarded through iptables or ipvs to Nginx. This increases network time consumption.
Passing through the NodePort will necessarily cause SNAT. If traffic is too concentrated, port exhaustion or conntrack insertion conflicts can easily occur, leading to packet loss and causing some traffic exceptions.
The NodePort of each node also serves as a CLB. If the CLB is bound to the NodePorts of large numbers of nodes, the CLB status is distributed among each node, which can easily cause global load imbalance.
The CLB carries out health probes on NodePorts, and probe packets are ultimately forwarded to the Pods of Nginx-ingress. If the CLB is bound to too many nodes, and the number of Pods of Nginx-ingress is small, the probe packets will cause immense pressure on Nginx-ingress.
Using HostNetwork + load balancer mode
The console does not support setting this mode currently. You can manually modify the YAML file of the Nginx workload to set the network mode to HostNetwork and manually create a CLB instance to bind the node port exposed by Nginx.
Note that when you use HostNetwork, to avoid port listening conflicts, Nginx-ingress Pods cannot be scheduled to the same node.
Default Parameters for Nginx-ingress Installation in TKE
Setting Nginx-ingress parameters
In the details page of Nginx-ingress add-on, you can select an Nginx-ingress instance to edit YAML in Nginx Configuration tab.
Note
By default, Nginx won't restart after parameter configuration, and it will take a short while for the parameters to take effect.
1. Log in to the TKE console and select Cluster in the left sidebar.
2. On the Cluster page, click the ID of the target cluster to go to the cluster details page.
3. In the left sidebar, click Add-on management to go to the Add-on list page.
4. Click Update Nginx Configuration on the right of the target add-on to enter the Nginx Configuration page.
5. Select the target Nginx-ingress instance and click Edit YAML.
6. On the Update ConfigMap page, edit the YAML file and click Done.

 Yes
Yes
 No
No
Was this page helpful?