Using COS
Download
Focus Mode
Font Size
Overview
Tencent Kubernetes Engine (TKE) allows you to use Cloud Object Storage (COS) by creating PersistentVolumes (PVs) and PersistentVolumeClaims (PVCs) and mounting volumes to workloads. This document describes how to mount a COS bucket to a workload in a TKE cluster.
Preparations
1. Installing the COS add-on
Note
If your cluster has been installed with the COS-CSI add-on, skip this step.
1. Log in to the TKE console. In the left sidebar, click Cluster.
2. On the Cluster page, click the ID of the target cluster to go to the cluster details page.
3. In the left sidebar, click Add-On Management. On the Add-On Management page, click Create.
4. On the Create add-on page, select Tencent Cloud COS.
5. Click Done.
2. Creating an access key
Note
To avoid loss to your cloud assets due to root account key leakage, we recommend that you disable your root account from logging in to the console, or use the root account key to access cloud APIs but use a sub-account or collaborator account with the relevant management permissions to operate related resources. For more information, see Security Best Practice.
This document describes how to create or view an access key by using a sub-user with the relevant access and management permissions. For more information about how to create a sub-user and grant access and management permissions to the sub-user, see Creating Sub-User.
1. Use a sub-account to log in to the Cloud Access Management (CAM) console. In the left sidebar, choose Access Key > API Keys.
2. On the API Key Management page, click Create Key and wait until the key is created.
Note
One sub-user can have at most two API keys.
An API key is an important credential for creating Tencent Cloud API requests. To keep your assets and services secure, store your keys appropriately and change them regularly. Delete old keys when new ones are created.
3. Creating a bucket
Log in to the COS console and create a bucket. For more information, see Creating Bucket. After the bucket is created, you can find it in the bucket list.
4. Getting the bucket subdirectory
1. On the Bucket List page, click the name of the created bucket to go to the bucket details page.
2. Click File List in the left sidebar, and click the subfolder to be mounted to go to its details page. Get the subdirectory
/costest in the top-right corner of the page as shown below:
Directions
Using COS via the console
Step 1. Create a Secret that can access COS
1. Log in to the TKE console. In the left sidebar, click Cluster.
2. On the Cluster page, click the ID of the target cluster to go to the cluster details page.
3. On the cluster details page, choose Configuration Management > Secret in the left sidebar. On the Secret page, click Create.
4. On the Create Secret page, set the parameters as required, as shown below:

Name: Enter a custom name. This document uses
cos-secret as an example.Secret Type: Select Opaque. This type is suitable for saving key certificates and configuration files. The value is Base64-coded.
Effective Scope: Select Specific Namespace. Make sure that the Secret is created under the
kube-system namespace.Content: Specify the access key required by the Secret to access the bucket. The value must contain the variable names
SecretId and SecretKey and their corresponding variable values. Refer to Creating an access key to create an access key, and go to the API Key Management page to get its details.5. Click Create Secret.
Step 2. Create a PV that supports COS-CSI static configuration
Note
This step requires a bucket. If no bucket is available in the current region, create one. For more information, see Creating Bucket.
1. On the details page of the target cluster, choose Storage > PersistentVolume in the left sidebar. On the PersistentVolume page, click Create.
2. On the Create PersistentVolume page, set the parameters as required, as shown below:
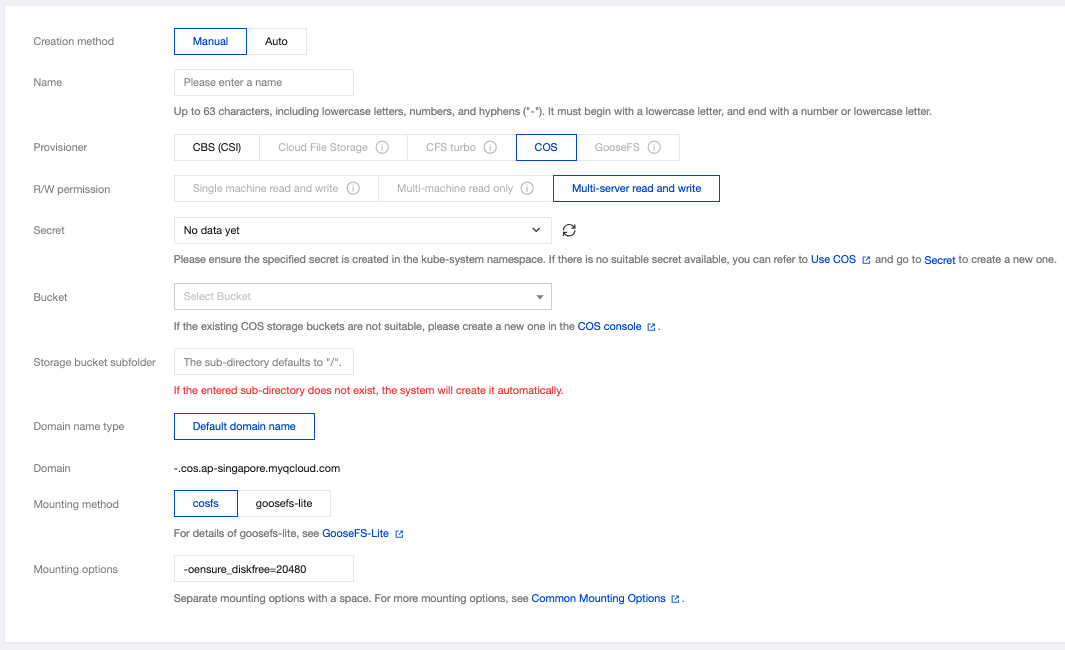
The main parameters are described as follows:
Creation Method: Select Manual.
Name: Enter a custom name. This document uses
cos-pv as an example.Provisioner: Select COS.
R/W permission: COS only supports Multi-computer read and write.
Note
Single machine read and write: Currently, CBS disks can only be mounted to the same machine, and therefore, only data read and write on a single machine can be processed.
Multi-computer read and write: CFS/COS can be mounted to multiple machines at a time, and therefore, data read and write on multiple machines can be processed.
Secret: Select the Secret created in Step 1. This document uses
cos-secret as an example. Make sure that the Secret is created under the kube-system namespace.Buckets list: The list of buckets used to save COS objects. You can select an available bucket as required.
Storage bucket subfolder: Enter the bucket subdirectory obtained in Getting the bucket subdirectory. This document uses
/costest as an example. If the entered subdirectory does not exist, the system will automatically create it for you.Domain: The default domain name is displayed. You can use this domain name to access the bucket.
Mounting options: The COSFS tool allows a bucket to be mounted locally. After the bucket is mounted, you can directly operate on the COS objects in it. This parameter is used to set related restrictions. The mounting option
-oensure_diskfree=20480 in this example indicates that when the free space of the disk where the cache files are stored is less than 20,480 MB, the COSFS tool will fail to be started.Note
Different mounting options must be separated with spaces. For more mounting options, see Common Mounting Options.
3. Click Create PersistentVolume.
Step 3. Create a PVC to bind a PV
Note
Do not bind a PV that is in the bound state.
1. On the details page of the target cluster, choose Storage > PersistentVolumeClaim in the left sidebar. On the PersistentVolumeClaim page, click Create.
2. On the Create PersistentVolumeClaim page, set the parameters as required, as shown below:
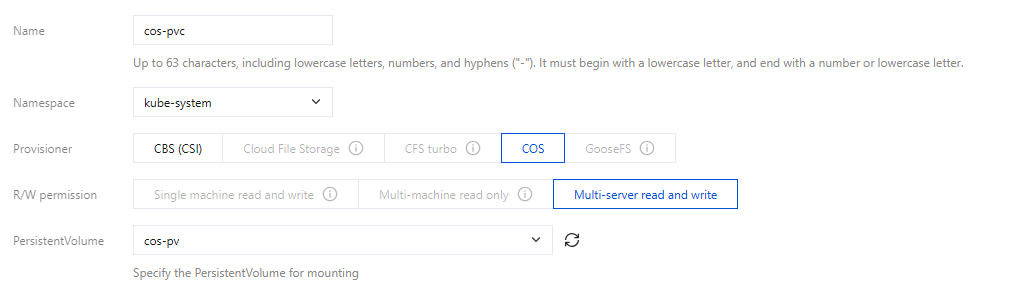
Name: Enter a custom name. This document uses
cos-pvc as an example.Namespace: Select kube-system.
Provisioner: Select COS.
R/W permission: COS only supports Multi-computer read and write.
PersistentVolume: Select the PV that you created in Step 2. This document uses
cos-pv as an example.3. Click Create PersistentVolumeClaim.
Step 4. Create a Pod that uses a PVC
Note
This step creates a Deployment workload as an example.
1. On the details page of the target cluster, choose Workload > Deployment. On the Deployment page, click Create.
2. On the Create Deployment page, set the parameters as required to create a Deployment. For more information, see Creating a Deployment. Then, mount a volume as required, as shown below:
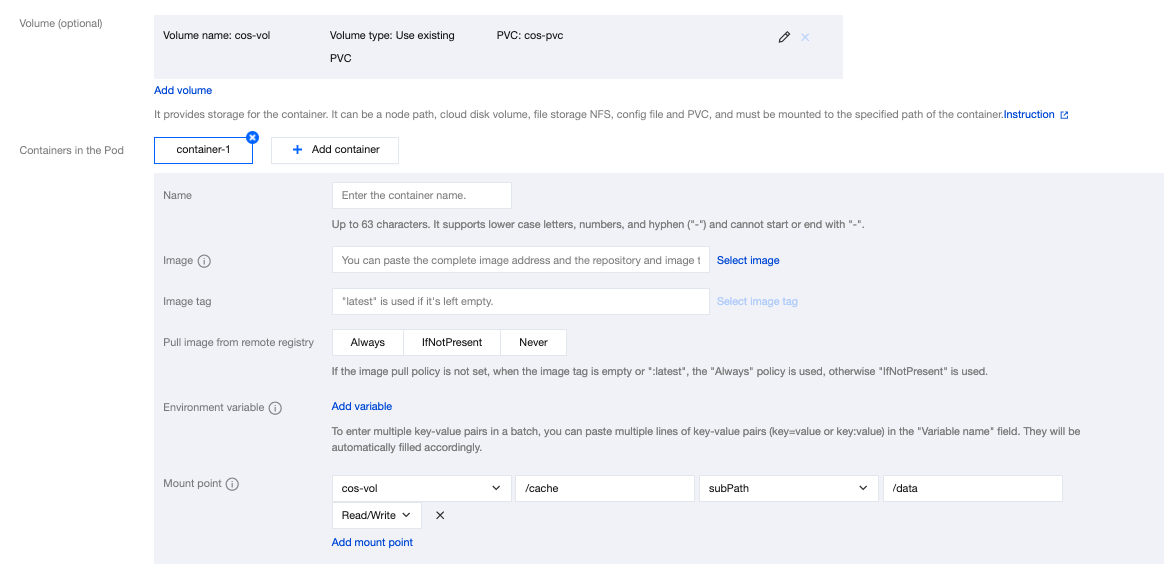
Volume (optional):
Mount method: Select Use existing PVC.
Volume name: Enter a custom name. This document uses
cos-vol as an example.Select PVC: Select the PVC that you created in Step 3. This document uses
cos-pvc as an example.Containers in the Pod: Click Add mount point to set a mount point.
Volume: Select the volume
cos-vol that you added in this step.Target path: Enter a destination path. This document uses
/cache as an example.Sub-path: Mount only a sub-path or a single file in the selected volume, such as
./data or data.3. Click Create Deployment.
Using COS via a YAML file
Creating a secret that can access COS
You can create a secret that can access COS by using a YAML file. The YAML file template is as follows:
apiVersion: v1kind: Secrettype: Opaquemetadata:name: cos-secret# Replaced by your secret namespace.namespace: kube-systemdata:# Replaced by your temporary secret file content. You can generate a temporary secret key with these docs:# Note: the value must be encoded by base64.SecretId: VWVEJxRk5Fb0JGbDA4M...(base64 encode)SecretKey: Qa3p4ZTVCMFlQek...(base64 encode)
Creating a PV that supports COS-CSI dynamic configuration
You can create a PV to support COS-CSI dynamic configuration by using a YAML file. The YAML file template is as follows:
apiVersion: v1kind: PersistentVolumemetadata:name: cos-pvspec:accessModes:- ReadWriteManycapacity:storage: 10Gicsi:driver: com.tencent.cloud.csi.cosfsnodePublishSecretRef:name: cos-secretnamespace: kube-systemvolumeAttributes:# Replaced by the url of your region.url: http://cos.ap-XXX.myqcloud.com# Replaced by the bucket name you want to use.bucket: XXX-1251707795# You can specify sub-directory of bucket in cosfs command in here.path: /costest# You can specify any other options used by the cosfs command in here.# additional_args: "-oallow_other"# Specify a unique volumeHandle like bucket name. (This value must be different from other pv's volumeHandle.)volumeHandle: XXXpersistentVolumeReclaimPolicy: RetainvolumeMode: Filesystem
Creating a PVC that binds a PV
You can create a PVC that binds the preceding PV by using a YAML file. The YAML file template is as follows:
apiVersion: v1kind: PersistentVolumeClaimmetadata:name: cos-pvcspec:accessModes:- ReadWriteManyresources:requests:storage: 1Gi# You can specify the pv name manually or just let kubernetes to bind the pv and pvc.# volumeName: cos-pv# Currently cos only supports static provisioning, the StorageClass name should be empty.storageClassName: ""
Creating a pod that uses a PVC
You can create a pod by using a YAML file. The YAML file template is as follows:
apiVersion: v1kind: Podmetadata:name: pod-cosspec:containers:- name: pod-coscommand: ["tail", "-f", "/etc/hosts"]image: "centos:latest"volumeMounts:- mountPath: /dataname: cosresources:requests:memory: "128Mi"cpu: "0.1"volumes:- name: cospersistentVolumeClaim:# Replaced by your pvc name.claimName: cos-pvc
More Information
Help and Support
Was this page helpful?
You can also Contact sales or Submit a Ticket for help.
Help us improve! Rate your documentation experience in 5 mins.
Feedback