Linux 实例:SSH 登录提示无法连接或者连接云服务器失败
下载
聚焦模式
字号
说明:
本文来源于社区贡献,仅供参考,与腾讯云相关产品无关。
文中涉及的相关文件操作,请务必谨慎执行。如有必要,可通过创建快照等方式进行数据备份。
现象描述
使用 SSH 登录 Linux 实例 时,提示无法连接或者连接失败,导致无法正常登录 Linux 实例。
问题定位及处理
当使用 SSH 登录 Linux 实例失败,并返回报错信息时,您可记录报错信息,并匹配以下常见的报错信息,快速定位问题并参考步骤进行解决。
SSH 登录报错 User root not allowed because not listed in AllowUsers
现象描述
使用 SSH 登录 Linux 实例时,无法正常登录。客户端或服务端的 secure 日志中出现类似如下信息:
Permission denied, please try again.
User test from 192.X.X.1 not allowed because not listed in AllowUsers.
User test from 192.X.X.1 not allowed because listed in DenyUsers.
User root from 192.X.X.1 not allowed because a group is listed in DenyGroups.
User test from 192.X.X.1 not allowed because none of user's groups are listed in AllowGroups.
问题原因
该问题通常是由于 SSH 服务启用了用户登录控制参数,对登录用户进行了限制。参数说明如下:
AllowUsers:允许登录的用户白名单,只有该参数标注的用户可以登录。
DenyUsers:拒绝登录的用户黑名单,该参数标注的用户都被拒绝登录。
AllowGroups:允许登录的用户组白名单,只有该参数标注的用户组可以登录。
DenyGroups:拒绝登录的用户组黑名单,该参数标注的用户组都被拒绝登录。
说明:
拒绝策略优先级高于允许策略。
解决思路
1. 参见 处理步骤,进入 SSH 配置文件
sshd_config 检查配置。2. 删除用户登录控制参数,并重启 SSH 服务即可。
处理步骤
2. 执行以下命令,使用 VIM 编辑器进入
sshd_config 配置文件。vim /etc/ssh/sshd_config
3. 按 i 进入编辑模式,找到并删除以下配置,或在每行行首增加
# 进行注释。AllowUsers root testDenyUsers testDenyGroups testAllowGroups root
4. 按 Esc 退出编辑模式,输入 :wq 保存修改。
5. 对应实际使用的操作系统,执行以下命令,重启 SSH 服务。
CentOS
systemctl restart sshd.service
Ubuntu
service sshd restart
SSH 登录报错 Disconnected:No supported authentication methods available
现象描述
使用 SSH 登录时,出现如下报错信息:
Permission denied (publickey,gssapi-keyex,gssapi-with-mic).sshd[10826]: Connection closed by xxx.xxx.xxx.xxx.Disconnected:No supported authentication methods available.
问题原因
SSH 服务修改了
PasswordAuthentication 参数,禁用了密码验证登录导致。解决思路
1. 参见 处理步骤,进入 SSH 配置文件
sshd_config。2. 修改
PasswordAuthentication 参数,并重启 SSH 服务即可。处理步骤
2. 执行以下命令,使用 VIM 编辑器进入
sshd_config 配置文件。vim /etc/ssh/sshd_config
3. 按 i 进入编辑模式,将
PasswordAuthentication no 修改为 PasswordAuthentication yes。4. 按 Esc 退出编辑模式,并输入 :wq 保存修改。
5. 对应实际使用的操作系统,执行以下命令,重启 SSH 服务。
CentOS
systemctl restart sshd.service
Ubuntu
service sshd restart
SSH 登录报错 ssh_exchange_identification: read: Connection reset by peer
现象描述
使用 SSH 登录时,出现报错信息 “ssh_exchange_identification: read: Connection reset by peer”。或出现以下报错信息:
“ssh_exchange_identification: Connection closed by remote host”
“kex_exchange_identification: read: Connection reset by peer”
“kex_exchange_identification: Connection closed by remote host”
问题原因
导致该类问题的原因较多,常见原因有以下几种:
本地访问控制限制了连接
某些入侵防御软件更改了防火墙规则,例如 Fail2ban 及 denyhost 等。
sshd 配置中最大连接数限制
本地网络存在问题
解决思路
处理步骤
检查及调整访问策略设置
Linux 中可以通过
/etc/hosts.allow 和 /etc/hosts.deny 文件设置访问策略,两个文件分别对应允许和阻止的策略。例如,可以在 hosts.allow 文件中设置信任主机规则,在 hosts.deny 文件中拒绝所有其他主机。以 hosts.deny 为例,阻止策略配置如下:in.sshd:ALL # 阻止全部ssh连接in.sshd:218.64.87.0/255.255.255.128 # 阻止218.64.87.0—-127的sshALL:ALL # 阻止所有TCP连接
配置有误,请按需修改,更改即时生效。
未配置或配置无误,请进行下一步。
说明:
若您未配置访问策略,则默认文件均为空,且允许所有连接。
检查 iptables 防火墙规则
检查是否 iptables 防火墙规则是否被修改,包括使用某些入侵防御软件,例如 Fail2ban 及 denyhost 等。执行以下命令,查看防火墙是否阻止过 SSH 连接。
sudo iptables -L --line-number
若 SSH 连接被阻止,请通过对应软件白名单等相关策略自行设置。
若 SSH 连接未被阻止,请进行下一步。
检查及调整 sshd 配置
1. 执行以下命令,使用 VIM 编辑器进入
sshd_config 配置文件。vim /etc/ssh/sshd_config
2. 检查
MaxStartups 值是否需调整。sshd_config 配置文件中通过 MaxStartups 设置允许的最大连接数,如果短时间需建立较多连接,则需适当调整该值。若需调整,则请参考以下步骤修改:
2.1.1 按 i 进入编辑模式,修改完成后按 Esc 退出编辑模式,并输入 :wq 保存修改。
说明:
MaxStartups 10:30:100为默认配置,指定 SSH 守护进程未经身份验证的并发连接的最大数量。10:30:100表示从第10个连接开始,以30%的概率拒绝新的连接,直到连接数达到100。
2.1.2 执行以下命令,重启 sshd 服务。
service sshd restart
若无需调整,请进行下一步。
测试网络环境
1. 检查是否使用了 内网 IP 进行登录。
是,请切换为 公网 IP 后再次进行尝试。
否,请进行下一步。
2. 使用其他网络环境测试是否连接正常。
是,请重启实例后使用 VNC 登录实例。
否,请根据测试结果解决网络环境问题。
SSH 登录报错 Permission denied, please try again
现象描述
root 用户使用 SSH 登录 Linux 实例时,出现报错信息 “Permission denied, please try again”。
问题原因
系统启用了 SELinux 服务,或是由 SSH 服务修改了
PermitRootLogin 配置所致。解决思路
处理步骤
检查及关闭 SELinux 服务
2. 执行以下命令,查看当前 SELinux 服务状态。
/usr/sbin/sestatus -v
若返回参数为
enabled 即处于开启状态,disabled 即处于关闭状态。如下所示,则为开启状态:SELinux status: enabled
3. 您可结合实际情况,临时或永久关闭 SELinux 服务。
临时关闭 SELinux 服务
执行以下命令,临时关闭 SELinux。修改实时生效,无需重启系统或实例。
setenforce 0
永久关闭 SELinux 服务
执行以下命令,关闭 SELinux 服务。
sed -i 's/SELINUX=enforcing/SELINUX=disabled/' /etc/selinux/config
注意:
该命令仅适用于 SELinux 服务为 enforcing 状态时。
执行命令后需重启系统或实例,使修改生效。
检查及调整 sshd 配置
2. 执行以下命令,使用 VIM 编辑器进入
sshd_config 配置文件。vim /etc/ssh/sshd_config
3. 按 i 进入编辑模式,将
PermitRootLogin no 修改为 PermitRootLogin yes。说明:
若
sshd_config 中未配置该参数,则默认允许 root 用户登录。该参数仅影响 root 用户使用 SSH 登录,不影响 root 用户通过其他方式登录实例。
4. 按 Esc 退出编辑模式,并输入 :wq 保存修改。
5. 执行以下命令,重启 SSH 服务。
service sshd restart
SSH 登录时报错 Too many authentication failures for root
现象描述
使用 SSH 登录时,登录时多次输入密码后返回报错信息 “Too many authentication failures for root”,并且连接中断。
问题原因
在多次连续输入错误密码后,触发了 SSH 服务密码重置策略导致。
解决思路
1. 参见 处理步骤,进入 SSH 配置文件
sshd_config。2. 检查并修改 SSH 服务密码重置策略的
MaxAuthTries 参数配置,并重启 SSH 服务即可。处理步骤
2. 执行以下命令,使用 VIM 编辑器进入
sshd_config 配置文件。vim /etc/ssh/sshd_config
3. 查看是否包含类似如下配置。
MaxAuthTries 5
说明:
该参数默认未启用,用于限制用户每次使用 SSH 登录时,能够连续输入错误密码的次数。超过设定的次数则会断开 SSH 连接,并显示相关错误信息。但相关账号不会被锁定,仍可重新使用 SSH 登录。
请您结合实际情况确定是否需修改配置,如需修改,建议您备份
sshd_config 配置文件。4. 按 i 进入编辑模式,修改以下配置,或在行首增加
# 进行注释。MaxAuthTries <允许输入错误密码的次数>
5. 按 Esc 退出编辑模式,输入 :wq 保存修改。
6. 执行以下命令,重启 SSH 服务。
service sshd restart
SSH 启动时报错 error while loading shared libraries
现象描述
Linux 实例启动 SSH 服务,在 secure 日志文件中,或直接返回类似如下错误信息:
“error while loading shared libraries: libcrypto.so.10: cannot open shared object file: No such file or directory”
“PAM unable to dlopen(/usr/lib64/security/pam_tally.so): /usr/lib64/security/pam_tally.so: cannot open shared object file: No such file or directory”
问题原因
SSH 服务运行依赖相关的系统库文件丢失或权限配置等异常所致。
解决思路
处理步骤
说明:
本文以处理 libcrypto.so.10 库文件异常为例,其他库文件异常的处理方法类似,请结合实际情况进行操作。
获取库文件信息
2. 执行以下命令,查看 libcrypto.so.10 库文件信息。
ll /usr/lib64/libcrypto.so.10
返回类似如下信息,表示
/usr/lib64/libcrypto.so.10 是 libcrypto.so.1.0.2k 库文件的软链接。lrwxrwxrwx 1 root root 19 Jan 19 2021 /usr/lib64/libcrypto.so.10 -> libcrypto.so.1.0.2k
3. 执行以下命令,查看
libcrypto.so.1.0.2k 库文件信息。ll /usr/lib64/libcrypto.so.1.0.2k
返回类似如下信息:
-rwxr-xr-x 1 root root 2520768 Dec 17 2020 /usr/lib64/libcrypto.so.1.0.2k
4. 记录正常库文件的路径、权限、属组等信息,并通过以下方式进行处理:
查找及替换库文件
1. 执行以下命令,查找
libcrypto.so.1.0.2k 文件。find / -name libcrypto.so.1.0.2k
2. 根据返回结果,执行以下命令,将库文件拷贝至正常目录。
cp <步骤1获取的库文件绝对路径> /usr/lib64/libcrypto.so.1.0.2k
3. 依次执行以下命令,修改文件权限、所有者及属组。
chmod 755 /usr/lib64/libcrypto.so.1.0.2k
chown root:root /usr/lib64/libcrypto.so.1.0.2k
4. 执行以下命令,创建软链接。
ln -s /usr/lib64/libcrypto.so.1.0.2k /usr/lib64/libcrypto.so.10
5. 执行以下命令,启动 SSH 服务。
service sshd start
外部文件上传
1. 通过 FTP 软件将其他正常服务器上的
libcrypto.so.1.0.2k 的库文件上传至目标服务器的 \\tmp 目录。说明:
本文以上传至目标服务器的
\\tmp 目录为例,您可结合实际情况进行修改。2. 执行以下命令,将库文件拷贝至正常目录。
cp /tmp/libcrypto.so.1.0.2k /usr/lib64/libcrypto.so.1.0.2k
3. 依次执行以下命令,修改文件权限、所有者及属组。
chmod 755 /usr/lib64/libcrypto.so.1.0.2k
chown root:root /usr/lib64/libcrypto.so.1.0.2k
4. 执行以下命令,创建软链接。
ln -s /usr/lib64/libcrypto.so.1.0.2k /usr/lib64/libcrypto.so.10
5. 执行以下命令,启动 SSH 服务。
service sshd start
通过快照回滚恢复
注意:
快照回滚会导致快照创建后的数据丢失,请谨慎操作。
建议按快照创建时间从近到远的顺序逐一尝试回滚,直至 SSH 服务正常运行。若回滚后仍无法正常运行 SSH 服务,则说明该时间点的系统已经出现异常。
SSH 服务启动时报错 fatal: Cannot bind any address
现象描述
Linux 实例启动 SSH 服务时,直接返回或在 secure 日志文件中出现类似如下错误信息:
FAILED.fatal: Cannot bind any address.address family must be specified before ListenAddress.
问题原因
SSH 服务的
AddressFamily 参数配置不当所致。AddressFamily 参数用于指定运行时使用的协议簇,若参数仅配置了 IPv6,而系统内未启用 IPv6 或 IPv6 配置无效,则可能导致该问题。解决思路
1. 参见 处理步骤,进入 SSH 配置文件
sshd_config 检查配置。2. 修改
AddressFamily 参数,并重启 SSH 服务即可。处理步骤
2. 执行以下命令,使用 VIM 编辑器进入
sshd_config 配置文件。vim /etc/ssh/sshd_config
3. 查看是否包含类似如下配置。
AddressFamily inet6
常用参数说明如下:
inet:使用 IPv4 协议簇,为默认值。
inet6:使用 IPv6 协议簇。
any:同时启用 IPv4 和 IPv6 协议簇。
4. 按 i 进入编辑模式,修改为以下配置,或在行首增加
# 进行注释。 AddressFamily inet
注意:
AddressFamily 参数需在 ListenAddress 前配置才可生效。5. 按 Esc 退出编辑模式,并输入 :wq 保存修改。
6. 执行以下命令,重启 SSH 服务。
servicesshd restart
SSH 服务启动时报错 Bad configuration options
现象描述
Linux 实例启动 SSH 服务时,直接返回或在 secure 日志文件中出现类似如下错误信息:
/etc/ssh/sshd_config: line 2: Bad configuration options:\\\\/etc/ssh/sshd_config: terminating, 1 bad configuration options
问题描述
配置文件存在文件编码或配置错误等异常问题所致。
解决思路
参考处理步骤提供的以下处理项,修复
sshd_config 配置文件。处理步骤
对应错误信息修改配置文件
若错误信息中明确指出了错误配置,则可通过 VIM 编辑器直接修改
/etc/ssh/sshd_config 配置文件。您可参考其他实例的正确配置文件进行修改。外部文件上传
1. 通过 FTP 软件将其他正常服务器上的
/etc/ssh/sshd_config 的库文件上传至目标服务器的 \\tmp 目录。说明:
本文以上传至目标服务器的
\\tmp 目录为例,您可结合实际情况进行修改。2. 执行以下命令,将库文件拷贝至正常目录。
cp /tmp/sshd_config /etc/ssh/sshd_config
3. 依次执行以下命令,修改文件权限、所有者及属组。
chmod 600 /etc/ssh/sshd_config``` ```chown root:root /etc/ssh/sshd_config
4. 执行以下命令,启动 SSH 服务。
service sshd start
重新安装 SSH 服务
2. 执行以下命令,卸载 SSH 服务。
rpm -e openssh-server
3. 执行以下命令,安装 SSH 服务。
yum install openssh-server
4. 执行以下命令,启动 SSH 服务。
service sshd start
通过快照回滚恢复
注意:
快照回滚会导致快照创建后的数据丢失,请谨慎操作。
建议按快照创建时间从近到远的顺序逐一尝试回滚,直至 SSH 服务正常运行。若回滚后仍无法正常运行 SSH 服务,则说明该时间点的系统已经出现异常。
SSH 启用 UseDNS 导致 SSH 登录或数据传输速度变慢
现象描述
Linux 实例通过外网使用 SSH 登录或进行数据传输时,速度很慢。在切换为内网后,登录及数据传输速度仍然很慢。
问题原因
可能是由于 SSH 服务启用了 UseDNS 特性所致。UseDNS 特性是 SSH 服务的安全增强特性,默认未开启。开启后,服务端会先根据客户端 IP 进行 DNS PTR 反向查询,得到客户端主机名。再根据得到的客户端主机名进行 DNS 正向 A 记录查询,最后比对得到的 IP 与原始 IP 是否一致,用以防止客户端欺骗。
通常情况下,客户端使用的都是动态 IP,没有相应的 PTR 记录。该特性开启后,不仅无法用于信息比对,反而由于相关查询操作增加了操作延迟,最终导致客户端连接速度变慢。
解决思路
1. 参考 处理步骤,进入 SSH 配置文件
sshd_config。2. 检查并修改 SSH 服务的 UseDNS 配置,并重启 SSH 服务即可。
处理步骤
2. 执行以下命令,使用 VIM 编辑器进入
sshd_config 配置文件。vim /etc/ssh/sshd_config
3. 查看是否包含如下配置:
UseDNS yes
4. 按 i 进入编辑模式,删除配置或在行首增加
# 进行注释。5. 执行以下命令,重启 SSH 服务。
servicesshd restart
SSH 登录报错 No supported key exchange algorithms
现象描述
使用 SSH 登录 Linux 实例时,无法正常登录。客户端或服务端的 secure 日志中可能出现类似如下错误信息::
Read from socket failed: Connection reset by peer.
Connection closed by 192.X.X.1.
sshd error: could not load host key.
fatal: No supported key exchange algorithms [preauth].
DSA host key for 192.X.X.1 has changed and you have requested strict checking.
Host key verification failed.
ssh_exchange_identification: read: Connection reset by peer.
问题原因
通常是由于 SSH 服务相关的密钥文件出现异常,导致 sshd 守护进程无法加载到正确的 SSH 主机密钥。常见异常原因如下:
相关密钥文件异常。例如,文件损坏、被删除或篡改等。
相关密钥文件权限配置异常,无法正确读取。
解决思路
参考处理步骤提供的以下处理项,进行配置检查及修改。
处理步骤
检查及修改文件权限
SSH 服务会对相关密钥文件的权限进行检查。例如,私钥文件默认权限为600,如果配置为777等其他权限,导致其他用户也具备读取或修改权限。则 SSH 服务会认为该配置存在安全风险,导致客户端连接失败。检查及修复步骤如下:
2. 依次执行以下命令,恢复相关文件的默认权限。
cd /etc/ssh/
chmod 600 ssh_host_*
chmod 644 *.pub
3. 执行
ll 命令,查看文件权限。返回如下结果,表明文件权限正常。total 156-rw-------. 1 root root 125811 Nov 23 2013 moduli-rw-r--r--. 1 root root 2047 Nov 23 2013 ssh_config-rw------- 1 root root 3639 May 16 11:43 sshd_config-rw------- 1 root root 668 May 20 23:31 ssh_host_dsa_key-rw-r--r-- 1 root root 590 May 20 23:31 ssh_host_dsa_key.pub-rw------- 1 root root 963 May 20 23:31 ssh_host_key-rw-r--r-- 1 root root 627 May 20 23:31 ssh_host_key.pub-rw------- 1 root root 1675 May 20 23:31 ssh_host_rsa_key-rw-r--r-- 1 root root 382 May 20 23:31 ssh_host_rsa_key.pub
检查及修改文件有效性
1. SSH 服务在启动时会自动重建丢失的密钥文件。依次执行以下命令,确认存在
ssh_host_* 文件。cd /etc/ssh/
ll
返回如下结果,表明存在
ssh_host_* 文件。total 156 -rw-------. 1 root root 125811 Nov 23 2013 moduli -rw-r--r--. 1 root root 2047 Nov 23 2013 ssh_config -rw------- 1 root root 3639 May 16 11:43 sshd_config -rw------- 1 root root 672 May 20 23:08 ssh_host_dsa_key -rw-r--r-- 1 root root 590 May 20 23:08 ssh_host_dsa_key.pub -rw------- 1 root root 963 May 20 23:08 ssh_host_key -rw-r--r-- 1 root root 627 May 20 23:08 ssh_host_key.pub -rw------- 1 root root 1675 May 20 23:08 ssh_host_rsa_key -rw-r--r-- 1 root root 382 May 20 23:08 ssh_host_rsa_key.pub
2. 执行以下命令,删除相关文件。
rm -rf ssh_host_*
Ubuntu 及 Debain 类操作系统,请执行以下命令,删除相关文件。
sudo rm -r /etc/ssh/ssh*key
3. 执行
ll 命令,确认文件是否成功删除。返回结果如下所示,则说明已成功删除。total 132-rw-------. 1 root root 125811 Nov 23 2013 moduli-rw-r--r--. 1 root root 2047 Nov 23 2013 ssh_config-rw------- 1 root root 3639 May 16 11:43 sshd_config
4. 执行以下命令,重启 SSH 服务,自动生成相关文件。
service sshd restart
Ubuntu 及 Debain 类操作系统,请执行以下命令,重启 SSH 服务。
sudo dpkg-reconfigure openssh-server
5. 执行
ll 命令,确认是否成功生成 ssh_host_* 文件。返回结果如下,则说明已成功生成。total156-rw-------.1root root125811Nov232013moduli -rw-r--r--.1root root2047Nov232013ssh_config -rw-------1root root3639May1611:43 sshd_config -rw-------1root root668May2023:16 ssh_host_dsa_key -rw-r--r--1root root590May2023:16 ssh_host_dsa_key.pub -rw-------1root root963May2023:16 ssh_host_key -rw-r--r--1root root627May2023:16 ssh_host_key.pub -rw-------1root root1671May2023:16 ssh_host_rsa_key -rw-r--r--1root root382May2023:16 ssh_host_rsa_key.pub
SSH 服务启动时报错 must be owned by root and not group or word-writable
现象描述
Linux 实例启动 SSH 服务时,返回 “must be owned by root and not group or word-writable” 错误信息。
问题原因
通常是由于 SSH 服务相关权限,或属组异常所致。基于安全性考虑,SSH 服务对相关目录或文件的权限配置及属组等均有一定要求。
解决思路
参考处理步骤中提供的处理项,检查并修改错误配置。
处理步骤
说明:
本步骤以 CentOS 7.6 操作系统环境为例,请您结合实际业务情况进行操作。
检查及修复 /var/empty/sshd 目录配置
2. 执行以下命令,查看
/var/empty/sshd 目录权限配置。 ll -d /var/empty/sshd/
以下内容为默认权限配置。
drwx--x--x. 2 root root 4096 Aug 9 2019 /var/empty/sshd/
3. 对比实际返回结果与默认权限配置,若不相同,则请依次执行以下命令,恢复默认配置。
说明:
/var/empty/sshd 目录权限默认为711,默认为 root 属组的 root 用户。chown -R root:root /var/empty/sshd
chmod -R 711 /var/empty/sshd
4. 执行以下命令,重启 SSH 服务。
systemctl restart sshd.service
检查及修复 /etc/securetty 文件配置
1. 执行如下命令,查看
/etc/securetty 文件权限配置。ll /etc/securetty
以下内容为默认权限配置。
-rw-------. 1 root root 255 Aug 5 2020 /etc/securetty
2. 对比实际返回结果与默认权限配置,若不相同,则请依次执行以下命令,恢复默认配置。
说明:
/etc/securetty 文件权限默认为600,默认为 root 属组的 root 用户。chown root:root /etc/securetty
chmod 600 /etc/securetty
3. 执行以下命令,重启 SSH 服务。
systemctl restart sshd.service
SSH 登录时报错 Host key verification failed
现象描述
使用 SSH 登录 Linux 实例时,无法正常登录,且出现以下报错信息:
@@@@@@@@@@@@@@@@@@@@@@@@@@@@@@@@@@@@@@@@@@@@@@@@@@@@@@@@@@@@ WARNING: REMOTE HOST IDENTIFICATION HAS CHANGED! @@@@@@@@@@@@@@@@@@@@@@@@@@@@@@@@@@@@@@@@@@@@@@@@@@@@@@@@@@@@IT IS POSSIBLE THAT SOMEONE IS DOING SOMETHING NASTY!Someone could be eavesdropping on you right now (man-in-the-middle attack)!It is also possible that the RSA host key has just been changed.The fingerprint for the RSA key sent by the remote host isae:6e:68:4c:97:a6:91:81:11:38:8d:64:ff:92:13:50.Please contact your system administrator.Add correct host key in /root/.ssh/known_hosts to get rid of this message.Offending key in /root/.ssh/known_hosts:70RSA host key for x.x.x.x has changed and you have requested strict checking.Host key verification failed.
若客户端为 Windows 操作系统,则通常 SSH 客户端在连接时出现以下报错信息:
X.X.X.X (端口:XX)的主机密钥与本地主机密钥数据库中保存的不一致。主机密钥已更改或有人试图监听此连接。若无法确定,建议取消此连接。
问题原因
Linux 实例重装系统操作后,账户信息等变更使 SSH 公钥变更,造成客户端保存的公钥指纹与服务器端不一致,导致 SSH 认证失败拒绝登录。
解决思路
对应客户端实际使用操作系统,参考处理步骤中提供的步骤进行操作。
处理步骤
Windows 客户端
说明:
本文 SSH 客户端以 PuTTY 为例,请您结合实际情况进行操作。
1. 启动 PuTTY。
2. 在登录页面,选择会话后单击 Delete 进行删除。如下图所示:
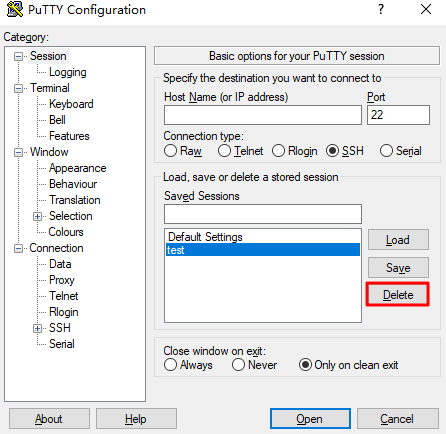
3. 参考 使用远程登录软件登录 Linux 实例,重新使用用户名及密码登录实例,确认保存新的公钥指纹后,即可成功登录。
Linux 客户端
说明:
本文 Linux 实例操作系统以 CentOS 6.5 为例,不同版本操作系统可能存在区别,请您结合实际情况操作。
2. 执行如下命令,进入对应账号的
known_hosts 文件。vi ~/.ssh/known_hosts
3. 按 i 进入编辑模式,删除 Linux 实例 IP 对应的条目。类似如下信息:
1.14.xxx.xxskowcenw96a/pxka32sa....dsaprgpck2wa22mvi332ueddw...
4. 按 Esc 输入 :wq 保存修改并退出。
5. 参考 使用 SSH 登录 Linux 实例,重新连接 Linux 实例,确认保存新的公钥指纹后,即可成功登录。
SSH 登录报错 pam_listfile(sshd:auth): Refused user root for service sshd
现象描述
使用 SSH 登录 Linux 实例时,即使输入正确密码,仍无法登录实例。该问题出现时,通过控制台或 SSH 两种登录方式可能均登录失败,或仅其中一种可登录成功。secure 日志出现类似如下错误信息:
sshd[1199]: pam_listfile(sshd:auth): Refused user root for service sshd
sshd[1199]: Failed password for root from 192.X.X.1 port 22 ssh2
sshd[1204]: Connection closed by 192.X.X.2
问题原因
pam 模块(pam_listfile.so)相关访问控制策略导致用户登录失败。
pam 模块介绍
pam(Pluggable Authentication Modules)是由 Sun 提出的一种认证机制。通过提供一些动态链接库和一套统一的 API,将系统提供的服务和该服务的认证方式分开。使系统管理员可以灵活地根据需求给不同的服务配置不同的认证方式,而无需更改服务程序,同时也便于向系统中添加新的认证手段。
每个启用了 pam 模块的应用程序,在
/etc/pam.d 目录中都有对应的同名配置文件。例如,login 命令的配置文件是 /etc/pam.d/login,可以在相应配置文件中配置具体的策略。解决思路
处理步骤
说明:
本文处理步骤以 CentOS 6.5 操作系统为例,不同操作系统版本有一定区别,请结合实际情况进行操作。
2. 使用
cat 命令,查看对应 pam 配置文件。说明如下:文件 | 功能说明 |
/etc/pam.d/login | 控制台(管理终端)对应配置文件 |
/etc/pam.d/sshd | SSH 登录对应配置文件 |
/etc/pam.d/system-auth | 系统全局配置文件 |
3. 查看是否存在类似如下配置。
auth required pam_listfile.soitem=usersense=allowfile=/etc/ssh/whitelistonerr=fail
说明如下:
item:设置访问控制的对象类型。可选值为 tty、user、rhost、ruser、group 和 shell。
sense:在配置文件中找到符合条件项目的控制方式。可选值为 allow 和 deny。allow 代表白名单方式,deny 代表黑名单方式。
file:用于指定配置文件的全路径名称。
onerr:定义出现错误时的缺省返回值。例如,无法打开配置文件的错误。
4. 使用 VIM 编辑器,删除策略配置,或在行首增加
# 进行注释。说明:
相关策略配置可一定程度提高服务器的安全性,请您集合实际情况进行修改,建议修改前进行备份。
# auth required pam_listfile.so item=user sense=allow file=/etc/ssh/whitelist onerr=fail
5. 使用 SSH 登录实例,详情请参见 使用 SSH 登录 Linux 实例。
SSH 登录时报错 requirement "uid >= 1000" not met by user "root"
现象描述
使用 SSH 登录 Linux 实例时,输入正确的用户及密码也无法登录成功。该问题出现时,通过控制台或 SSH 两种登录方式可能均登录失败,或仅其中一种可登录成功。secure 日志出现类似如下错误信息:
pam_succeed_if(sshd:auth): requirement "uid >= 1000" not met by user "root".
问题原因
pam 模块的策略配置禁止了 UID 小于1000的用户进行登录。
解决方案
处理步骤
说明:
本文处理步骤以 CentOS 6.5 操作系统为例,不同操作系统版本有一定区别,请结合实际情况进行操作。
2. 使用
cat 命令,查看对应 pam 配置文件。说明如下:文件 | 功能说明 |
/etc/pam.d/login | 控制台(管理终端)对应配置文件 |
/etc/pam.d/sshd | SSH 登录对应配置文件 |
/etc/pam.d/system-auth | 系统全局配置文件 |
3. 查看是否存在类似如下配置。
auth required pam_succeed_if.so uid >= 1000
4. 使用 VIM 编辑器,修改、删除策略配置或在行首增加
# 进行注释。请结合实际情况进行修改,建议修改前进行备份。auth required pam_succeed_if.so uid <= 1000 # 修改策略# auth required pam_succeed_if.so uid >= 1000 # 注释相关配置
5. 使用 SSH 登录实例,详情请参见 使用 SSH 登录 Linux 实例。
SSH 登录时报错 Maximum amount of failed attempts was reached
现象描述
使用 SSH 登录 Linux 实例时,出现 “Maximum amount of failed attempts was reached” 报错信息。
问题原因
连续多次输入错误密码,触发系统 pam 认证模块策略限制,导致用户被锁定。
解决方案
参考处理步骤提供的处理项,结合实际情况进行操作:
处理步骤
说明:
本文处理步骤以 CentOS 7.6 及 CentOS 6.5 操作系统为例,不同操作系统版本有一定区别,请结合实际情况进行操作。
root 用户未被锁定
1. 使用 root 用户登录实例,详情请参见 使用 VNC 登录 Linux 实例。
2. 执行以下命令,查看系统全局 pam 配置文件。
cat /etc/pam.d/system-auth
3. 执行以下命令,查看本地终端对应的 pam 配置文件。
cat /etc/pam.d/login
4. 执行以下命令,查看 SSH 服务对应的 pam 配置文件。
cat /etc/pam.d/sshd
5. 使用 VIM 编辑器编辑以上文件相关内容,修改、删除对应配置或在行首增加
# 注释配置。本文以注释配置为例,修改完成后,相关配置如下所示:#auth required pam_tally2.so deny=3 unlock_time=5#auth required pam_tally.so onerr=fail no_magic_root#auth requeired pam_tally2.so deny=5 lock_time=30 unlock_time=10 even_deny_root root_unlock_time=10
说明如下:
此处使用
pam_tally2 模块,如果不支持则可以使用 pam_tally 模块。不同的 pam 版本,设置可能有所不同,具体使用方法请参照相关模块的使用规则。pam_tally2 与 pam_tally 模块都可以用于账户锁定策略控制。两者的区别是前者增加了自动解锁时间的功能。even_deny_root 指限制 root 用户。deny 指设置普通用户和 root 用户连续错误登录的最大次数。超过最大次数,则锁定该用户。unlock_time 指设定普通用户锁定后,指定时间后解锁,单位为秒。root_unlock_time 指设定 root 用户锁定后,指定时间后解锁,单位为秒。6. 使用 SSH 登录实例,详情请参见 使用 SSH 登录 Linux 实例。
root 用户被锁定
1. 使用单用户模式登录实例,详情请参见 设置 Linux 云服务器进入单用户模式。
2. 在单用户模式下,依次执行以下命令,手动解锁 root 用户。
pam_tally2 -u root #查看root用户登录密码连续输入错误次数
pam_tally2 -u root -r #清除root用户密码连续输入错误次数
authconfig --disableldap --update #更新PAM安全认证记录
3. 重启实例。
4. 参考 root 用户未被锁定 步骤,在对应的 pam 配置文件进行注释、修改或更新即可。
5. 使用 SSH 登录实例,详情请参见 使用 SSH 登录 Linux 实例。
SSH 登录时报错 login: Module is unknown
现象描述
使用 SSH 登录 Linux 实例时,无法登录成功,且 secure 日志中出现类似如下报错信息:
login: Module is unknown.login: PAM unable to dlopen(/lib/security/pam_limits.so): /lib/security/pam_limits.so: cannot open shared object file: No such file or directory.
问题原因
每个启用了 pam 模块的应用程序,在
/etc/pam.d 目录中都有对应的同名配置文件。例如,login 命令的配置文件是 /etc/pam.d/login,可以在相应配置文件中配置具体的策略。如下表所示:文件 | 功能说明 |
/etc/pam.d/login | 控制台(管理终端)对应配置文件 |
/etc/pam.d/sshd | SSH 登录对应配置文件 |
/etc/pam.d/system-auth | 系统全局配置文件 |
远程连接登录时,某些启用了 pam 的应用程序加载模块失败,导致配置了相应策略的登录方式交互失败。
解决思路
处理步骤
说明:
2. 执行以下命令,查看 pam 配置文件。
cat [对应 pam 配置文件的绝对路径]
查看配置文件是否包含类似如下配置信息,该配置信息模块文件路径为
/lib/security/pam_limits.so。session required pam_limits.so
3. 执行以下命令,确认
/lib/security/pam_limits.so 路径是否错误。ll /lib/security/pam_limits.so
是,则使用 VIM 编辑器编辑 pam 配置文件,修复
pam_limits.so 模块路径。64位系统的 Linux 实例中,正确路径应该为 /lib64/security。 修改后配置信息应如下所示:session required /lib64/security/pam_limits.so
否,则请通过 提交工单 寻求帮助。
4. 使用 SSH 登录实例,详情请参见 使用 SSH 登录 Linux 实例。
病毒引起 SSH 服务运行异常报错 fatal: mm_request_send: write: Broken pipe
现象描述
病毒引发 SSH 服务运行异常,系统提示 “fatal: mm_request_send: write: Broken pipe” 报错信息。
问题原因
可能是由于 udev-fall 等病毒影响了 SSH 服务的正常运行所致。
解决思路
参考处理步骤中提供的处理项,结合实际情况处理病毒问题。
处理步骤
临时处理方法
本文以 udev-fall 病毒为例,您可通过下步骤,临时恢复 SSH 服务的正常运行。
2. 执行以下命令,查看 udev-fall 病毒进程信息,并记录该进程 ID。
ps aux | grep udev-fall
3. 执行以下命令,根据获取的 udev-fall 病毒进程 ID,结束 udev-fall 病毒进程。
kill -9 [病毒进程 ID]
4. 执行以下命令,取消 udev-fall 病毒程序的自动运行设置。
chkconfig udev-fall off
5. 执行以下命令,删除所有 udev-fall 病毒程序相关指令和启动配置。
for i in ` find / -name "udev-fall"`;do echo '' > $i && rm -rf $i;done
6. 执行以下命令,重启 SSH 服务。
systemctl restart sshd.service
可靠处理方法
注意:
快照回滚会导致快照创建后的数据丢失,请谨慎操作。
建议按快照创建时间从近到远的顺序逐一尝试回滚,直至 SSH 服务正常运行。若回滚后仍无法正常运行 SSH 服务,则说明该时间点的系统已经出现异常。
SSH 服务启动时报错 main process exited, code=exited
现象描述
在 Linux 实例中,使用 service 或 systemctl 命令启动 SSH 服务时,命令行没有返回报错信息,但服务没有正常运行。secure 日志中发现类似如下错误信息:
sshd.service: main process exited, code=exited, status=203/EXEC.init: ssh main process (1843) terminated with status 255.
问题原因
通常是 PATH 环境变量配置异常,或 SSH 软件包相关文件被移除导致。
解决方案
处理步骤
说明:
本文处理步骤以 CentOS 6.5 操作系统为例,不同操作系统版本有一定区别,请结合实际情况进行操作。
2. 执行以下命令,检查环境变量配置。
echo $PATH
3. 对比实际返回 PATH 环境变量与默认值。PATH 环境变量默认值:
/usr/local/sbin:/usr/local/bin:/sbin:/bin:/usr/sbin:/usr/bin:/root/bin
若实际返回 PATH 环境变量若与默认值不相同,则需执行以下命令,重置 PATH 环境变量。
export PATH=/usr/local/sbin:/usr/local/bin:/sbin:/bin:/usr/sbin:/usr/bin:/root/bin
4. 执行如下命令,查找并确认 sshd 程序路径。
find / -name sshd
返回结果如下,则说明 sshd 程序文件已存在。
/usr/sbin/sshd
若对应文件不存在,则请重新安装 SSH 软件包。
5. 执行以下命令,重启 SSH 服务。
servicesshd restart
SSH 登录时报错 pam_limits(sshd:session):could not sent limit for ‘nofile’
现象描述
使用 SSH 登录 Linux 实例后,返回如下错误信息:
-bash: fork: retry: Resource temporarily unavailable.pam_limits(sshd:session):could not sent limit for 'nofile':operaton not permitted.Permission denied.
问题原因
通常是由于当前 Shell 进程或文件开启的数量,超出服务器 Ulimit 系统环境限制导致。
解决思路
处理步骤
说明:
CentOS 6系统版本及之后发行版本中,增加了
X-nproc.conf 文件管理 Ulimit 系统环境限制,操作步骤以 CentOS 6进行区分。X-nproc.conf 文件在不同系统版本中前缀数字不同,在 CentOS 6中为 90-nproc.conf,在 CentOS 7中为 20-nproc.conf,请以实际情况环境为准。本文以 CentOS 7.6 及 CentOS 5 操作系统环境为例,请您结合实际业务情况进行操作。
CentOS 6之前版本
2. 执行以下命令,查看系统当前 Ulimit 系统资源限制信息。
cat/etc/security/limits.conf
说明如下:
<domain>:需要限制的系统用户,可以用 * 代替所有用户。
<type>:soft、hard 和 - 三种参数。
soft 指当前系统已经生效的 <value> 值。
hard 指系统中设定的最大 <value> 值。
soft 的限制不能比 hard 限制高,- 表示同时设置 soft 和 hard 的值。
<item>:需要限制的使用资源类型。
core 指限制内核文件的大小。
rss 指最大持久设置大小。
nofile 指打开文件的最大数目。
noproc 指进程的最大数目。
3. 默认未设置系统资源限制,请根据实际情况进行判断,如果系统开启并配置系统资源限制,则需通过编辑
limits.conf 文件,选择注释、修改或删除 noproc 或 nofile 参数限制的资源类型代码操作。
修改前建议执行以下命令,备份 limits.conf 文件。cp -af /etc/security/limits.conf /root/limits.conf_bak
4. 修改完成后,重启实例即可。
CentOS 6之后版本
2. 执行以下命令,查看系统当前 Ulimit 系统资源限制信息。
cat/etc/security/limits.d/20-nproc.conf
返回结果如下图所示,表示已开启系统资源限制,并允许 root 用户以外的所有用户最大连接进程数为4096。
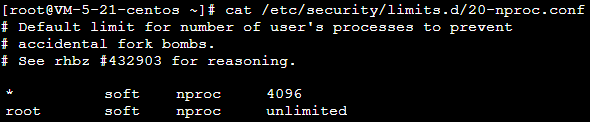
3. 参考 CentOS 6之前版本 版本步骤,修改
/etc/security/limits.d/20-nproc.conf 文件,建议修改前进行文件备份。4. 修改完成后,重启实例即可。
SSH 登录报错 pam_unix(sshdsession) session closed for user
现象描述
使用 SSH 登录 Linux 实例时,输入正确的用户及密码无法登录成功。直接返回或在 secure 日志出现类似如下错误信息:
This account is currently not available.
Connection to 127.0.0.1 closed.
Received disconnect from 127.0.0.1: 11: disconnected by user.
pam_unix(sshd:session): session closed for user test.
问题原因
通常由于对应用户的默认 Shell 被修改导致。
解决思路
处理步骤
2. 执行以下命令,查看 test 用户的默认 Shell。
cat /etc/passwd | grep test
系统返回类似如下信息,表示 test 用户的 Shell 被修改成 nologin。
test:x:1000:1000::/home/test:/sbin/nologin
3. 执行以下命令,使用 VIM 编辑器编辑
/etc/passwd 文件。建议在修改前进行文件备份。vim /etc/passwd
4. 按 i 进入编辑模式,将
/sbin/nologin 修改为 /bin/bash。 5. 按 Esc 输入 :wq,保存编辑并退出。
6. 使用 SSH 登录实例,详情请参见 使用 SSH 登录 Linux 实例。
文档反馈