Creating a Custom Image
Download
Focus Mode
Font Size
Overview
Besides public images, you can also create custom images, with which you can create CVM instances with the same configurations.
Note:
Images use the CBS snapshot service for data storage:
Upon the creation of a custom image, a snapshot is automatically created and associated with the image. As a result, retaining custom images incurs costs. For more information, please see Billing Overview.
Note
Each region currently supports up to 500 custom images. Under normal circumstances, the capacity of a created custom image is set to match the disk size of the instance.
When the Linux instance has a data disk attached, and you only create an image on the system disk, make sure
/etc/fstab does not include data disk configuration. Otherwise, instances created with this image cannot be started normally.The creation process takes ten minutes or longer, which depends on the data size of the instance. Please prepare in advance to avoid business impacts.
If your Windows instance needs to join a domain and use a domain account, run Sysprep before creating a custom image to ensure a unique SID after the instance joins the domain. For details, see Using Sysprep to Ensure a Unique SID After a CVM Joins a Domain.
If you are using a bare metal server with a 25Gbps NIC (that is, the private network bandwidth of the model is -25Gbps), creating custom images via the console or API is currently not supported.
Directions
Shut down an instance (optional)
1. Log in to the CVM console and check whether the corresponding instance needs to be shut down.
Note:
For CVMs created based on public images after July 2018, you can create images without shutting down the instance. For other CVMs, shut down the instance before creating a custom image to ensure that the image has the same environment deployment as the current instance.
If the instance needs to be shut down, proceed to the next step.
If the instance doesn’t need to be shut down, please proceed to Create a custom image.
2. On the instance management page, proceed according to the actually used view mode:
List View: In the row of the target instance, choose More > Instance Status > Shut Down. The operation is shown in the following figure:

Tab View: On the instance details page, click Shut Down. The operation is shown in the following figure:

Create a custom image
1. On the instance management page, proceed according to the actually used view mode:
List View: Choose More > Image/Operating System > Create Custom Image. The operation is shown in the following figure:

Tab View: In the upper-right corner, choose More Actions > Image/Operating System > Create Custom Image. The operation is shown in the following figure:

2. In the pop-up Create Custom Image window, see the following information to configure:
Image name and Image description: Custom name and description.
Tag: You can add tags for the instance as needed, which are used to categorize, search for, and aggregate cloud resources. For more information, see Overview.
Note:
3. Click Create Image.
Use the custom image to create an instance (optional)
After the image is created, select the image you created in the image list and click Create Instance on the right side of the row where it is located. Then you can purchase a server with the same image as before, as shown in the figure below:

Creating Custom Image
1. Log in to the CVM console and check whether the corresponding instance needs to be shut down.
Note:
For CVMs created after July 2018, you can create images without shutting down the instance. For other CVMs, shut down the instance before creating a custom image to ensure that the image has the same environment deployment as the current instance.
If it is necessary, shut down the instance.
If it is not necessary, continue with the following steps.
2. Click Images in the left sidebar to go to the Images page, and then select Create Custom Image above the list.

3. In the pop-up Create Custom Image window, see the following information to configure:
Select Instance: Select the instance in this region for which you want to create a custom image.
Image name and Image description: Custom name and description.
Tag: You can add tags for the instance as needed, which are used to categorize, search for, and aggregate cloud resources. For more information, see Overview.
If your instance has data disks, a full machine image that includes both the system disk and data disks is created by default. You can specify to create only a system disk image.
4. Click Create Image.
After that, you can view the image creation progress on the Images page.
Use the custom image to create an instance (optional)
After the image is created, select the image you created in the image list and click Create Instance on the right side of the row where it is located. Then you can purchase a server with the same image as before, as shown in the figure below:

Background Information
Packer is an open-source, lightweight tool for automating image builds. You can use configuration files in JSON format or HCL2 (HashiCorp Configuration Language) to define the image build process, enabling fast and reliable image building and deployment. Packer also facilitates testing and updating images, reducing the time cost of Ops and image management. For more information, see the Packer official website.
Prerequisites
The sub-user has been created and granted all permissions for CVM and TencentCloud API.
To create a sub-user, see Create Sub-user.
To grant permissions to a sub-user, see Sub-user Permission Settings. This document grants the
QcloudCVMFullAccess, QcloudCVMFinanceAccess, and QcloudAPIFullAccess preset policies to the sub-user.Create a SecretId and SecretKey for the sub-user. For the specific steps, see Sub-account Access Key Management. Record and securely store them.
Note:
You can use the SecretId and SecretKey of a root account. However, because a root account has full control over its resources, to avoid the security risks associated with access key leakage, it is not recommended that you use a root account. Please create a sub-account.
Operation Steps
Installing Packer
1. Run the following command to obtain the Packer installation package.
wget https://releases.hashicorp.com/packer/1.9.4/packer_1.9.4_linux_amd64.zip
2. Run the following command to extract the Packer installation package.
unzip packer_1.9.4_linux_amd64.zip
3. Run the following command to install Packer to the environment variable directory
/usr/local/bin.sudo mv packer /usr/local/bin
4. Run the following command to check the Packer version and verify whether the installation was successful.
packer -v
Note:
Defining a Packer Template
To create a custom image using Packer, first define a template file in HCL or JSON format. Then, in this file, specify the Builders and Provisioners for creating the custom image, as well as the temporary instance information used during the creation process.
1. Run the following command to create a template file.
vim tencentcloud.pkr.hcl
vim tencentcloud.json
2. Press
i to enter file editing mode. Then, edit the custom image generator configurator and the instance information based on your actual situation.variable "secret_id" {type = stringdefault = env("TENCENTCLOUD_SECRET_ID")}variable "secret_key" {type = stringdefault = env("TENCENTCLOUD_SECRET_KEY")}source "tencentcloud-cvm" "basic" {secret_id = var.secret_idsecret_key = var.secret_keyregion = "ap-guangzhou"zone = "ap-guangzhou-6"instance_type = "SA3.MEDIUM2"disk_type = "CLOUD_PREMIUM"source_image_id = "img-9xqekomx"image_name = "packer-basic"ssh_username = "root"associate_public_ip_address = truerun_tags = {"packer" = "packer-test"}}build {sources = ["source.tencentcloud-cvm.basic"]provisioner "shell" {inline = ["sleep 30", "yum install redis.x86_64 -y"]}}
{"variables": {"secret_id": "{{env `TENCENTCLOUD_SECRET_ID`}}","secret_key": "{{env `TENCENTCLOUD_SECRET_KEY`}}"},"builders": [{"type": "tencentcloud-cvm","secret_id": "{{user `secret_id`}}","secret_key": "{{user `secret_key`}}","region":"ap-guangzhou","zone": "ap-guangzhou-6","instance_type": "SA3.MEDIUM2","disk_type": "CLOUD_PREMIUM","source_image_id": "img-9xqekomx","image_name": "packer-basic","ssh_username": "root","associate_public_ip_address": true,"run_tags": {"packer": "packer-test"}}],"provisioners": [{"type": "shell","inline": ["sleep 30", "yum install redis.x86_64 -y"]}]}
The descriptions of the custom parameters are shown in the following table:
Parameter | Required or Not | Description |
secret_id | Yes | It is recommended to set the secret_id to the TENCENTCLOUD_SECRET_ID environment variable. |
secret_key | Yes | It is recommended to set the secret_key to the TENCENTCLOUD_SECRET_KEY environment variable. |
region | Yes | Region. The region where the temporary CVM is created, and the region where the image is created. Example value: ap-guangzhou |
zone | Yes | AZ. The AZ where the temporary CVM is created. Example value: ap-guangzhou-6 |
instance_type | Yes | Instance type. Different instance types specify different resource specifications. Example value: SA3.MEDIUM2 |
source_image_id | Yes | The base image ID, which is used to create a temporary CVM image, can be obtained from the public image list or queried through the DescribeImages API. Example value: img-9xqekomx |
image_name | Yes | Specify the name of the custom image. It consists of letters, numbers, and -, and cannot exceed 60 characters. Example value: packer-basic |
image_description | No | Image description. It cannot exceed 60 characters. |
associate_public_ip_address | No | Whether to enable a public IP address for the temporary CVM. The default value is false. If you connect via a public IP address, set the value to true. |
force_poweroff | No | Whether to force shut down the temporary CVM to create an image when the process of shutting down the temporary CVM to create an image fails. The default value is false. |
sysprep | No | Whether to enable Sysprep during Windows image creation. Example value: false |
image_copy_regions | No | The region to which the image will be copied after creation. Example value: ["ap-beijing"] |
image_share_accounts | No | The accounts to which the image will be shared after creation. Example value: ["10002297xxxx"] |
skip_region_validation | No | Region is not checked during validation. Example value: false |
internet_max_bandwidth_out | No | The maximum bandwidth for startup (in Mbps). The value can be set between 1 and 100. |
instance_name | No | Instance name. |
disk_type | No | |
disk_size | No | System disk size. Value range (in GB): LOCAL_BASIC: 50 Other: 50 to 1000 (>50 requires an allowlist) |
data_disks | No | |
vpc_id | No | The vpc_id required for creating the temporary CVM. |
vpc_name | No | The name of the vpc created before creating the CVM. If the name is not specified, a default value such as packer-**** is assigned. |
cidr_block | No | If vpc_id is not set, specify the CIDR block for the VPC to be created. Example value: false |
subnet_id | No | The subnet_id required for creating the temporary CVM. |
subnet_name | No | The name of the Subnet created before the CVM is created. If the name is not specified, a default value such as packer-**** is assigned. |
subnet_cidr_block | No | If subnet_id is not set, specify the CIDR block for the Subnet to be created. Example value: false |
security_group_id | No | The security group ID required for creating the temporary CVM. |
security_group_name | No | The name of the security group, required when a security group is created if security_group_id is not set. |
user_data | No | User data. |
user_data_file | No | User data file. |
host_name | No | Host name. |
run_tags | No | Tags, used to specify instance tags when the temporary CVM is created, and are not used for creating images. |
Data Disk Details
:Parameter | Required or Not | Description |
disk_type | Yes | The type of data disk. Valid options: CLOUD_BASIC, CLOUD_PREMIUM, and CLOUD_SSD. |
disk_size | Yes | The size of the data disk. |
disk_snapshot_id | Yes | The ID of the data disk snapshot. |
3. Press the Esc key, type wq , and then press Enter to save and exit.
Creating Custom Image
1. Configure the environment variables SecretId and SecretKey.
export TENCENTCLOUD_SECRET_ID=xxxxexport TENCENTCLOUD_SECRET_KEY=xxxx
2. Run the following command to start creating a custom image.
packer build tencentcloud.pkr.hcl
packer build tencentcloud.json
Note:
This operation creates billable resources. Please ensure to release and clean them up. Examples include CVM instances, public IP addresses, and images. Except for images, other resources are automatically cleaned up under normal circumstances.
View the following running result:
tencentcloud-cvm.basic: output will be in this color.==> tencentcloud-cvm.basic: Trying to check image name: packer-basic...tencentcloud-cvm.basic: Image name: useable==> tencentcloud-cvm.basic: Trying to check source image: img-9xqekomx...tencentcloud-cvm.basic: Image found: CentOS Stream 9 64bit==> tencentcloud-cvm.basic: Trying to create a new keypair: packer_656c7***...tencentcloud-cvm.basic: Keypair created: skey-2ekzd***==> tencentcloud-cvm.basic: Trying to create a new vpc...tencentcloud-cvm.basic: Vpc created: vpc-bm797***==> tencentcloud-cvm.basic: Trying to create a new subnet...tencentcloud-cvm.basic: Subnet created: subnet-74c4j***==> tencentcloud-cvm.basic: Trying to create a new securitygroup...tencentcloud-cvm.basic: Securitygroup created: sg-7kf8z***==> tencentcloud-cvm.basic: Trying to create securitygroup polices...tencentcloud-cvm.basic: Securitygroup polices created==> tencentcloud-cvm.basic: Trying to create a new instance...tencentcloud-cvm.basic: Waiting for instance readytencentcloud-cvm.basic: Instance created: ins-n6dp2***==> tencentcloud-cvm.basic: Using SSH communicator to connect: 1.14.***.***==> tencentcloud-cvm.basic: Waiting for SSH to become available...==> tencentcloud-cvm.basic: Connected to SSH!==> tencentcloud-cvm.basic: Provisioning with shell script: /var/folders/0_/xl3kk_6n79vbnpgj97******0000gn/T/packer-shell1288510462tencentcloud-cvm.basic: CentOS Stream 9 - AppStream 42 MB/s | 18 MB 00:00tencentcloud-cvm.basic: CentOS Stream 9 - BaseOS 31 MB/s | 7.9 MB 00:00tencentcloud-cvm.basic: Last metadata expiration check: 0:00:01 ago on Sun 03 Dec 2023 09:18:14 PM CST.tencentcloud-cvm.basic: Dependencies resolved.tencentcloud-cvm.basic: ================================================================================tencentcloud-cvm.basic: Package Architecture Version Repository Sizetencentcloud-cvm.basic: ================================================================================tencentcloud-cvm.basic: Installing:tencentcloud-cvm.basic: redis x86_64 6.2.7-1.el9 appstream 1.3 Mtencentcloud-cvm.basic:tencentcloud-cvm.basic: Transaction Summarytencentcloud-cvm.basic: ================================================================================tencentcloud-cvm.basic: Install 1 Packagetencentcloud-cvm.basic:tencentcloud-cvm.basic: Total download size: 1.3 Mtencentcloud-cvm.basic: Installed size: 4.7 Mtencentcloud-cvm.basic: Downloading Packages:tencentcloud-cvm.basic: redis-6.2.7-1.el9.x86_64.rpm 6.5 MB/s | 1.3 MB 00:00tencentcloud-cvm.basic: --------------------------------------------------------------------------------tencentcloud-cvm.basic: Total 6.5 MB/s | 1.3 MB 00:00tencentcloud-cvm.basic: Running transaction checktencentcloud-cvm.basic: Transaction check succeeded.tencentcloud-cvm.basic: Running transaction testtencentcloud-cvm.basic: Transaction test succeeded.tencentcloud-cvm.basic: Running transactiontencentcloud-cvm.basic: Preparing : 1/1tencentcloud-cvm.basic: Running scriptlet: redis-6.2.7-1.el9.x86_64 1/1tencentcloud-cvm.basic: Installing : redis-6.2.7-1.el9.x86_64 1/1tencentcloud-cvm.basic: Running scriptlet: redis-6.2.7-1.el9.x86_64 1/1tencentcloud-cvm.basic: Verifying : redis-6.2.7-1.el9.x86_64 1/1tencentcloud-cvm.basic:tencentcloud-cvm.basic: Installed:tencentcloud-cvm.basic: redis-6.2.7-1.el9.x86_64tencentcloud-cvm.basic:tencentcloud-cvm.basic: Complete!==> tencentcloud-cvm.basic: Trying to detach keypair: skey-2ekzdz0x...tencentcloud-cvm.basic: Waiting for keypair detachedtencentcloud-cvm.basic: Keypair detached==> tencentcloud-cvm.basic: Trying to create a new image: packer-basic...tencentcloud-cvm.basic: Waiting for image readytencentcloud-cvm.basic: Image created: img-pubkd***==> tencentcloud-cvm.basic: Cleaning up instance...==> tencentcloud-cvm.basic: Cleaning up securitygroup...==> tencentcloud-cvm.basic: Cleaning up subnet...==> tencentcloud-cvm.basic: Cleaning up vpc...==> tencentcloud-cvm.basic: Cleaning up keypair...Build 'tencentcloud-cvm.basic' finished after 3 minutes 38 seconds.==> Wait completed after 3 minutes 38 seconds==> Builds finished. The artifacts of successful builds are:--> tencentcloud-cvm.basic: Tencentcloud images(ap-guangzhou: img-pubkd***) were created.
3. View the created custom images.
3.1 Log in to the Cloud Virtual Machine (CVM) console.
3.2 In the left sidebar, click Images to go to the Image Management page.
3.3 Click the region in the upper-left corner to view the custom images for that region in the drop-down list.

Scenarios
This section describes how to create a custom image on a Windows client by using the Packer tool via WinRM connection. Packer is an automated image building tool released by HashiCorp, which helps you create custom CVM images quickly and consistently.
Note:
Windows relies on WinRM to establish network connections and issue commands. Because WinRM is not fully enabled by default in Windows public images, you need to enable WinRM via UserData. The business code that was originally placed in UserData when the RunInstances API is called should be executed in the provisioners section instead.
When Packer creates a machine and packages an image, it does not wait for the UserData code to finish executing before proceeding to the provisioners module. Additionally, Packer heavily relies on WinRM on Windows systems, but WinRM is not fully enabled in sysprep public images.
Starting from version 1.9.0, Packer separates the Plugin from its main program. You must install the Plugin separately; otherwise, the
builder unknown error will be reported. In contrast, Packer versions prior to 1.9.0 (for example, version 1.8.7) include the Plugin by default.Prerequisites
The sub-user has been created and granted all permissions for CVM and TencentCloud API.
To create a sub-user, see Create Sub-user.
To grant permissions to a sub-user, see Sub-user Permission Settings. In this section, the
QcloudCVMFullAccess, QcloudCVMFinanceAccess, and QcloudAPIFullAccess preset policies are granted to the sub-user.The SecretId and SecretKey have been created for the sub-user. For the specific steps, see Sub-account Access Key Management. Record and securely store them.
Note:
You can use the SecretId and SecretKey of a root account. However, because a root account has full control over its resources, to avoid the security risks associated with access key leakage, it is not recommended that you use a root account. Please create a sub-account.
Ensure network connectivity between the client (the host executing the
packer.exe command) and the Packer builder machine. It is recommended to configure a public network assignment ("associate_public_ip_address": true) in config.json, or ensure the client is another CVM within the same VPC as specified in config.json, to guarantee private network interconnection.Operation Steps
Step 1: Install Packer
1. Download Packer.
2. Extract the Packer installation package. Using version 1.14.1 as an example, the extracted files contain
packer.exe. Using the CMD command line, go to the extraction directory and run the following command to complete the Packer environment initialization.packer.exe plugins install github.com/hashicorp/tencentcloud
Note:
Packer environment initialization requires obtaining the Packer Plugin from GitHub. Access to GitHub from instances in the Chinese mainland is slow, so please wait patiently. If you encounter an error, retry or use a host in another country or region.
Step 2: Define a Packer Template
To create a custom image using Packer, first define a template file in JSON or HCL format. In the template file, you need to specify the Builders and Provisioners for creating the custom image, as well as the temporary instance information used during the creation process.
The complete content of the Tencent Cloud Windows Packer configuration file config.json is as follows:
{"builders": [{"type": "tencentcloud-cvm","secret_id": "Your secret_id","secret_key": "Your secret_key","region": "ap-shanghai","zone": "ap-shanghai-5","instance_type": "S5.MEDIUM4","source_image_id": "img-m07ny34j","disk_size": 40,"disk_type": "CLOUD_PREMIUM","vpc_id": "vpc-9yabaw4m","subnet_id": "subnet-ih08bvf9","communicator": "winrm","winrm_port": 5985,"winrm_username": "Administrator","winrm_password": "A complex password consisting of uppercase letters, lowercase letters, and numbers","image_name": "test_Packer1","security_group_id": "sg-c65mz0li","packer_debug": true,"associate_public_ip_address": true,"run_tags": {"good": "luck"},"user_data_file": "winrm_enable_userdata.ps1"}],"provisioners": [{"type": "powershell","inline": ["mkdir C:\\\\test -force;wget http://windows-1251783334.cos.ap-shanghai.myqcloud.com/installChrome.ps1 -Outfile c:\\\\test\\\\packer.ps1;Start-Process powershell.exe -ArgumentList '-NoProfile -File c:\\\\test\\\\packer.ps1' -Wait;"]}]}
You need to modify the custom image generator configurator and the instance information based on your actual situation. The descriptions of each parameter are as follows:
Parameter | Required | Description |
secret_id | Yes | It is recommended to set the TENCENTCLOUD_SECRET_ID environment variable. |
secret_key | Yes | It is recommended to set the TENCENTCLOUD_SECRET_KEY environment variable. |
region | Yes | Region. The region where the temporary CVM is created, and the region where the image is created. Example value: ap-guangzhou |
zone | Yes | AZ. The AZ where the temporary CVM is created. Example value: ap-guangzhou-4 |
instance_type | Yes | Instance type. Different instance types specify different resource specifications. Example value: S5.MEDIUM4 |
source_image_id | Yes | The base image ID, which is used to create a temporary CVM image, can be obtained from the public image list or queried through the DescribeImages API. Example value: img-m07ny34j |
image_name | Yes | The name of the custom image. It consists of letters, numbers, and -, and cannot exceed 60 characters.Example value: test_Packer1. |
communicator | Yes | Specifies the method for Packer to connect to the target machine. It is fixed to winrm and establishes communication with the machine via WinRM. |
winrm_port | Yes | The port number for WinRM connections, which is fixed to 5985. |
winrm_username | Yes | |
winrm_password | Yes | |
associate_public_ip_address | No | Whether to enable a public IP address for the temporary CVM. The default value is false. If you connect via a public IP address, set the value to true. |
disk_type | No | |
disk_size | No | The system disk size, measured in GB. For example, for 40GB, enter 40. |
vpc_id | No | The VPC ID required for creating the temporary CVM. |
subnet_id | No | The subnet ID required for creating the temporary CVM. |
security_group_id | No | The security group ID required for creating the temporary CVM. |
user_data_file | No | The path to the user data file. |
inline | No | The necessary business logic before the image is created. For example, automatically install the Chrome browser when a public network connection is available. |
Step 3: Create a Custom Image
1. Place
config.json and winrm_enable_userdata.ps1 in the same directory as the Packer main program packer.exe.2. After switching to the corresponding directory, run the following command:
packer.exe build config.json
Note:
During the execution of
packer.exe, you can view the created builder machine in the CVM console. Do not operate this server. Regardless of whether the image creation succeeds or fails, this server will be automatically reclaimed in the end. If a reclamation exception occurs, contact Online Customer Service for assistance.3. After the command execution is complete, if the output contains information similar to the following, it indicates that the image creation was successful:
==> tencentcloud-cvm: Waiting for image creating...==> tencentcloud-cvm: Image ID: img-xxxxxxBuild 'tencentcloud-cvm' finished after ...
FAQs
Some builds didn't complete successfully and had errors: tencentcloud-cvm: Image name xxxx exists
After successfully creating an image using
config.json, you need to update the image_name value when reusing it.Waiting for WinRM become available...
Ensure that the password in
config.json for winrm_password matches the password in winrm_enable_userdata.ps1. The password configuration location in winrm_enable_userdata.ps1 is as follows: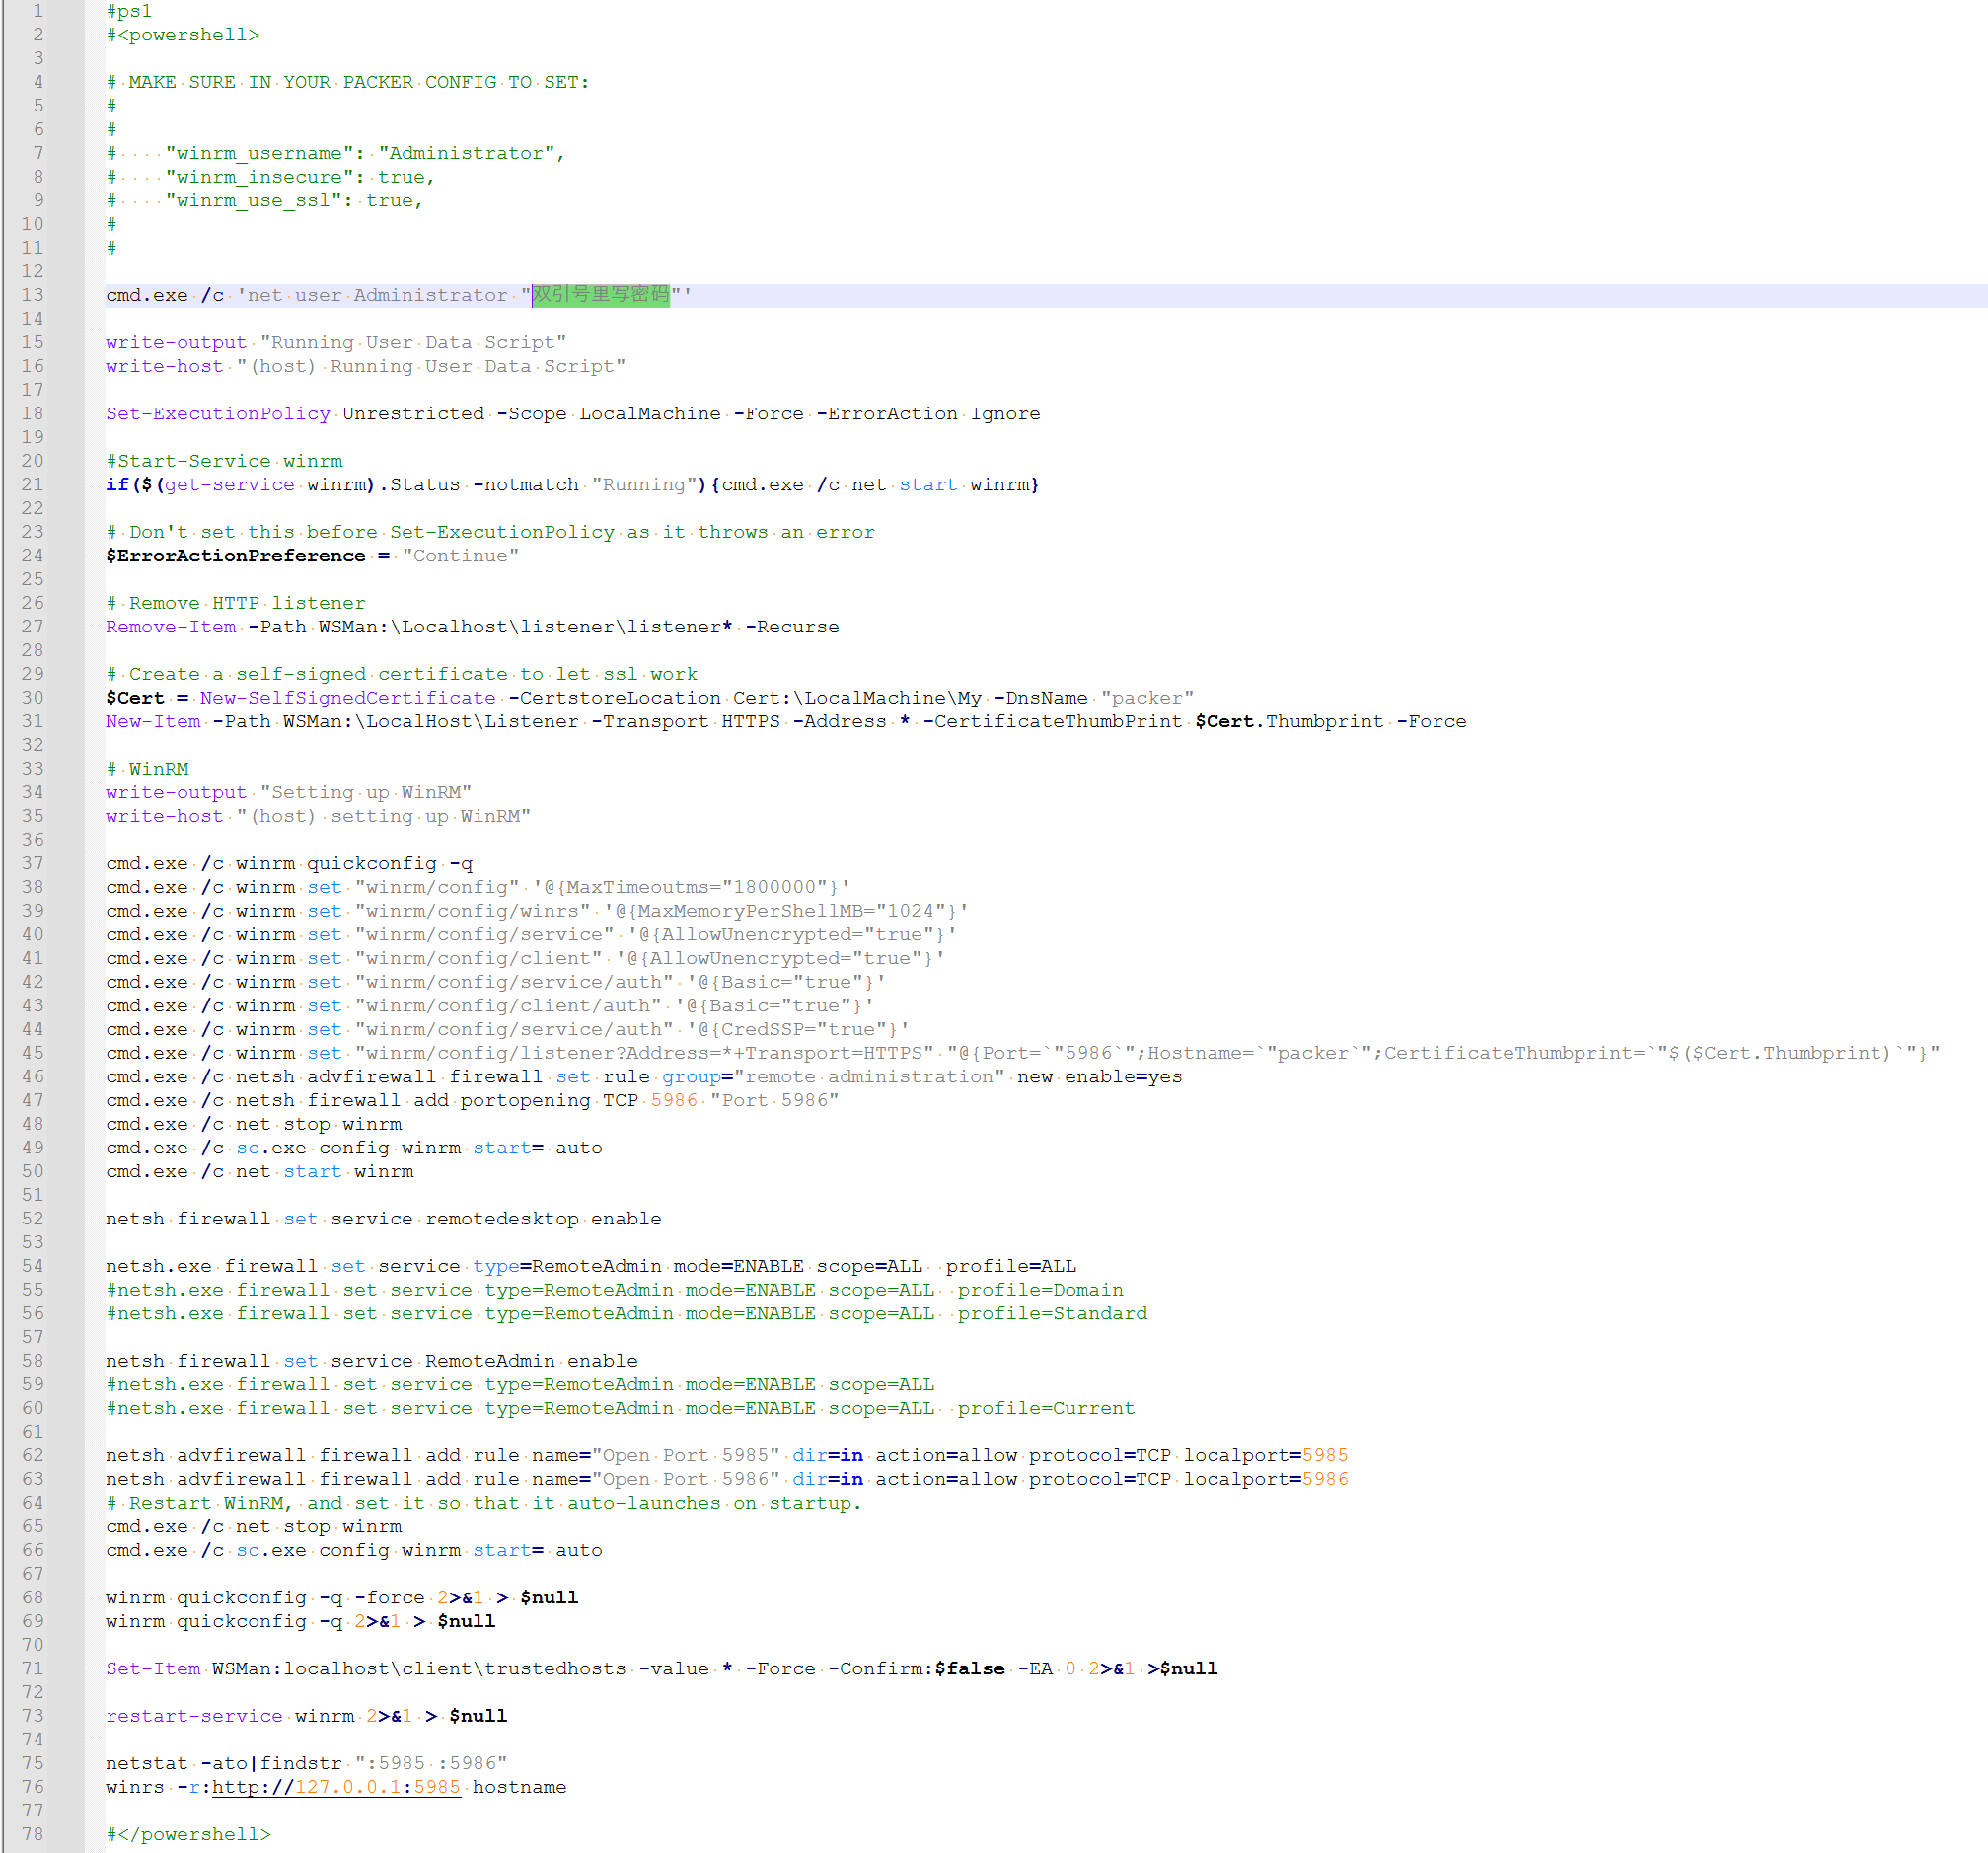
Script exited with non-zero exit status: 16001.
Packer may be unable to access the network due to the network security measures of security software, resulting in a packaging timeout. It is recommended that clients use a CVM in an isolated network whenever possible.
Related Operations
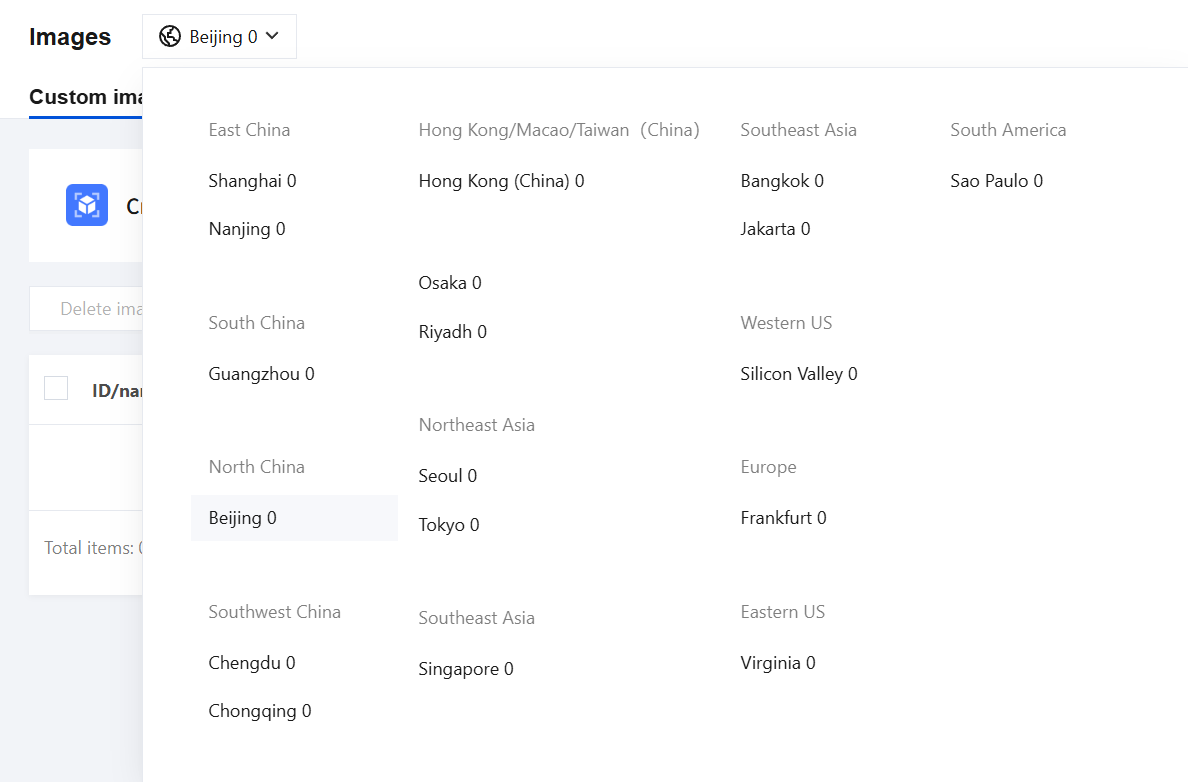
Viewing the Number of Custom Images in Each Region
In scenarios with numerous image resources or cross-region deployments, one-click querying of image counts across regions helps you manage image resources more efficiently.
1. Log in to the Cloud Virtual Machine (CVM) console.
2. In the left sidebar, click Images to go to the Image Management page.
3. Click the region in the upper-left corner to view the number of custom images for each region in the drop-down list.
4. Switch to the Shared Image Management page, click the region in the upper-left corner, and then view the number of shared images for each region in the drop-down list.
Migrating the data on a data disk
If you need to retain the data on the original instance's data disk when launching a new instance, you can first create a snapshot of the data disk and then use that data disk snapshot to create a new CBS data disk when launching the new instance.
Help and Support
Was this page helpful?
You can also Contact sales or Submit a Ticket for help.
Help us improve! Rate your documentation experience in 5 mins.
Feedback