搭建 Docker
下载
聚焦模式
字号
操作场景
本文档介绍如何在腾讯云云服务器上搭建和使用 Docker。本文适用于熟悉 Linux 操作系统,刚开始使用腾讯云云服务器的开发者。如需了解更多关于 Docker 相关信息,请参见 Docker 官方文档。
说明:
示例操作系统
本文使用云服务器实例操作系统以 CentOS 8.2 为例。
若您使用了 TencentOS Server 操作系统,则需对应实际版本进行操作:
TencentOS Server 2.4:镜像已预置 Docker,无需再次安装,可参考 使用 Docker 直接开始使用。
TencentOS Server 3.1 (TK4):请参考文档步骤进行搭建。
前提条件
已购买 Linux 云服务器。
说明:
搭建 Docker 必须使用64位系统,且内核版本至少为3.10。
操作步骤
安装 Docker
请根据操作系统的版本,按照以下步骤进行操作:
CentOS 8.2
2. 执行以下命令,添加 Docker 软件源。
dnf config-manager --add-repo=http://mirrors.tencent.com/docker-ce/linux/centos/docker-ce.repo
3. 执行以下命令,查看已添加的 Docker 软件源。
dnf list docker-ce
4. 执行以下命令,安装 Docker。
dnf install -y docker-ce --nobest
5. 执行以下命令,运行 Docker。
systemctl start docker
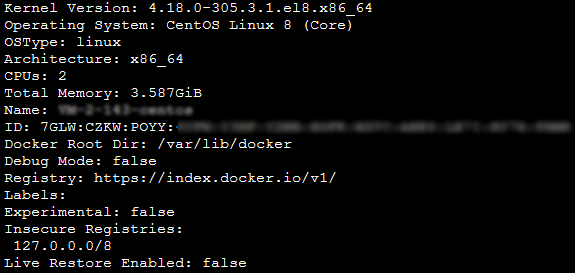
6. 执行以下命令,检查安装结果。
docker info
返回如下信息,即表示安装成功。
使用 Docker
Docker 的基本使用命令如下:
管理 Docker 守护进程。
运行 Docker 守护进程:
systemctl start docker
停止 Docker 守护进程:
systemctl stop docker
重启 Docker 守护进程:
systemctl restart docker
管理镜像。本文以 Docker Hub 的 Nginx 镜像为例。
docker pull nginx
修改标签:您可以修改镜像标签以便记忆区分。
docker tag docker.io/nginx:latest tencentyun/nginx:v1
查看已有镜像:
docker images
强制删除镜像:
docker rmi -f tencentyun/nginx:v1
管理容器。
进入容器:
docker run -it ImageId /bin/bash
其中,
ImageId 可通过执行 docker images 命令获取。退出容器:执行
exit 命令,退出当前容器。进入后台运行的容器:
docker exec -it 容器 ID /bin/bash
将容器做成镜像:
docker commit <容器 ID 或容器名> [<仓库名>[:<标签>]]
例如:
docker commit 1c23456cd7**** tencentyun/nginx:v2
制作镜像
1. 执行以下命令,打开 Dockerfile 文件。
vim Dockerfile
2. 按 i 切换至编辑模式,添加如下内容。
FROM tencentyun/nginx:v2 #声明基础镜像来源。MAINTAINER DTSTACK #声明镜像拥有者。RUN mkdir /dtstact # RUN 后面接容器运行前需要执行的命令,由于 Dockerfile 文件不能超过127行,因此当命令较多时建议写到脚本中执行。ENTRYPOINT ping https://cloud.tencent.com/ #开机启动命令,此处最后一个命令需要是可在前台持续执行的命令,否则容器后台运行时会因为命令执行完而退出。
3. 按 Esc,输入 :wq,保存文件并返回。
4. 执行以下命令,构建镜像。
docker build -t nginxos:v1 . #.是 Dockerfile 文件的路径,不能忽略。
5. 执行以下命令,查看镜像是否创建成功。
docker images
6. 依次执行以下命令,运行容器并查看容器。
docker run -d nginxos:v1 #后台运行容器。docker ps #查看当前运行中的容器。docker ps -a #查看所有容器,包括未运行中的。docker logs CONTAINER ID/IMAGE #如未查看到刚才运行的容器,则用容器 ID 或者名字查看启动日志排错。
7. 依次执行以下命令,制作镜像。
docker commit fb2844b6**** nginxweb:v2 #commit 参数后添加容器 ID 和构建新镜像的名称和版本号。docker images #列出本地(已下载的和本地创建的)镜像。
8. 执行以下命令,将镜像推送至远程仓库。
默认推送到 Docker Hub。您需要先登录 Docker,为镜像绑定标签,将镜像命名为
Docker 用户名/镜像名:标签的格式,最终完成推送。docker login #执行后输入镜像仓库用户名及密码docker tag [镜像名]:[标签] [用户名]:[标签]docker push [用户名]:[标签]
推送完成后,即可使用浏览器登录 Docker Hub 官网进行查看。
文档反馈