DPDK를 사용한 테스트
다운로드
포커스 모드
폰트 크기
작업 시나리오
본문은 DPDK 방법을 사용하여 높은 처리량의 CVM 네트워크 성능을 테스트하는 방법을 설명합니다.
작업 단계
DPDK 컴파일 및 설치
1. 테스트 서버 2대를 준비합니다. Linux CVM 커스텀 설정을 참고하여 테스트 서버를 구매하십시오. 본문의 테스트 서버는 CentOS 8.2 운영 체제를 사용합니다.
2. 테스트 서버에 하나씩 로그인하고 다음 명령을 실행하여 DPDK 도구를 다운로드합니다. CVM에 로그인하는 방법은 Linux 인스턴스에 로그인을 참고하십시오.
yum install -y sysstat wget tar automake make gcc
wget http://git.dpdk.org/dpdk/snapshot/dpdk-17.11.tar.gz
tar -xf dpdk-17.11.tar.gz
mv dpdk-17.11 dpdk
3. txonly 엔진을 수정하여 각 DPDK 송신 패킷의 CPU 상의 UDP 트래픽 포트가 여러 스트림을 생성하도록 합니다.
다음 명령어를 실행하여
dpdk/app/test-pmd/txonly.c 파일을 수정합니다.vim dpdk/app/test-pmd/txonly.c
i를 눌러 편집 모드로 들어가 다음 내용을 수정합니다.
3.1.1
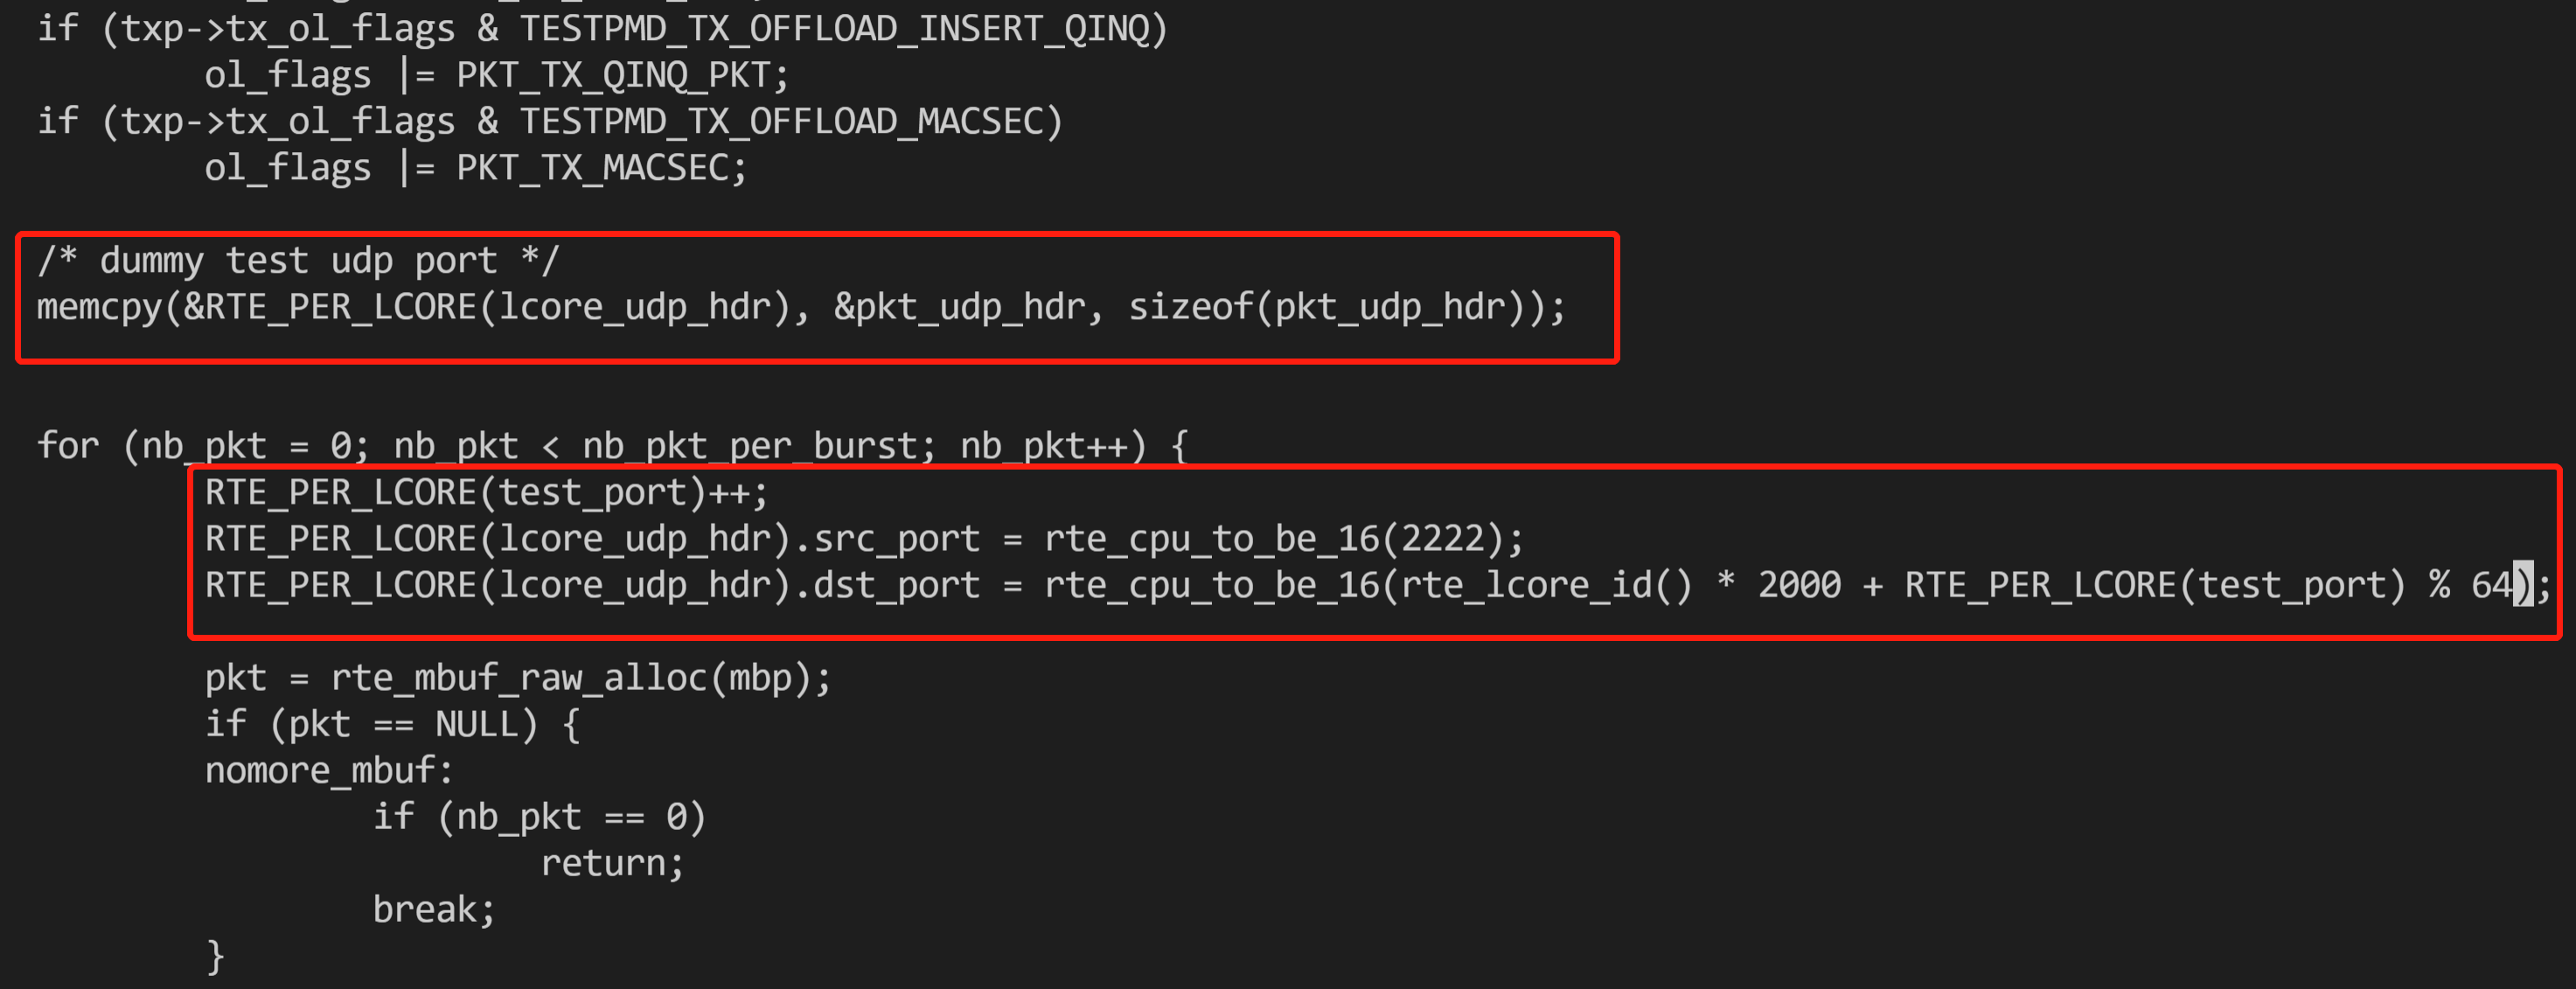
#include "testpmd.h"를 찾아 새 행에 다음 내용을 입력합니다.RTE_DEFINE_PER_LCORE(struct udp_hdr, lcore_udp_hdr);RTE_DEFINE_PER_LCORE(uint16_t, test_port);
다음과 같이 수정을 완료합니다.

3.1.2
ol_flags |= PKT_TX_MACSEC;를 찾아 새 행에 다음 내용을 입력합니다./* dummy test udp port */memcpy(&RTE_PER_LCORE(lcore_udp_hdr), &pkt_udp_hdr, sizeof(pkt_udp_hdr));
3.1.3 그 다음 아래의
for (nb_pkt = 0; nb_pkt < nb_pkt_per_burst; nb_pkt++) {을 찾아 새 행에 다음 내용을 입력합니다.RTE_PER_LCORE(test_port)++;RTE_PER_LCORE(lcore_udp_hdr).src_port = rte_cpu_to_be_16(rte_lcore_id() * 199 + test_port % 2222);RTE_PER_LCORE(lcore_udp_hdr).dst_port = rte_cpu_to_be_16(rte_lcore_id() * 2000 + test_port % 64);
다음과 같이 수정을 완료합니다.
3.1.4
copy_buf_to_pkt(&pkt_udp_hdr, sizeof(pkt_udp_hdr), pkt,를 찾아, 다음 내용으로 바꿉니다.copy_buf_to_pkt(&RTE_PER_LCORE(lcore_udp_hdr), sizeof(RTE_PER_LCORE(lcore_udp_hdr)), pkt,
다음과 같이 수정을 완료합니다.

다음 명령어를 실행하여
dpdk/config/common_base 파일을 수정합니다.vim dpdk/config/common_base
i를 눌러 편집 모드로 들어가 
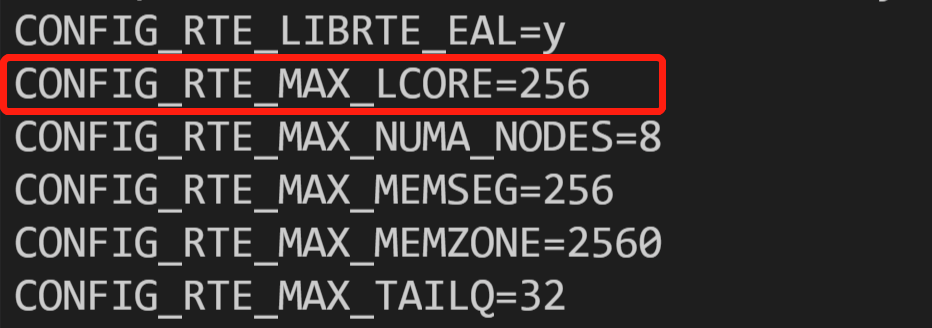
CONFIG_RTE_MAX_MEMSEG=256을 찾아 1024로 수정합니다. 수정 완료 후는 다음 이미지와 같습니다.
CONFIG_RTE_MAX_LCORE=128을 찾습니다. 시스템의 CPU 코어 수가 128보다 크면 256으로 변경할 수 있습니다. 수정 완료 후는 다음 이미지와 같습니다.
설명:
수신측과 발신측 모두 상기 구성 파일을 수정해야 합니다. 다음 명령을 사용하여 수정된 파일을 피어로 전송하여 중복 수정을 방지할 수 있습니다.
scp -P 22 /root/dpdk/app/test-pmd/txonly.c root@<IP주소>:/root/dpdk/app/test-pmd/scp -P 22 /root/dpdk/config/common_base root@<IP주소>:/root/dpdk/config
4. 다음 명령어를 실행하여
dpdk/app/test-pmd/txonly.c의 IP 주소를 테스트 서버용 IP로 수정합니다.vim dpdk/app/test-pmd/txonly.c
i를 눌러 편집 모드로 들어가 다음 내용을 찾습니다.
#define IP_SRC_ADDR (198U << 24) | (18 << 16) | (0 << 8) | 1;#define IP_DST_ADDR (198U << 24) | (18 << 16) | (0 << 8) | 2;
숫자 198, 18, 0, 1을 디바이스 IP로 바꿉니다. SRC_ADDR은 발신측 IP, DST_ADDR은 수신측 IP입니다.
5. 디바이스 운영 체제에 따라 다음 명령을 실행하여 numa를 설치합니다.
yum install numactl-devel
apt-get install libnuma-dev
6.
dpdk/ 디렉터리에서 다음 명령을 실행하고 KNI를 비활성화합니다.sed -i "s/\\(^CONFIG_.*KNI.*\\)=y/\\1=n/g" ./config/*
7. 운영 체제 커널 버전이 비교적 높은 경우(예: 5.3) 다음 명령을 실행하여 차이를 차단하십시오.
sed -i "s/\\(^WERROR_FLAGS += -Wundef -Wwrite-strings$\\)/\\1 -Wno-address-of-packed-member/g" ./mk/toolchain/gcc/rte.vars.mk
sed -i "s/fall back/falls through -/g" ./lib/librte_eal/linuxapp/igb_uio/igb_uio.c
8. 다음 명령을 실행하여 DPDK를 컴파일합니다.
make defconfig
make -j
Hugepage 메모리 설정
다음 명령을 실행하여 Hugepage 메모리를 설정합니다.
echo 4096 > /sys/kernel/mm/hugepages/hugepages-2048kB/nr_hugepages
오류 메시지가 나타나면 Hugepage 메모리가 부족한 것입니다. 명령 구성을 조정할 수 있습니다. 예시:
echo 2048 > /sys/kernel/mm/hugepages/hugepages-2048kB/nr_hugepages
커널 모듈 설치 및 인터페이스 바인딩
설명:
1. VNC를 사용하여 Linux 인스턴스에 로그인합니다. ENI 드라이버가 igb_uio 사용자 모드 드라이버에 바인딩된 후, 해당 ENI는 ssh 또는 IP를 통해 액세스할 수 없으며, VNC 또는 console을 통한 액세스만 지원됩니다.
2. 다음 명령을 순서대로 실행하여 UIO 모듈을 설치하고 virito 인터페이스를 바인딩합니다.
ifconfig eth0 0
ifconfig eth0 down
modprobe uio
insmod /root/dpdk/build/kmod/igb_uio.ko
cd /root/dpdk/usertools/
python3 dpdk-devbind.py --bind=igb_uio 00:05.0
설명:
명령어의 00.05.0은 예시 주소입니다. ENI의 실제 주소를 얻으려면 다음 명령을 실행하십시오.
python3 dpdk-devbind.py -s
테스트 완료 후, 다음 명령을 실행하여 ENI 변경 사항을 복구할 수 있습니다.
cd /root/dpdk/usertools/
python3 dpdk-devbind.py --bind=virtio-pci 00:05.0
ifconfig eth0 up
대역폭 및 처리량 테스트
설명:
테스트 명령은 txpkts 매개변수를 사용하여 송신 패킷 크기를 제어합니다. 테스트 대역폭은 1430B를 사용하고, 테스트 pps는 64B를 사용합니다.
이 단계의 명령어 매개변수는 Centos 8.2 운영 체제에 적합합니다. 다른 시스템 이미지 버전을 사용하는 경우 실제 상황에 따라 매개변수를 조정하고 다시 테스트해야 합니다. 예를 들어 CentOS 7.4의 커널 버전이 3.10이고 CentOS 8.2의 커널 버전 4.18과 성능 차이가 존재하는 경우, 대역폭 테스트 명령에서
nb-cores를 2로 수정할 수 있습니다. 명령 매개변수에 대한 자세한 내용은 testpmd-command-line-options를 참고하십시오.1. 다음 명령을 실행합니다. 발신측은 TX only 모드를 사용하여 testpmd를 실행하고 수신측은 rxonly 모드를 활성화합니다.
발신측:
/root/dpdk/build/app/testpmd -- --txd=128 --rxd=128 --txq=512 --rxq=512 --nb-cores=16 --forward-mode=txonly --txpkts=1430 --stats-period=1
설명:
이 중
-l 8-191 -w 0000:00:05.0 이 두 매개변수는 테스트 환경의 실제 값으로 대체해야 하며 그 다음은 동일하게 처리합니다.수신측:
/root/dpdk/build/app/testpmd -- --txd=128 --rxd=128 --txq=512 --rxq=512 --nb-cores=16 --forward-mode=rxonly --stats-period=1
2. 다음 명령을 실행하여 pps(UDP 64B 패킷)를 테스트합니다.
발신측:
/root/dpdk/build/app/testpmd -- --txd=128 --rxd=128 --txq=512 --rxq=512 --nb-cores=16 --forward-mode=txonly --txpkts=64 --stats-period=1
수신측:
/root/dpdk/build/app/testpmd -- --txd=128 --rxd=128 --txq=512 --rxq=512 --nb-cores=16 --forward-mode=rxonly --stats-period=1
아래 이미지와 같이 테스트 결과를 가져옵니다.

네트워크 대역폭 계산
수신측 PPS와 테스트 패킷 길이에 따라 현재 네트워크의 수신 대역폭을 계산할 수 있으며, 공식은 다음과 같습니다.
PPS × packet length × 8bit/B × 10-9 = 대역폭
테스트에서 얻은 데이터와 결합하여, 현재 대역폭은 다음과 같이 계산할 수 있습니다.
4692725pps × 1430B × 8bit/B × 10-9 ≈ 53Gbps
설명:
메시지 길이는 14B 이더넷 헤더, 4B CRC 및 20B IP 헤더를 포함하여 1430B입니다.
테스트 결과의 Rx-pps는 순시값입니다. 더 정확한 결과와 평균값을 얻기 위해 여러 번 테스트할 수 있습니다.
피드백