If you encounter errors such as functions or methods not existing when using the XML version of the SDK, please first upgrade the XML version of the SDK to the latest version and then retry.
Environment Configuration and Preparation
1. JavaScript SDK requires browsers to support basic HTML5 features (supporting IE10 and above) to enable AJAX file uploads and calculation of the MD5 value.
3. Log in to the CAM console and obtain your project SecretId and SecretKey.
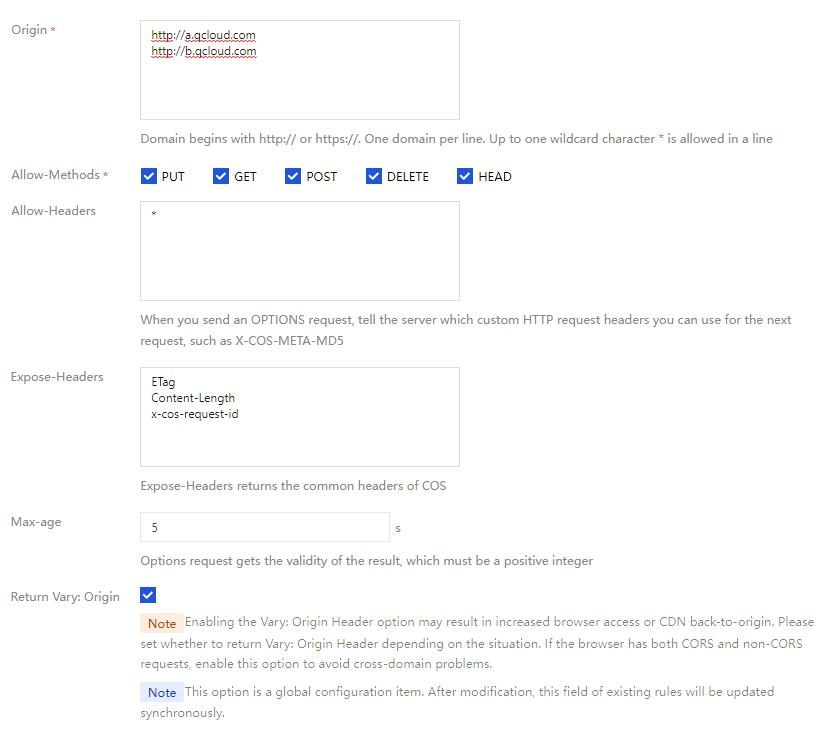
4. Configure CORS rules. Set AllowHeader to *, and ExposeHeaders should include ETag, Content-Length, and other header fields required by JavaScript, as shown in the figure below. For operation details, see the Set Cross-Origin Access documentation.
Note:
For the meanings of terms such as SecretId, SecretKey, and Bucket mentioned in this document and how to obtain them, please see COS Terminology.
For instructions on using cross-platform frameworks (such as uni-app), note that applications developed with the JavaScript SDK cannot be packaged into functional mobile applications such as Android or iOS apps. The corresponding Android SDK or iOS SDK must be used instead.
When server-side rendering technologies such as Next.js or Nuxt.js are used, please ignore the warning "cos-js-sdk-v5 does not support Node.js environments; use cos-nodejs-sdk-v5 instead." The JavaScript SDK can be used normally.
Installing the SDK
You can install the SDK through the following methods:
Method 1: script Introduction
Note:
It is recommended to download the SDK locally and then import it. Select Address 1 or Address 2 to download the latest cos-js-sdk-v5.min.js.
<!--src is a local path; adjust according to your project directory structure-->
When the SDK is referenced in a script tag, the SDK occupies the name of the global variable COS. You can create an SDK instance via its constructor.
Method 2: Import Method of Webpack
Install the SDK dependency via npm i cos-js-sdk-v5 --save. This supports Webpack bundling scenarios. You can import it as a module using npm, as shown in the following code:
constCOS=require('cos-js-sdk-v5');
// Or
importCOSfrom'cos-js-sdk-v5';
Initialize COS Service
Note:
It is recommended that users use temporary secret keys to call the SDK, further enhancing security through temporary authorization. When applying for temporary secret keys, please follow the Principle of Least Privilege to prevent leakage of resources beyond the target bucket or objects.
If you must use permanent secret keys, it is recommended that you follow the Principle of Least Privilege to restrict the scope of permissions for these keys.
To mitigate security risks associated with placing permanent secret keys in the frontend, we recommend using temporary secret keys for production deployments. The process is as follows: The frontend first sends a request to the backend server. The backend then uses permanent secret keys to call the STS service and obtain temporary secret keys (for details, see the Temporary Secret Key Generation and Usage Guide document). These temporary keys are then returned to the frontend for use.
Note:
If the site has a login status, this interface for obtaining temporary secret keys also requires verification of the login status.
Initialize COS Instance
You must import the SDK and initialize a cos instance before you can call its methods, such as cos.uploadFile and cos.getObject.
The SDK internally needs to generate signatures using secret keys. For key-related initialization, see the following example.
Single-Use Temporary Secret Keys
Callback for Temporary Key
Permanent Secret Key (For Testing Only)
Suitable for single upload operations, ideal for scenarios where temporary key expiration is not a concern. This key is only valid for the current COS operation.
importCOSfrom'cos-js-sdk-v5';
// console.log(COS.version); The sdk version must be at least 1.8.3.
const cos =newCOS({
SecretId:'your_tmpSecretId',// Temporary SecretId issued by the sts service
SecretKey:'your_tmpSecretKey',// Temporary SecretKey issued by the sts service
SecurityToken:'your_sessionToken',// Temporary SessionToken issued by the sts service
StartTime:1720770679403,// It is recommended to pass the server-side time to avoid signature errors caused by inaccurate client time
ExpiredTime:1720771991367,// Expiration time of the temporary secret key
The COS SDK uses a callback approach to obtain temporary keys. The SDK uses this callback to re-obtain temporary keys for the first time and when the cached temporary key is about to expire.
Suitable for globally initializing a cos instance to facilitate queue control, pause, resume, and other operations for file uploads.
const data =awaitfetchSts('xxxx');// The logic for obtaining temporary credentials needs to be implemented by yourself.
callback({
TmpSecretId: data.credentials.tmpSecretId,
TmpSecretKey: data.credentials.tmpSecretKey,
SecurityToken: data.credentials.sessionToken,
// It is recommended to return the server time as the start time of the signature to avoid signature errors caused by excessive deviation in the client's local time.
StartTime: data.startTime,// Timestamp in seconds, such as 1580000000
ExpiredTime: data.expiredTime,// Timestamp in seconds, such as 1580000000
ScopeLimit:true,// Fine-grained permission control needs to be set to true, which restricts the key to be reused only for the same request.
});
}
});
For example, create a utils/cos.js to be used globally within the project:
importCOSfrom'cos-js-sdk-v5';
const cos =newCOS({
// For other configuration items, refer to the Configuration Items for Initialization below.
// required parameters for getAuthorization
getAuthorization:function(options, callback){
// It is not called during initialization; it will only be entered when cos methods are called (such as cos.putObject)
// It is recommended to return the server time as the start time of the signature to avoid signature errors caused by significant deviation in the client's local time.
StartTime: data.startTime,// Timestamp in seconds, such as 1580000000
ExpiredTime: data.expiredTime,// Timestamp in seconds, such as 1580000000
ScopeLimit:true,// Fine-grained permission control needs to be set to true, which restricts the key to be reused only for the same request.
});
})
.catch(error=>{
console.error('Failed to obtain temporary credentials', error);
});
}
});
exportdefault cos;
pageA.js imports the exported cos instance from above.
import cos from'utils/cos';
let taskId;
// Upload file, file is the selected file.
asyncfunctionupload(file){
try{
const data =await cos.uploadFile({
Bucket:'examplebucket-1250000000',// Replace with your own bucket name. Required.
Region:'COS_REGION',// The region where the bucket is located. Required.
Key:'1.jpg',// The object key stored in the bucket (such as 1.jpg and a/b/test.txt). Required.
Body: file,// Upload file object.
SliceSize:1024*1024*5,// Threshold for triggering multipart upload. Files larger than 5MB use multipart upload; files smaller than 5MB use simple upload. Can be customized. Optional.
onProgress:function(progressData){
console.log('Upload progress:', progressData);
},
onTaskReady:function(id){// Optional
taskId = id;
},
});
console.log('Upload succeeded', data);
}catch(e){
console.error('Upload failed', e);
}
}
// Listen to the upload queue.
cos.on('update-list',data=>{
console.log(data);
});
// Pause the upload task.
cos.pauseTask(taskId);
// Restart the upload task.
cos.restartTask(taskId);
// Cancel the upload task.
cos.cancelTask(taskId)
You can use Tencent Cloud's permanent keys for local debugging during the development phase.Since this method poses a risk of key leakage, be sure to replace it with temporary keys before deployment.
importCOSfrom'cos-js-sdk-v5';
// For SECRETID and SECRETKEY, please log in to https://console.tencentcloud.com/cam/capi to view and manage them.
const cos =newCOS({
SecretId: process.env.SecretId,// It is recommended to obtain via environment variables; User's SecretId. It is recommended to use sub-account keys, with authorization following the principle of least privilege to mitigate usage risks. For how to obtain sub-account keys, refer to https://www.tencentcloud.com/document/product/598/37140?from_cn_redirect=1
SecretKey: process.env.SecretKey,// It is recommended to obtain via environment variables; User's SecretKey. It is recommended to use sub-account keys, with authorization following the principle of least privilege to mitigate usage risks. For how to obtain sub-account keys, refer to https://www.tencentcloud.com/document/product/598/37140?from_cn_redirect=1
});
Configuration Item Description
Initialization Parameters
getAuthorization Description of the Callback Function
For initializing parameters, see the following parameter descriptions for the new COS(options) constructor.
Parameter Name
Parameter Description
Type
Required or Not
SecretId
The user's SecretId. When passing a permanent key, it is recommended to use it only during frontend debugging to avoid key exposure.
String
No
SecretKey
The user's SecretKey. When a permanent key is passed, it is recommended to use it only during frontend debugging to avoid key exposure.
String
No
SecurityToken
The sessionToken of the obtained temporary keys (supported since version v1.8.3). When temporary keys are passed for SecretId and SecretKey, SecurityToken is required.
String
No
StartTime
The start timestamp of the obtained temporary keys' validity period (supported since version v1.8.3), unit: seconds. When temporary keys are passed for SecretId and SecretKey, it is recommended to pass StartTime.
Number
No
ExpiredTime
The expiration timestamp of the obtained temporary keys (supported since version v1.8.3), unit: seconds. When temporary keys are passed for SecretId and SecretKey, it is recommended to pass ExpiredTime.
Number
No
FileParallelLimit
The concurrency of file uploads under the same instance, default value is 3.
Number
No
ChunkParallelLimit
The concurrency of parts per uploaded file, default value is 3.
Number
No
ChunkRetryTimes
The number of retries on error during multipart upload and multipart copy, default value is 2 (first attempt plus two retries, totaling three requests).
Number
No
ChunkSize
The size in bytes of each part during multipart upload, default value is 1048576 (1MB).
Number
No
SliceSize
When uploadFiles is used for batch upload, files larger than this size will use multipart upload; otherwise, simple upload will be invoked. Unit: Byte, default value is 1048576 (1MB).
Number
No
CopyChunkParallelLimit
The concurrency of multipart copy operations performed during multipart upload, default value is 20.
Number
No
CopyChunkSize
The size in bytes of each part when the sliceCopyFile is used for multipart copy, default value is 10485760 (10MB).
Number
No
CopySliceSize
When sliceCopyFile is used for multipart copy, files larger than this size will use multipart copy; otherwise, simple copy will be invoked. Default value is 10485760 (10MB).
Number
No
ProgressInterval
The callback frequency of the onProgress callback method for upload progress, unit: ms, default value is 1000.
Number
No
Protocol
The protocol used when requests are sent, options include https: and http:. By default, it uses http: if the current page is http:; otherwise, it uses https:.
String
No
Domain
When calling APIs to operate on buckets and objects, you can customize the request domain name. Templates can be used, such as "{Bucket}.cos.{Region}.myqcloud.com", where the Bucket and Region in the parameters passed in will be replaced when the API is called.
String
No
UploadQueueSize
The maximum length of the upload queue. Tasks that exceed this limit will be cleared if their status is not waiting, checking, or uploading. Default value is 10000.
Number
No
UploadCheckContentMd5
When uploading files, verify the Content-MD5, default is false. If the Content-MD5 is enabled, the MD5 of the file content will be calculated during upload, which may take longer for large files.
Boolean
No
UploadAddMetaMd5
Verify Content-MD5 when files are uploaded, default is false. When the Content-MD5 verification is enabled, the x-cos-meta-md5 header will be added to upload requests.
Boolean
No
getAuthorization
The callback method to obtain the signature. This parameter is required if SecretId and SecretKey are not provided.
Note: This callback method is passed in when the instance is initialized and will be executed to obtain the signature only when using the instance to call an interface.
Function
No
Timeout
Timeout in milliseconds, default is 0, meaning no timeout.
Number
No
UseAccelerate
Whether to enable the domain name for Global Acceleration, default is false. If set to true, the bucket must have the feature for Global Acceleration enabled. For details, see Enabling Global Acceleration.
Callback method after a temporary key is obtained.
Function
After the temporary key is obtained, the callback returns an object with the following properties:
Property Name
Parameter Description
Type
Required or Not
TmpSecretId
tmpSecretId of the obtained temporary key.
String
Yes
TmpSecretKey
tmpSecretKey of the obtained temporary key.
String
Yes
SecurityToken
The sessionToken of the obtained temporary key, corresponding to the x-cos-security-token field in the header.
String
Yes
StartTime
The start time for obtaining the key, that is, the timestamp at the moment of acquisition, in seconds (startTime, such as: 1580000000). This parameter specifies the start time for signature generation to prevent signature expiration issues caused by frontend time deviation.
String
No
ExpiredTime
expiredTime of the obtained temporary key, the expiration timestamp in seconds, such as: 1580000900.
String
Yes
Get authentication credentials
How the authentication credentials of the instance itself are obtained can be controlled through parameters passed during instantiation. There are three methods:
1. When an instance is instantiated, pass in SecretId and SecretKey. Signatures are generated internally by the instance when needed.
2. When instantiating, pass in a getAuthorization callback function. Each time a signature is required, it is computed through this callback and returned to the instance.
3. When instantiating, pass in a getAuthorization callback. This callback returns temporary key credentials when invoked, and will be re-invoked after the temporary key credentials expire.
Enable Beacon Reporting (Optional)
In order to continuously track and optimize the quality of the SDK and provide you with a better user experience, we have introduced the Tencent Beacon SDK.
Note:
Tencent Beacon only monitors the request performance on the COS side and will not report business-side data.
To enable this feature, ensure that the SDK version is upgraded to 1.7.1 or later, then pass BeaconReporter during initialization.
// For a complete demo, refer to: https://github.com/tencentyun/cos-js-sdk-v5/blob/master/demo/index.html.
const Beacon =require('./lib/beacon_mp.min');
newCOS({
...
BeaconReporter: Beacon,
})
Usage Methods
The sample uses the callback approach by default. The relevant code is as follows.
Note:
The cos.getObjectUrl method currently only supports the callback approach.
Callback Methods
Promise method
Synchronization method
// Here, the initialization process and upload parameters are omitted.
var cos =newCOS({...});
cos.uploadFile({...},function(err, data){
if(err){
console.log('Upload error', err);
}else{
console.log('Upload succeeded', data);
}
});
// Here, the initialization process and upload parameters are omitted.
var cos =newCOS({...});
cos.uploadFile({...}).then(data =>{
console.log('Upload succeeded', data);
}).catch(err =>{
console.log('Upload error', err);
});
async function upload(){
// Here, the initialization process and upload parameters are omitted.
var cos =newCOS({...});
try{
var data = await cos.uploadFile({...});
return{ err:null, data: data }
}catch(err){
return{ err: err, data:null};
}
}
// You can synchronously obtain the return value of the request. This is an example, and the actual returned data format can be customized.
Strongly recommend using the advanced upload interface uploadFile, which automatically handles small files with simple upload and large files with multipart upload for better performance. For details, see the advanced upload documentation.
If using the temporary key method, you need to authorize both simple upload of objects and multipart upload permissions. See Authorization Guide.