This document describes how to achieve direct file upload with Tencent Cloud COS for your mobile applications. COS makes it easy for you to store files and data as you only need to generate and manage the access key on your server.
Architecture
For client applications, storing permanent keys in the code increases the risk that your credentials could leak and makes it difficult to control access permissions. We recommend that your applications use temporary keys with a specified validity period to access your COS resources to prevent credential leakage.
The COS Mobile SDK (Android/IOS) allows you to apply temporary keys on COS access request authorization. You only need to set up the temporary key service on the backend to authorize the requests.
Workflow
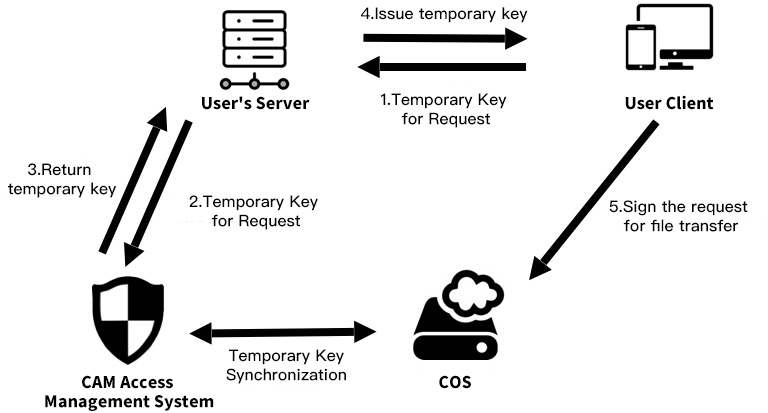
The diagram below illustrates how to enable CAM for the COS:
User’s server: user's backend server, which is used to obtain the temporary keys and return them to the App.
Prerequisites
1. Create a bucket.
Create a bucket using the COS Console. Depending on your needs, set your bucket permission to private read/write, or public read and private write. For detailed directions, see Creating Buckets and Setting Access Permission.
2. Obtain the permanent key.
Temporary keys are generated with the permanent key. Get the SecretId and SecretKey on the API Key Management page. Get the APPID in the Account Center.
Directions
Setting up temporary key service
For security purposes, we recommend you use temporary keys to calculate a signature. To create and use temporary keys, you need to set up the temporary key service on your server and an API for your application. For more information, see Temporary Key Generation and Usage Guide.
Note:
In official deployment, add a layer of permission check of your website on the server side.
Defining permissions
We recommended that you define a scope for the permission granted to temporary keys through Policy based on the principle of "least privilege". A key that has all permissions to read and write the data increases the risk that your other data could leak. For more information, see Temporary Key Generation and Usage Guide.
Integrating SDK with authorization service
Android
After the temporary key service is set up, you integrate the SDK with the authorization service. Instead of you managing the temporary keys, the SDK controls the number of concurrent requests to process, cache the valid keys on your local devices, and requests new keys to replace the expired ones.
Authorization with standard response body
If you use the JSON data obtained from the STS SDK as a response body for the temporary key service (similar to cossign), you can create an authorization class in the COS SDK using the following code:
import android.content.Context;
import com.tencent.cos.xml.*;
import com.tencent.qcloud.core.auth.*;
import com.tencent.qcloud.core.common.*;
import com.tencent.qcloud.core.http.*;
import java.net.*;
Context context =...;
CosXmlServiceConfig cosXmlServiceConfig =...;
/**
* Get the authorization service URL
*/
URL url = null; // URL of the backend authorization service
try{
url = new URL("your_auth_server_url");
} catch (MalformedURLException e){
e.printStackTrace();
}
/**
* Initialize the {@link QCloudCredentialProvider} object to provide a temporary key to the SDK.
*/
QCloudCredentialProvider credentialProvider = new SessionCredentialProvider(new HttpRequest.Builder<String>()
.url(url)
.method("GET")
.build());
CosXmlService cosXmlService = new CosXmlService(context, cosXmlServiceConfig, credentialProvider);
Note:
Because this method requires that the signature start time matches the local time on your mobile phone. A large difference (more than 10 minutes) between the time on your phone and the correct local time may cause a signature error. In this case, we recommend you use the custom response body for authorization as described below:
Authorization with custom response body
For higher flexibility, you can inherit the BasicLifecycleCredentialProvider class and implement its fetchNewCredentials() for custom configurations. For example, you can customize the HTTP response body for the temporary key service to return the server time to the device as the signature start time so as to avoid signature error caused by big device time difference. You can also choose to use other protocols for the communication between the end device and the service side.
Authorize the request with your custom MyCredentialProvider instance:
import android.content.Context;
import com.tencent.cos.xml.*;
import com.tencent.qcloud.core.auth.*;
import com.tencent.qcloud.core.common.*;
import com.tencent.qcloud.core.http.*;
import java.net.*;
Context context =...;
CosXmlServiceConfig cosXmlServiceConfig =...;
/**
* Initialize the {@link QCloudCredentialProvider} to provide a temporary key to the SDK.
*/
QCloudCredentialProvider credentialProvider = new MyCredentialProvider();
CosXmlService cosXmlService = new CosXmlService(context, cosXmlServiceConfig, credentialProvider);
For more information on how files are uploaded and downloaded between an Android device and COS, see Getting Started with Android SDK.
iOS
We provide QCloudCredentailFenceQueue to make it easier for you to obtain and manage temporary signatures. With QCloudCredentailFenceQueue, a request for signature will be processed only after the signature process is completed.
To use QCloudCredentailFenceQueue, you need to first create an instance.
//AppDelegate.m
//AppDelegate must follow QCloudCredentailFenceQueueDelegate protocol
Next, to call the QCloudCredentailFenceQueue class, you must follow QCloudCredentailFenceQueueDelegate and implement the method defined in the protocol:
When you obtain the signature using QCloudCredentailFenceQueue, all the requests in the SDK that need signatures will not be performed until the parameters required for the signature are obtained via the method defined by the protocol and a valid signature is generated. See the example below:
responseSerializer.serializerBlocks = @[QCloudAcceptRespnseCodeBlock([NSSet setWithObjects:@(200), nil],nil),//An error is returned when the return code is other than 200.
QCloudResponseJSONSerilizerBlock];//Return element parsed in JSON format