uni-app直接アップロードの実践
Download
フォーカスモード
フォントサイズ
概要
本記事では、SDKに依存せず、シンプルなコードを使用して、uni-appでファイルをCloud Object Storage(COS)のバケットへ直接アップロードする方法を紹介します。
説明:
ソリューションの説明
実行プロセス
1. フロントエンドでファイルを選択し、拡張子をサーバー側に送信します。
2. サーバー側は拡張子に基づき、時間情報を含むランダムなCOSファイルパスを生成し、対応するPostObject policy署名を計算して、URLと署名情報をフロントエンドに返します。
3. フロントエンドはPostObjectインターフェースまたはPutObjectインターフェースを呼び出して、ファイルをCOSに直接アップロードします。
ソリューションの利点
パスのセキュリティ:サーバー側でランダムなCOSファイルパスを決定するため、既存のファイルが上書きされる問題やセキュリティリスクを効果的に回避できます。
マルチエンド対応:uni-appが提供するファイル選択およびアップロードインターフェースを使用することで、1つのコードで複数プラットフォーム(Web/ミニプログラム/App)に対応可能です。
前提条件
2. CAMコンソールにログインし、プロジェクトのSecretIdおよびSecretKeyを取得します。
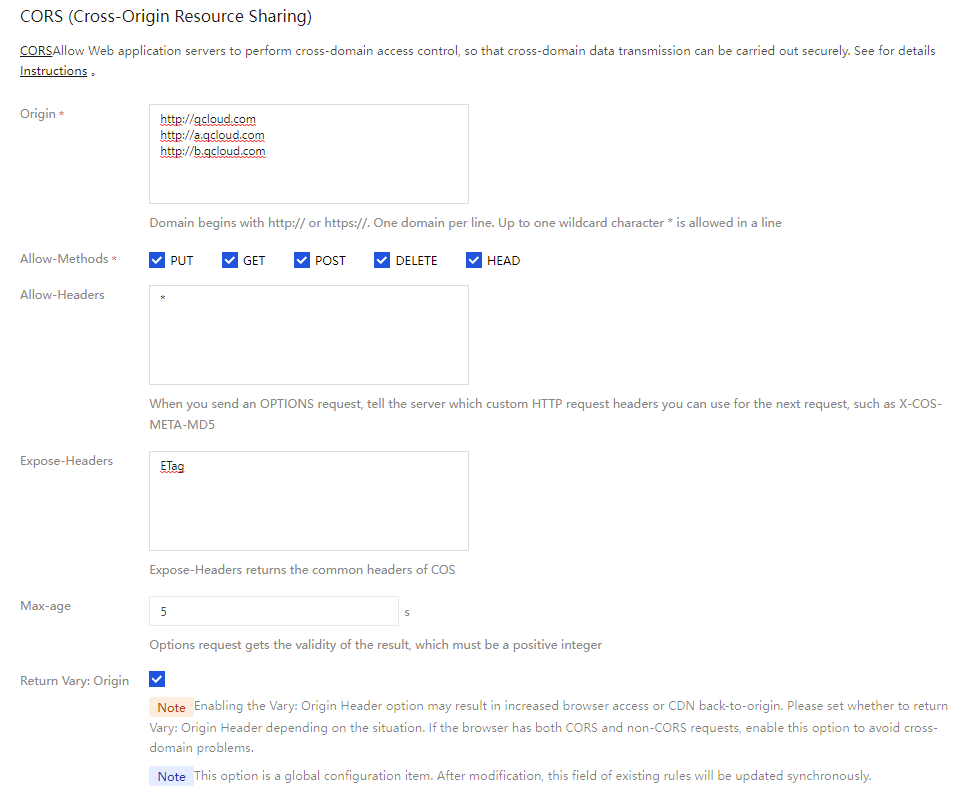
3. 作成したバケットの詳細ページに入り、セキュリティ管理>クロスオリジンアクセス CORS設定ページで、ルール追加をクリックします。設定例は下図の通りです。詳細はクロスオリジンアクセスの設定ドキュメントをご参照ください。
実践手順
注意:
正式デプロイ前には、サーバー側にWebサイト自体の権限検証レイヤーを追加することをお勧めします。
フロントエンドがアップロード
1. post-policyの例(PostObjectサーバー側インターフェース)またはput-signの例(PutObjectサーバー側インターフェース)を参照し、ランダムなファイルパスを生成し、署名を計算してフロントエンドに返すために使用されます。
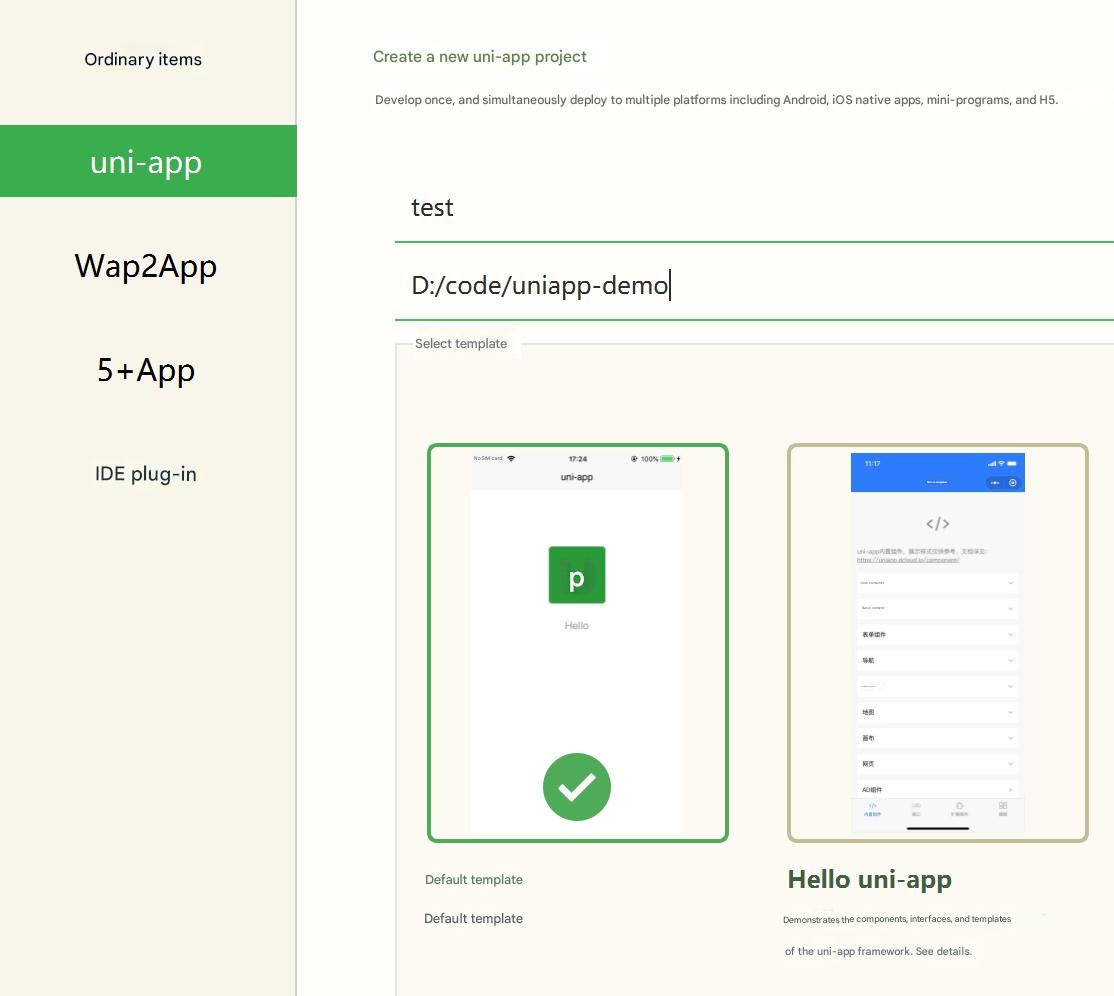
2. HBuilderXのデフォルトテンプレート(詳細はHBuilderX公式サイトを参照)を使用してuni-appアプリケーションを作成します。
3. ファイル>新規作成>プロジェクトを選択し、作成完了後、このアプリケーションはVueベースのプロジェクトになります。
4. 以下のコードをコピーしてpages/index/index.vueファイルの内容を置換し、呼び出されるpost-policyインターフェースリンクを修正して、自身のサーバーアドレス(ステップ1のサーバー側インターフェース)を指すようにします。
<template><view class="content"><button type="default" @click="selectUpload">ファイルを選択してアップロード</button><image v-if="fileUrl" class="image" :src="fileUrl"></image></view></template><script>export default {data() {return {title: 'Hello',fileUrl: ''};},onLoad() {},methods: {selectUpload() {var vm = this;// より多くの文字エンコーディングに対応したURLエンコード形式var camSafeUrlEncode = function (str) {return encodeURIComponent(str).replace(/!/g, '%21').replace(/'/g, '%27').replace(/\\(/g, '%28').replace(/\\)/g, '%29').replace(/\\*/g, '%2A');};// アップロードパスとアップロードクレデンシャルの取得var getUploadInfo = function (extName, callback) {// ファイルの拡張子を渡し、バックエンドにランダムなCOSオブジェクトパスを生成させ、アップロードドメイン名とPostObjectインターフェースで使用するpolicy署名を返す// サーバー側のサンプルを参照:https://github.com/tencentyun/cos-demo/tree/main/server/post-policyuni.request({url: 'http://127.0.0.1:3000/post-policy?ext=' + extName,success: (res) => {// リターンフォーマットが正しいかどうかを確認しますconsole.log(res);callback && callback(null, res.data);},error(err) {callback && callback(err);},});};// アップロードリクエストを送信します。アップロードにはPostObjectインターフェースを使用し、policy署名で保護します。// インターフェースドキュメント:https://www.tencentcloud.com/document/product/436/14690#.E7.AD.BE.E5.90.8D.E4.BF.9D.E6.8A.A4var uploadFile = function (opt, callback) {var formData = {key: opt.cosKey,policy: opt.policy, // このパラメータはpolicyのbase64文字列を渡しますsuccess_action_status: 200,'q-sign-algorithm': opt.qSignAlgorithm,'q-ak': opt.qAk,'q-key-time': opt.qKeyTime,'q-signature': opt.qSignature,};// サーバー側が一時キーを使用して計算する場合、x-cos-security-tokenを渡す必要がありますif (opt.securityToken) formData['x-cos-security-token'] = opt.securityToken;uni.uploadFile({url: 'https://' + opt.cosHost, //サンプルです。実際のインターフェースアドレスではありませんfilePath: opt.filePath,name: 'file',formData: formData,success: (res) => {if (![200, 204].includes(res.statusCode)) return callback && callback(res);var fileUrl = 'https://' + opt.cosHost + '/' + camSafeUrlEncode(opt.cosKey).replace(/%2F/g, '/');callback && callback(null, fileUrl);},error(err) {callback && callback(err);},});};// ファイル選択uni.chooseImage({success: (chooseImageRes) => {var file = chooseImageRes.tempFiles[0];if (!file) return;// アップロードするローカルファイルのパスを取得するvar filePath = chooseImageRes.tempFilePaths[0];// アップロードされたファイルの拡張子を取得し、その後、サーバー側がランダムなCOSパスを生成しますvar fileName = file.name;var lastIndex = fileName.lastIndexOf('.');var extName = lastIndex > -1 ? fileName.slice(lastIndex + 1) : '';// アップロード前用のドメイン名、パス、クレデンシャルを取得しますgetUploadInfo(extName, function (err, info) {// 返されるinfoのフォーマットが正しいかどうかを確認しますconsole.log(info);// ファイルアップロードinfo.filePath = filePath;uploadFile(info, function (err, fileUrl) {vm.fileUrl = fileUrl;});});}});},}}</script><style>.content {padding: 20px 0;display: flex;flex-direction: column;align-items: center;justify-content: center;}.image {margin-top: 20px;margin-left: auto;margin-right: auto;}</style>
<template><view class="content"><button type="default" @click="selectUpload">ファイルを選択してアップロード</button><image v-if="fileUrl" class="image" :src="fileUrl"></image></view></template><script>export default {data() {return {title: 'Hello',fileUrl: ''};},onLoad() {},methods: {selectUpload() {var vm = this;// より多くの文字エンコーディングに対応したURLエンコード形式var camSafeUrlEncode = function (str) {return encodeURIComponent(str).replace(/!/g, '%21').replace(/'/g, '%27').replace(/\\(/g, '%28').replace(/\\)/g, '%29').replace(/\\*/g, '%2A');};// アップロードパスとアップロードクレデンシャルの取得var getUploadInfo = function (extName, callback) {// ファイルの拡張子を渡し、バックエンドにランダムなCOSオブジェクトパスを生成させ、PUT Objectインターフェースで使用する署名を返す// バックエンドは以下を返す必要があります:cosHost、cosKey、認証情報、securityToken(オプション)uni.request({url: 'http://127.0.0.1:3000/put-signature?ext=' + extName,success: (res) => {// リターンフォーマットが正しいかどうかを確認しますconsole.log(res);callback && callback(null, res.data);},fail(err) {callback && callback(err);},});};// ファイルをArrayBufferとして読み込むvar readFileAsArrayBuffer = function (filePath, callback) {uni.getFileSystemManager().readFile({filePath: filePath,success: (res) => {callback && callback(null, res.data); // res.dataはArrayBufferです},fail(err) {callback && callback(err);}});};// アップロードリクエストを送信し、PUT Objectインターフェースを使用します// インターフェースドキュメント:https://www.tencentcloud.com/document/product/436/7749var uploadFile = function (opt, fileData, callback) {var headers = {'Authorization': opt.authorization, // 署名情報'Content-Type': opt.contentType || 'application/octet-stream'};// サーバー側が一時キーを使用して計算する場合、x-cos-security-tokenを渡す必要がありますif (opt.securityToken) {headers['x-cos-security-token'] = opt.securityToken;}console.log('アップロードリクエスト情報:', {url: 'https://' + opt.cosHost + '/' + opt.cosKey,headers: headers});uni.request({url: 'https://' + opt.cosHost + '/' + opt.cosKey,method: 'PUT',header: headers,data: fileData, // ArrayBuffer形式success: (res) => {console.log('アップロードレスポンス:', res);if (![200, 204].includes(res.statusCode)) {console.error('アップロードが失敗しました、ステータスコード:', res.statusCode);return callback && callback(res);}var fileUrl = 'https://' + opt.cosHost + '/' + camSafeUrlEncode(opt.cosKey).replace(/%2F/g, '/');callback && callback(null, fileUrl);},fail(err) {console.error('アップロードリクエスト失敗:', err);callback && callback(err);},});};// ファイル選択uni.chooseImage({success: (chooseImageRes) => {var file = chooseImageRes.tempFiles[0];if (!file) return;// アップロードするローカルファイルのパスを取得するvar filePath = chooseImageRes.tempFilePaths[0];// アップロードされたファイルの拡張子を取得し、その後、サーバー側がランダムなCOSパスを生成しますvar fileName = file.name;var lastIndex = fileName.lastIndexOf('.');var extName = lastIndex > -1 ? fileName.slice(lastIndex + 1) : '';// アップロード前用のドメイン名、パス、署名を取得するgetUploadInfo(extName, function (err, info) {if (err) {console.error('アップロード情報の取得に失敗しました:', err);return;}// 返されるinfoのフォーマットが正しいかどうかを確認しますconsole.log(info);// ファイルをArrayBufferとして読み込むreadFileAsArrayBuffer(filePath, function (err, fileData) {if (err) {console.error('ファイルの読み込みが失敗しました:', err);return;}// ファイルアップロードuploadFile(info, fileData, function (err, fileUrl) {if (err) {console.error('アップロード失敗:', err);return;}vm.fileUrl = fileUrl;console.log('アップロード済み:', fileUrl);});});});}});},}}</script><style>.content {padding: 20px 0;display: flex;flex-direction: column;align-items: center;justify-content: center;}.image {margin-top: 20px;margin-left: auto;margin-right: auto;}</style>
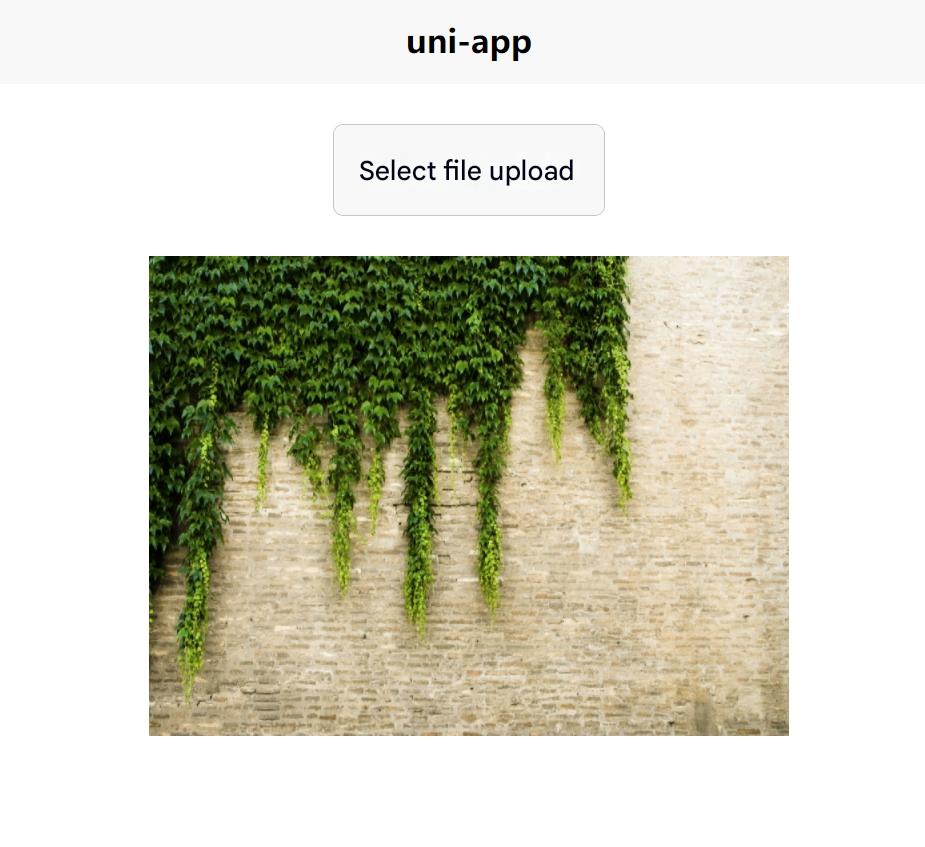
5. HBuilderXで、実行>ブラウザで実行>Chromeを選択すると、ブラウザでファイルを選択してアップロードできます。
6. 実行結果は下図の通りです。
プロジェクトを作成する:
直接アップロード結果:
関連ドキュメント
フィードバック