ミニプログラムでの直接アップロード
Download
フォーカスモード
フォントサイズ
概要
本記事では、SDKに依存せず、シンプルなコードを使用して、ミニプログラムからCloud Object Storage(COS)のバケットへファイルを直接アップロードする方法について説明します。
注意:
本記事の内容はXMLバージョンのAPIに基づくものです。
前提条件
2. CAMコンソールにログインし、APIキー管理ページに移動して、プロジェクトのSecretIdおよびSecretKeyを取得します。
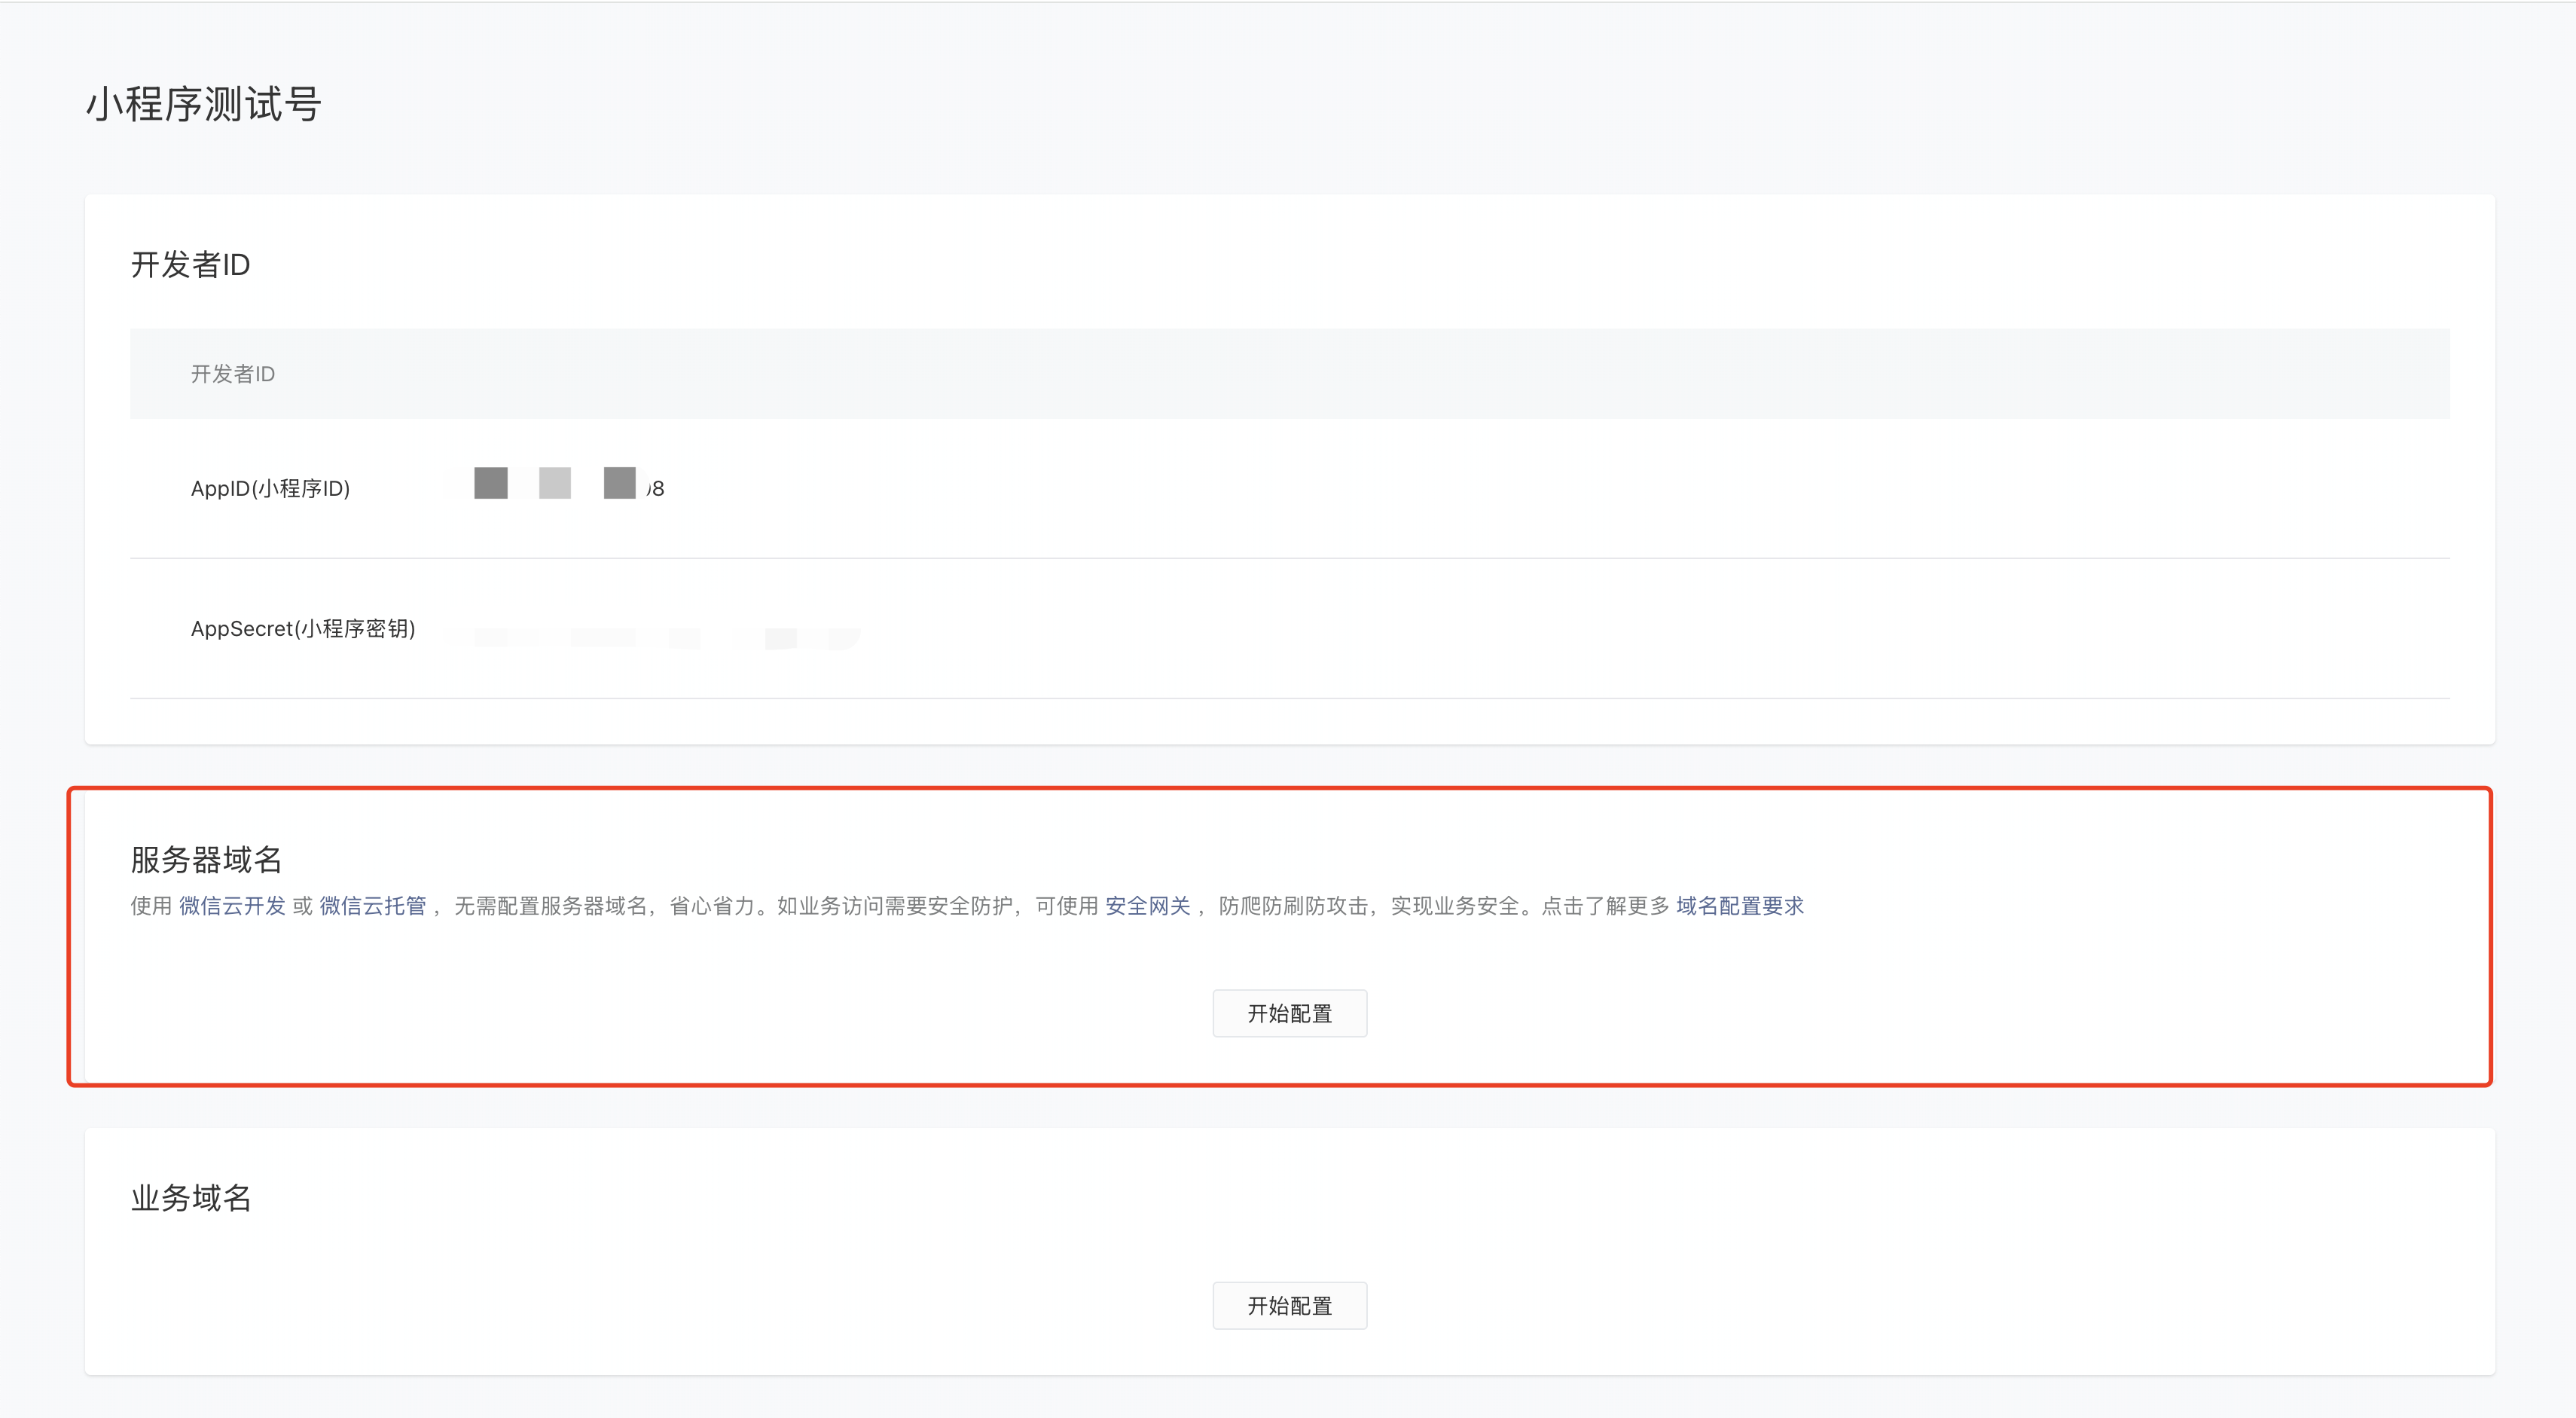
3. ミニプログラムのドメインホワイトリストの設定
ミニプログラムからCOSへリクエストを行うには、WeChat公式アカウントプラットフォームにログインし、「開発」>「開発設定」にて、ドメインホワイトリストを設定する必要があります。SDKは、wx.uploadFileとwx.requestの2つのインターフェースを使用します。
cos.postObjectは、wx.uploadFileを使用してリクエストを送信します。
その他のメソッドは、wx.requestを使用してリクエストを送信します。
両方とも、対応するホワイトリストにCOSドメインを設定する必要があります。例:
examplebucket-1250000000.cos.ap-guangzhou.myqcloud.com。ソリューションの説明
実行プロセス
1. フロントエンドでファイルを選択し、拡張子をサーバー側に送信します。
2. サーバー側は拡張子に基づき、時間情報を含むランダムなCOSファイルパスを生成し、対応する署名を計算して、URLと署名情報をフロントエンドに返します。
3. フロントエンドはPUTまたはPOSTリクエストを使用し、ファイルをCOSに直接アップロードします。
ソリューションの利点
権限のセキュリティ:サーバー側での署名を使用することで、安全な権限範囲を効果的に制限でき、指定された単一のファイルパスへのアップロードのみに限定できます。
パスのセキュリティ:サーバー側でランダムなCOSファイルパスを決定するため、既存のファイルが上書きされる問題やセキュリティリスクを効果的に回避できます。
実践手順
署名を実装するためのサーバー側の設定
注意:
正式デプロイ時は、サーバー側にご自身のWebサイト自体の権限検証レイヤーを追加してください。
署名の計算方法については、ドキュメントリクエスト署名をご参照ください。
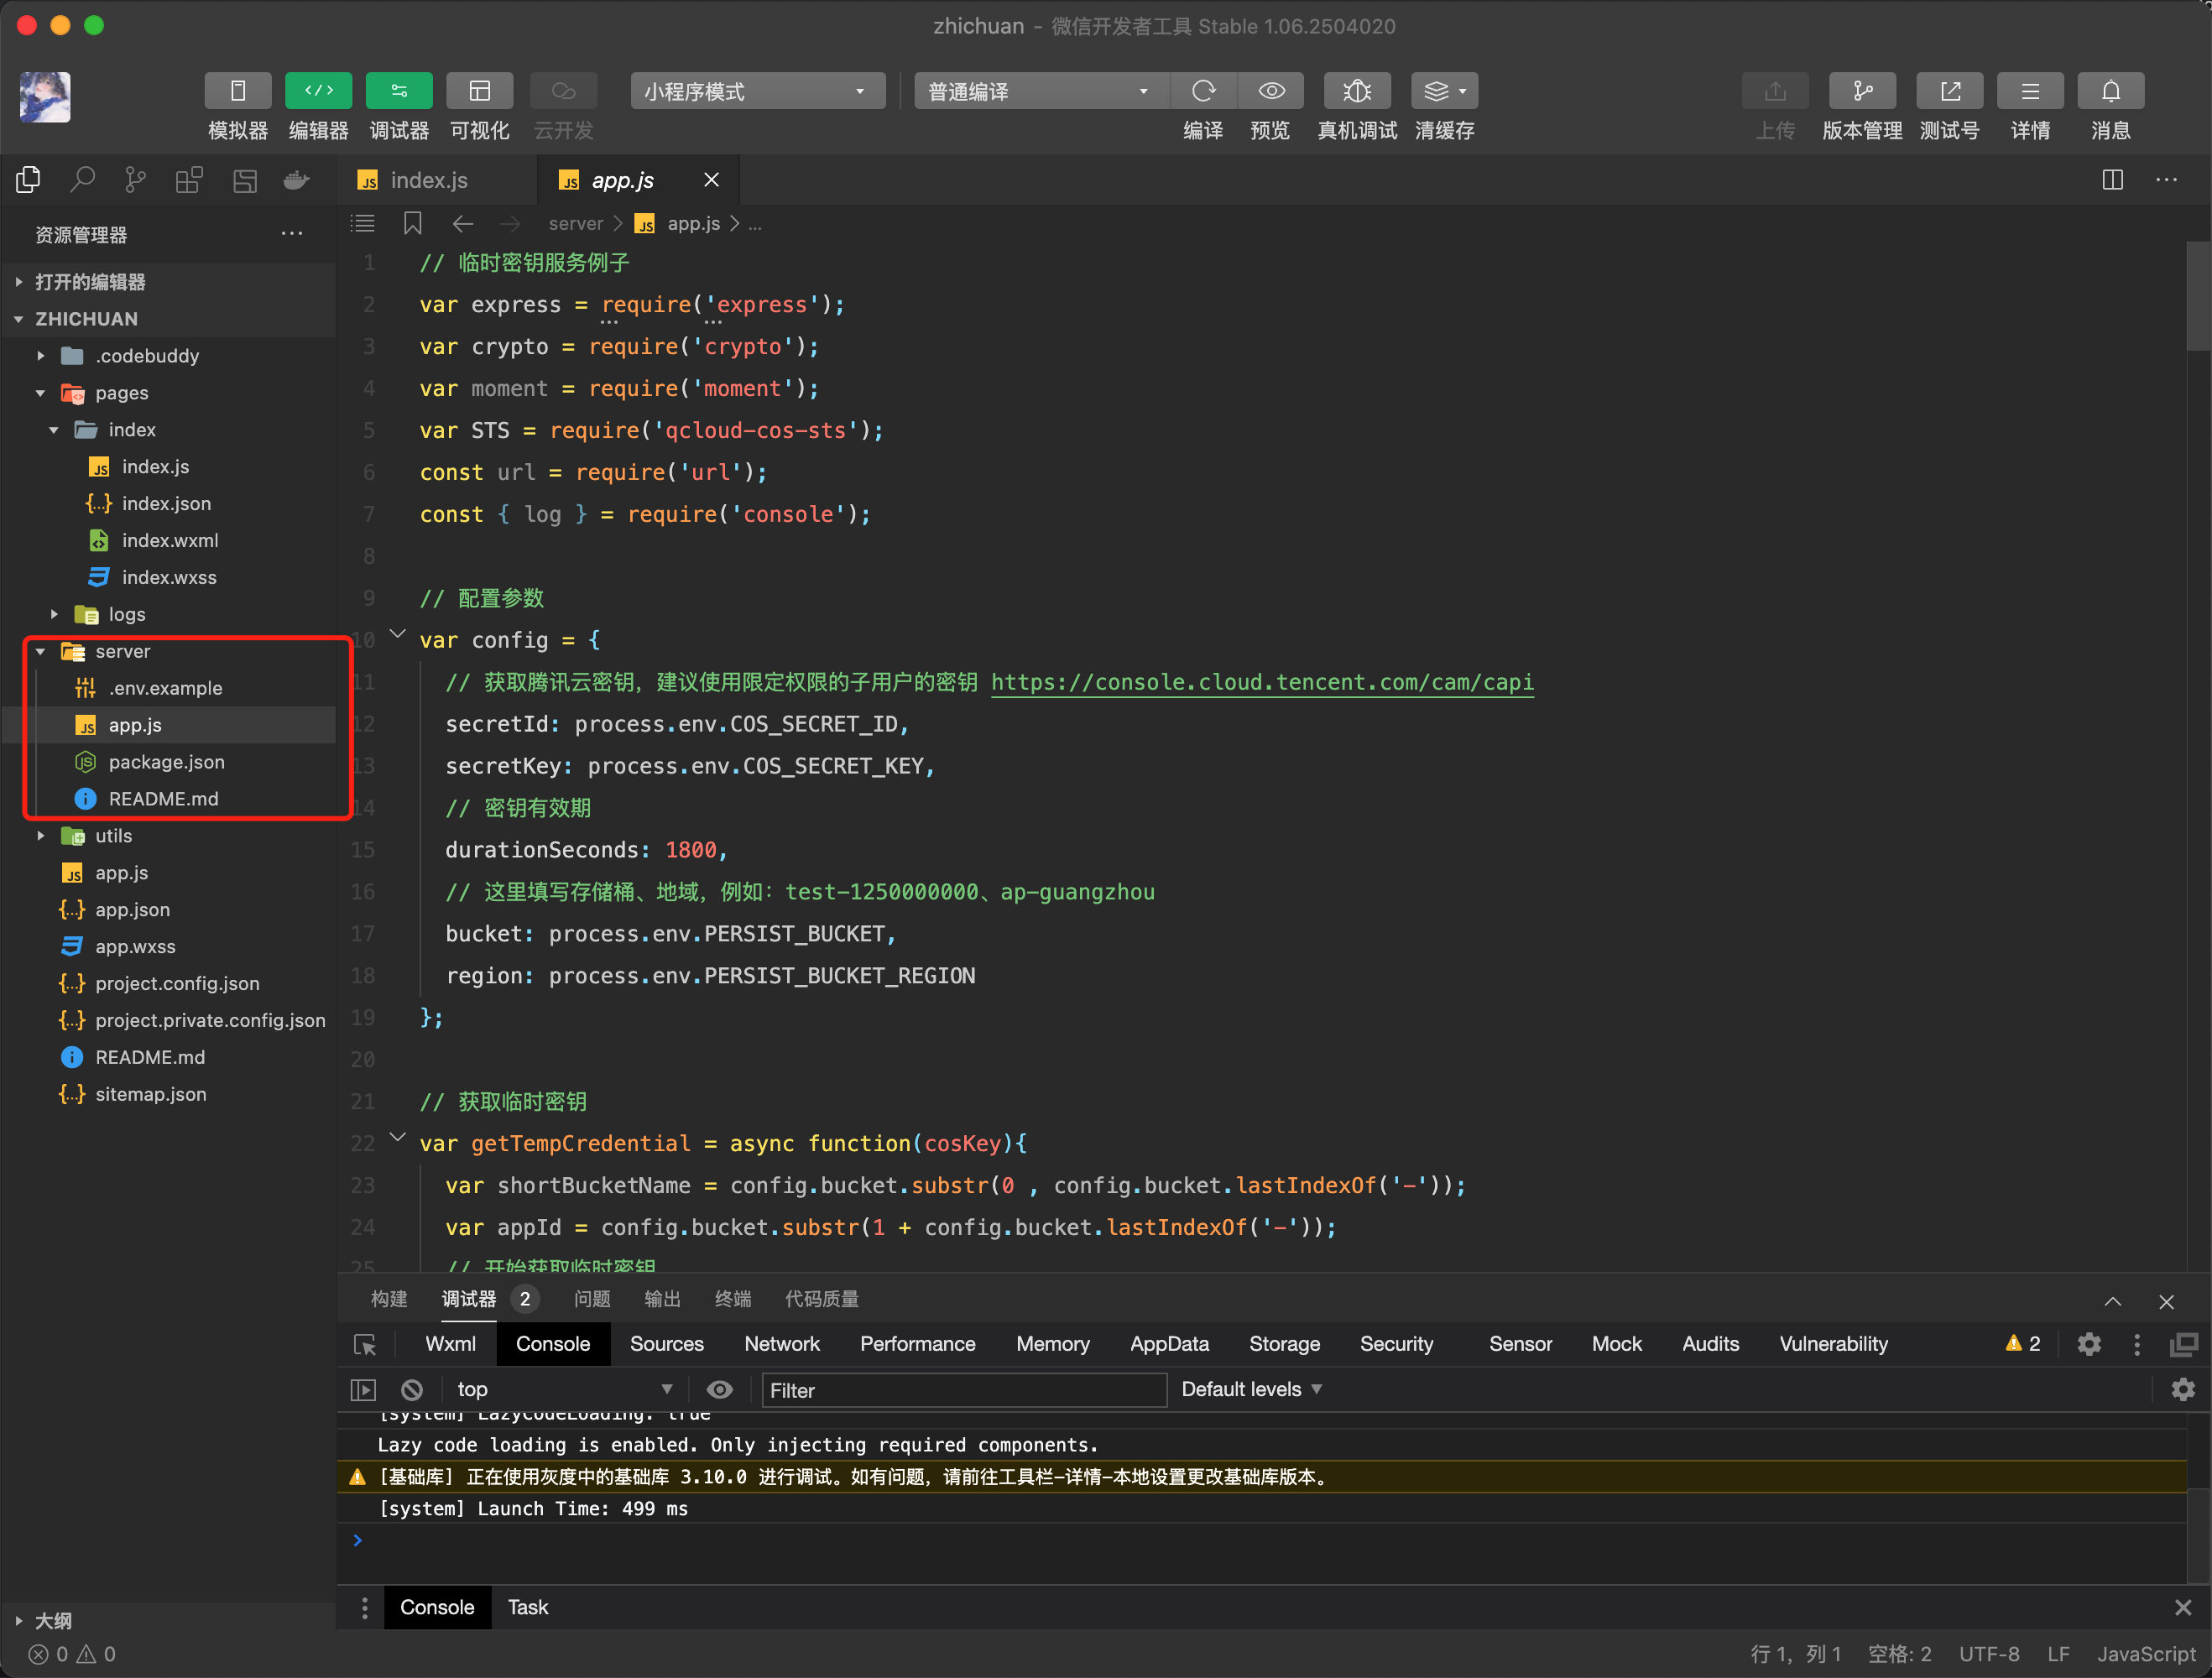
サーバー側でNode.jsを使用して署名を計算する場合は、Node.jsの例をご参照ください。
初心者の方はクイックスタートをご参照ください。
ミニプログラムのアップロード例
具体的な手順は以下の通りです。
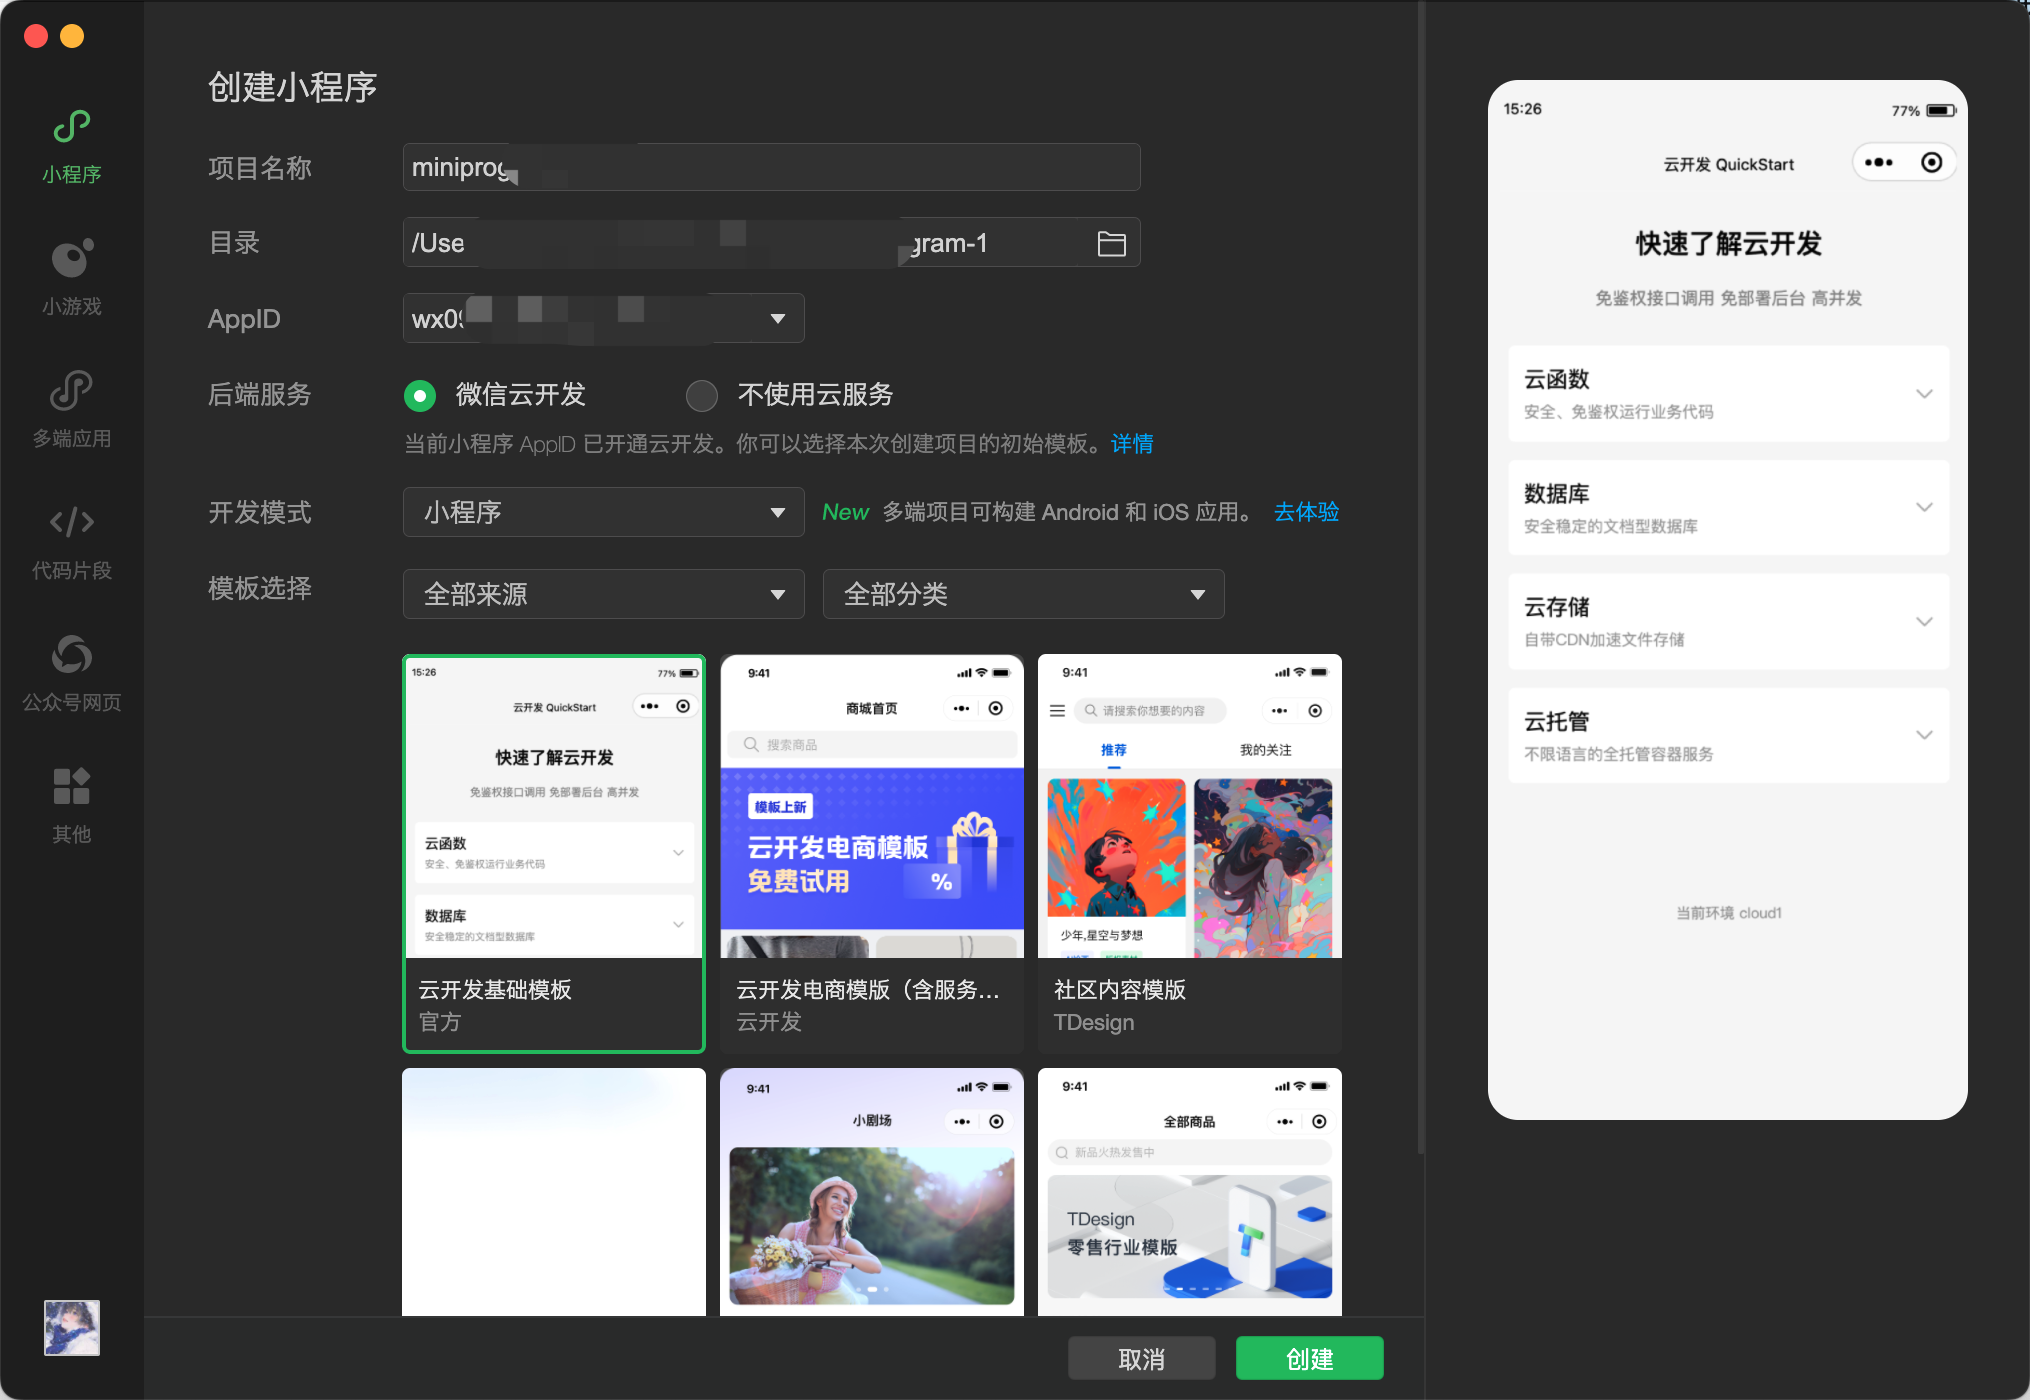
1. WeChatミニプログラムプロジェクトを作成し、開発者ツールを開いてプロジェクトを新規作成し、AppIDを入力します。
2. プロジェクト内で新しいページ(例:pages/index/index.js)を見つけるか作成し、以下の直接アップロード用コードを追加します。
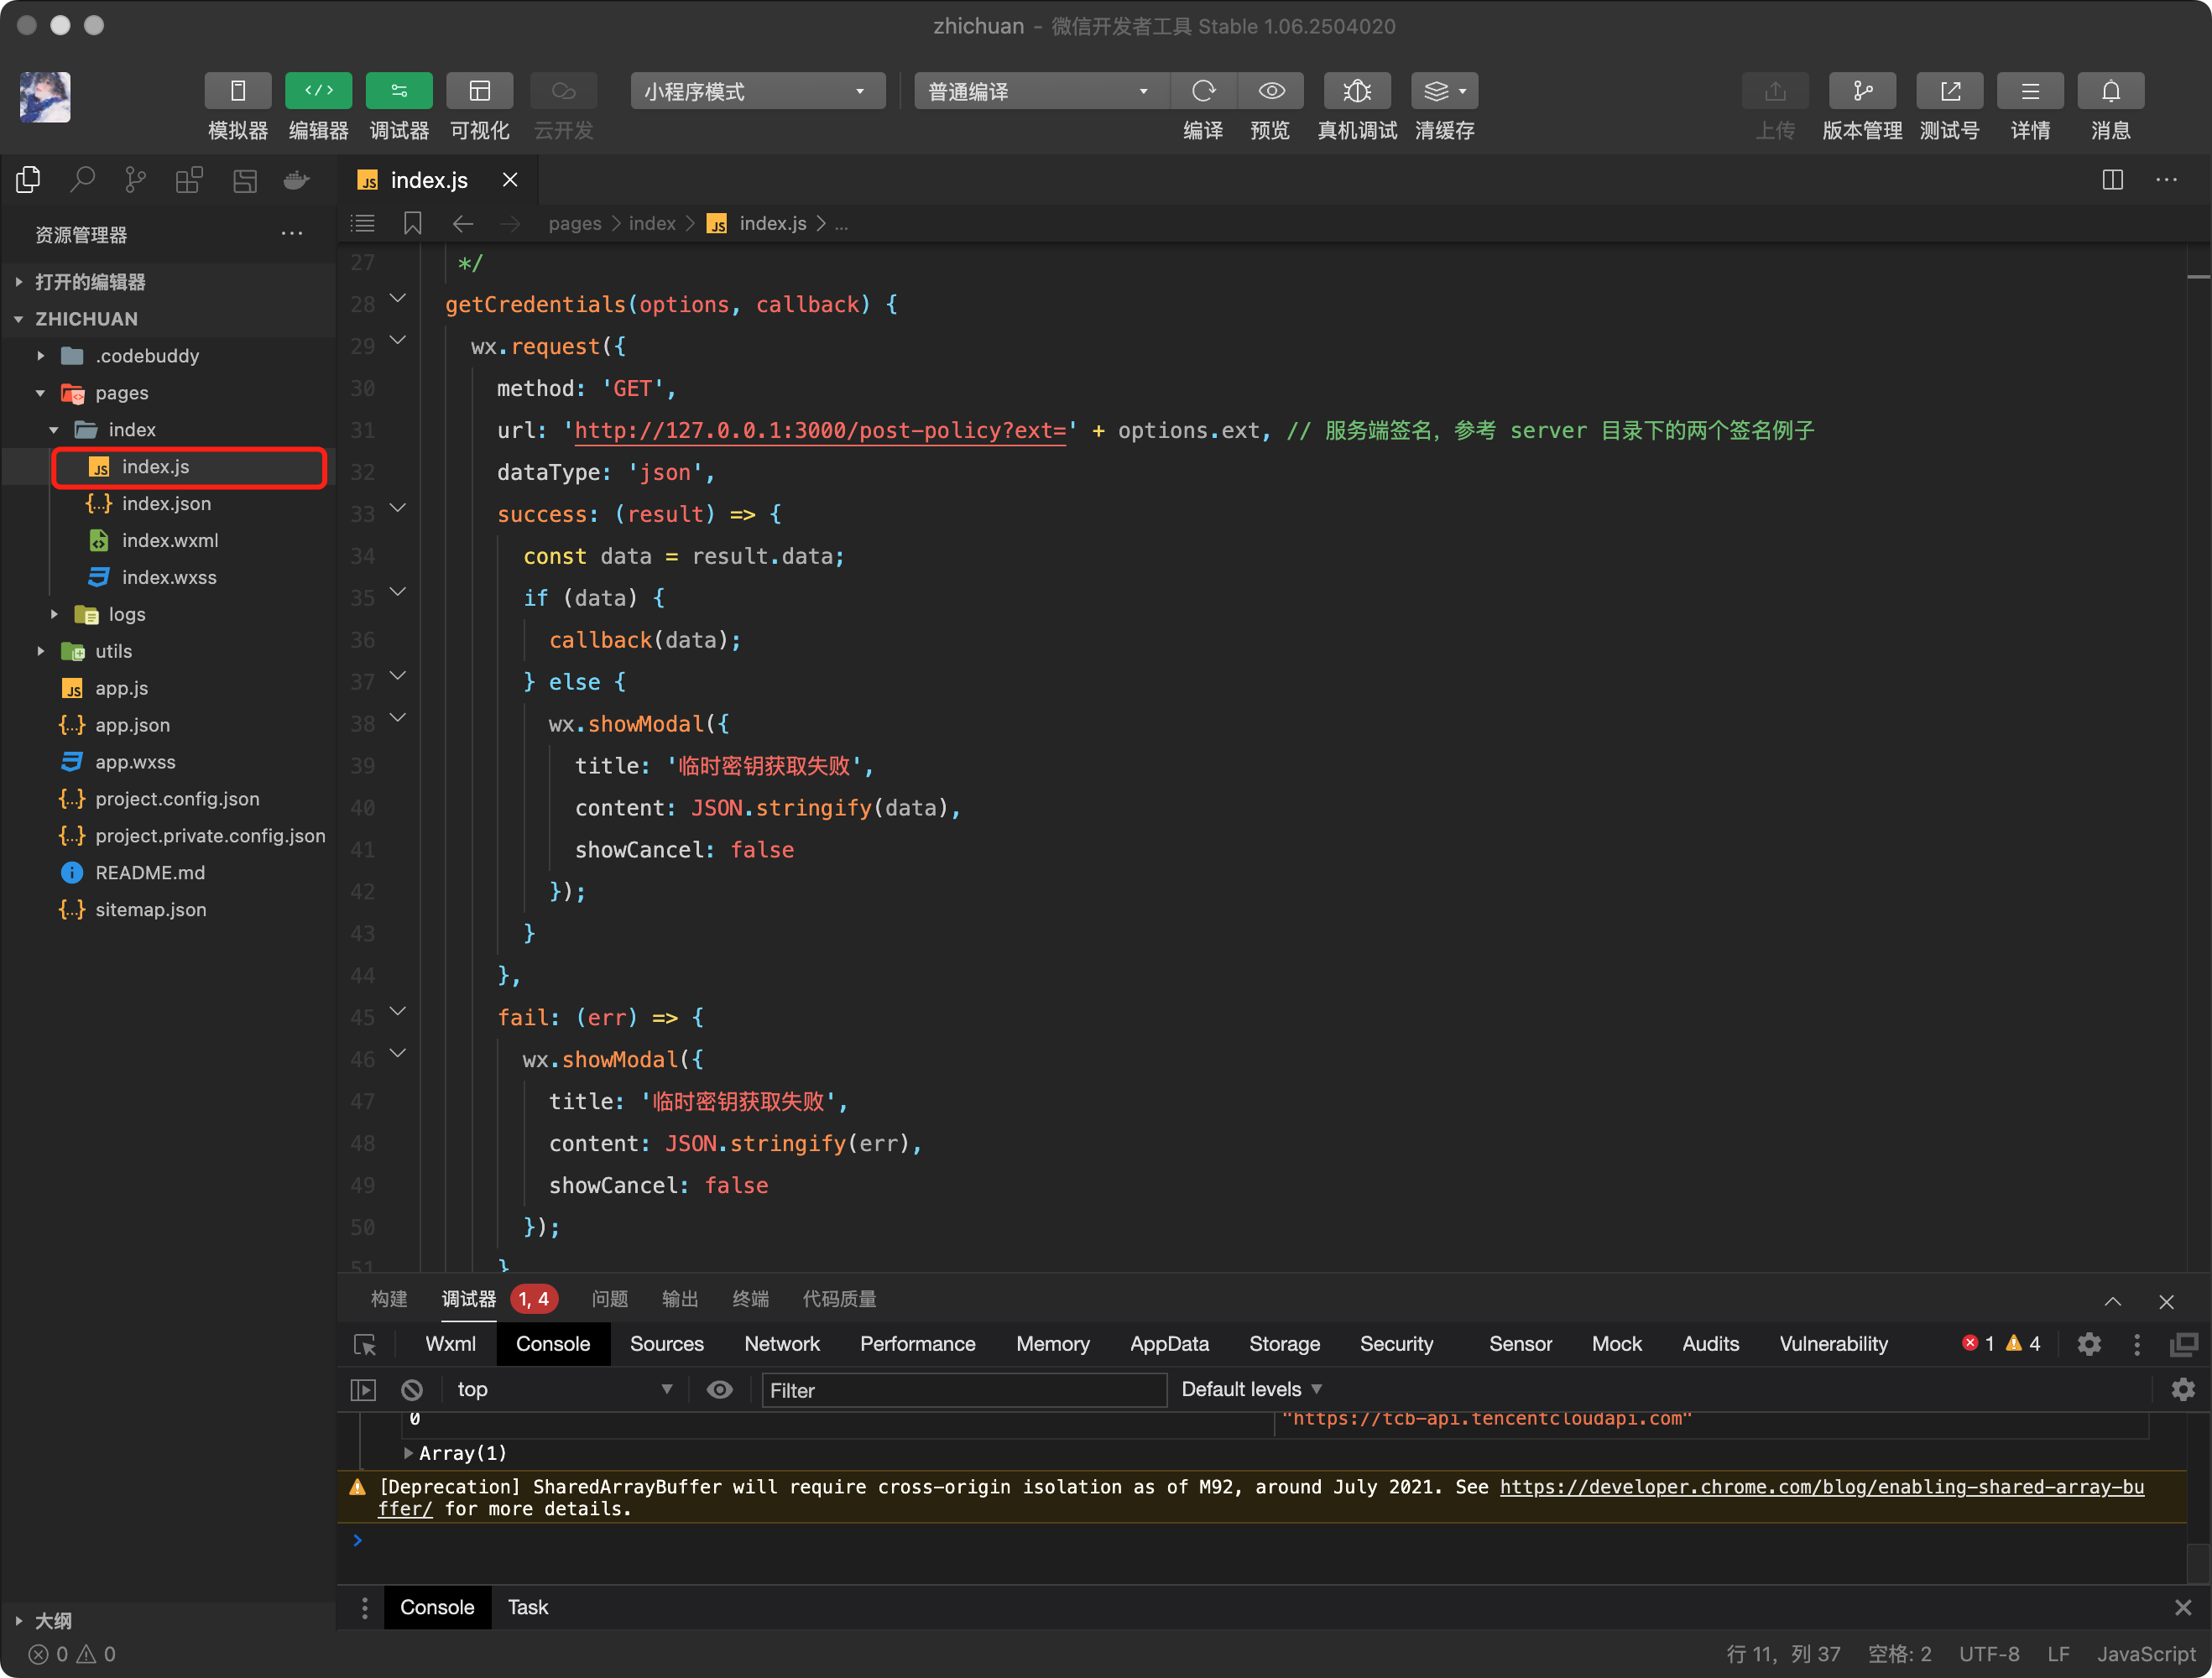
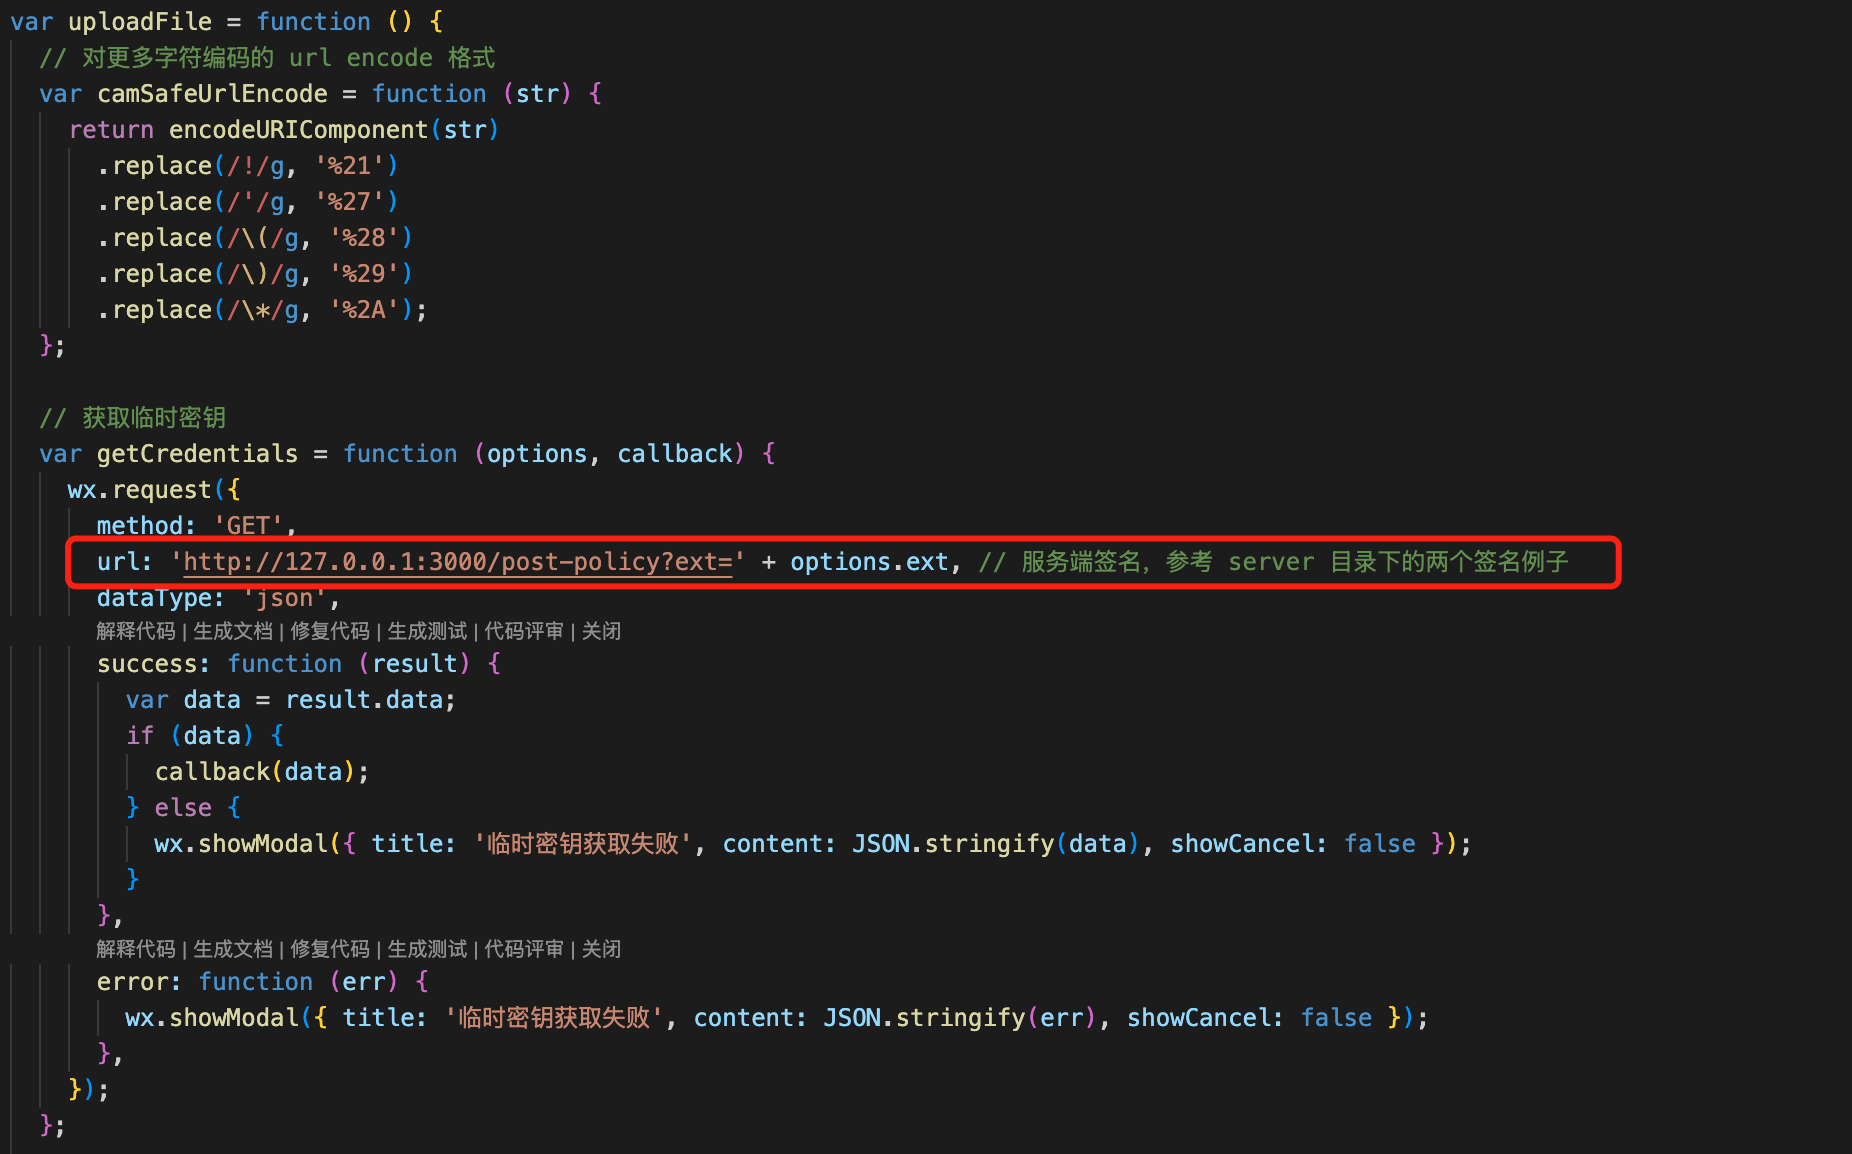
3. コード内の対応するサーバーアドレスを修正します。
4. サーバー側でNode.jsを使用して署名を計算する場合は、Node.jsの例をご参照ください。
5. WeChat公式アカウントプラットフォームの開発 > 開発設定にて、ドメインホワイトリストを設定します。SDKは、wx.uploadFileとwx.requestの2つのインターフェースを使用します。
POSTを使用したアップロード
var uploadFile = function () {// より多くの文字エンコーディングに対応したURLエンコード形式var camSafeUrlEncode = function (str) {return encodeURIComponent(str).replace(/!/g, '%21').replace(/'/g, '%27').replace(/\\(/g, '%28').replace(/\\)/g, '%29').replace(/\\*/g, '%2A');};// 署名の取得var getAuthorization = function (options, callback) {wx.request({method: 'GET',// 自身のサーバーアドレスに置き換え、postアップロード署名を取得url: 'http://127.0.0.1:3000/post-policy?ext=' + options.ext,dataType: 'json',success: function (result) {var data = result.data;if (data) {callback(data);} else {wx.showModal({title: '一時キーの取得に失敗しました',content: JSON.stringify(data),showCancel: false,});}},error: function (err) {wx.showModal({title: '一時キーの取得に失敗しました',content: JSON.stringify(err),showCancel: false,});},});};/*** prefix: COSリクエストURL* filePath: ミニプログラムで選択したアップロードファイルパス* key: cosへのアップロードパス* formData: サーバー側から返された認証パラメータ*/var postFile = function ({ prefix, filePath, key, formData }) {var requestTask = wx.uploadFile({url: prefix,name: 'file',filePath: filePath,formData: formData,success: function (res) {var url = prefix + '/' + camSafeUrlEncode(key).replace(/%2F/g, '/');if (res.statusCode === 200) {wx.showModal({ title: 'アップロード済み', content: url, showCancel: false });} else {wx.showModal({title: 'アップロード失敗',content: JSON.stringify(res),showCancel: false,});}console.log(res.header['x-cos-request-id']);console.log(res.statusCode);console.log(url);},fail: function (res) {wx.showModal({title: 'アップロード失敗',content: JSON.stringify(res),showCancel: false,});},});requestTask.onProgressUpdate(function (res) {console.log('進行中:', res);});};// ファイルアップロードvar uploadFile = function (filePath) {var extIndex = filePath.lastIndexOf('.');var fileExt = extIndex >= -1 ? filePath.substr(extIndex + 1) : '';// ファイル拡張子を渡し、サーバー側で署名付きURLを生成getAuthorization({ ext: fileExt }, function (AuthData) {// AuthData形式が正しいか確認console.log(AuthData);// リクエストに使用するパラメータvar prefix = 'https://' + AuthData.cosHost; // リクエストURLvar key = AuthData.cosKey; // サーバー側でファイル名を決定する方が安全ですvar formData = {key: key,success_action_status: 200,'Content-Type': '','q-sign-algorithm': AuthData.qSignAlgorithm,'q-ak': AuthData.qAk,'q-key-time': AuthData.qKeyTime,'q-signature': AuthData.qSignature,policy: AuthData.policy,};if (AuthData.securityToken)formData['x-cos-security-token'] = AuthData.securityToken;postFile({ prefix, filePath, key, formData });});};// ファイル選択wx.chooseMedia({count: 1, // デフォルトで9sizeType: ['original'], // 元画像か圧縮画像かを指定可能、ここではデフォルトで元画像を使用しますsourceType: ['album', 'camera'], // ソースをアルバムかカメラかを指定可能、デフォルトでは両方ともありますsuccess: function (res) {uploadFile(res.tempFiles[0].tempFilePath);},});};
PUTを使用したアップロード
var uploadFile = function () {// より多くの文字エンコーディングに対応したURLエンコード形式var camSafeUrlEncode = function (str) {return encodeURIComponent(str).replace(/!/g, '%21').replace(/'/g, '%27').replace(/\\(/g, '%28').replace(/\\)/g, '%29').replace(/\\*/g, '%2A');};// 署名の取得var getAuthorization = function (options, callback) {wx.request({method: 'GET',// 自身のサーバーアドレスに置き換え、putアップロード署名を取得しますurl: 'http://127.0.0.1:3000/put-sign?ext=' + options.ext,dataType: 'json',success: function (result) {var data = result.data;if (data) {callback(data);} else {wx.showModal({title: '一時キーの取得に失敗しました',content: JSON.stringify(data),showCancel: false,});}},error: function (err) {wx.showModal({title: '一時キーの取得に失敗しました',content: JSON.stringify(err),showCancel: false,});},});};/*** prefix: COSリクエストURL* filePath: ミニプログラムで選択したアップロードファイルパス* key: COSへのアップロードパス* formData: サーバー側から返された認証パラメータ*/var putFile = function ({ prefix, filePath, key, AuthData }) {// putアップロードでは、ファイルの実際の内容を読み取ってアップロードする必要がありますconst wxfs = wx.getFileSystemManager();wxfs.readFile({filePath: filePath,success: function (fileRes) {var requestTask = wx.request({url: prefix + '/' + key,method: 'PUT',header: {Authorization: AuthData.authorization,'x-cos-security-token': AuthData.securityToken,},data: fileRes.data,success: function success(res) {var url = prefix + '/' + camSafeUrlEncode(key).replace(/%2F/g, '/');if (res.statusCode === 200) {wx.showModal({title: 'アップロード済み',content: url,showCancel: false,});} else {wx.showModal({title: 'アップロード失敗',content: JSON.stringify(res),showCancel: false,});}console.log(res.statusCode);console.log(url);},fail: function fail(res) {wx.showModal({title: 'アップロード失敗',content: JSON.stringify(res),showCancel: false,});},});},});};// ファイルアップロードvar uploadFile = function (filePath) {var extIndex = filePath.lastIndexOf('.');var fileExt = extIndex >= -1 ? filePath.substr(extIndex + 1) : '';getAuthorization({ ext: fileExt }, function (AuthData) {// AuthData形式が正しいか確認console.log(AuthData);const prefix = 'https://' + AuthData.cosHost;const key = AuthData.cosKey;putFile({ prefix, filePath, key, AuthData });});};// ファイル選択wx.chooseMedia({count: 1, // デフォルトで9sizeType: ['original'], // 元画像か圧縮画像かを指定可能、ここではデフォルトで元画像を使用しますsourceType: ['album', 'camera'], // ソースをアルバムかカメラかを指定可能、デフォルトでは両方ともありますsuccess: function (res) {uploadFile(res.tempFiles[0].tempFilePath);},});};
関連ドキュメント
ミニプログラムSDKを使用する必要がある場合は、ミニプログラムSDKクイックスタートドキュメントをご参照ください。
フィードバック