テンプレート
ダウンロード
フォーカスモード
フォントサイズ
概要
データワークフローサービスを使用する際、通常は一連のパラメータを設定する必要があります。テンプレートの役割は、この一連のパラメータを一つに組み合わせることです。テンプレートを設定すると、操作を簡略化でき、設定したパラメータは再利用が可能なため、繰り返し入力する必要もなくなります。
メディア処理機能(オーディオビデオトランスコーディング、オーディオビデオスプライシング、ビデオフレームキャプチャ、ビデオのアニメーション画像生成など)については、タスクまたはワークフローの作成時に、使用するテンプレートを指定する必要があります。テンプレートページでシステムプリセットテンプレートを提供するほか、ご自身の業務ニーズに応じてカスタムテンプレートを作成することもできます。
システムプリセットテンプレート
システムプリセットテンプレートはよく用いられるパラメータをあらかじめ組み合わせて提供するテンプレートで、そのまま使用できます。タスクまたはワークフローを作成する際に、テンプレート名でこのタイプのテンプレートを選択することができます。
1. COSコンソールにログインします。
2. 左側ナビゲーションバーでバケットリストをクリックし、バケットリスト管理ページに進みます。
3. 操作する必要のあるバケットを見つけ、そのバケット名をクリックし、バケット管理ページに進みます。
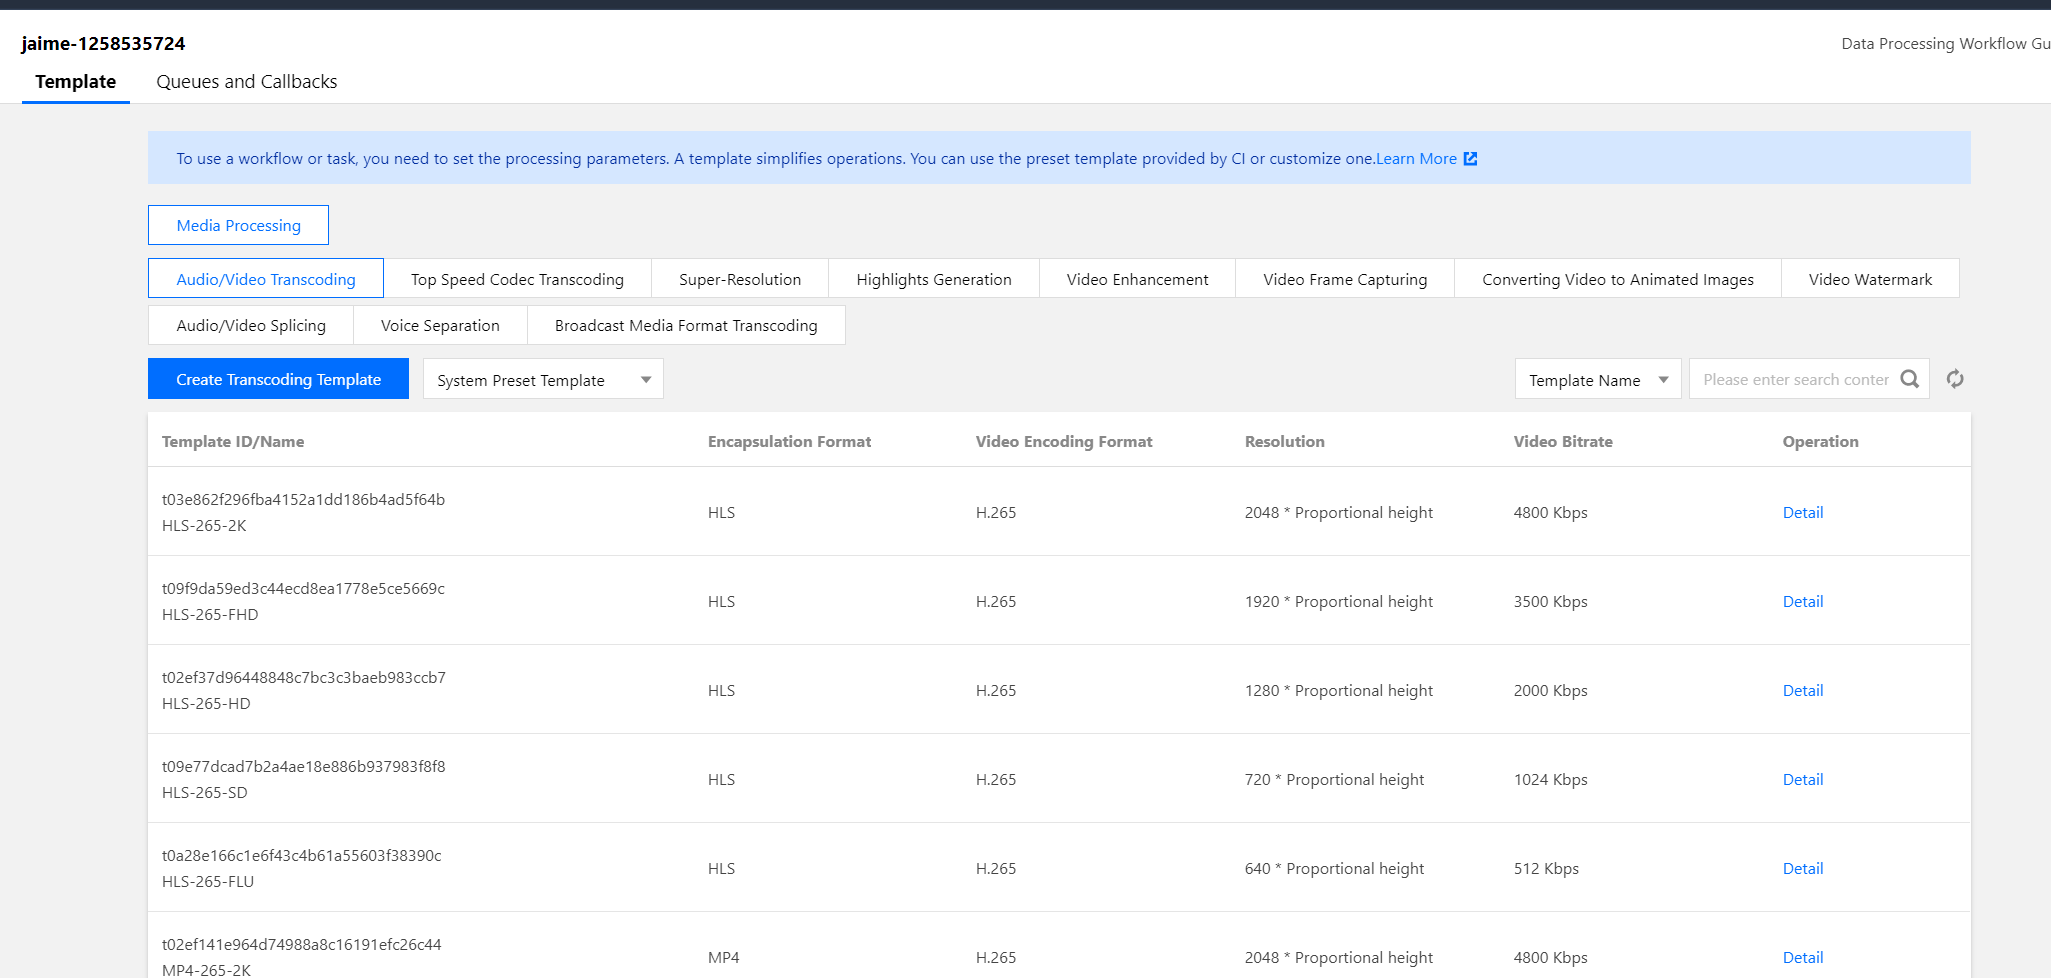
4. 左側ナビゲーションバーで、データワークフロー > テンプレート設定をクリックすると、さまざまな処理タイプのテンプレートを表示することができます。
説明:
現在システムでは15種類のオーディオビデオトランスコーディングプリセットテンプレート、3種類のビデオフレームキャプチャプリセットテンプレートおよび18種類のビデオアニメーション画像生成プリセットテンプレートを提供しています。
システムプリセットテンプレートではテンプレート情報の表示のみサポートしており、編集と削除はできません。
オーディオビデオトランスコーディングシステムテンプレート
テンプレートID | テンプレート名 | コンテナ形式 | ビデオコーデック形式 | 解像度 | ビデオビットレート | オーディオコーデック形式 | オーディオビットレート |
t0e2b9f4cd25184c6ab73d0c85a6ee9cb5 | H264-MP4-LD-360P | MP4 | H.264 | 640 * 比例ズーム | 512 Kbps | AAC | 128 Kbps |
t0876739cd865042d1957d73c78f0484fb | H264-MP4-SD-480P | MP4 | H.264 | 720 * 比例ズーム | 1024 Kbps | AAC | 128 Kbps |
t0852e7ff4acd4484e99ba104f3840d3cb | H264-MP4-HD-720P | MP4 | H.264 | 1280 * 比例ズーム | 2000 Kbps | AAC | 128 Kbps |
t04df9eb0c373c4a8780ec894ce05469a7 | H264-MP4-FHD-1080P | MP4 | H.264 | 1920 * 比例ズーム | 3500 Kbps | AAC | 128 Kbps |
t09d027135634d47048e5a30dc1e19ee90 | H264-MP4-2K | MP4 | H.264 | 2048 * 比例ズーム | 4800 Kbps | AAC | 128 Kbps |
t0e634622e8dfb49339ba478d60ddc7188 | H264-HLS-LD-360P | M3U8 | H.264 | 640 * 比例ズーム | 512 Kbps | AAC | 128 Kbps |
t0fa5bdbf58bb348e88bf73fae5d674fdf | H264-HLS-SD-480P | M3U8 | H.264 | 720 * 比例ズーム | 1024 Kbps | AAC | 128 Kbps |
t09d0f419921e44ed98190f355ec9fd629 | H264-HLS-HD-720P | M3U8 | H.264 | 1280 * 比例ズーム | 2000 Kbps | AAC | 128 Kbps |
t080ae8a06f9074f3daa46201078f8d4b1 | H264-HLS-FHD-1080P | M3U8 | H.264 | 1920 * 比例ズーム | 3500 Kbps | AAC | 128 Kbps |
t0ab68939cef0f40d19c4a135df540239f | H264-HLS-2K | M3U8 | H.264 | 2048 * 比例ズーム | 4800 Kbps | AAC | 128 Kbps |
t0e165bef65ed24d568eeecc8661248af6 | H264-FLV-LD-360P | M3U8 | H.264 | 640 * 比例ズーム | 512 Kbps | AAC | 128 Kbps |
t057d0410c32444e48b9220f9571e6097a | H264-FLV-SD-480P | M3U8 | H.264 | 720 * 比例ズーム | 1024 Kbps | AAC | 128 Kbps |
t00daf332ba39049f8bfb899c1ed0134b0 | H264-FLV-HD-720P | M3U8 | H.264 | 1280 * 比例ズーム | 2000 Kbps | AAC | 128 Kbps |
t0d41905a814434c8a81897ecb54d53a32 | H264-FLV-FHD-1080P | M3U8 | H.264 | 1920 * 比例ズーム | 3500 Kbps | AAC | 128 Kbps |
t0e287e59454b94a8983ba78a6a30ee864 | H264-FLV-2K | M3U8 | H.264 | 2048 * 比例ズーム | 4800 Kbps | AAC | 128 Kbps |
ビデオフレームキャプチャシステムテンプレート
テンプレートID | テンプレート名 | フレームキャプチャ開始時間 | フレームキャプチャ間隔 | シングルビデオ最大フレームキャプチャ数 | 出力画像サイズ | 出力形式 |
t01d40e440761448fc8c538fb8d5a5b81e | snapshot_320 * 180_1 | 0s | 2s | 5 | 320px * 180px | JPEG |
t0a60a2bc71a4b40c7b3d7f7e8a2779a81 | snapshot_640 * 360_2 | 0s | 10s | 5 | 640px * 360px | JPEG |
t07740e32081b44ad7a0aea03adcffd54a | snapshot_1280 * 720_3 | 0s | 10s | 5 | 1280px * 720px | JPEG |
ビデオアニメーション画像生成システムテンプレート
テンプレートID | テンプレート名 | トランスコード開始時間 | トランスコード時間 | フレーム抽出方式 | 出力アニメーションフレームレート | 出力アニメーションサイズ | 出力形式 | 出力アニメーション品質 |
t04373959a69c04d47b62fd214dd13d8e9 | gif_320 * 180_1 | 0s | 600s | キーフレームのみ抽出 | アダプティブ | 320px * 180px | GIF | \\ |
t0341b0ab2b8a340ff826e9cb4f3a7baea | gif_320 * 180_2 | 0s | 600s | フレーム抽出レート10秒/フレーム | アダプティブ(0.10フレーム/秒) | 320px * 180px | GIF | \\ |
t046b1d8e5bdf842c6a58d8028b48eafee | gif_320 * 180_3 | 0s | 600s | フレーム抽出レート10フレーム/秒 | アダプティブ(10フレーム/秒) | 320px * 180px | GIF | \\ |
t0ef2077f215864c018a2fca73614ceca6 | gif_640 * 360_4 | 0s | 600s | キーフレームのみ抽出 | アダプティブ | 640px * 360px | GIF | \\ |
t0d21406ca737a40869973a37a5daa349a | gif_640 * 360_5 | 0s | 600s | フレーム抽出レート10秒/フレーム | アダプティブ(0.10フレーム/秒) | 640px * 360px | GIF | \\ |
t0878a9c9c1f054cb5bca68b8b06e556c2 | gif_640 * 360_6 | 0s | 600s | フレーム抽出レート10フレーム/秒 | アダプティブ(10フレーム/秒) | 640px * 360px | GIF | \\ |
t0dae821708cea4ba5b3e271810ac80a21 | gif_1280 * 720_7 | 0s | 600s | キーフレームのみ抽出 | アダプティブ | 1280px * 720px | GIF | \\ |
t03fef67ad94d2466b9c0c89252ed72e87 | gif_1280 * 720_8 | 0s | 600s | フレーム抽出インターバル10秒/フレーム | アダプティブ(0.10フレーム/秒) | 1280px * 720px | GIF | \\ |
t030a64e9f9f5a4f53a9ef64bb7ce490b5 | gif_1280 * 720_9 | 0s | 600s | フレーム抽出レート10フレーム/秒 | アダプティブ(10フレーム/秒) | 1280px * 720px | GIF | \\ |
t03b0e9eca4fc34e2cba9da89d9c7c13a2 | webp_320 * 180_1 | 0s | 60s | キーフレームのみ抽出 | アダプティブ | 320px * 180px | WEBP | 75 |
t016fcddf6bc3c44b793e9b7b07119b4ee | webp_320 * 180_2 | 0s | 600s | フレーム抽出インターバル10秒/フレーム | アダプティブ(0.10フレーム/秒) | 320px * 180px | WEBP | 75 |
t0bf1f1ce6d2404b258c0f81fbb9aaece1 | webp_320 * 180_3 | 0s | 600s | フレーム抽出インターバル10秒/フレーム | アダプティブ(10フレーム/秒) | 320px * 180px | WEBP | 75 |
t098d6d3fcfd2c45309a408594a42559f6 | webp_640 * 360_4 | 0s | 60s | キーフレームのみ抽出 | アダプティブ | 640px * 360px | WEBP | 75 |
t0169a6a9c2eec4b51972eb63bafcbf08d | webp_640 * 360_5 | 0s | 600s | フレーム抽出インターバル10秒/フレーム | アダプティブ(0.10フレーム/秒) | 640px * 360px | WEBP | 75 |
t0ef9ba537011e4876b8777aebc19d10a5 | webp_640 * 360_6 | 0s | 600s | フレーム抽出インターバル10秒/フレーム | アダプティブ(10フレーム/秒) | 640px * 360px | WEBP | 75 |
t02743d344b5e74c579e50e9e135b432b8 | webp_1280 * 720_7 | 0s | 60s | キーフレームのみ抽出 | アダプティブ | 1280px * 720px | WEBP | 75 |
t0dd27c136ff2741538bec96981e058868 | webp_1280 * 720_8 | 0s | 600s | フレーム抽出インターバル10秒/フレーム | アダプティブ(0.10フレーム/秒) | 1280px * 720px | WEBP | 75 |
t00ad05235d67a45a9a697b553052b7346 | webp_1280 * 720_9 | 0s | 600s | フレーム抽出インターバル10秒/フレーム | アダプティブ(10フレーム/秒) | 1280px * 720px | WEBP | 75 |
カスタムテンプレート
システムプリセットテンプレートではニーズを満たせない場合は、カスタムテンプレートを選択できます。現在、オーディオビデオトランスコーディング、高速高画質トランスコーディング、ハイライトコレクション、ビデオフレームキャプチャ、ビデオアニメーション画像生成、ビデオウォーターマーク、オーディオビデオスプライシング、音声分離、ビデオエンハンスメント、超解像度、画像処理、ブロードキャストグレードフォーマットのトランスコーディングのカスタムテンプレートを作成することができます。
音声/ビデオトランスコーディング
オーディオビデオトランスコーディングはオーディオ、ビデオなどのメディアファイルのトランスコード機能をご提供します。これは、ファイルのビットストリームを別のビットストリームに変換するプロセスです。トランスコードによって、コーデック、解像度、ビットレートなどの元のビットストリームのパラメータを変更して、様々なデバイスやネットワーク環境での再生に適合させます。カスタムオーディオビデオトランスコードテンプレートでは、テンプレートのパラメータをカスタム設定することができます。
操作手順
1. COSコンソールにログインします。
2. 左側ナビゲーションバーでバケットリストをクリックし、バケットリスト管理ページに進みます。
3. ビデオを保存したいバケットを見つけ、そのバケット名をクリックし、バケット管理ページに進みます。
4. 左側ナビゲーションバーで、データワークフロー > テンプレート設定をクリックし、テンプレート設定ページに進みます。
5. メディア処理 > オーディオビデオトランスコーディングを選択し、トランスコードテンプレートの作成をクリックすると、トランスコードテンプレート作成ウィンドウがポップアップします。
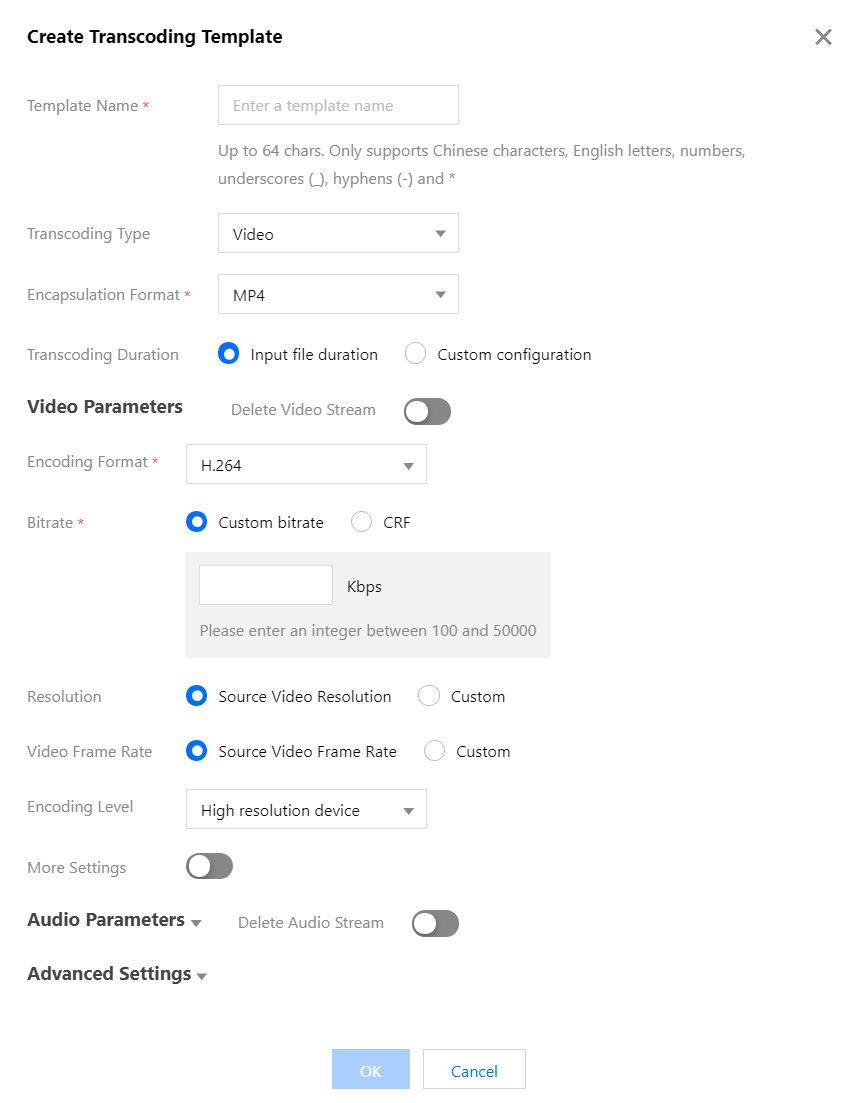
6. トランスコードテンプレート作成ウィンドウで、以下の情報を設定します。
テンプレート名:長さは64文字以下とし、中国語、英語、数字、アンダーバー「_」、ハイフン「-」、「*」のみサポートします。
トランスコードタイプ:ビデオトランスコードとオーディオトランスコードをサポートします。
コンテナ形式:ビデオトランスコードはMP4、FLV、HLS、TS、MKV、WebM形式を、オーディオトランスコードはMP3、AAC、AMR、FLAC、WebM形式をそれぞれサポートします。
コーデック形式:H264、H265、AV1、VP8、VP9などの形式をサポートします。
ビットレート:アダプティブビットレートをサポートし、ビデオ内容を自動的に分析した後、ビットレートを割り当てます。
トランスコード時間:ソースファイル時間、カスタム設定時間から選択できます。
ビデオ/オーディオパラメータ:ビデオおよびオーディオパラメータはユーザーのニーズに応じてカスタマイズできます。
7. OKをクリックしてテンプレートの作成を完了します。
作成に成功すると、新しく作成したテンプレートに対し、カスタムテンプレートリストで表示、編集、削除の操作を行うことができるようになります。
説明:
高速高画質トランスコーディング
高速高画質トランスコーディングは低ビットレートでのビデオの主観的画質を向上させることができます。高速高画質トランスコーディングを使用すると、通常のオーディオビデオトランスコーディングに比べてファイルサイズをより小さく、画質をより鮮明にすることができ、ネットワークリソースの消費を抑えると同時に、ユーザーにより良い視覚体験をもたらします。高速高画質トランスコードテンプレートのコーデック形式、解像度、ビットレートなどのパラメータはカスタマイズ可能です。
操作手順
1. COSコンソールにログインします。
2. 左側ナビゲーションバーでバケットリストをクリックし、バケットリスト管理ページに進みます。
3. ビデオを保存したいバケットを見つけ、そのバケット名をクリックし、バケット管理ページに進みます。
4. 左側ナビゲーションバーで、データワークフロー > テンプレート設定をクリックし、テンプレート設定ページに進みます。
5. 高速高画質トランスコーディングを選択し、高速高画質トランスコードテンプレートの作成をクリックすると、高速高画質トランスコードテンプレート作成ウィンドウがポップアップします。
6. ブロードキャストグレードフォーマットのトランスコーディング作成ウィンドウで、以下の情報を設定します。
テンプレート名:長さは64文字以下とし、中国語、英語、数字、アンダーバー「_」、ハイフン「-」、「*」のみサポートします。
トランスコードタイプ:デフォルトではビデオトランスコードになっています。
コンテナ形式:MP4、HLS形式があります。
トランスコード時間:ソースファイル時間、カスタム設定時間から選択できます。
ビデオ/オーディオパラメータ:ビデオおよびオーディオパラメータはユーザーのニーズに応じてカスタマイズできます。
7. OKをクリックしてテンプレートの作成を完了します。
作成に成功すると、新しく作成したテンプレートに対し、カスタムテンプレートリストで表示、編集、削除の操作を行うことができるようになります。
説明:
ブロードキャストグレードフォーマットのトランスコーディング
XAVC、Proresなどの特殊な形式の処理をサポートしています。
操作手順
1. COSコンソールにログインします。
2. 左側ナビゲーションバーでバケットリストをクリックし、バケットリスト管理ページに進みます。
3. ビデオを保存したいバケットを見つけ、そのバケット名をクリックし、バケット管理ページに進みます。
4. 左側ナビゲーションバーで、データワークフロー > テンプレート設定をクリックし、テンプレート設定ページに進みます。
5. ブロードキャストグレードフォーマットのトランスコーディングを選択し、ブロードキャストグレードフォーマットのトランスコードテンプレートの作成をクリックします。
6. ブロードキャストグレードフォーマットのトランスコーディング作成ウィンドウで、以下の情報を設定します。
テンプレート名:長さは64文字以下とし、中国語、英語、数字、アンダーバー「_」、ハイフン「-」、「*」のみサポートします。
エンコーダのプリセット:エンコーダのサンプルレートなどの組み合わせを選択します。
コンテナ形式:mxf形式があります。
トランスコード時間:ソースファイル時間、カスタム設定時間から選択できます。
ビデオ/オーディオパラメータ:ビデオおよびオーディオパラメータはユーザーのニーズに応じてカスタマイズできます。
7. OKをクリックしてテンプレートの作成を完了します。
作成に成功すると、新しく作成したテンプレートに対し、カスタムテンプレートリストで表示、編集、削除の操作を行うことができるようになります。
説明:
ハイライトコレクション
ハイライトコレクションは、ビデオからハイライト部分を自動的に抽出することができる機能です。カスタムテンプレートでは、ハイライトコレクションテンプレート名の設定、ハイライトコレクションの最長出力時間、出力ビデオ解像度、出力形式の指定を行うことができます。
操作手順
1. COSコンソールにログインします。
2. 左側ナビゲーションバーでバケットリストをクリックし、バケットリスト管理ページに進みます。
3. ビデオを保存したいバケットを見つけ、そのバケット名をクリックし、バケット管理ページに進みます。
4. 左側ナビゲーションバーで、データワークフロー > テンプレート設定をクリックし、テンプレート設定ページに進みます。
5. ハイライトコレクションを選択し、ハイライトコレクションテンプレートの作成をクリックすると、ハイライトコレクションテンプレート作成ウィンドウがポップアップします。
6. 音声分離テンプレートウィンドウで、以下の情報を設定します。
説明:
テンプレート名:長さは64文字以下とし、中国語、英語、数字、アンダーバー「_」、ハイフン「-」、「*」のみサポートします。
コンテナ形式:MP4、FLV、HLS、TS、MKV形式があります。
コレクション時間:コレクション出力時間は、自動分析された完全な時間、またはカスタマイズしたコレクション出力時間を指定できます。
ビデオ/オーディオパラメータ:ビデオおよびオーディオパラメータはユーザーのニーズに応じてカスタマイズできます。
7. OKをクリックしてテンプレートの作成を完了します。
作成に成功すると、新しく作成したテンプレートに対し、カスタムテンプレートリストで表示、編集、削除の操作を行うことができるようになります。
説明:
ビデオフレームキャプチャ
ビデオフレームキャプチャは、ビデオのある時点のスクリーンキャプチャを撮る機能です。出力するスクリーンキャプチャの形式はデフォルトではJPG形式です。フレームキャプチャ圧縮を有効にしている場合はHEIF形式やTPG形式での出力が可能です。カスタムビデオフレームキャプチャテンプレートは、テンプレート名、フレームキャプチャ開始時間、フレームキャプチャ間隔、フレームキャプチャ数、出力画像サイズ、出力形式のカスタム設定をサポートしています。
操作手順
1. COSコンソールにログインします。
2. 左側ナビゲーションバーでバケットリストをクリックし、バケットリスト管理ページに進みます。
3. ビデオを保存したいバケットを見つけ、そのバケット名をクリックし、バケット管理ページに進みます。
4. 左側ナビゲーションバーで、データワークフロー > テンプレート設定をクリックし、テンプレート設定ページに進みます。
5. ビデオフレームキャプチャを選択し、フレームキャプチャテンプレートの作成をクリックすると、フレームキャプチャテンプレート作成ウィンドウがポップアップします。

6. フレームキャプチャテンプレート作成ウィンドウで、以下の情報を設定します。
テンプレート名:長さは64文字以下とし、中国語、英語、数字、アンダーバー「_」、ハイフン「-」、「*」のみサポートします。
フレームキャプチャ開始時間:ビデオ全体時間の範囲内で、任意のノードをフレームキャプチャ開始時間として選択できます。
フレームキャプチャ方式:
デフォルトの全フレームキャプチャ:ビデオの各フレームをキャプチャします。
カスタムフレームキャプチャ間隔:フレームキャプチャ開始時点からビデオ終了まで、設定した時間間隔に従って、一定間隔ごとに1枚のフレームキャプチャ画像を出力します。
平均フレームキャプチャ:設定したフレームキャプチャ数に従って、フレームキャプチャ開始時点からビデオ終了まで、均等間隔で画像をキャプチャします。
キーフレームキャプチャ:キーフレームのキャプチャを選択できます。
シングルビデオ最大フレームキャプチャ数:選択したフレームキャプチャ方式がデフォルトの全フレームキャプチャ、カスタムフレームキャプチャ間隔またはキーフレームキャプチャの場合は、シングルビデオ最大フレームキャプチャ数を設定する必要があります。
フレームキャプチャ数:選択したフレームキャプチャ方式が平均フレームキャプチャの場合は、フレームキャプチャ数を設定する必要があります。平均フレームキャプチャでは、設定したフレームキャプチャ数に従って、フレームキャプチャ開始時点からビデオ終了まで、均等間隔で画像をキャプチャします。
出力画像サイズ:デフォルトのスクリーンキャプチャ出力サイズはオリジナル画像のサイズです。カスタム画像サイズを選択する場合は、入力する幅と高さを128~4096の間の整数とするようご注意ください。
フレームキャプチャ圧縮:有効にすると、キャプチャ後の画像を圧縮することができます。
7. OKをクリックしてテンプレートの作成を完了します。
作成に成功すると、新しく作成したテンプレートに対し、カスタムテンプレートリストで表示、編集、削除の操作を行うことができるようになります。
説明:
ビデオアニメーション画像生成
ビデオアニメーション画像生成機能を利用すると、ビデオ形式をアニメーション形式に変換することができます。カスタムビデオアニメーション画像生成テンプレートでは、テンプレート名、トランスコード開始時間、トランスコード時間、フレーム抽出方式、出力アニメーションフレームレート、出力アニメーションサイズ、出力形式のカスタム設定をサポートしています。
操作手順
1. COSコンソールにログインします。
2. 左側ナビゲーションバーでバケットリストをクリックし、バケットリスト管理ページに進みます。
3. ビデオを保存したいバケットを見つけ、そのバケット名をクリックし、バケット管理ページに進みます。
4. 左側ナビゲーションバーで、データワークフロー > 共通設定 > テンプレートをクリックし、テンプレート設定ページに進みます。
5. ビデオアニメーション画像生成を選択し、アニメーション画像生成テンプレートの作成をクリックすると、アニメーション画像生成テンプレート作成ウィンドウがポップアップします。
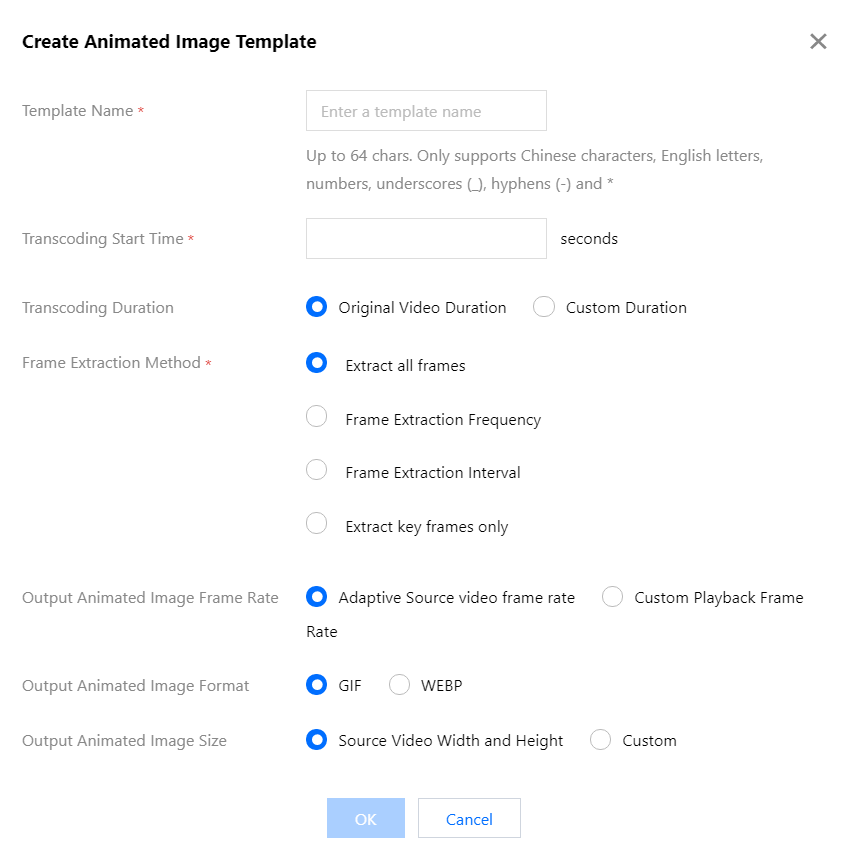
6. アニメーション画像生成テンプレート作成ウィンドウで、以下の情報を設定します。
テンプレート名:長さは64文字以下とし、中国語、英語、数字、アンダーバー「_」、ハイフン「-」、「*」のみサポートします。
トランスコード開始時間:ビデオ全体時間の範囲内で、任意のノードをトランスコード開始時間として選択できます。
トランスコード時間:トランスコード時間とは、トランスコード開始時間後のトランスコードの時間の長さを指します。ソースビデオ時間とカスタム時間の2種類の時間をご提供しています。
フレーム抽出方式:
全フレーム抽出:ビデオの各フレームを抽出します。
フレーム抽出レート:1秒間に抽出するフレーム数を設定できます。1~50の間の整数を入力できます。
フレーム抽出インターバル:指定された秒数間隔ごとに1フレームを抽出します。
キーフレームのみ抽出:ビデオの内容を理解し、AIによるインテリジェント認識を利用して、最適なフレームを抽出して組み合わせ、アニメーションとして出力します。
出力アニメーションフレームレート:アダプティブとは、選択した上記のパラメータに基づき、システムが自動的に適切なフレームレートを選択することを指します。再生フレームレートのカスタマイズも可能です。フレームレートは毎秒1~60フレームの間に限定されます。
出力アニメーション形式:出力されるアニメーションはデフォルトではGIF形式です。アニメーションをWEBP形式で出力したい場合は、出力するアニメーションの品質(1~99の間、デフォルトでは75)を選択する必要があります。
出力アニメーションサイズ:デフォルトの出力アニメーションサイズは元のビデオの幅と高さとなります。カスタムの幅と高さを選択する場合は、入力する幅と高さを128~4096の間の整数とするようご注意ください。
7. OKをクリックしてテンプレートの作成を完了します。
作成に成功すると、新しく作成したテンプレートに対し、カスタムテンプレートリストで表示、編集、削除の操作を行うことができるようになります。
説明:
ビデオウォーターマーク
ビデオウォーターマークはオーディオビデオトランスコーディングをベースにした機能であり、オーディオビデオトランスコーディングの過程でビデオに画像ウォーターマークまたはテキストウォーターマークを同期的に追加することができます。
説明:
現在、1回のトランスコード操作で同時に複数のウォーターマークを添付することが可能です。コンソール方式では一度に3個まで、API方式では一度に5個までウォーターマークを追加できます。それ以上のウォーターマークが必要な場合は、お問い合わせください。
操作手順
1. COSコンソールにログインします。
2. 左側ナビゲーションバーでバケットリストをクリックし、バケットリスト管理ページに進みます。
3. ビデオを保存したいバケットを見つけ、そのバケット名をクリックし、バケット管理ページに進みます。
4. 左側ナビゲーションバーで、データワークフロー > テンプレート設定をクリックし、テンプレート設定ページに進みます。
5. ビデオウォーターマークを選択し、ビデオウォーターマークテンプレートの作成をクリックすると、ビデオウォーターマークテンプレート作成ウィンドウがポップアップします。
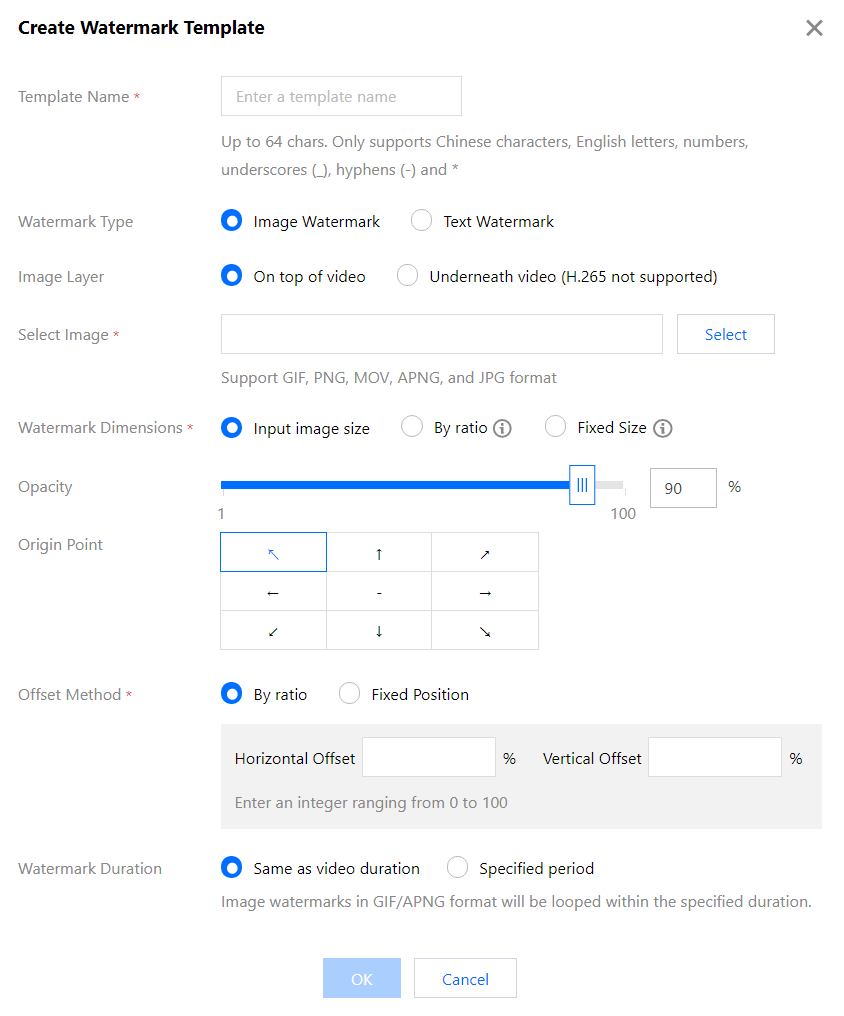
6. ビデオウォーターマークテンプレート作成ウィンドウで、以下の情報を設定します。
統一パラメータ
テンプレート名:長さは64文字以下とし、中国語、英語、数字、_、-および*のみサポートします。
ウォーターマークのタイプ:画像ウォーターマークまたはテキストウォーターマークを選択できます。
基準位置:TopLeft、TopRight、BottomLeft、BottomRightを選択できます。それぞれ、ビデオの左上隅、右上隅、左下隅、右下隅に対応します。
不透明度:値の範囲は[1,100]、単位は%です。
オフセット方式:ウォーターマークのオフセット方式は基準位置に基づいて設定します。比率スケールまたは固定位置を選択できます。
ウォーターマーク時間:ウォーターマークのカバー時間をビデオの長さと一致させるか、または時間を指定するかを選択できます。このうち時間を指定する場合は、ウォーターマークの開始時間と終了時間を設定できます。開始時間のみを設定した場合は、デフォルトでビデオの終了までカバーされます。
画像ウォーターマークのパラメータ
画像の選択:画像ウォーターマークを選択する場合は、画像ウォーターマークのソースを選択する必要があります。現在は同一のバケット内にあるウォーターマーク画像を選択できます。ない場合は、新しい画像をアップロードする必要があります。
画像レイヤー:画像をビデオ上方に設置するか、ビデオ下部に設置するかを選択できます。
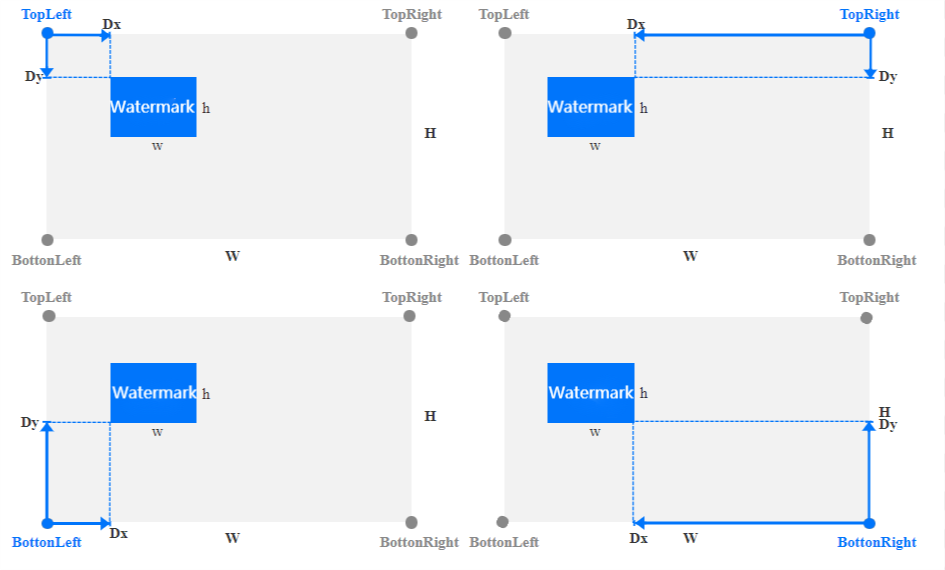
画像をビデオ上方に設置する場合は、下図のようになります。
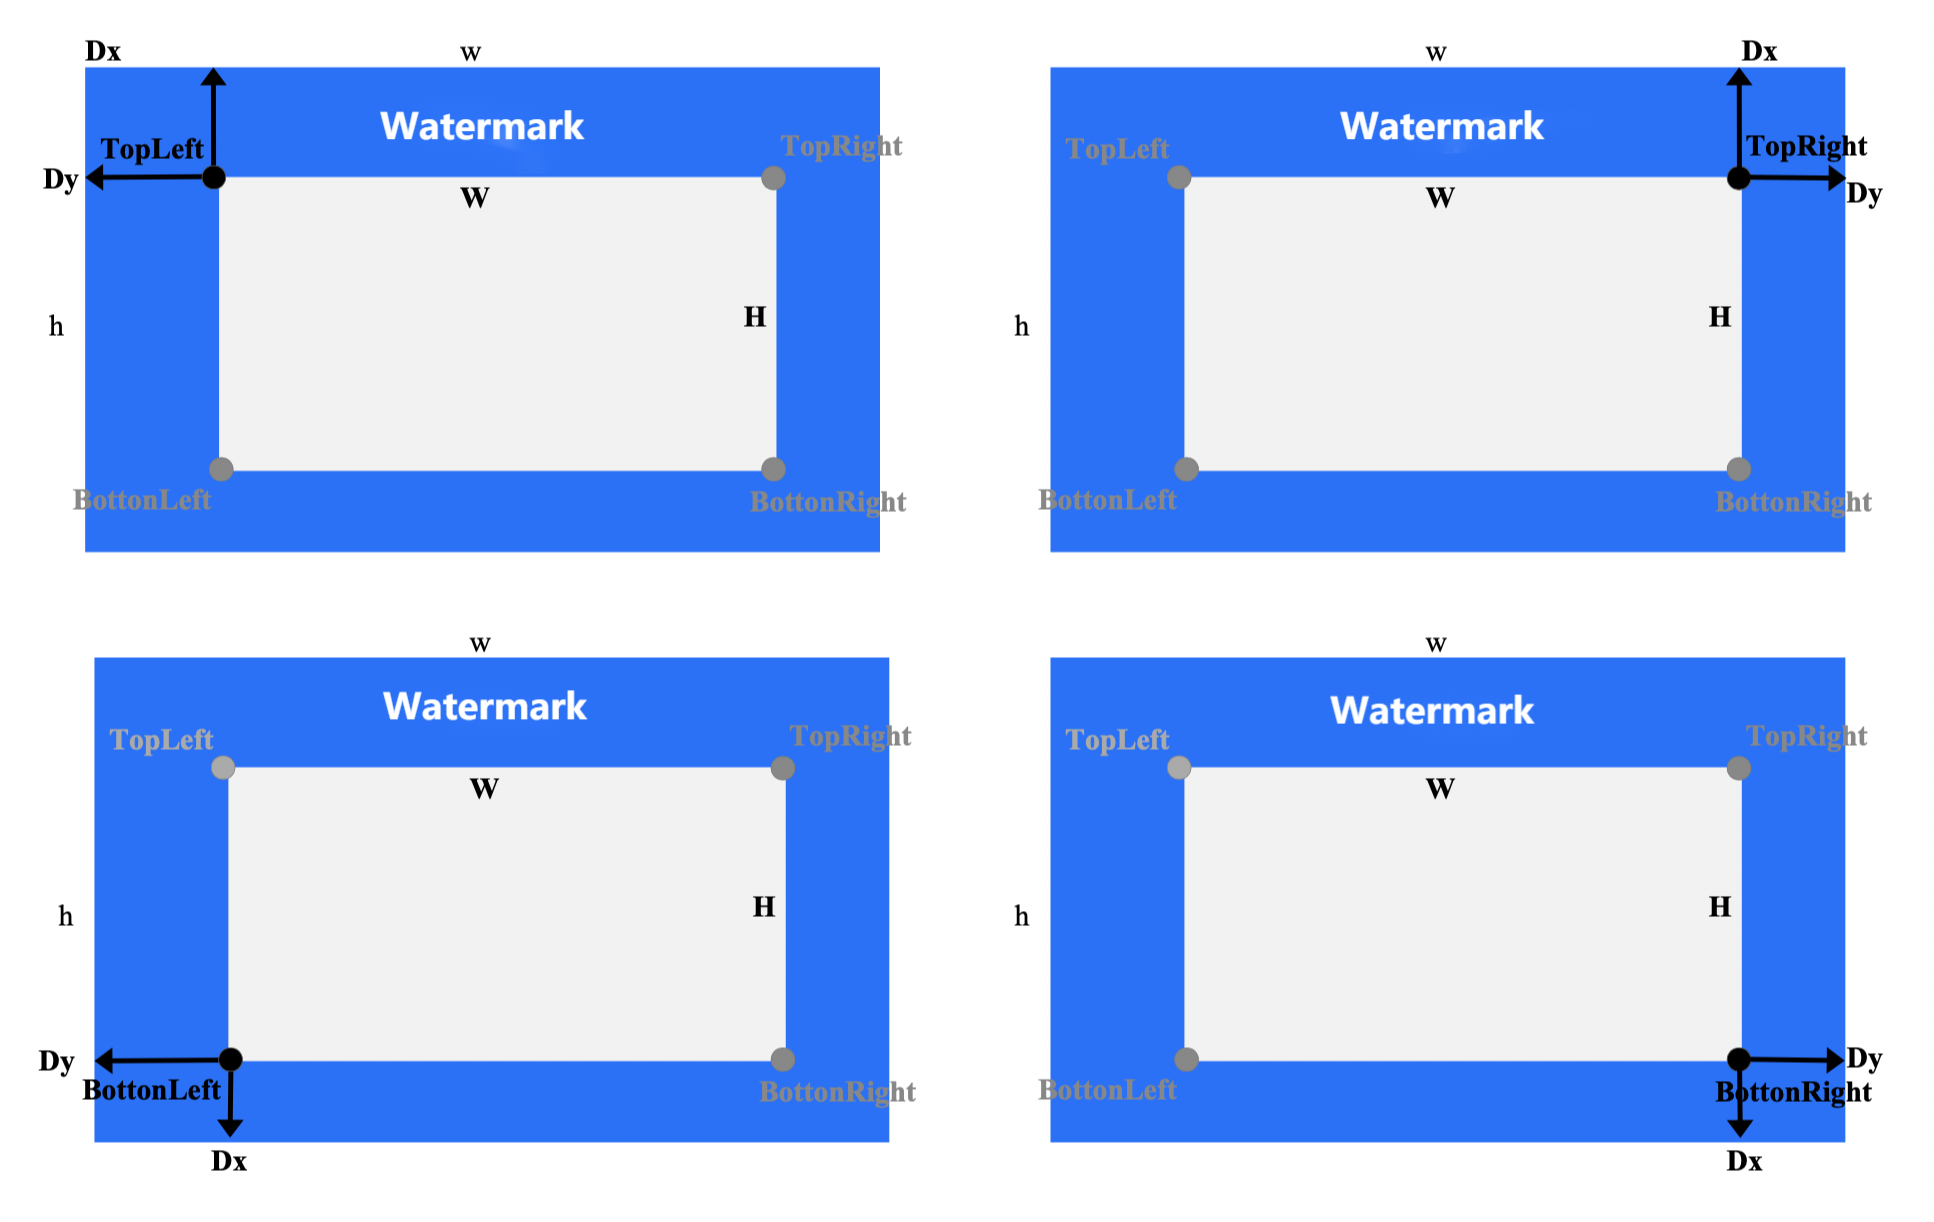
画像をビデオ下部に設置する(ビデオの背景画像とする)場合は、下図のようになります。
ウォーターマークのサイズ:
オリジナル画像サイズ:ウォーターマークのオリジナル画像を維持し、処理を行いません。ウォーターマーク画像がビデオ画面のサイズより大きい場合は、ウォーターマークが完全に表示されない可能性があることに注意してください。
比率スケール:幅または高さに応じてパーセンテージを設定します。値の範囲は[1, 100]です。幅または高さのいずれかだけを設定し、ディメンションを設定していない場合は同じ比率でスケーリングされます。設定する幅の比率をa、高さの比率をbとした場合、ウォーターマークの幅w = W * a、ウォーターマークの高さh = H * bとなります。このうちW、Hはそれぞれビデオの幅と高さです。
固定サイズ:ウォーターマークの幅と高さを指定することができます。値の範囲は[8,4096]、単位はpxです。
オフセット方式(画像をビデオ上方に設置する場合):
比率スケール:幅または高さに応じてパーセンテージを設定します。値の範囲は[0, 100]です。下図のように、設定する水平オフセットの比率をa、垂直オフセットの比率をbとした場合、水平オフセットDx = W * a、垂直オフセットDy = H * bとなります。このうちW、Hはそれぞれビデオの幅と高さです。
固定位置:値の範囲は[0,4096]、単位はpxです。図のように、水平オフセットはDxに、垂直オフセットはDyにそれぞれ対応します。
ウォーターマークのサイズ:
オリジナル画像サイズ:ウォーターマークのオリジナル画像を維持し、処理を行いません。ウォーターマーク画像がビデオ画面のサイズより小さい場合は、ウォーターマークが完全に表示されない可能性があることに注意してください。
比率スケール:幅または高さに応じてパーセンテージを設定します。値の範囲は[100, 300]です。幅または高さのいずれかだけを設定し、ディメンションを設定していない場合は同じ比率でスケーリングされます。設定する幅の比率をa、高さの比率をbとした場合、ウォーターマークの幅w = W * a、ウォーターマークの高さh = H * bとなります。このうちW、Hはそれぞれビデオの幅と高さです。
固定サイズ:ウォーターマークの幅と高さを指定することができます。値の範囲は[8,4096]、単位はpxです。
オフセット方式(ビデオ下方に設置する場合):
比率スケール:幅または高さに応じてパーセンテージを設定します。値の範囲は[-300, 0]です。下図のように、設定する水平オフセットの比率をa、垂直オフセットの比率をbとした場合、水平オフセットDx = W * a、垂直オフセットDy = H * bとなります。このうちW、Hはそれぞれビデオの幅と高さです。
固定位置:値の範囲は[-4096,0]、単位はpxです。図のように、水平オフセットはDxに、垂直オフセットはDyにそれぞれ対応します。
テキストウォーターマークのパラメータ
テキストウォーターマークの内容:長さは64文字以下とし、中国語、英語、数字、_、-および*のみサポートします。
フォントサイズ:値の範囲は[5 100]、単位はpxです。
フォントタイプ:現在、中国語と英語の混合ウォーターマークでは宋朝体、ゴシック体、楷書体、明朝体、中国語ゴシック体、中国語ゴシック体中、丸ゴシックを選択できます。英語のみのウォーターマークではariblk、arial、ahronbd、Helvetica、HelveticaNeueを選択できます。英語のみのフォントは英語の入力のみをサポートしており、ウォーターマークに中国語が含まれると文字化けを起こすおそれがありますのでご注意ください。
フォントの色:形式は0xRRGGBBです。
7. OKをクリックしてテンプレートの作成を完了します。
作成に成功すると、新しく作成したテンプレートに対し、カスタムテンプレートリストで表示、編集、削除の操作を行うことができるようになります。
プレビューをクリックすると、3種類の一般的な解像度のビデオでウォーターマークの位置とサイズを確認することもでき、テンプレートのスピーディーな調整に役立ちます。
説明:
オーディオビデオスプライシング
オーディオビデオスプライシングでは、指定されたオーディオクリップをオーディオファイルの最初または最後にステッチングして新しいオーディオファイルを生成したり、指定されたビデオクリップをビデオファイルの最初または最後にステッチングして新しいビデオファイルを生成したりできます。
操作手順
1. COSコンソールにログインします。
2. 左側ナビゲーションバーでバケットリストをクリックし、バケットリスト管理ページに進みます。
3. ビデオを保存したいバケットを見つけ、そのバケット名をクリックし、バケット管理ページに進みます。
4. 左側ナビゲーションバーで、データワークフロー > 共通設定 > テンプレートをクリックし、テンプレート設定ページに進みます。
5. オーディオビデオスプライシングを選択し、オーディオビデオスプライシングテンプレートの作成をクリックすると、オーディオビデオスプライシングテンプレート作成ウィンドウがポップアップします。
6. オーディオビデオスプライシングテンプレート作成ウィンドウで、以下の情報を設定します。
テンプレート名:長さは64文字以下とし、中国語、英語、数字、_、-および*のみサポートします。
コンテナ形式:AAC、MP3、MP4、FLV、HLS、TS形式があります。
スプライシング位置:ソースファイルの先頭か末尾へのスプライシングを選択できます。
その他のパラメータ:ユーザーはニーズに応じてオーディオビデオパラメータをカスタマイズできます。
7. OKをクリックしてテンプレートの作成を完了します。
作成に成功すると、新しく作成したテンプレートに対し、カスタムテンプレートリストでテンプレート情報の表示、編集、削除の操作を行うことができるようになります。
説明:
音声分離
同一のオーディオファイルから人の声のファイルと背景音のファイルを分離し、その後のビデオのトリミング、再生を行いやすくすることができます。
操作手順
1. COSコンソールにログインします。
2. 左側ナビゲーションバーでバケットリストをクリックし、バケットリスト管理ページに進みます。
3. ビデオを保存したいバケットを見つけ、そのバケット名をクリックし、バケット管理ページに進みます。
4. 左側ナビゲーションバーで、データワークフロー > テンプレート設定をクリックし、テンプレート設定ページに進みます。
5. スマート音声 > 音声分離を選択し、音声分離テンプレートの作成をクリックすると、音声分離テンプレート作成ウィンドウがポップアップします。
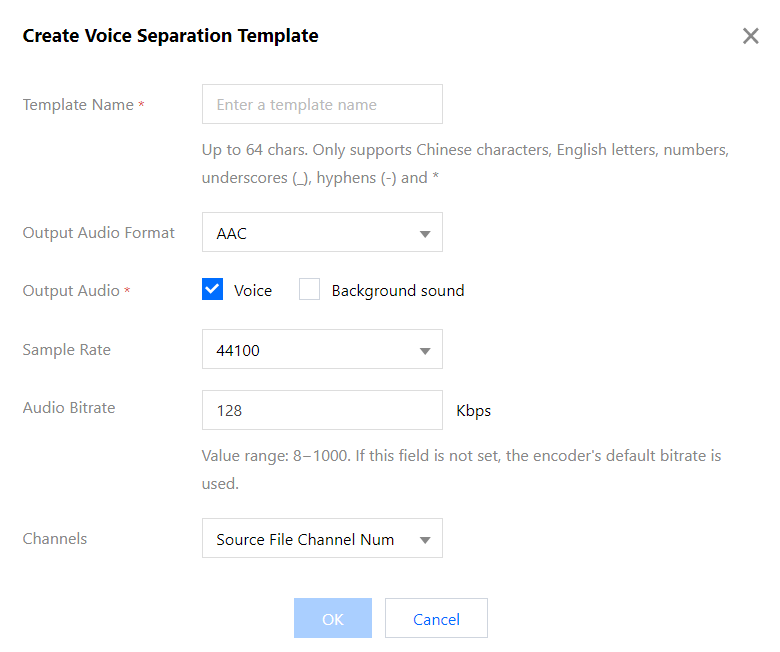
6. 音声分離テンプレート作成ウィンドウで、以下の情報を設定します。
テンプレート名:長さは64文字以下とし、中国語、英語、数字、アンダーバー「_」、ハイフン「-」、「*」のみサポートします。
出力オーディオ形式:MP3、AAC、AMR、FLAC形式があります。
出力オーディオ:人の声または背景音の出力を指定できます。
サンプルレート:実際のニーズに応じて選択できます。
オーディオビットレート:実際のニーズに応じて入力できます。
サウンドチャンネル数:実際のニーズに応じて選択できます。
7. OKをクリックしてテンプレートの作成を完了します。
作成に成功すると、新しく作成したテンプレートに対し、カスタムテンプレートリストで表示、編集、削除の操作を行うことができるようになります。
説明:
音声合成
テキストを様々な音色のオーディオに変換し、音声読み上げ、ナビゲーションなどのシーンに使用できるようにします。
操作手順
1. COSコンソールにログインします。
2. 左側ナビゲーションバーでバケットリストをクリックし、バケットリスト管理ページに進みます。
3. ビデオを保存したいバケットを見つけ、そのバケット名をクリックし、バケット管理ページに進みます。
4. 左側ナビゲーションバーで、データワークフロー > テンプレート設定をクリックし、テンプレート設定ページに進みます。
5. スマート音声 > 音声合成を選択し、音声合成テンプレートの作成をクリックすると、音声合成テンプレート作成ウィンドウがポップアップします。
6. 音声合成テンプレート作成ウィンドウで、以下の情報を設定します。
テンプレート名:長さは64文字以下とし、中国語、英語、数字、アンダーバー「_」、ハイフン「-」、「*」のみサポートします。
出力オーディオ形式:MP3、AAC、AMR、FLAC形式があります。
音色:出力する音色を指定できます。
処理モード:非同期または同期処理を選択できます。
音量:出力する音量を調節できます。
スピード:出力する音色を調節できます。
7. OKをクリックしてテンプレートの作成を完了します。
作成に成功すると、新しく作成したテンプレートに対し、カスタムテンプレートリストで表示、編集、削除の操作を行うことができるようになります。
画質エンハンスメント
ビデオエンハンスメントは、AIによってビデオの状態を改善し、視覚面でビデオのカラーおよび画面のディテールを向上させることができる機能です。超解像度、ディテールエンハンスメント、SDRtoHDR、フレーム補間などの機能をサポートしています。
操作手順
1. COSコンソールにログインします。
2. 左側ナビゲーションバーでバケットリストをクリックし、バケットリスト管理ページに進みます。
3. ビデオを保存したいバケットを見つけ、そのバケット名をクリックし、バケット管理ページに進みます。
4. 左側ナビゲーションバーで、データワークフロー > テンプレート設定をクリックし、テンプレート設定ページに進みます。
5. 画質エンハンスメントを選択し、画質エンハンスメントテンプレートの作成をクリックすると、ビデオエンハンスメントテンプレート作成ウィンドウがポップアップします。
6. 画質エンハンスメントテンプレート作成ウィンドウで、以下の情報を設定します。
説明:
現在、ビデオエンハンスメントではカラーエンハンスメント、ディテールエンハンスメント、超解像度、SDRTOHDRをサポートしています。その他の機能も順次リリース中です。
ビデオエンハンスメントの入力ビデオの長さは30分以内とします。
テンプレート名:長さは64文字以下とし、中国語、英語、数字、アンダーバー「_」、ハイフン「-」、「*」のみサポートします。
カラーエンハンスメント:システム自動分析によるカラーの最適化またはカラーエンハンスメントパラメータのカスタマイズを選択できます。
ディテールエンハンスメント:システム自動分析によるディテールエンハンスメントまたはディテールエンハンスメントパラメータのカスタマイズを選択できます。
7. OKをクリックしてテンプレートの作成を完了します。
作成に成功すると、新しく作成したテンプレートに対し、カスタムテンプレートリストでテンプレート情報の表示、編集、削除の操作を行うことができるようになります。
説明:
画像処理
画像処理は、Tencent CloudのCloud Infiniteが提供する、機能が豊富で低コストかつ信頼性の高い画像処理サービスです。画像処理では、画像の回転・切り抜き、トランスコーディング、拡大縮小といったフレキシブルな画像編集をサポートしています。また、Guetzli圧縮、TPGトランスコーディング、HEIFトランスコーディングなどの画像スリム化ソリューション、画像やテキストウォーターマーク、独自のブラインドウォーターマークといった著作権保護ソリューションを提供し、さまざまなビジネスシーンの画像ニーズに対応しています。
操作手順
1. COSコンソールにログインします。
2. 左側ナビゲーションバーでバケットリストをクリックし、バケットリスト管理ページに進みます。
3. ビデオを保存したいバケットを見つけ、そのバケット名をクリックし、バケット管理ページに進みます。
4. 左側ナビゲーションバーで、データワークフロー > 共通設定 > テンプレートをクリックし、テンプレート設定ページに進みます。
5. 画像処理を選択し、画像処理テンプレートの作成をクリックすると、画像処理テンプレート作成ウィンドウがポップアップします。
6. 画像処理テンプレート作成ウィンドウで、以下の情報を設定します。
テンプレート名:長さは64文字以下とし、中国語、英語、数字、アンダーバー「_」、ハイフン「-」、「*」のみサポートします。
編集モード:ベーシック版と拡張版から選択できます。拡張版では画面再構成および修正機能がさらに強化されています。
基本処理:出力するターゲット解像度を選択できます。
テキストウォーターマーク:有効にすると、画像に単一またはタイリングウォーターマークを追加できます
画像ウォーターマーク:有効にすると、画像の指定の位置に動的または静的ウォーターマークを追加できます
プレビュー:処理の効果をプレビューできます
7. OKをクリックしてテンプレートの作成を完了します。
作成に成功すると、新しく作成したテンプレートに対し、カスタムテンプレートリストでテンプレート情報の表示、編集、削除の操作を行うことができるようになります。
説明:
フィードバック