Creating a Bucket
Download
Focus Mode
Font Size
To store files in Cloud Object Storage (COS), you need to create a bucket to store objects. You can create a bucket via the console, tools, API, or SDK. For the bucket concept, please refer to Bucket Overview. The following is a detailed introduction on how to create a bucket.
After creating a bucket, you can upload objects to it and configure other features for it, such as setting up a static website, setting bucket tags, and setting bucket encryption. For more configuration instructions, see Console Overview.
Description
One root account can create up to 200 buckets.
Once a bucket is created successfully, its name and region cannot be modified.
Bucket names must be unique under the same root account and cannot be changed.
Bucket names can only contain lowercase letters, numbers, and hyphens, i.e., [a-z, 0-9], and their combinations. The maximum allowed characters for a bucket name are influenced by the region abbreviation and APPID, with a total of up to 60 characters for the complete request domain name. For example, the request domain
123456789012345678901-1250000000.cos.ap-beijing.myqcloud.com has a total of 60 characters.A bucket name cannot start or end with "-".
How to Use
Using COS console
1. Log in to the COS Console.
2. In the left sidebar, click bucket list.
3. On the bucket list page, click Create Bucket.
4. On the redirected Create Bucket interface, configure the following information:
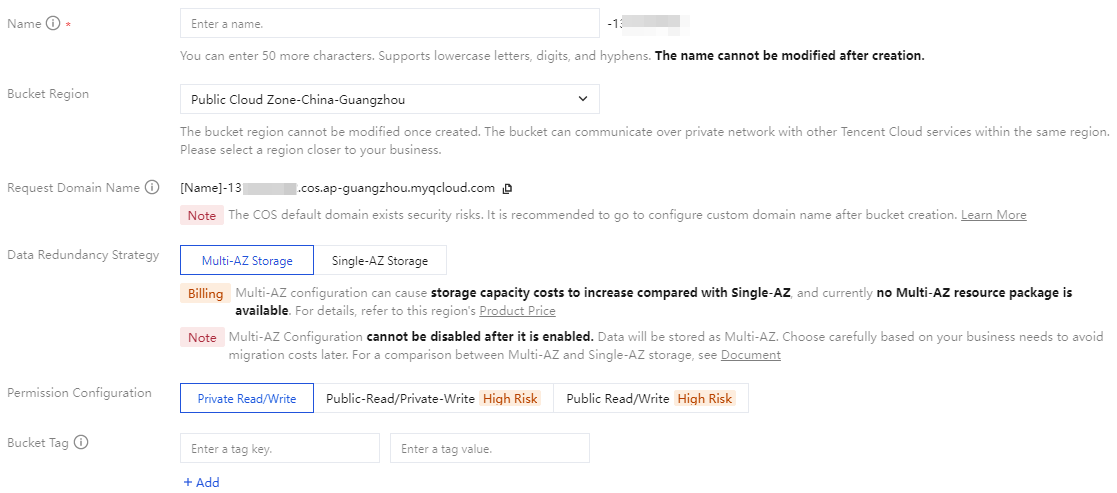
4.1 Bucket Basic Configuration
Bucket Type: Divided into General Purpose Bucket and Metadata Acceleration Bucket. Metadata Acceleration Bucket is currently open only to whitelisted users. For details, see overview of metadata acceleration function.
Name: Enter a custom bucket name. It cannot be modified after creation. For naming specifications, see naming specification for buckets.
Bucket Region: Please select the COS region corresponding to the physical area where your business (or number of users) is concentrated. This setting cannot be modified after creation. For more information, see regions and access endpoints.
Request Domain Name: Automatically generated. After bucket creation, you can use that domain name to access the bucket.
Data Redundancy Strategy: Multi-AZ storage is an identifier for the bucket. When you confirm to enable Multi-AZ storage configuration, your data will be stored in different data centers within the same region, providing cross-city disaster recovery. Selecting Single-AZ storage stores data in a single data center within the same region. Currently, Multi-AZ storage is only available in certain regions, Currently, this feature is applicable only to partial regions such as Beijing, Shanghai, Guangzhou, Hong Kong (China), Singapore, and Shanghai Finance region. For more applicable regions and feature introduction, see the Multi-AZ feature overview document.
Note:
Multi-AZ storage incurs higher storage capacity fees than single-AZ. For details, see product pricing in each region.
After enabling multi-AZ configuration for a bucket, it cannot be modified. Once enabled, data will be stored in the bucket with storage types that support multi-AZ features (such as MAZ_STANDARD and MAZ_STANDARD_IA). Configure with caution. If version control is also enabled, its status cannot be modified.
The COS bucket you created cannot enable multi-AZ configuration. It can only be enabled when creating a new bucket.
Permission Configuration: Buckets provide three types of access permissions by default: Private Read/Write, Public Read/Private Write, and Public Read/Write. These can still be modified after setting. For details, see bucket access permissions.
Bucket Tag: A bucket tag serves as an identifier for managing buckets. You can set tags for buckets, making it easy to group and manage them. For details, see set bucket tags.
4.2 Advanced Bucket Features
Note:
This setting item is selectable, configure as needed.

Versioning: Once enabled, uploading objects with the same name or performing operations like add, delete, modify will save earlier versions, convenient for you to retrieve object history.
Note:
If version control and the Multi-AZ feature are enabled simultaneously, the version control state cannot be changed. Configure with caution.
Server-Side Encryption: You can choose the server encryption method. For the server-side encryption overview and supported regions, see server-side encryption overview.
Smart Compression: Once enabled, each time you access images of specified format in the bucket, they will be compressed in real time without changing the image format, drastically saving traffic. For details, see introduction to smart compression.
Log Storage: Records various request logs related to bucket operations for you.
4.3 Click Create, then verify the bucket configuration information in the pop-up window. After confirming that everything is correct, click OK to complete bucket creation.
5. In the bucket list interface, you can see the newly created bucket.

Note:
The bucket list only shows buckets created by Data Lake Compute (DLC). Configuration is not currently supported. To configure, go to the DLC console. For details, see managed storage configuration.
Using REST API/SDK
You can directly use the REST API to trigger a bucket creation request. For details, see the PUT Bucket API document.
You can directly call the SDK to create a bucket. For details, see the following language SDK documents:
Using Tools
You can use tools to create a bucket, such as COSBrowser, COSCMD, COSCLI. For more tool introduction, see Tool Overview.
Help and Support
Was this page helpful?
You can also Contact sales or Submit a Ticket for help.
Help us improve! Rate your documentation experience in 5 mins.
Feedback